分享一下我老师大神的人工智能教程!零基础,通俗易懂!http://blog.csdn.net/jiangjunshow
也欢迎大家转载本篇文章。分享知识,造福人民,实现我们中华民族伟大复兴!
使用Ruby连接数据库的过程还真的是坎坷,于是写点文字记录一下。
简介
Ruby简介
Ruby是一种纯粹的面向对象编程语言。它由日本的松本行弘(まつもとゆきひろ/Yukihiro Matsumoto)创建于1993年······
简介就介绍到这么多了,反正也没人愿意看这些文字。下面着重讲下一个小结。
RubyGems简介
包管理之道
在说RubyGems之前,我们来谈一谈关于包管理。在没有包管理软件之前,我们要想完成一个库或者软件的安装,要处理好这些东西之间的依赖以及版本关系等等,总之,对于新手而言,这无疑是加大了学习的曲线。而包管理的诞生,把我们从繁琐复杂的安装过程中解放了出来。
比较著名的包管理举例
作为一个程序员,想必都接触过Linux系统,在其之上的包管理软件也有很多,比如Ubuntu的apt-get,Redhat的rpm,yum;Debian系列的dpkg等等;
或者Node.js语言的npm;
Python 的easy_install 或者久负盛名的pip
还有今天我们要说的Ruby 中的gem
细说gem
Gem 是 Ruby 模块 (叫做 Gems) 的包管理器。其包含包信息,以及用于安装的文件。
其原理是:
Gem通常是依照”.gemspec”文件构建的,包含了有关Gem信息的YAML文件。Ruby代码也可以直接建立Gem,这种情况下通常利用Rake来进行。
常用的命令
gem命名和Python的pip很相似,其实大部分的包管理使用起来都很类似,现简要的介绍一下吧。
安装
gem install mygem
卸载
gem uninstall mygem
列出已经安装的gem
gem list –local
列出可用的gem
gem list –remote
为所有的gems创建RDoc文档
gem rdoc -all
下载一个gem,但不安装
gem fetch mygem
从可用的gems中搜索gem
gem search STRING –remote
准备
要想使用Ruby连接数据库,我们就需要跨进程操作了。所以我们必须借助驱动来完成这两个工作模式完全不同的进程。那么,交给驱动来解决这个问题吧。
驱动下载
连接MySQL数据库,常见的几种方式如下。
dbi
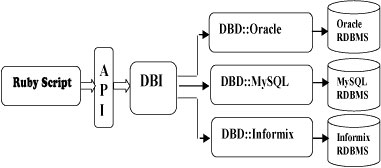
这就是DBI的工作原理,我们只需要调用封装好了的API就可以实现对不同数据库的操作,这对于移植来说会很方便。
Administrator@WIN-5APATS8G3U6 MINGW64 /d/Software/ruby/Ruby23-x64/lib/ruby/gems/2.3.0/gems$ gem install dbiSuccessfully installed dbi-0.4.5Parsing documentation for dbi-0.4.5Done installing documentation for dbi after 1 seconds1 gem installed
- 1
- 2
- 3
- 4
- 5
- 6
- 7
- 8
如此便成功安装了DBI模块。具体参照DBI 模块
mysql
不巧的是,我在安装mysql模块的时候出现了下面的这些个问题。根据错误提示我们需要使用dev工具来安装才行,但是mysql模块安装不成功并不影响我们对数据库的操作,所以这个问题就先放放一放吧。
$ gem install mysqlERROR: Error installing mysql: The 'mysql' native gem requires installed build tools.Please update your PATH to include build tools or download the DevKitfrom 'http://rubyinstaller.org/downloads' and follow the instructionsat 'http://github.com/oneclick/rubyinstaller/wiki/Development-Kit'
- 1
- 2
- 3
- 4
- 5
- 6
- 7
- 8
mysql2
Ruby 连接 Mysql 更高效的驱动 mysql2,目前也推荐使用这种方式连接 MySql。
安装过程同样是很简单。
gem install mysql2
$ gem install mysql2Successfully installed mysql2-0.4.4-x64-mingw32Parsing documentation for mysql2-0.4.4-x64-mingw32Done installing documentation for mysql2 after 0 seconds1 gem installed
- 1
- 2
- 3
- 4
- 5
- 6
- 7
MySQL的C/C++连接器
libmysql.dll 文件是MySQL的动态链接库文件,缺少此文件数据库无法正常工作。将这个文件 拷贝到 Ruby/Bin目录中,或者C:\windows\system32目录也可。
点击msi版本的安装即可。
测试环境
基本上准备工作完成了,下面说一下我的实验环境。
- OS: Windows 7 旗舰版
- Ruby版本: ruby 2.3.1p112 (2016-04-26 revision 54768) [x64-mingw32]
- IDE: RubyMine 2016.2
- MySQL版本: MySQL 5 .7
代码测试
下面真正开始使用Ruby操作MySQL数据库。根据Unix思想“做一件事,就用最好的方式,做到最好”,于是下面我就采用mysql2模块来操作了。
连接数据库
首先是连接数据库。如下:
require 'mysql2'client = Mysql2::Client.new( :host => '127.0.0.1', # 主机 :username => 'root', # 用户名 :password => '123456', # 密码 :database => 'test', # 数据库 :encoding => 'utf8' # 编码 )
- 1
- 2
- 3
- 4
- 5
- 6
- 7
- 8
- 9
里面的值视自己的情况而定。
CRUD
使用Ruby操作数据库实现增删改查也是很方便的一件事,至少和Python一样简洁。
Select
require 'mysql2'client = Mysql2::Client.new( :host => '127.0.0.1', # 主机 :username => 'root', # 用户名 :password => 'mysql', # 密码 :database => 'fams', # 数据库 :encoding => 'utf8' # 编码)result = client.query("Select * from dog")result.each do |item| puts "In row :#{item['id']} the dog's name is :#{item['name']}"end
- 1
- 2
- 3
- 4
- 5
- 6
- 7
- 8
- 9
- 10
- 11
- 12
- 13
- 14
获得的结果如下:
D:\Software\ruby\Ruby23-x64\bin\ruby.exe -e $stdout.sync=true;$stderr.sync=true;load($0=ARGV.shift) E:/Code/ruby/helloworld/hello.rb{"VERSION()"=>"5.7.13-log"}In row :1 the dog's name is :lachangIn row :2 the dog's name is :hashiqiIn row :3 the dog's name is :samoyedIn row :4 the dog's name is :wolfProcess finished with exit code 0
- 1
- 2
- 3
- 4
- 5
- 6
- 7
- 8
Delete
require 'mysql2'client = Mysql2::Client.new( :host => '127.0.0.1', # 主机 :username => 'root', # 用户名 :password => 'mysql', # 密码 :database => 'fams', # 数据库 :encoding => 'utf8' # 编码)client.query("delete from dog where id = 5")result = client.query("Select * from dog")result.each do |item| puts "In row :#{item['id']} the dog's name is :#{item['name']}"end
- 1
- 2
- 3
- 4
- 5
- 6
- 7
- 8
- 9
- 10
- 11
- 12
- 13
- 14
- 15
- 16
结果如下:
In row :1 the dog's name is :lachangIn row :2 the dog's name is :hashiqiIn row :3 the dog's name is :samoyedIn row :4 the dog's name is :wolf
- 1
- 2
- 3
- 4
Update
require 'mysql2'client = Mysql2::Client.new( :host => '127.0.0.1', # 主机 :username => 'root', # 用户名 :password => 'mysql', # 密码 :database => 'fams', # 数据库 :encoding => 'utf8' # 编码)client.query("update dog set name='郭璞' where id = 2")result = client.query("Select * from dog")result.each do |item| puts "In row :#{item['id']} the dog's name is :#{item['name']}"end
- 1
- 2
- 3
- 4
- 5
- 6
- 7
- 8
- 9
- 10
- 11
- 12
- 13
- 14
- 15
- 16
获得的结果为:
In row :1 the dog's name is :lachangIn row :2 the dog's name is :郭璞In row :3 the dog's name is :samoyedIn row :4 the dog's name is :wolf
- 1
- 2
- 3
- 4
Insert
require 'mysql2'client = Mysql2::Client.new( :host => '127.0.0.1', # 主机 :username => 'root', # 用户名 :password => 'mysql', # 密码 :database => 'fams', # 数据库 :encoding => 'utf8' # 编码)client.query("insert into dog(name) values('哈士奇')")result = client.query("Select * from dog")result.each do |item| puts "In row :#{item['id']} the dog's name is :#{item['name']}"end
- 1
- 2
- 3
- 4
- 5
- 6
- 7
- 8
- 9
- 10
- 11
- 12
- 13
- 14
- 15
- 16
处理结果为
In row :1 the dog's name is :lachangIn row :2 the dog's name is :hashiqiIn row :3 the dog's name is :samoyedIn row :4 the dog's name is :wolfIn row :5 the dog's name is :哈士奇
- 1
- 2
- 3
- 4
- 5
仿PreparedStatement
用过JDBC的PreparedStatement的API的都知道其好处,所以我们在这里要模拟一下。
“假冒伪劣版”
name = "CSDN 博客小札"client.query("update dog set name='"+name+"' where id = 2")result = client.query("Select * from dog")
- 1
- 2
- 3
“假冒伪劣进阶版”
或者这样的:
name = "CSDN 博客小小札"client.query("update dog set name='#{name}' where id = 2")result = client.query("Select * from dog")
- 1
- 2
- 3
实际上我们不难看出,其还是对SQL语句的拼凑,并不是真正的Prepared方式。所以在书写sql语句的时候要格外用心啊。
处理结果集
其实在上面的CRUD操作中我们就可以看到。我们经常采用遍历操作来获取结果集中的详细信息。我们在操作的时候一定是需要知道结果集中的数据字段信息的,这样才能较好的实现我们的需求。
表结构
本例中表结构的详细信息为:
mysql> desc dog;+-------+-------------+------+-----+---------+----------------+| Field | Type | Null | Key | Default | Extra |+-------+-------------+------+-----+---------+----------------+| id | int(10) | NO | PRI | NULL | auto_increment || name | varchar(30) | NO | | NULL | |+-------+-------------+------+-----+---------+----------------+2 rows in set (0.12 sec)
- 1
- 2
- 3
- 4
- 5
- 6
- 7
- 8
结果集遍历
result.each do |item| puts "In row :#{item['id']} the dog's name is :#{item['name']}"end
- 1
- 2
- 3
如此即可,遵守其规则之后,我们也会发现,不过如此了。
总结
对于Ruby而言,貌似真的是不太适合在Windows下学习,毕竟资料方面真的是太少了。而且有很多操作没有相关的命令,也让人很沮丧。不过我相信,只要用心学,就能学好Ruby的。
与君共勉 :-)
给我老师的人工智能教程打call!http://blog.csdn.net/jiangjunshow
