开发环境搭建
读完本章你将学会以下几点
- IntelliJ IDEA集成Maven,Git/GitHub
- 使用IntelliJ IDEA创建多模块的项目
- 使用IntelliJ IDEA将项目分享至GitHub
在接下来的开发过程中使用的软件以及版本声明如下所示:
| 名称 | 版本 |
|---|---|
| OS | MacOS10.13 |
| JDK | JDK8u162 |
| IDE(集成开发环境) | IntelliJ IDEA 2017.3.2 |
| Project Build(项目构建) | Maven3.5 |
| MyBatis | MyBatis3.4.5 |
在准备好以上环境之后,还需要在IntelliJ IDEA中集成Maven,Git和GitHub,因为后续项目都会同步到GitHub中
IntelliJ IDEA集成Maven
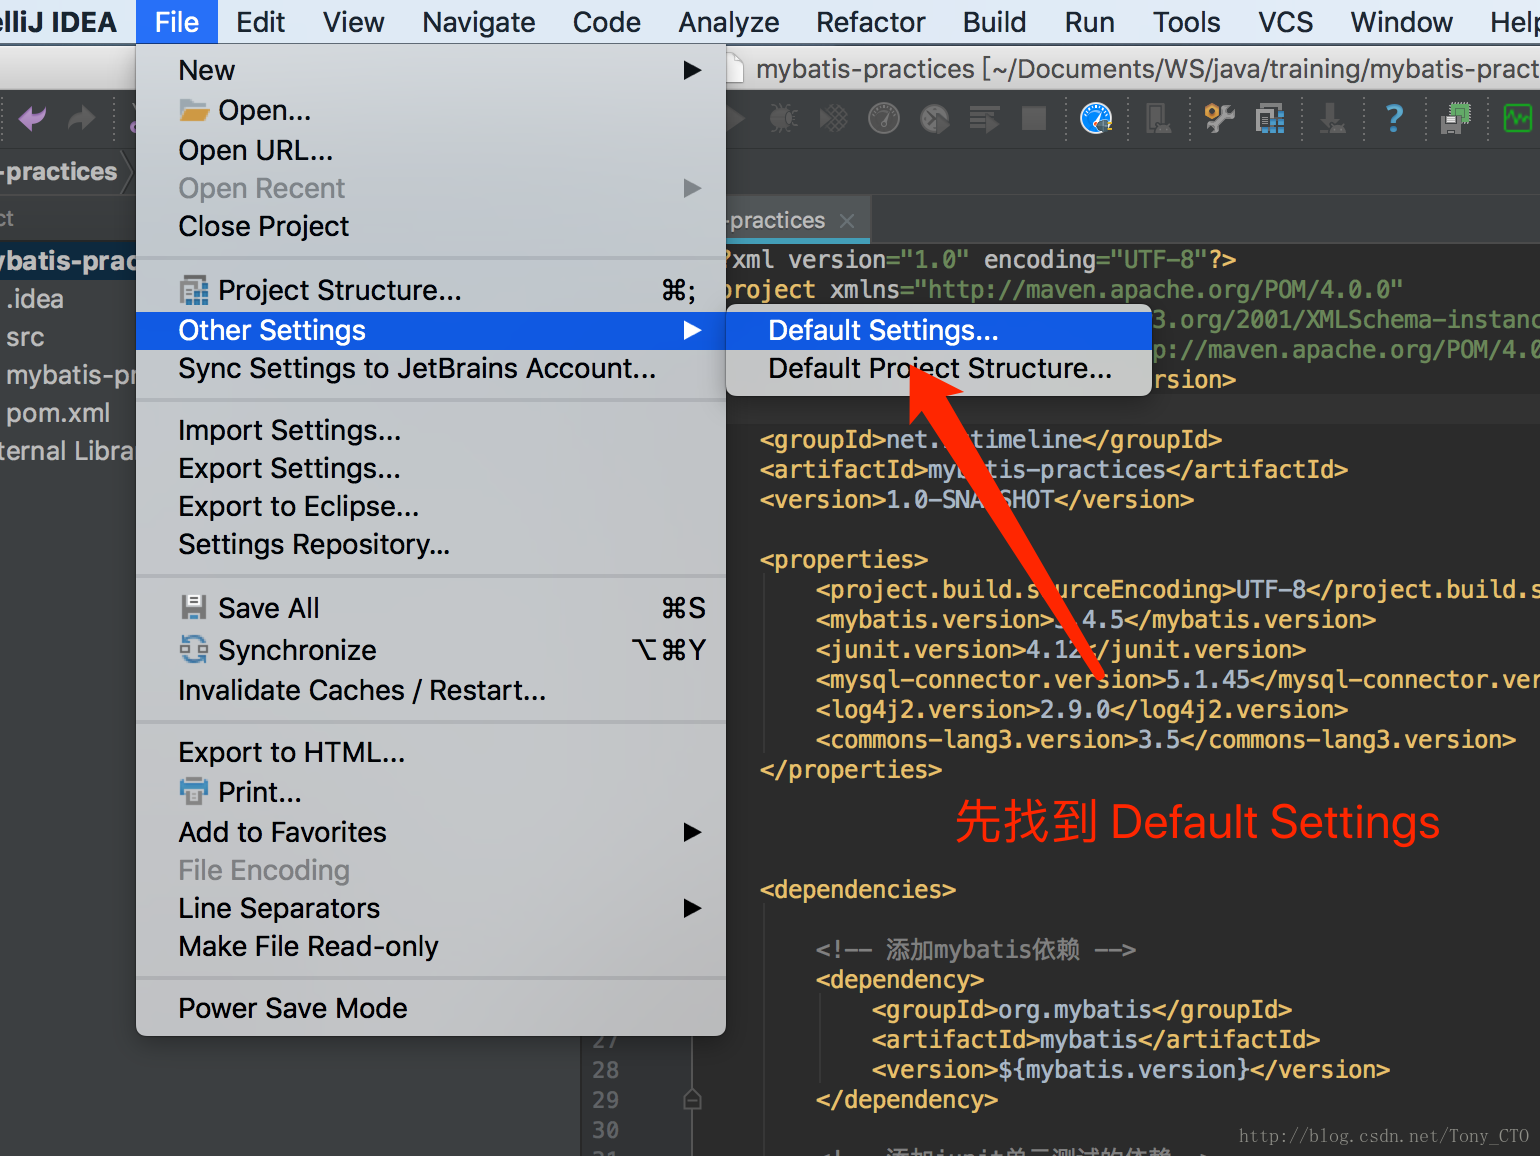
IntelliJ IDEA集成Maven非常简单,只需要指定Maven的安装路径即可,首先通过File->Other Settings找到Default Settings菜单,如下图所示
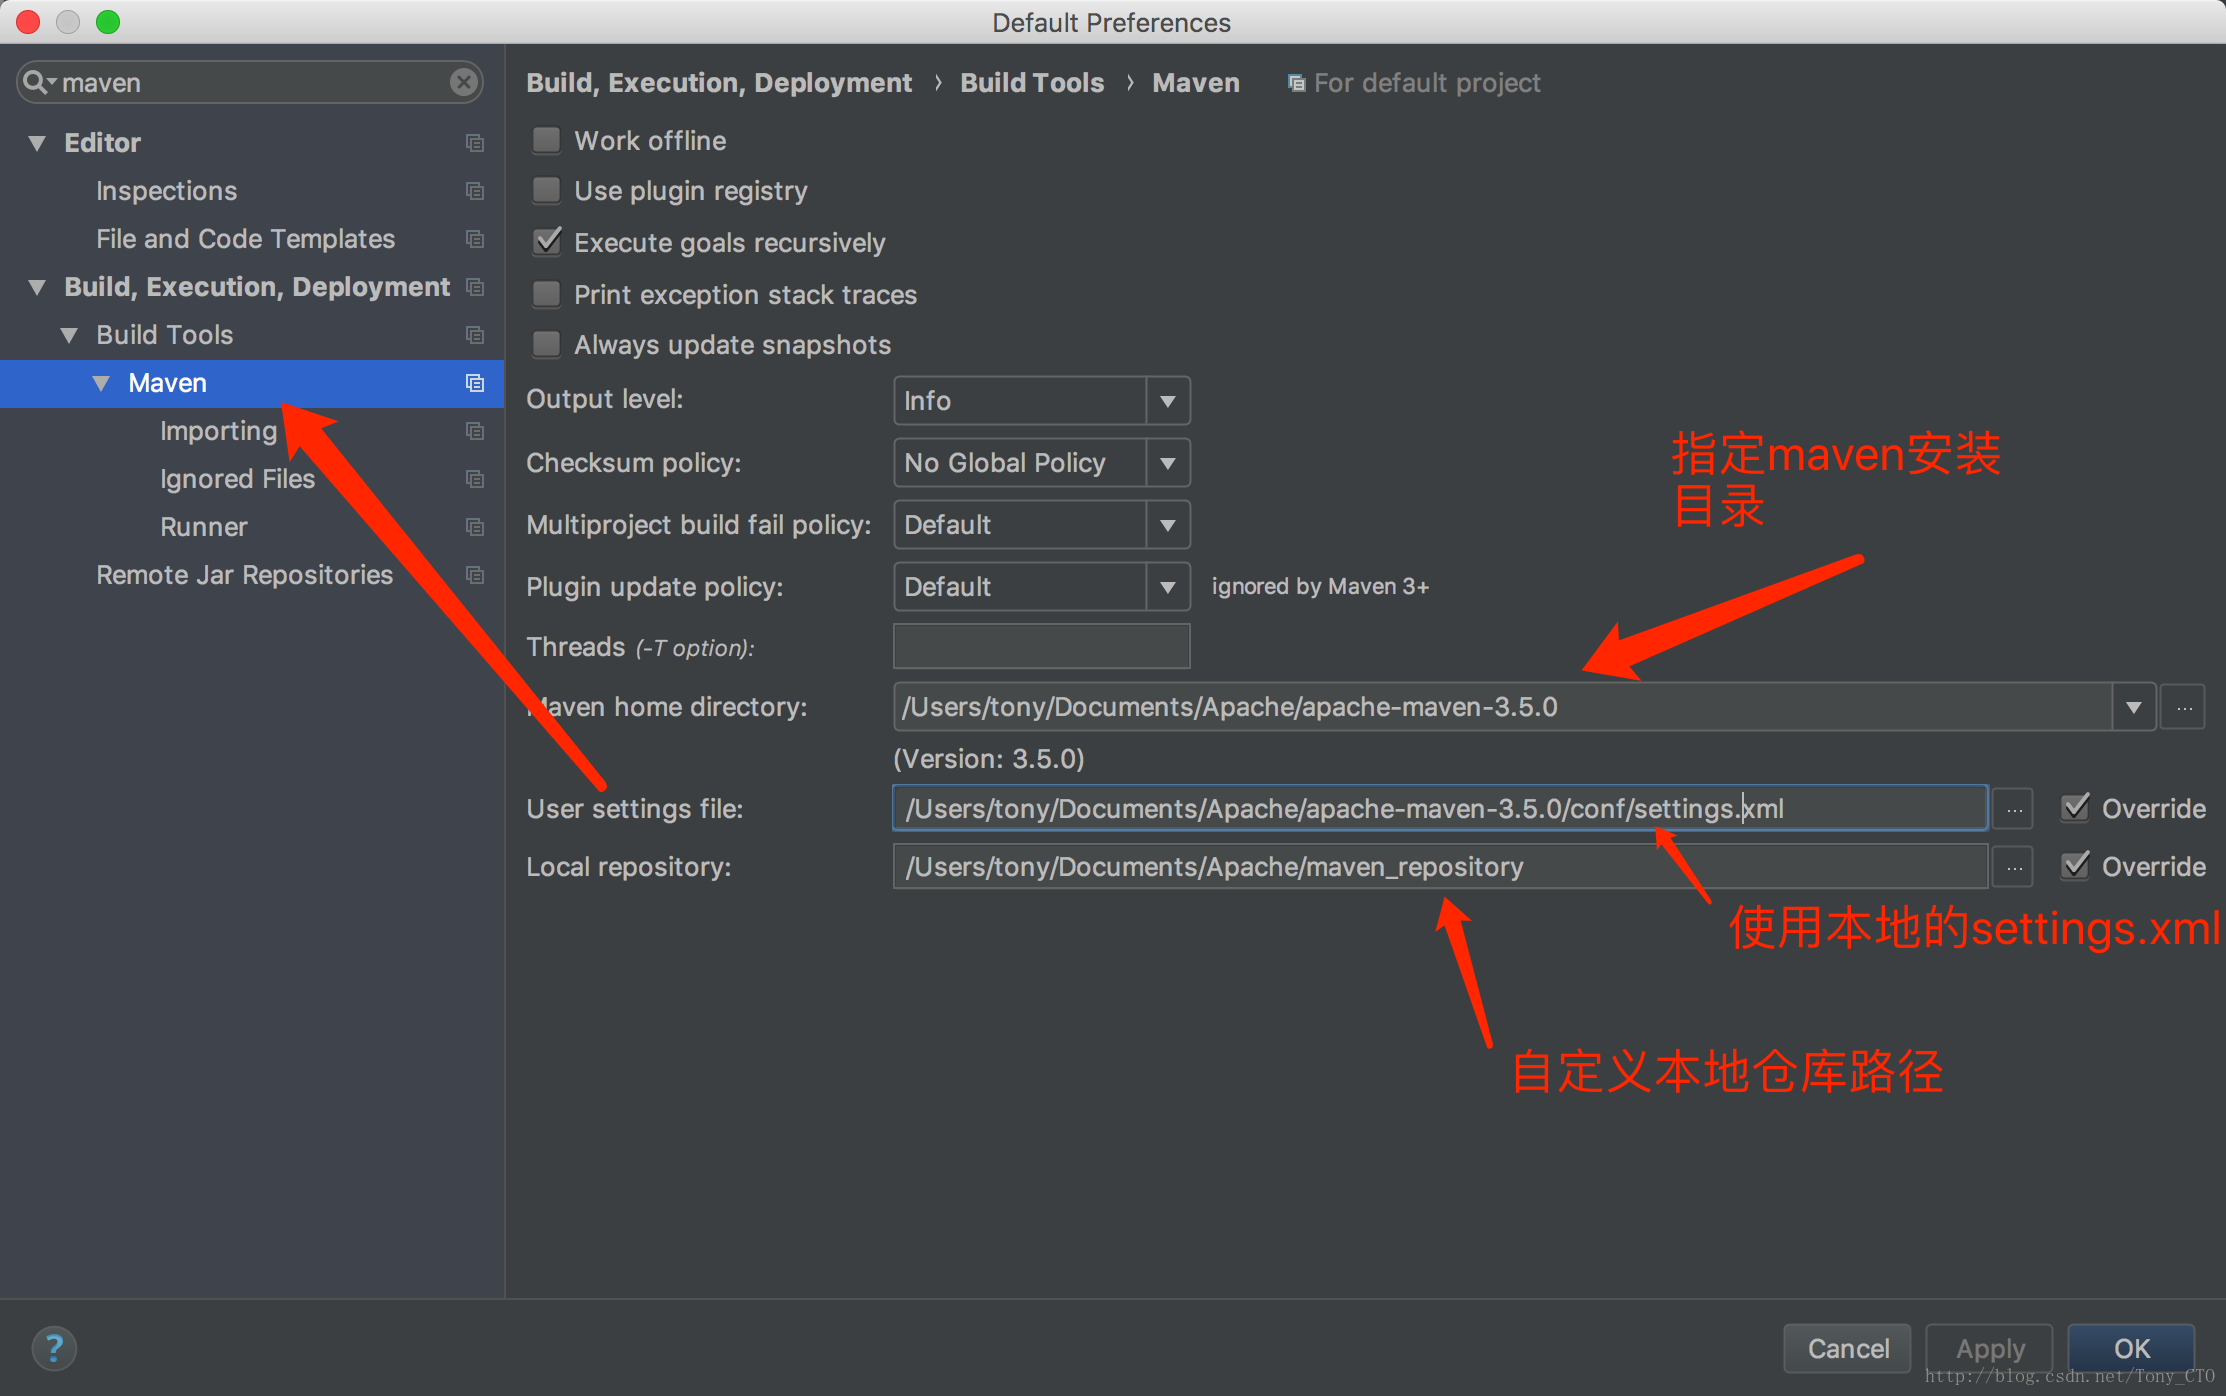
然后在设置中找到Maven菜单项,设置Maven安装路径,指定本地仓库路径以及配置文件路径,后续项目也会采用这里的默认配置,如下图所示
IntelliJ IDEA集成Git
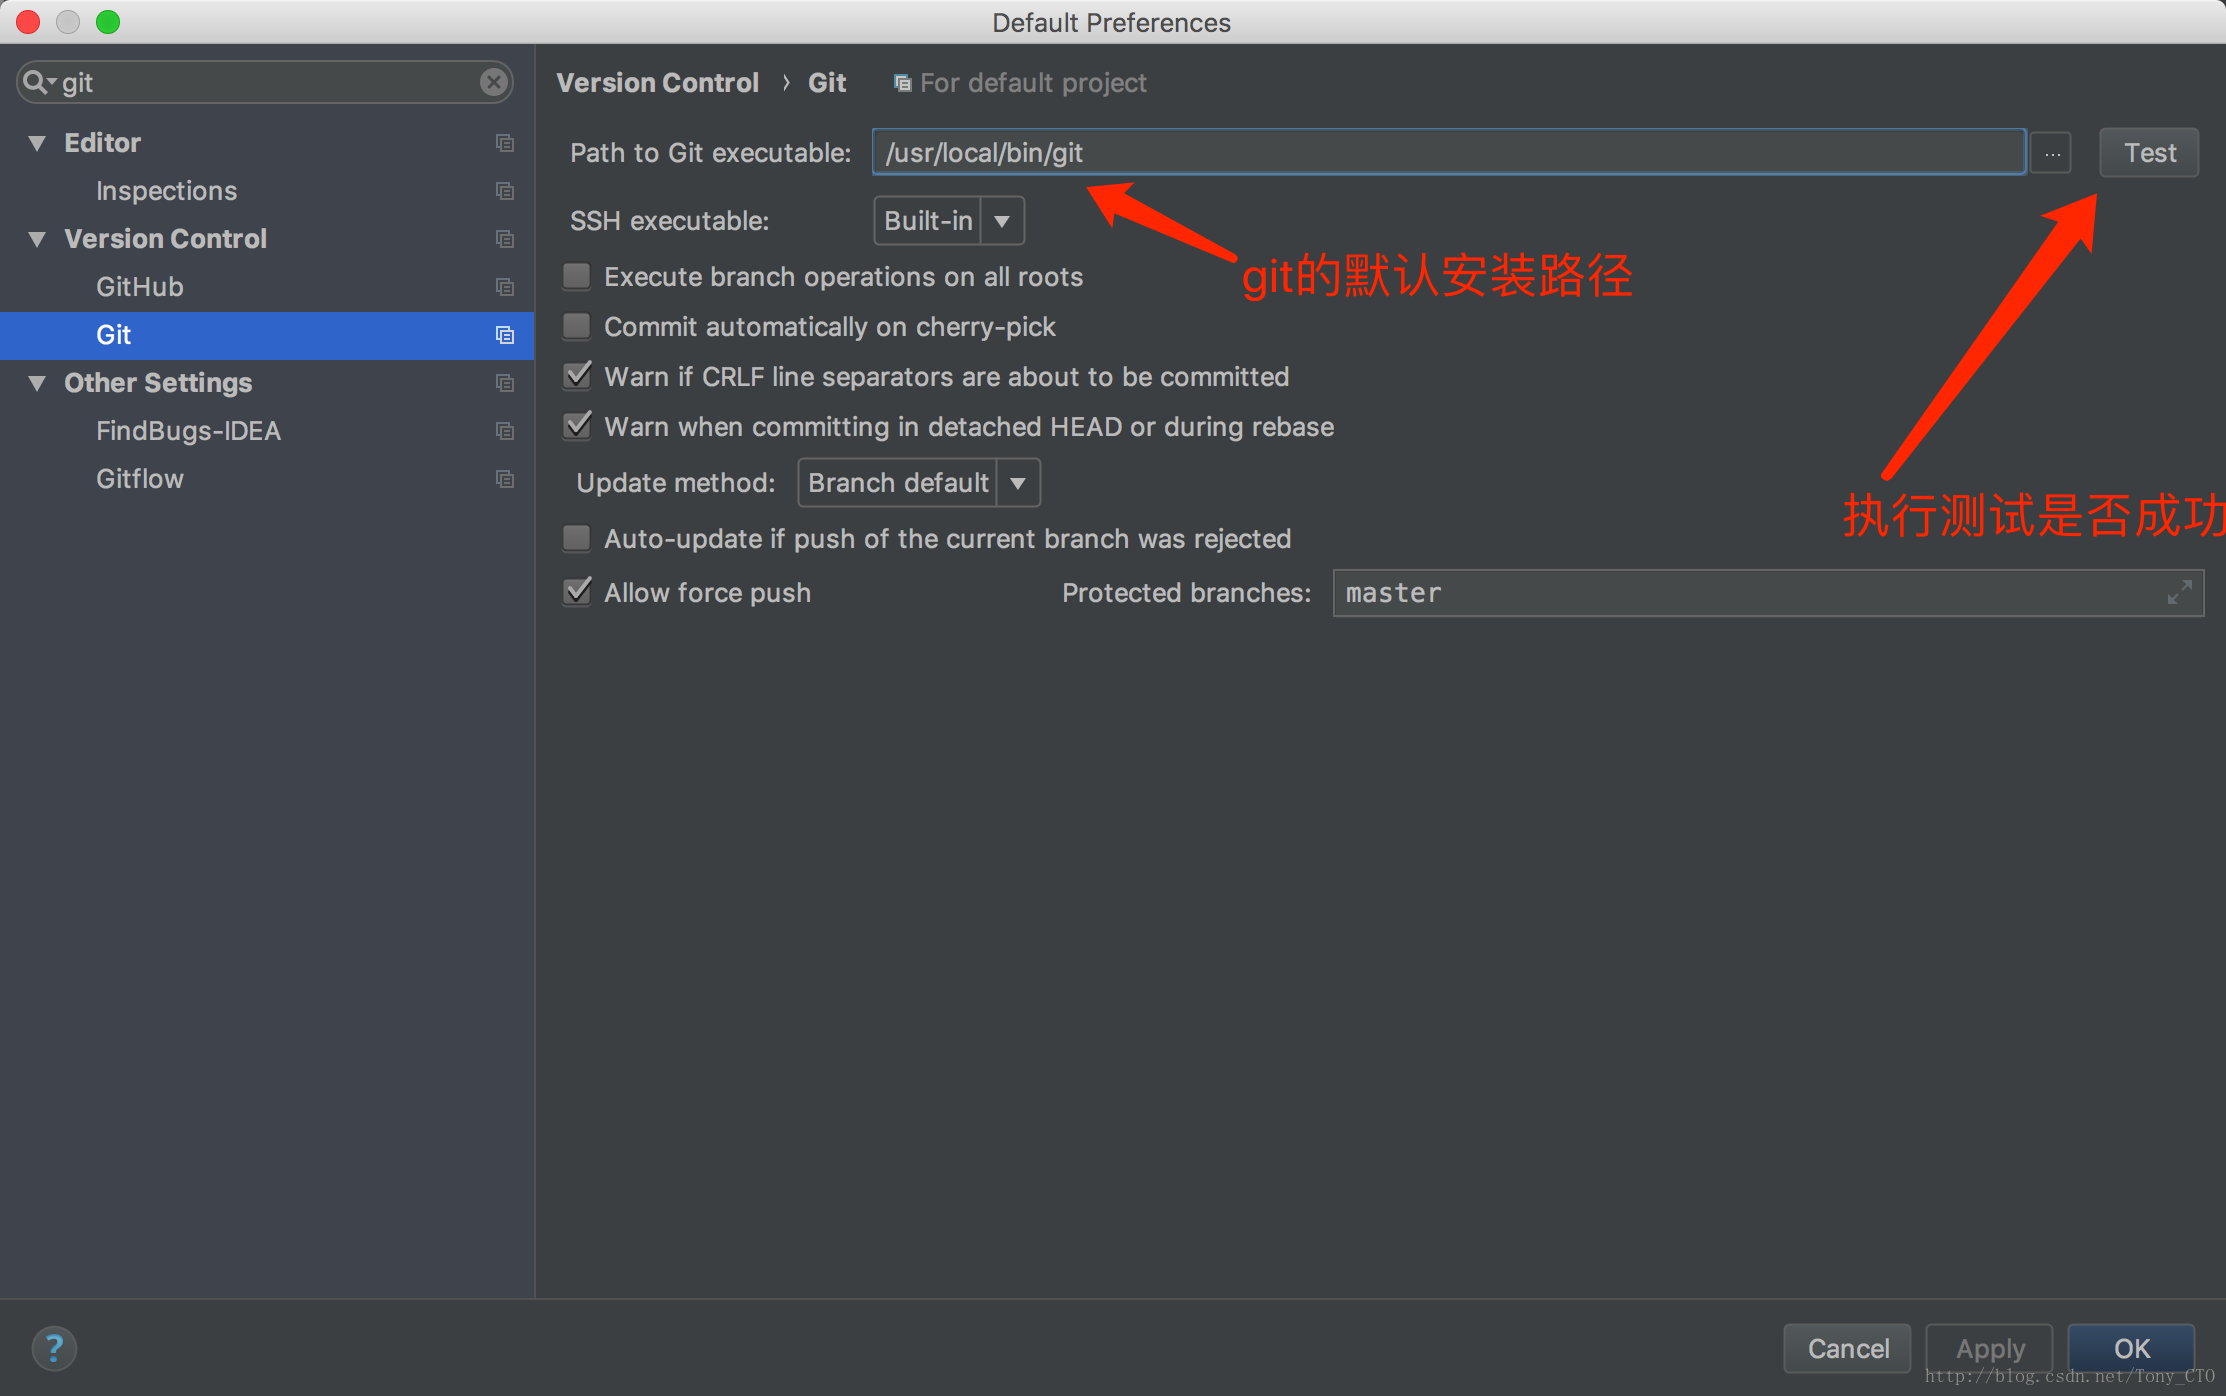
如果你安装了Git客户端,IntelliJ IDEA会在默认的路径下查找Git,如下图所示,点击Test查看Git是否安装成功
IntelliJ IDEA 集成GitHub
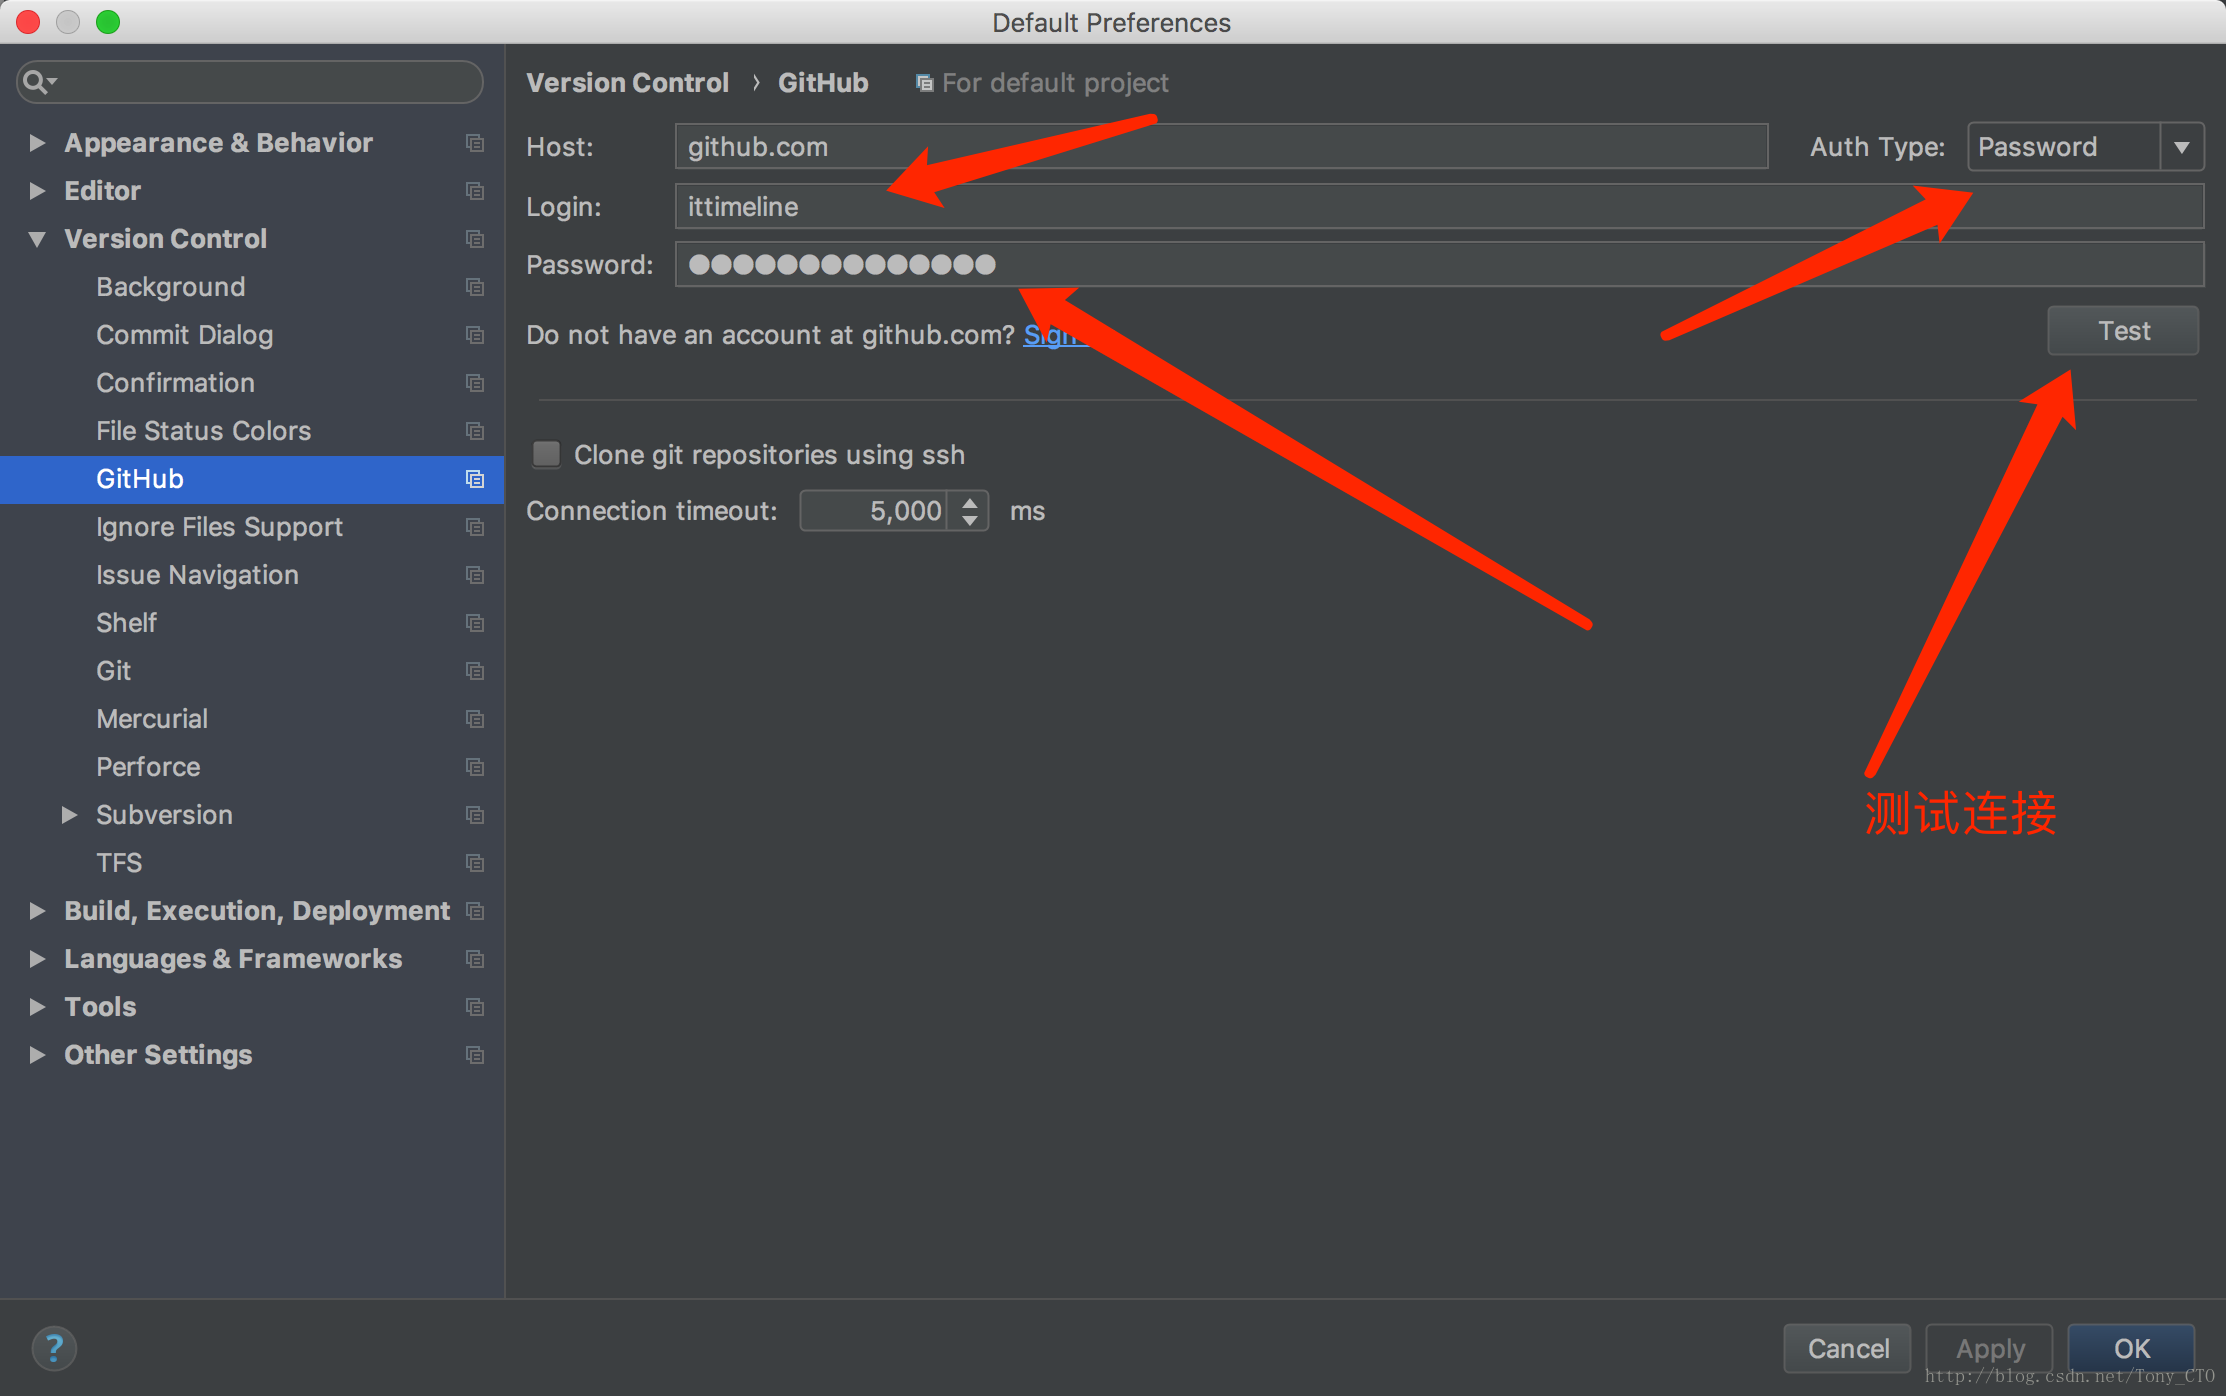
IntelliJ IDEA集成GitHub,只要输出你再GitHub上注册的用户名和密码即可,如下图所示
如果想更方便的使用GitHub或者是Gitlab,通常是在本地使用命令生成ssh_key,然后添加到GitHub/Gitlab中,那样后面提交代码就不用每次都输入用户名和密码了。
生成ssh_key的命令如下所
MacBookPro:~ tony$ git config --global user.name "tony"
MacBookPro:~ tony$ git config --global user.email "[email protected]"
MacBookPro:~ tony$ ssh-keygen -t rsa -C "[email protected]"
然后将生成的ssh key(位于路径MacBookPro:~ tony$ /Users/tony/.ssh/id_rsa.pub)添加到github账号即可,如下图所示

使用IntelliJ IDEA创建基于Maven的多模块项目
首先创建一个名为mybatis-practices的Project,该Project主要用于管理其他模块,也就是maven工程中的父工程,具体流程如下
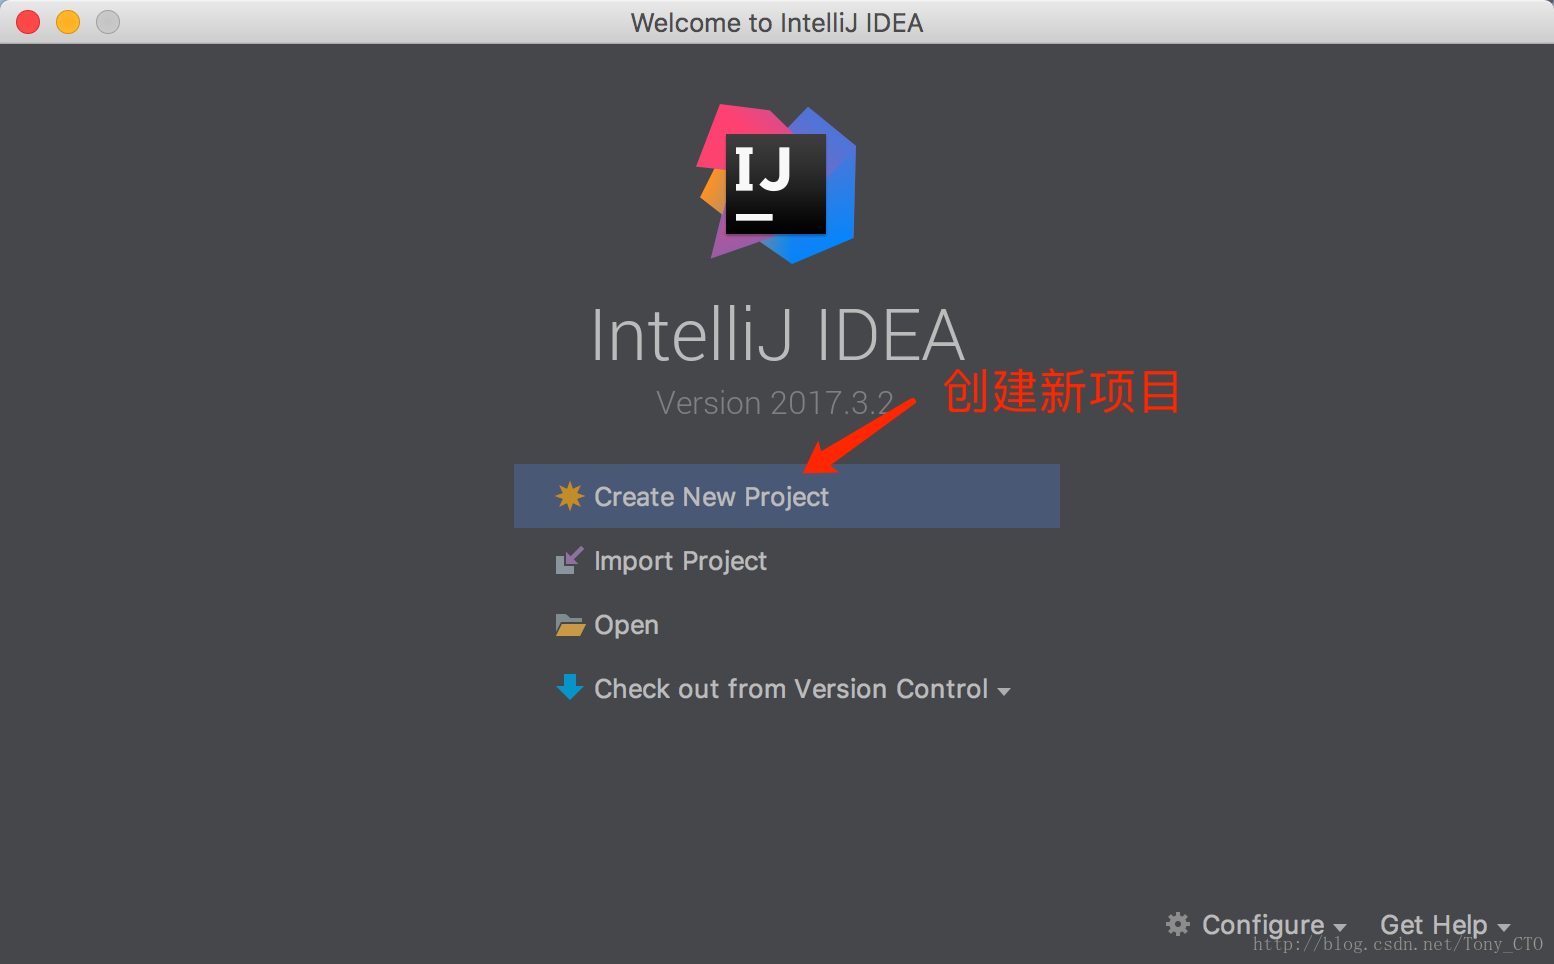
1 启动IntelliJ IDEA创建新项目

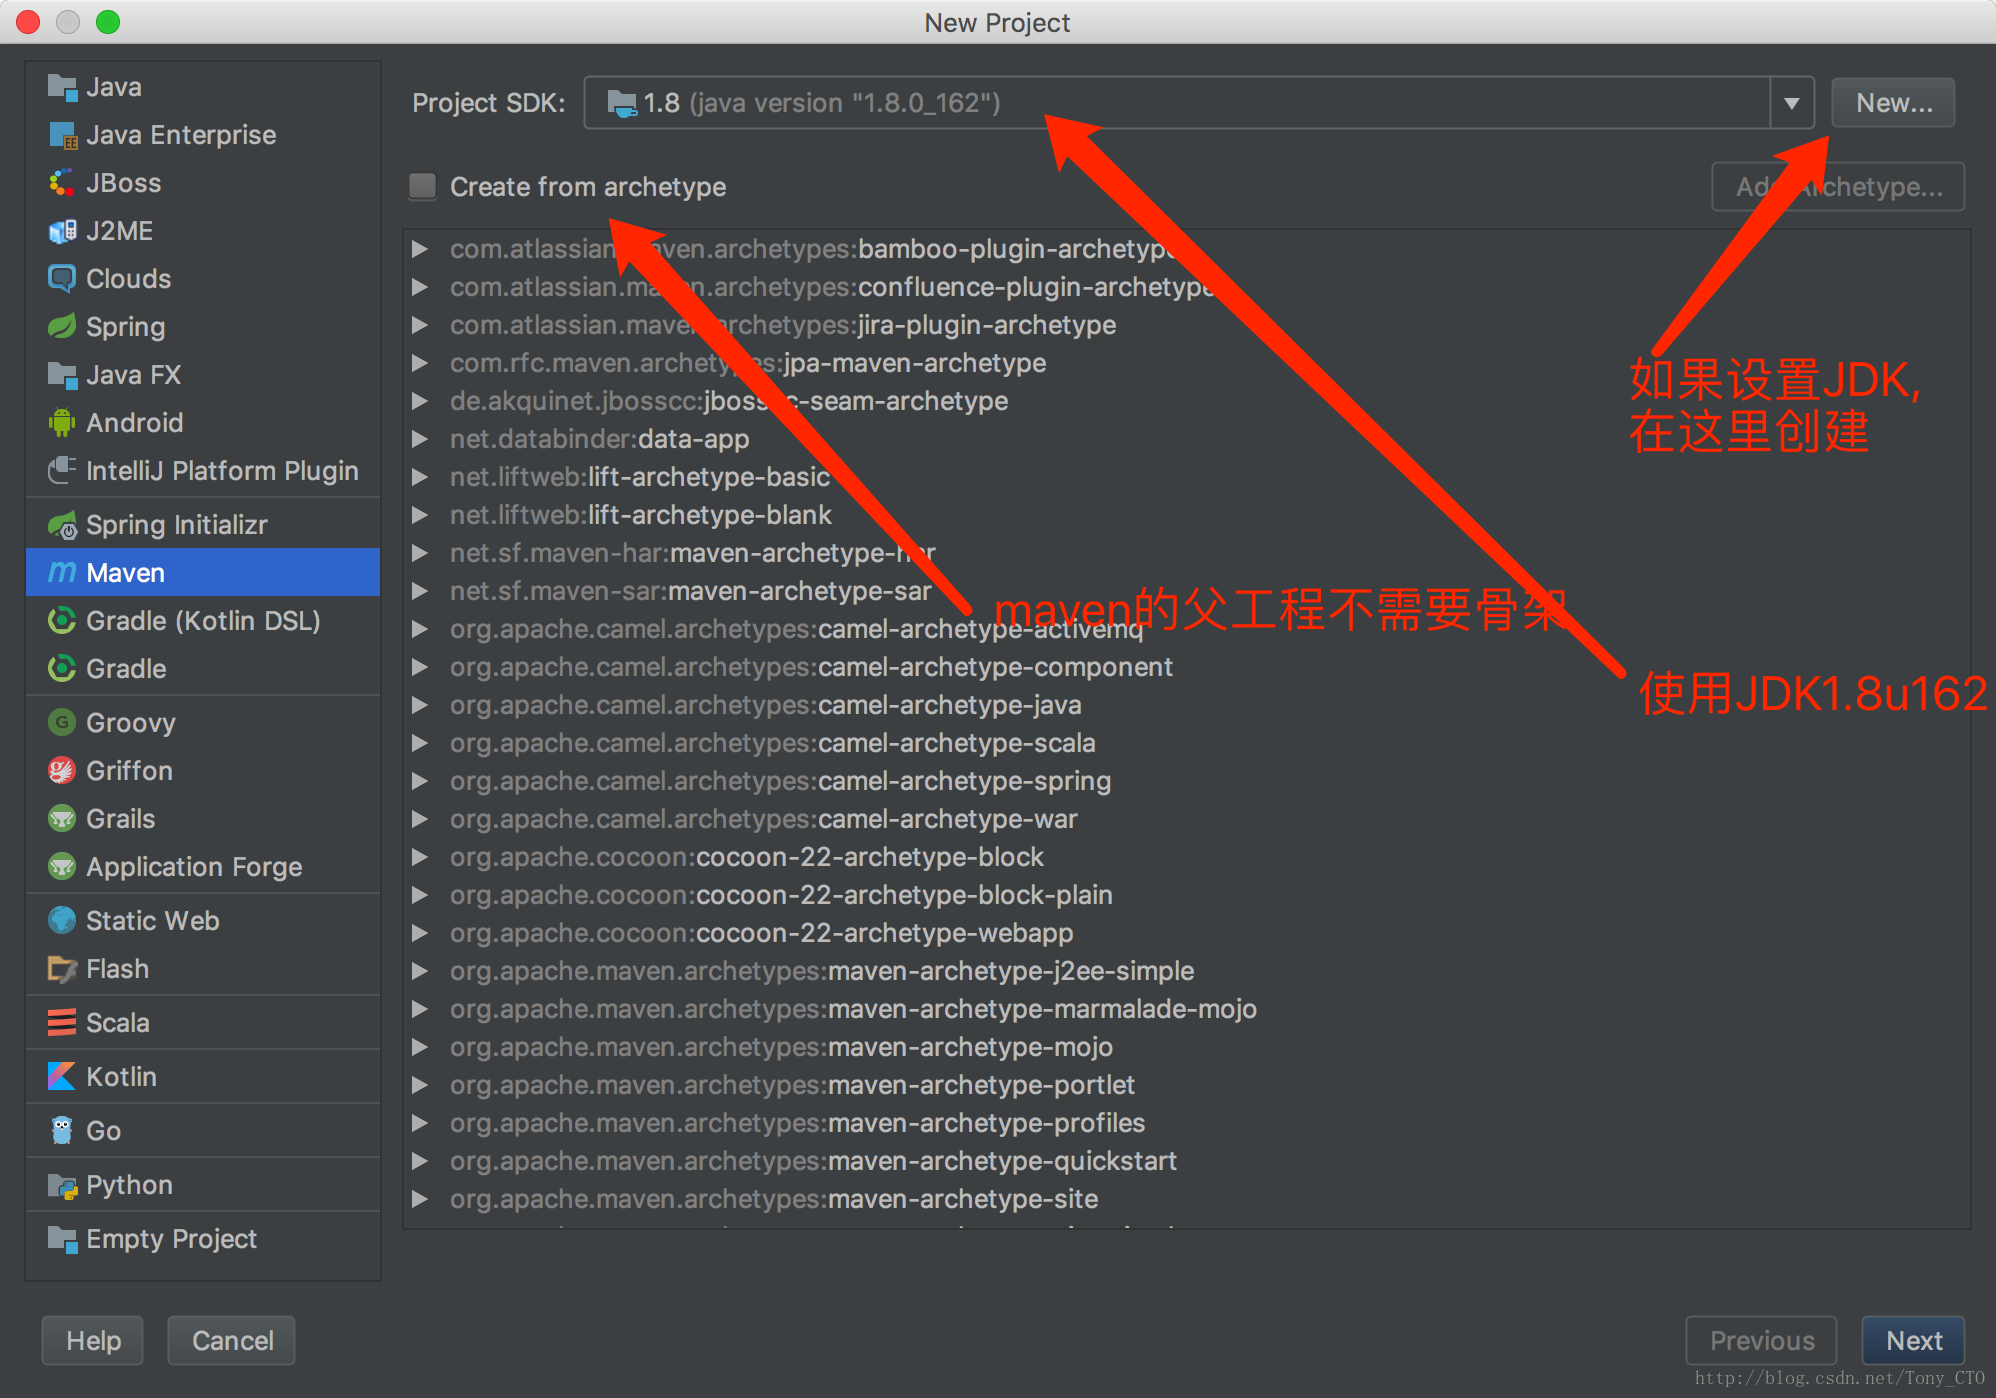
2 选择基于Maven的项目模板和JDK1.8u162
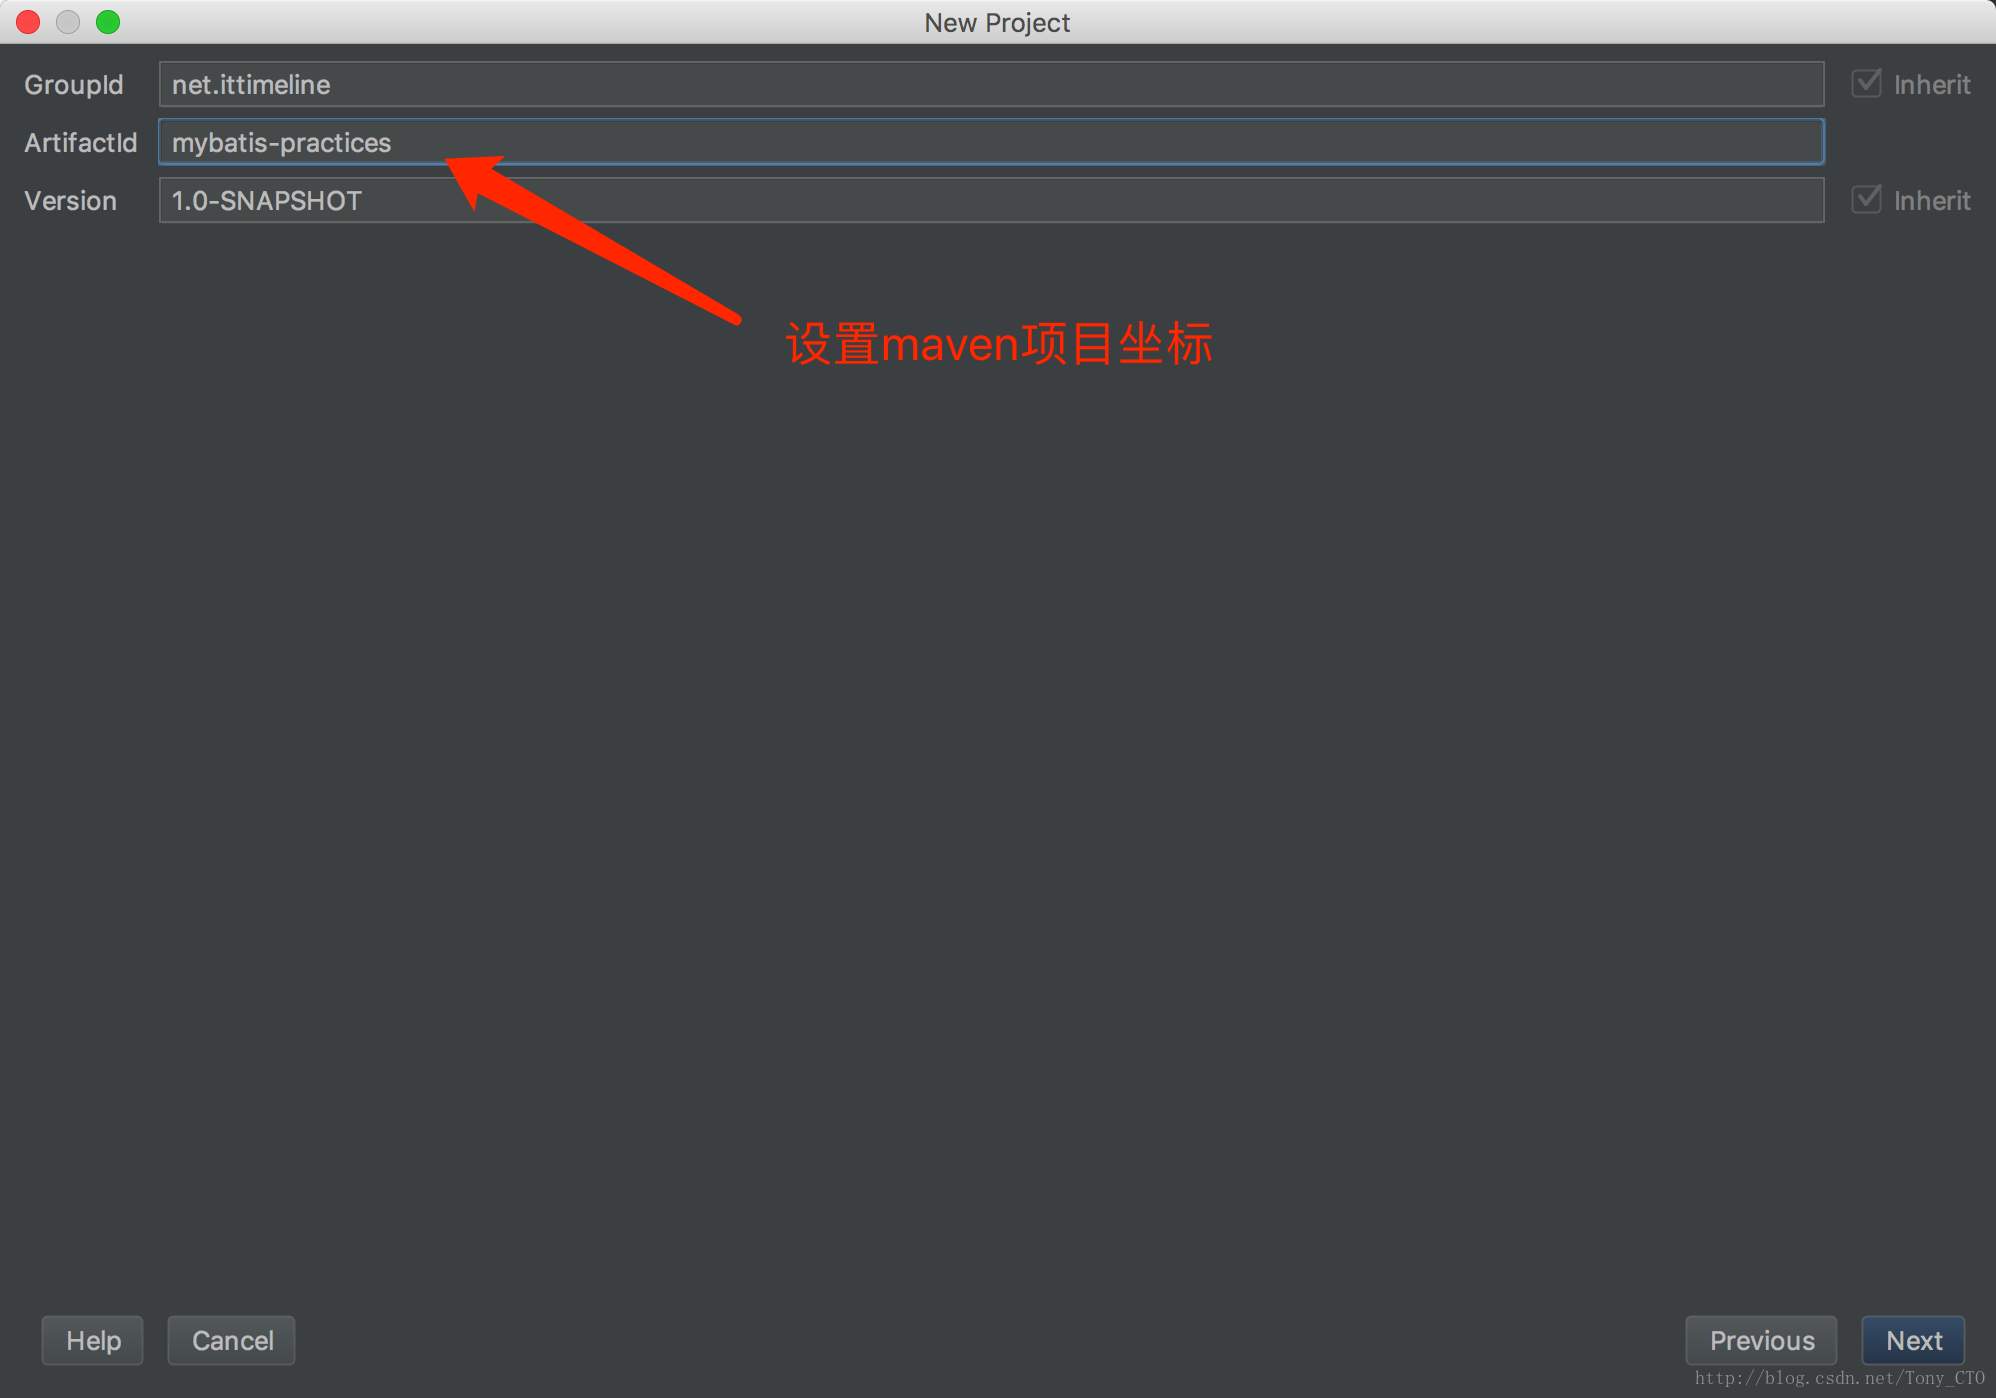
3 设置项目的Maven坐标
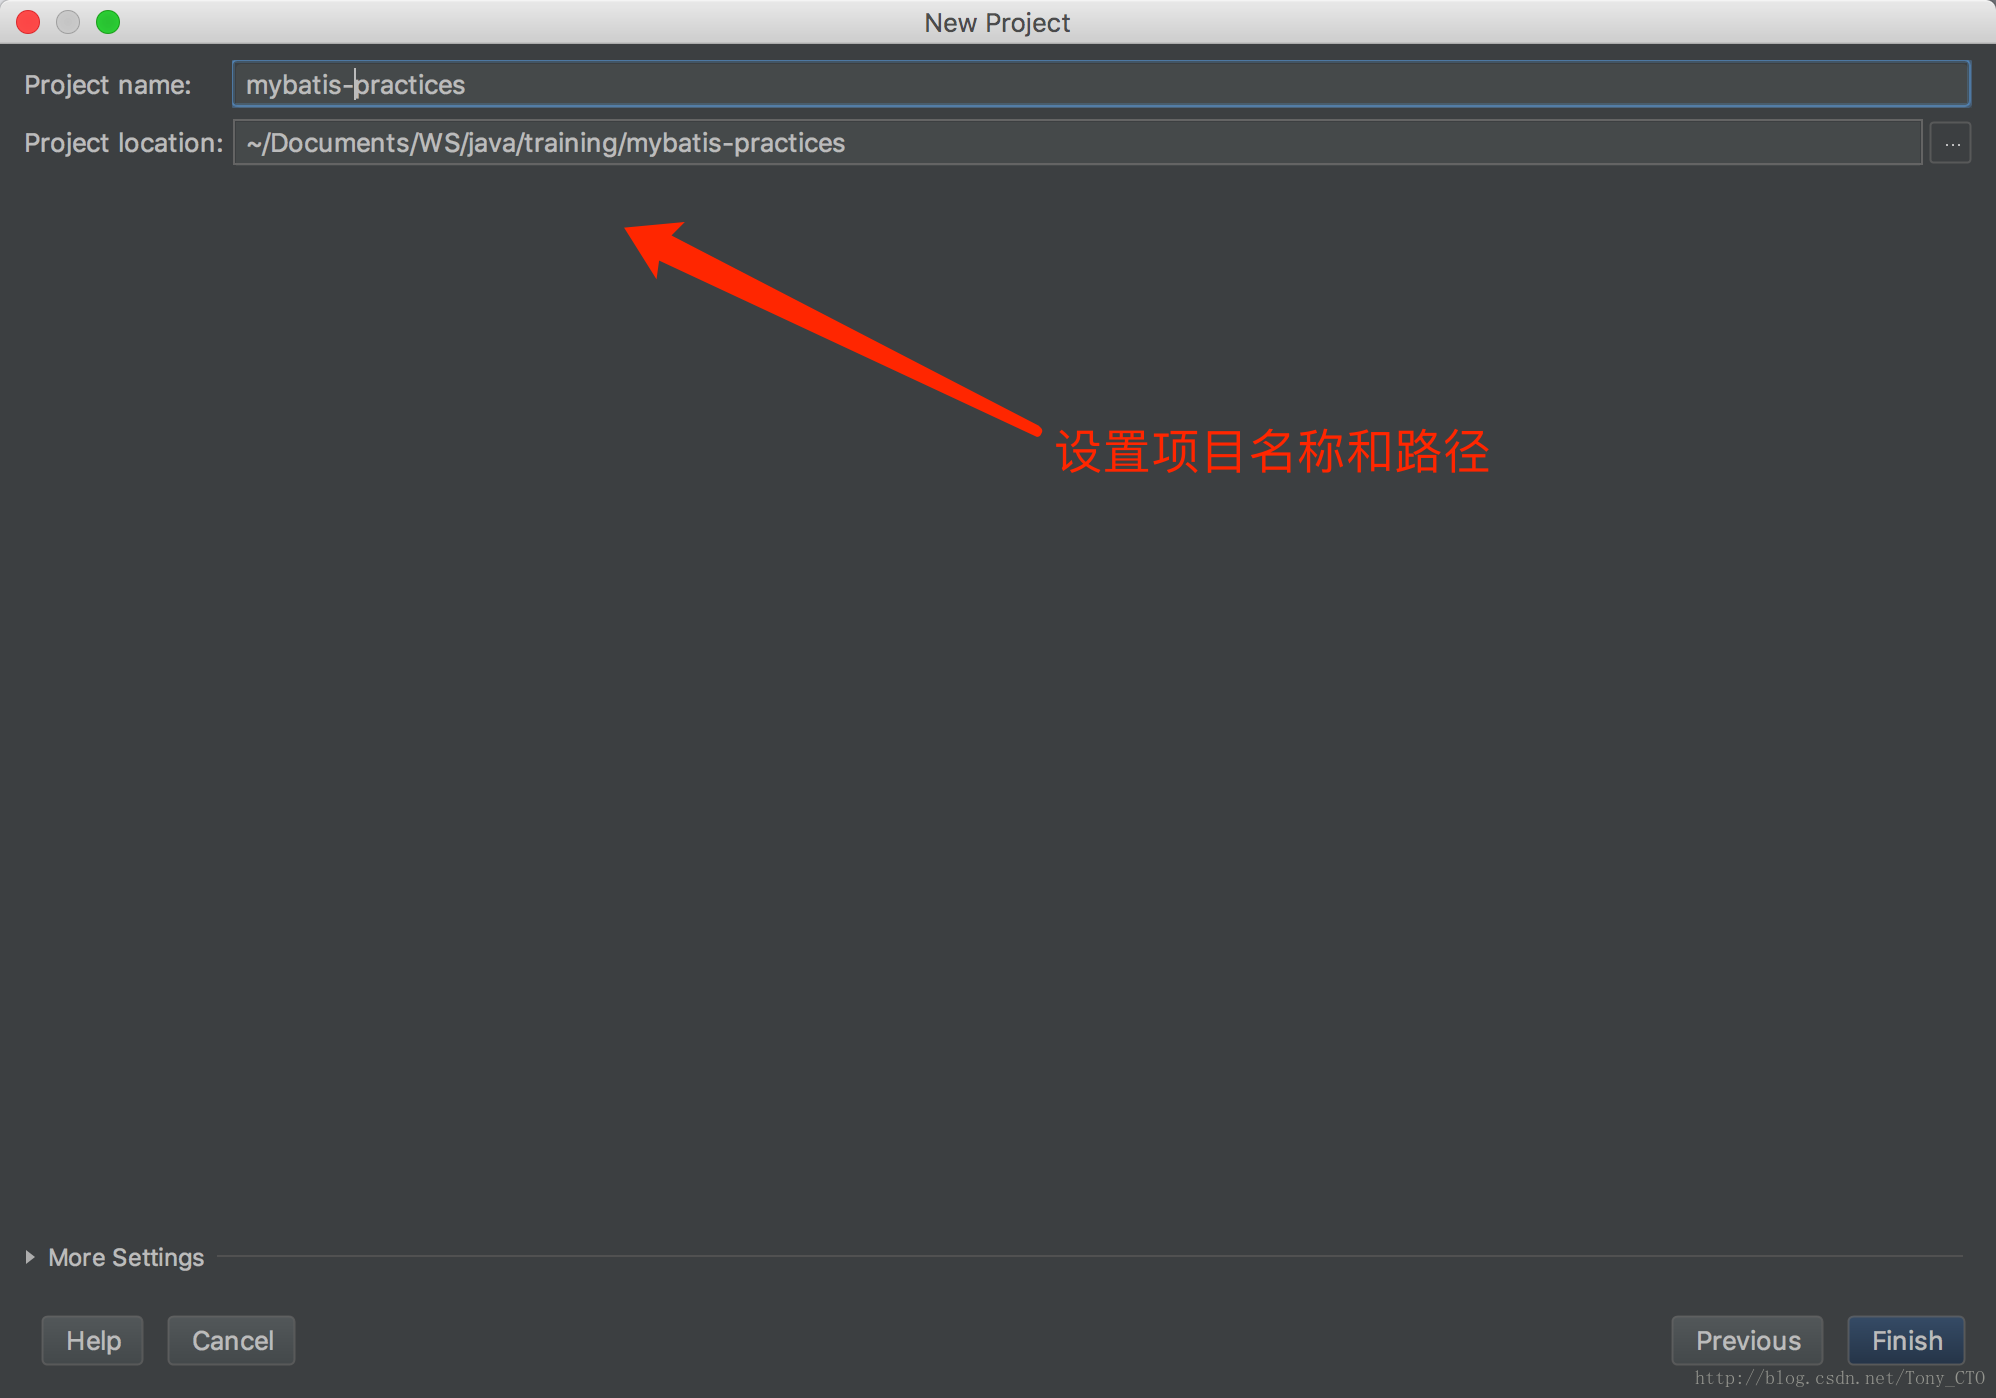
4 设置项目的名称和路径
5 项目总览
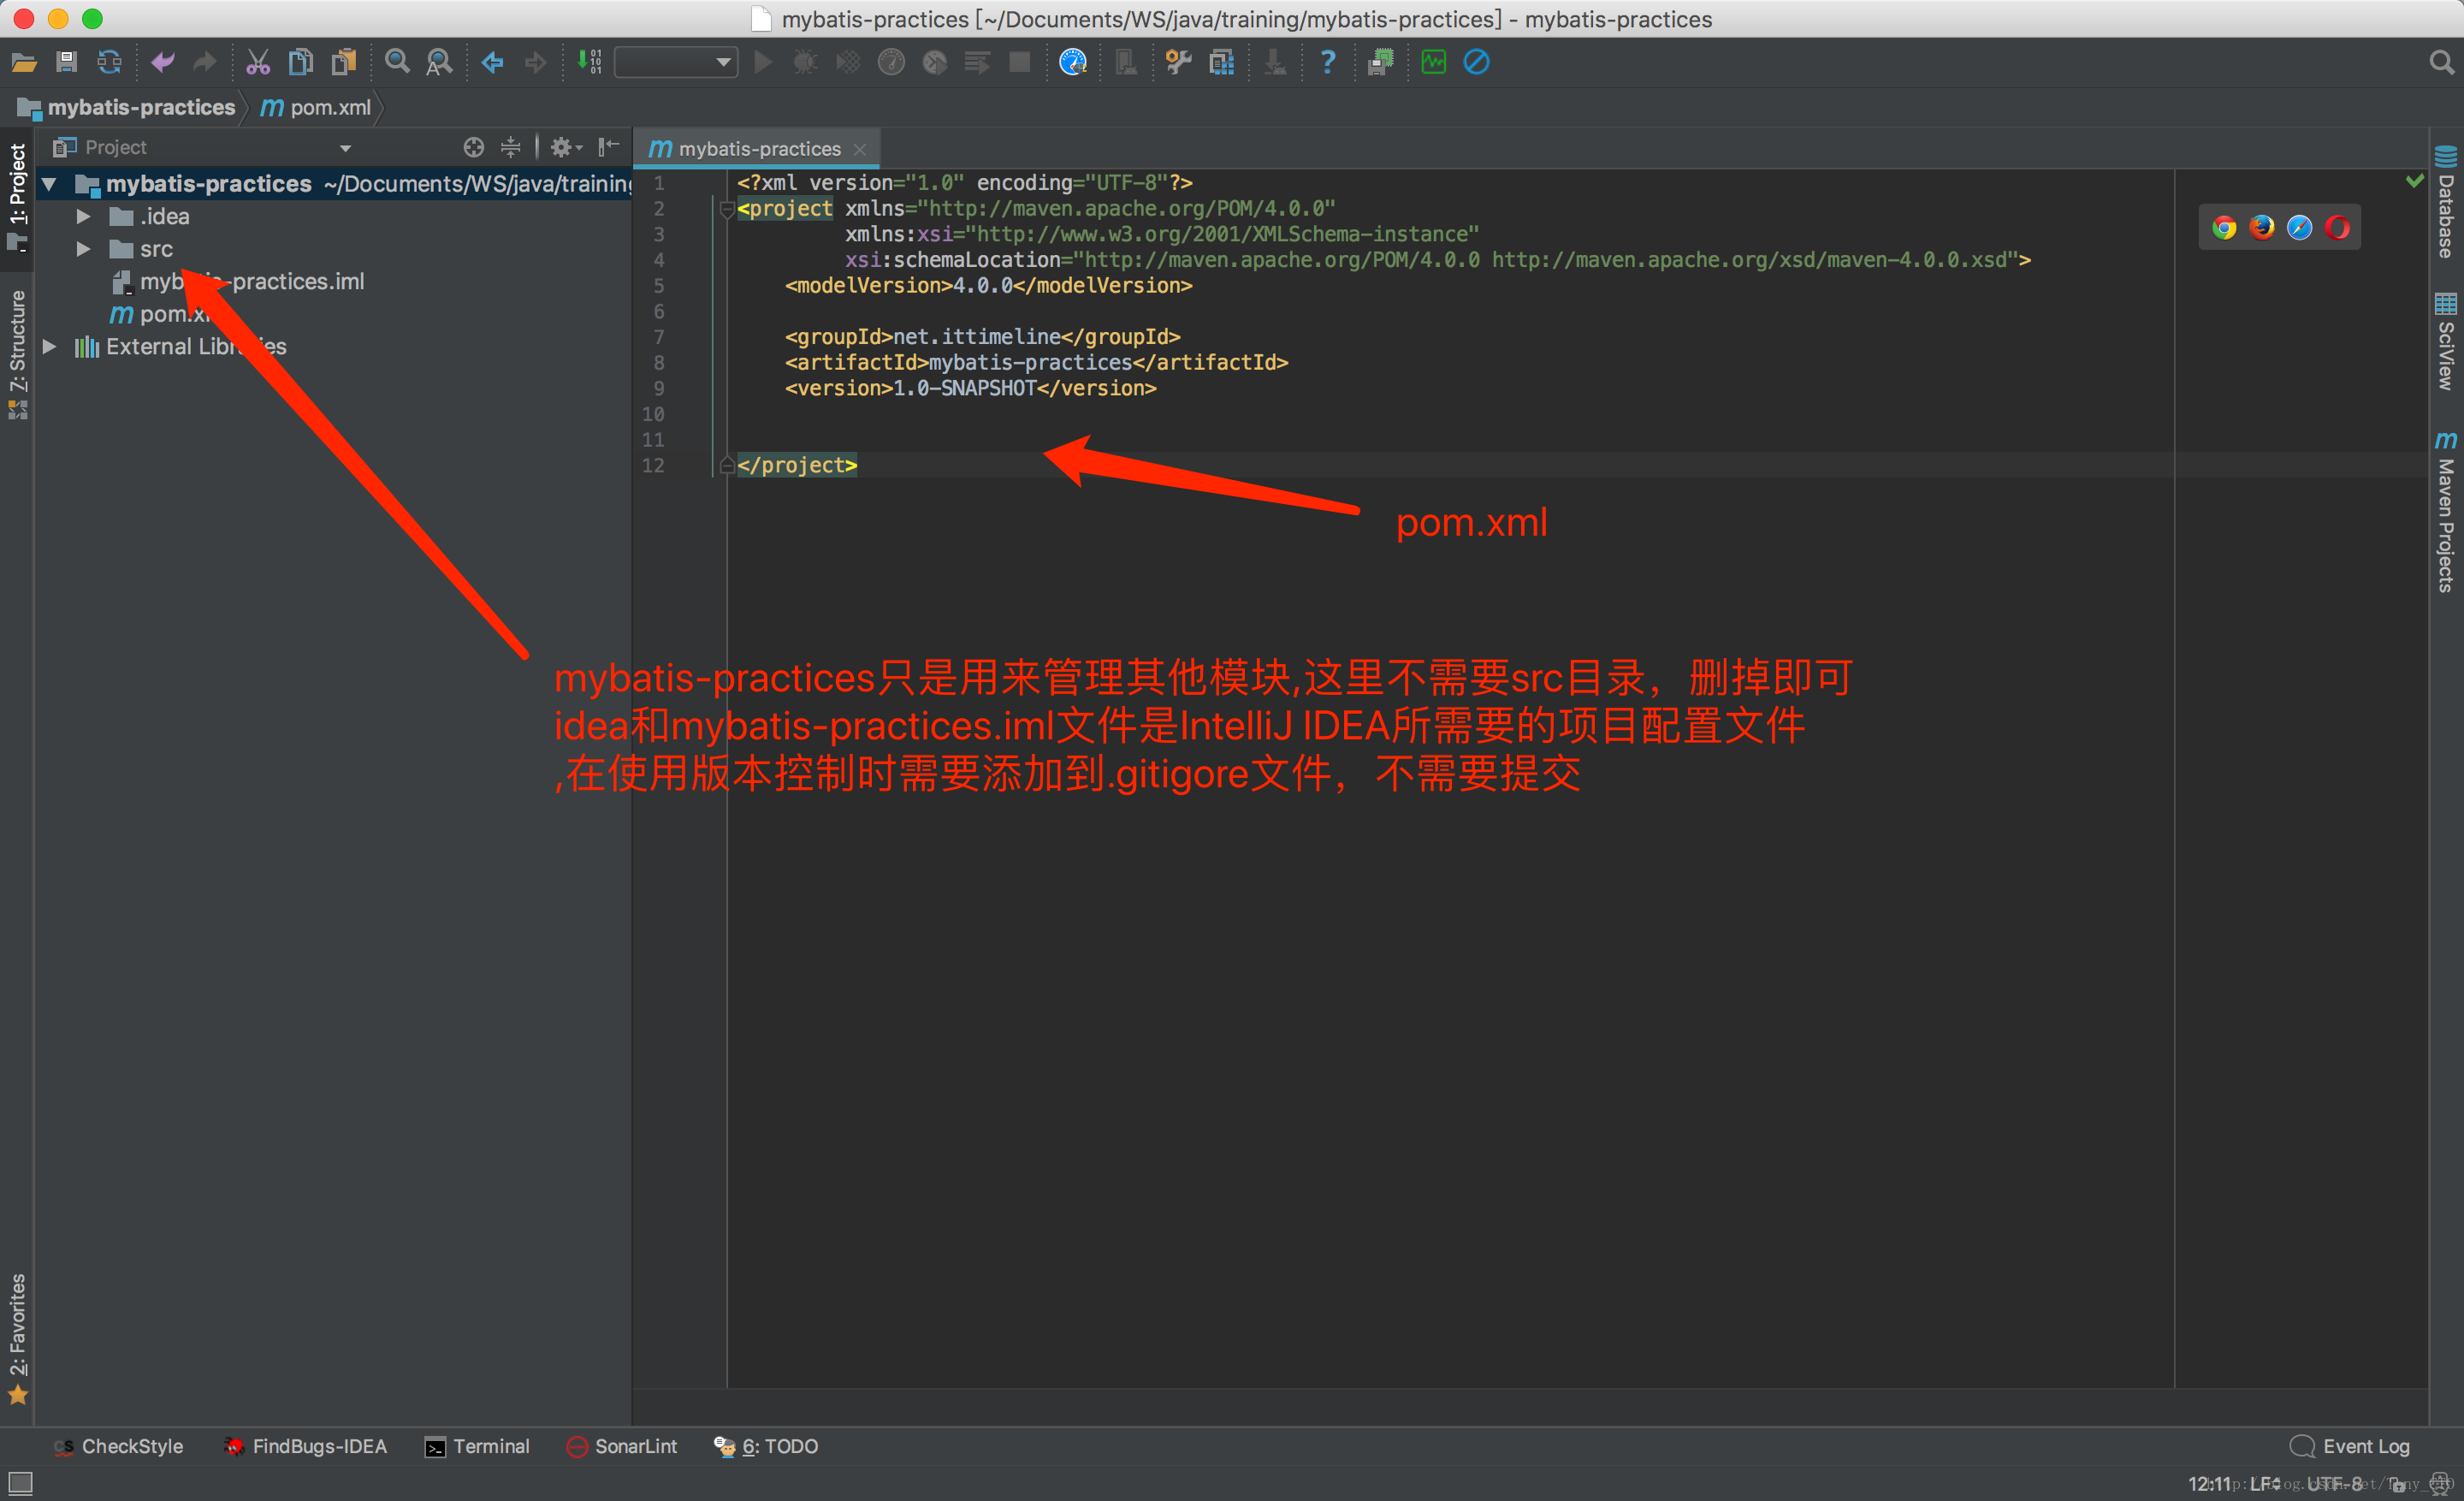
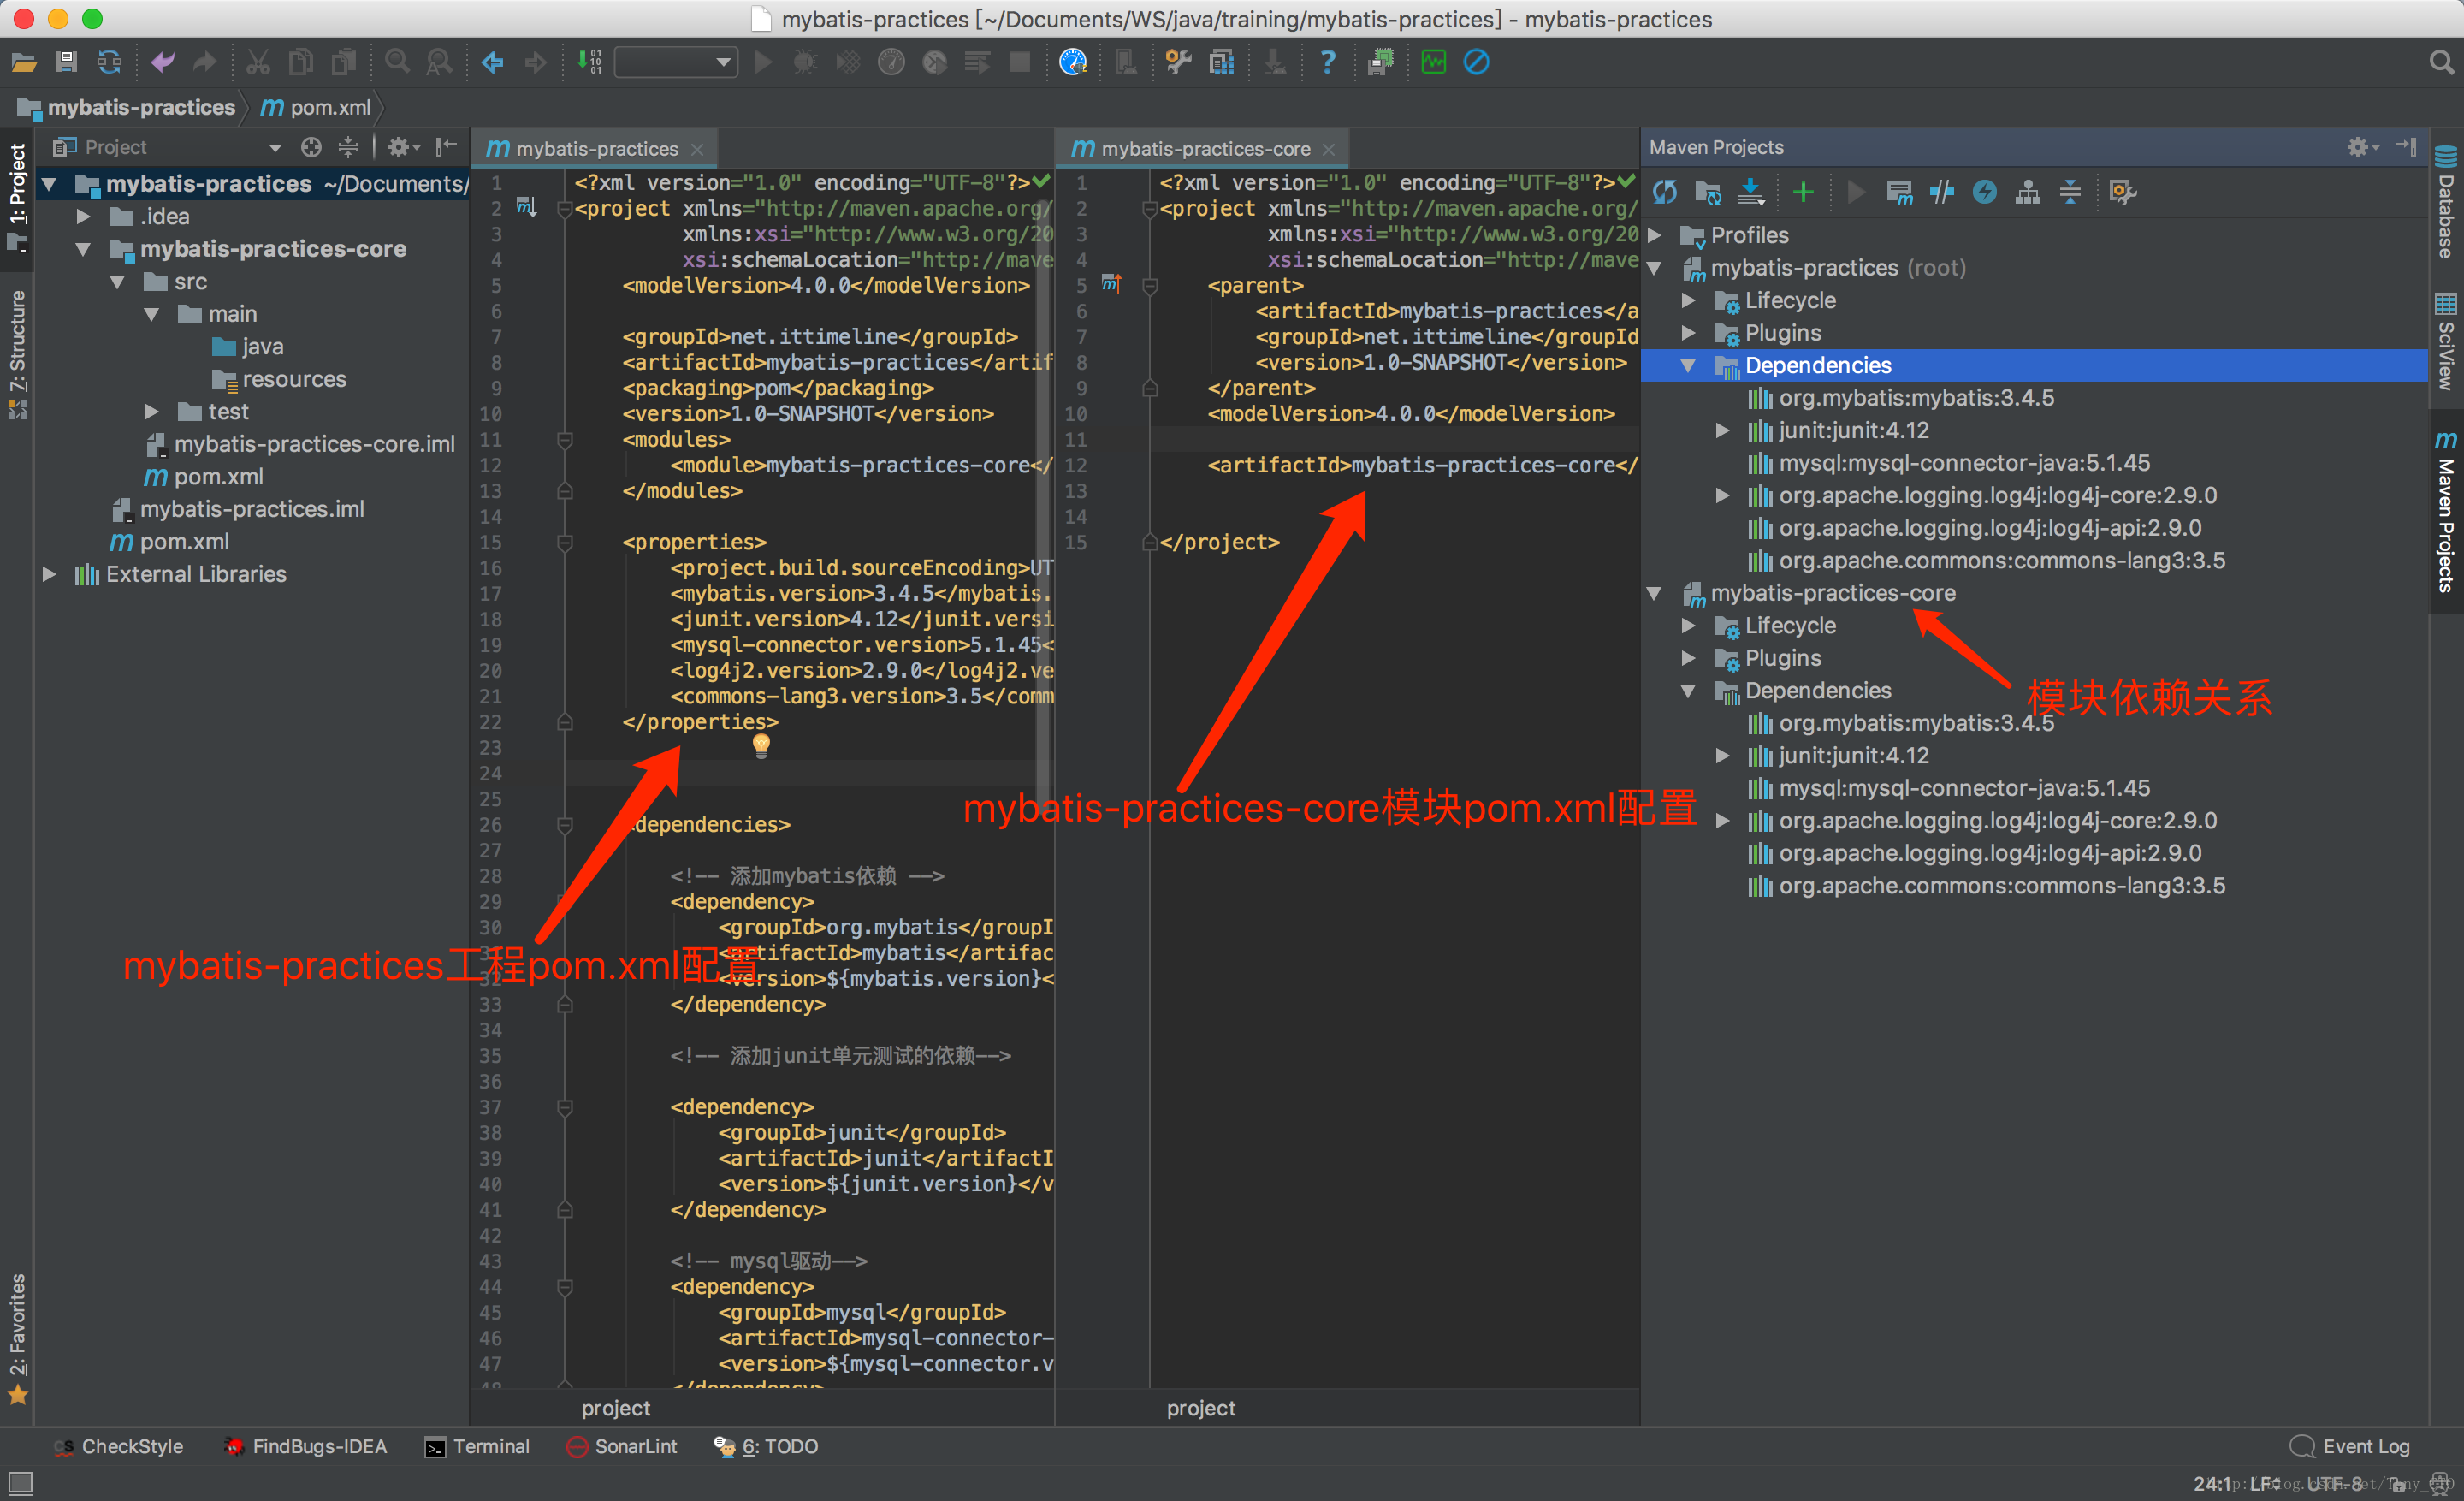
在创建模块之前,将后面程序用到的框架、类库的依赖加入到mybatis-practices的pom.xml文件中,那样后续建立的模块就不需要再重复添加依赖了,完整的pom.xml文件如下所示
<?xml version="1.0" encoding="UTF-8"?>
<project xmlns="http://maven.apache.org/POM/4.0.0"
xmlns:xsi="http://www.w3.org/2001/XMLSchema-instance"
xsi:schemaLocation="http://maven.apache.org/POM/4.0.0 http://maven.apache.org/xsd/maven-4.0.0.xsd">
<modelVersion>4.0.0</modelVersion>
<groupId>net.ittimeline</groupId>
<artifactId>mybatis-practices</artifactId>
<packaging>pom</packaging>
<version>1.0-SNAPSHOT</version>
<modules>
<module>mybatis-practices-core</module>
</modules>
<properties>
<project.build.sourceEncoding>UTF-8</project.build.sourceEncoding>
<mybatis.version>3.4.5</mybatis.version>
<junit.version>4.12</junit.version>
<mysql-connector.version>5.1.45</mysql-connector.version>
<log4j2.version>2.9.0</log4j2.version>
<commons-lang3.version>3.5</commons-lang3.version>
<commons-collection4.version>4.1</commons-collection4.version>
</properties>
<dependencies>
<!-- 添加mybatis依赖 -->
<dependency>
<groupId>org.mybatis</groupId>
<artifactId>mybatis</artifactId>
<version>${mybatis.version}</version>
</dependency>
<!-- 添加junit单元测试的依赖-->
<dependency>
<groupId>junit</groupId>
<artifactId>junit</artifactId>
<version>${junit.version}</version>
</dependency>
<!-- mysql驱动-->
<dependency>
<groupId>mysql</groupId>
<artifactId>mysql-connector-java</artifactId>
<version>${mysql-connector.version}</version>
</dependency>
<!-- log4j2-->
<dependency>
<groupId>org.apache.logging.log4j</groupId>
<artifactId>log4j-core</artifactId>
<version>${log4j2.version}</version>
</dependency>
<dependency>
<groupId>org.apache.logging.log4j</groupId>
<artifactId>log4j-api</artifactId>
<version>${log4j2.version}</version>
</dependency>
<dependency>
<groupId>org.apache.commons</groupId>
<artifactId>commons-lang3</artifactId>
<version>${commons-lang3.version}</version>
</dependency>
<!-- https://mvnrepository.com/artifact/org.apache.commons/commons-collections4 -->
<dependency>
<groupId>org.apache.commons</groupId>
<artifactId>commons-collections4</artifactId>
<version>${commons-collection4.version}</version>
</dependency>
</dependencies>
<build>
<plugins>
<!-- 设置编译源代码的JDK版本为1.8-->
<plugin>
<artifactId>maven-compiler-plugin</artifactId>
<configuration>
<source>1.8</source>
<target>1.8</target>
</configuration>
</plugin>
</plugins>
</build>
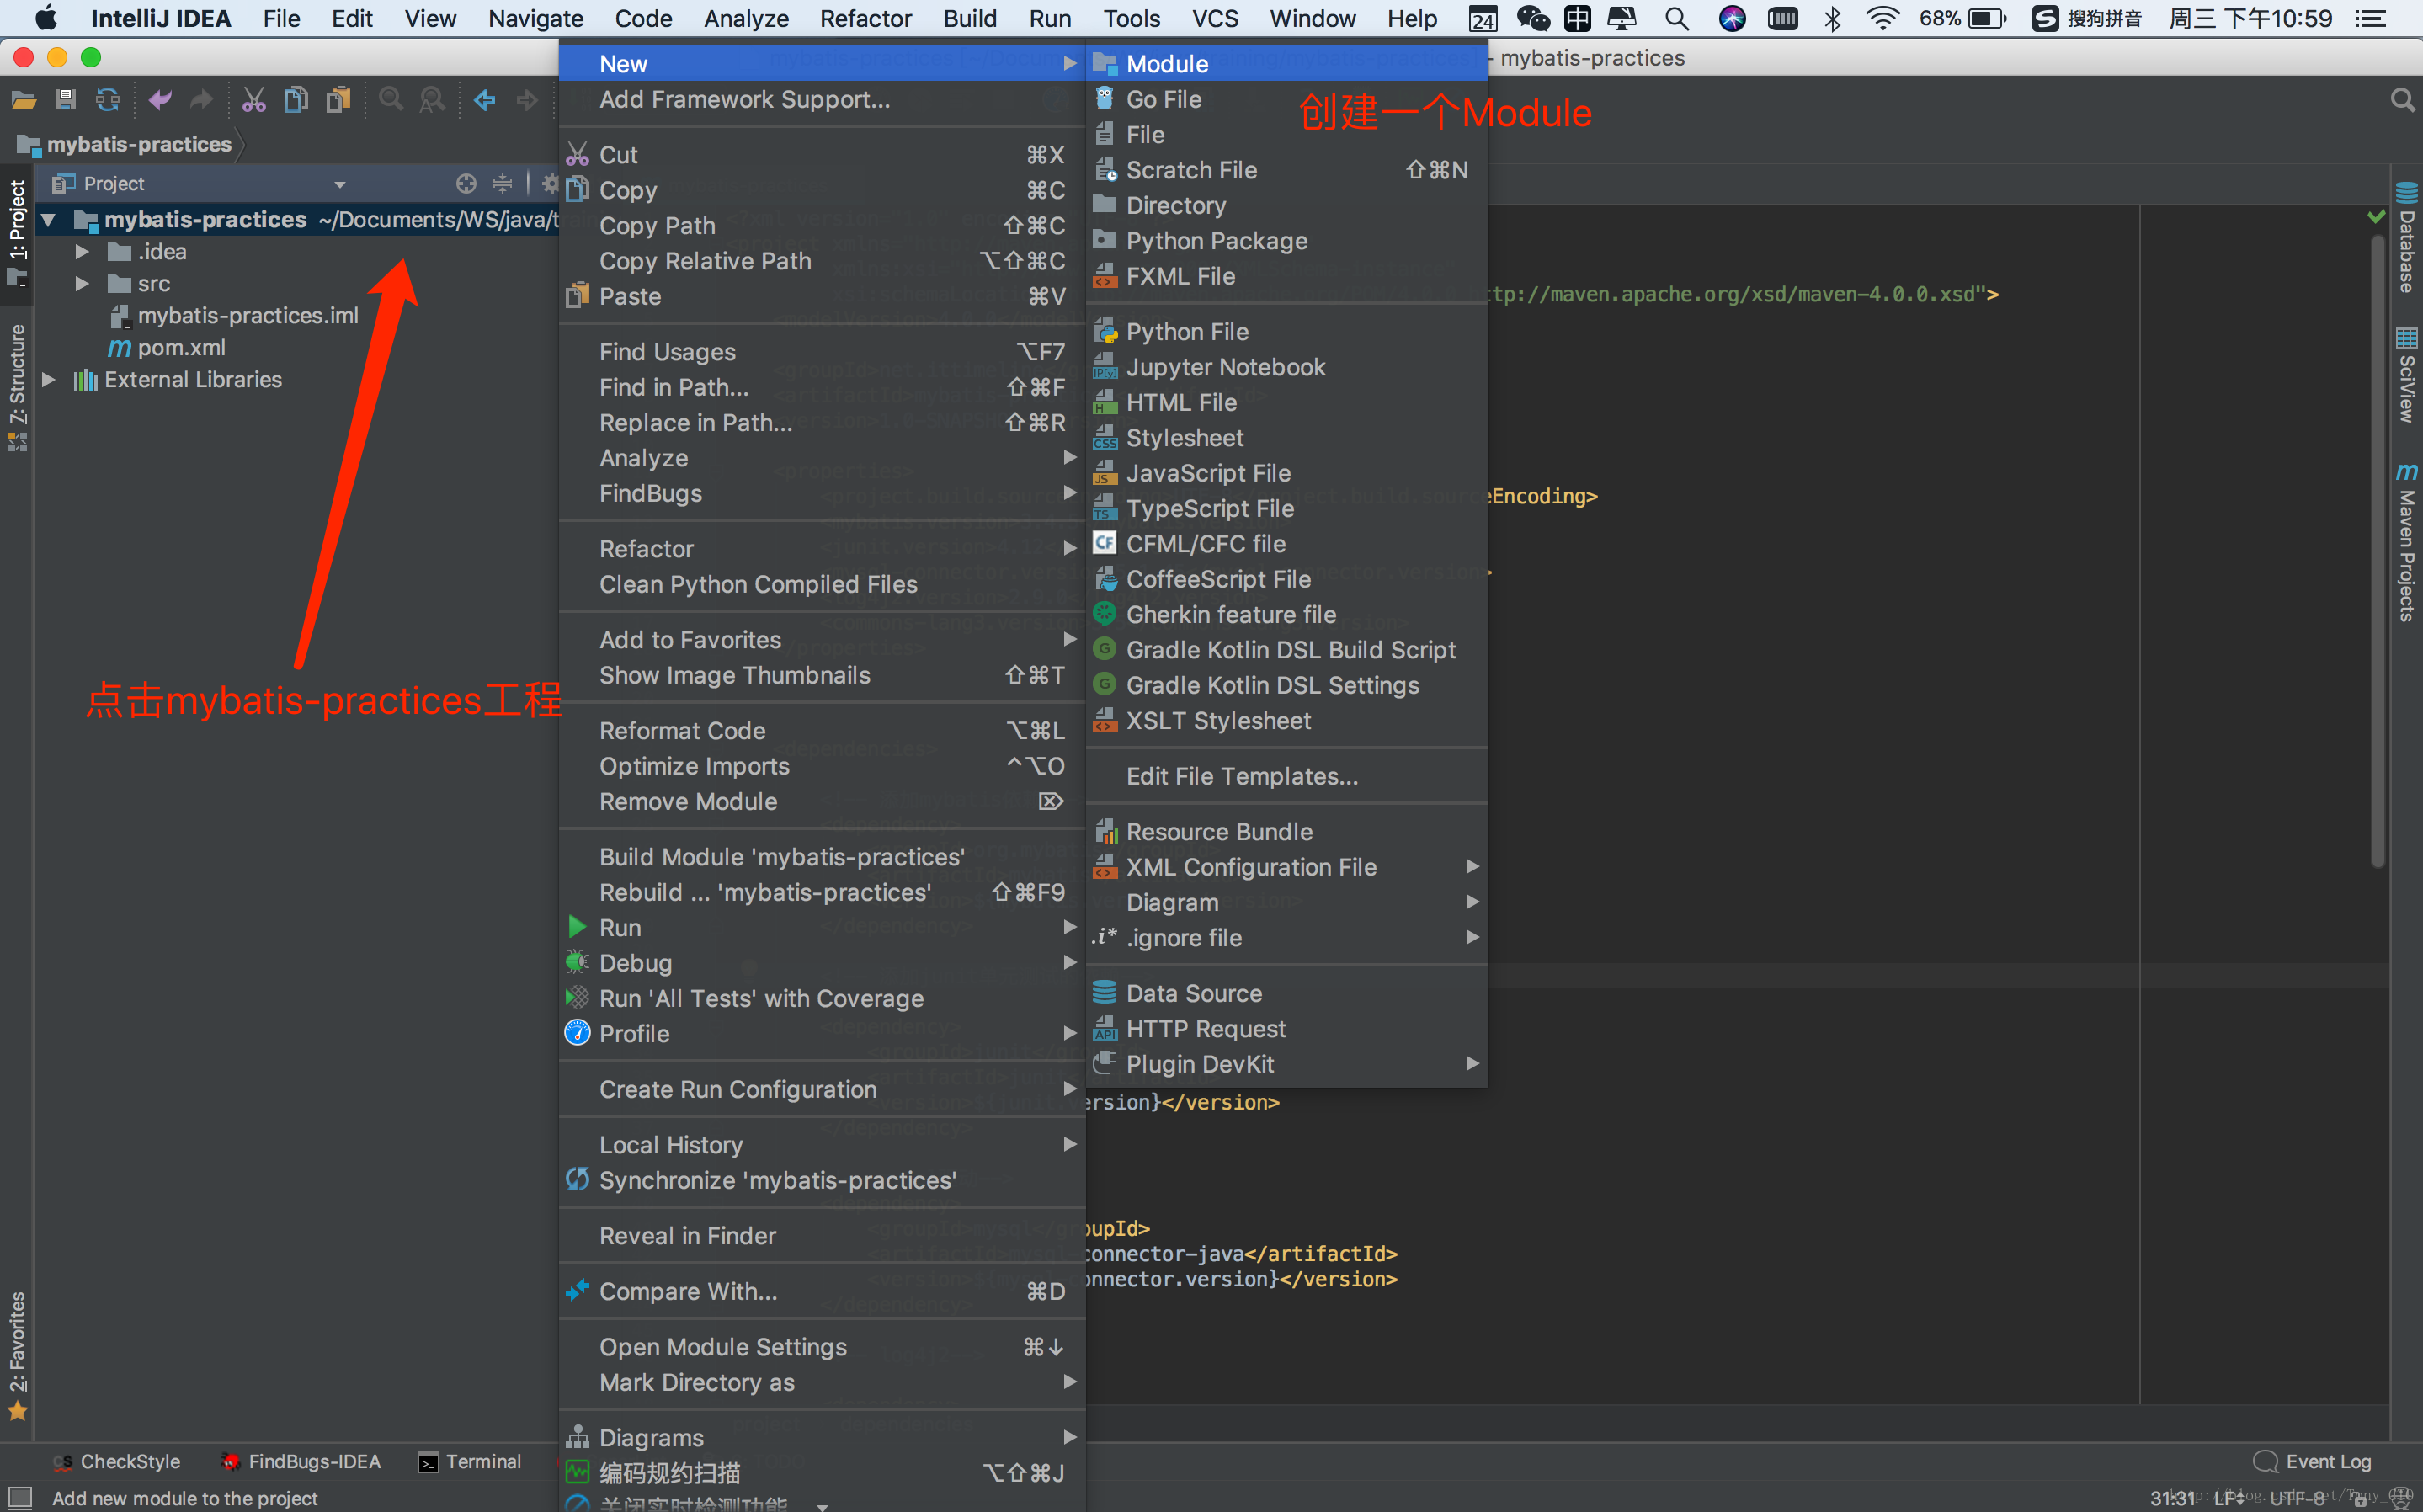
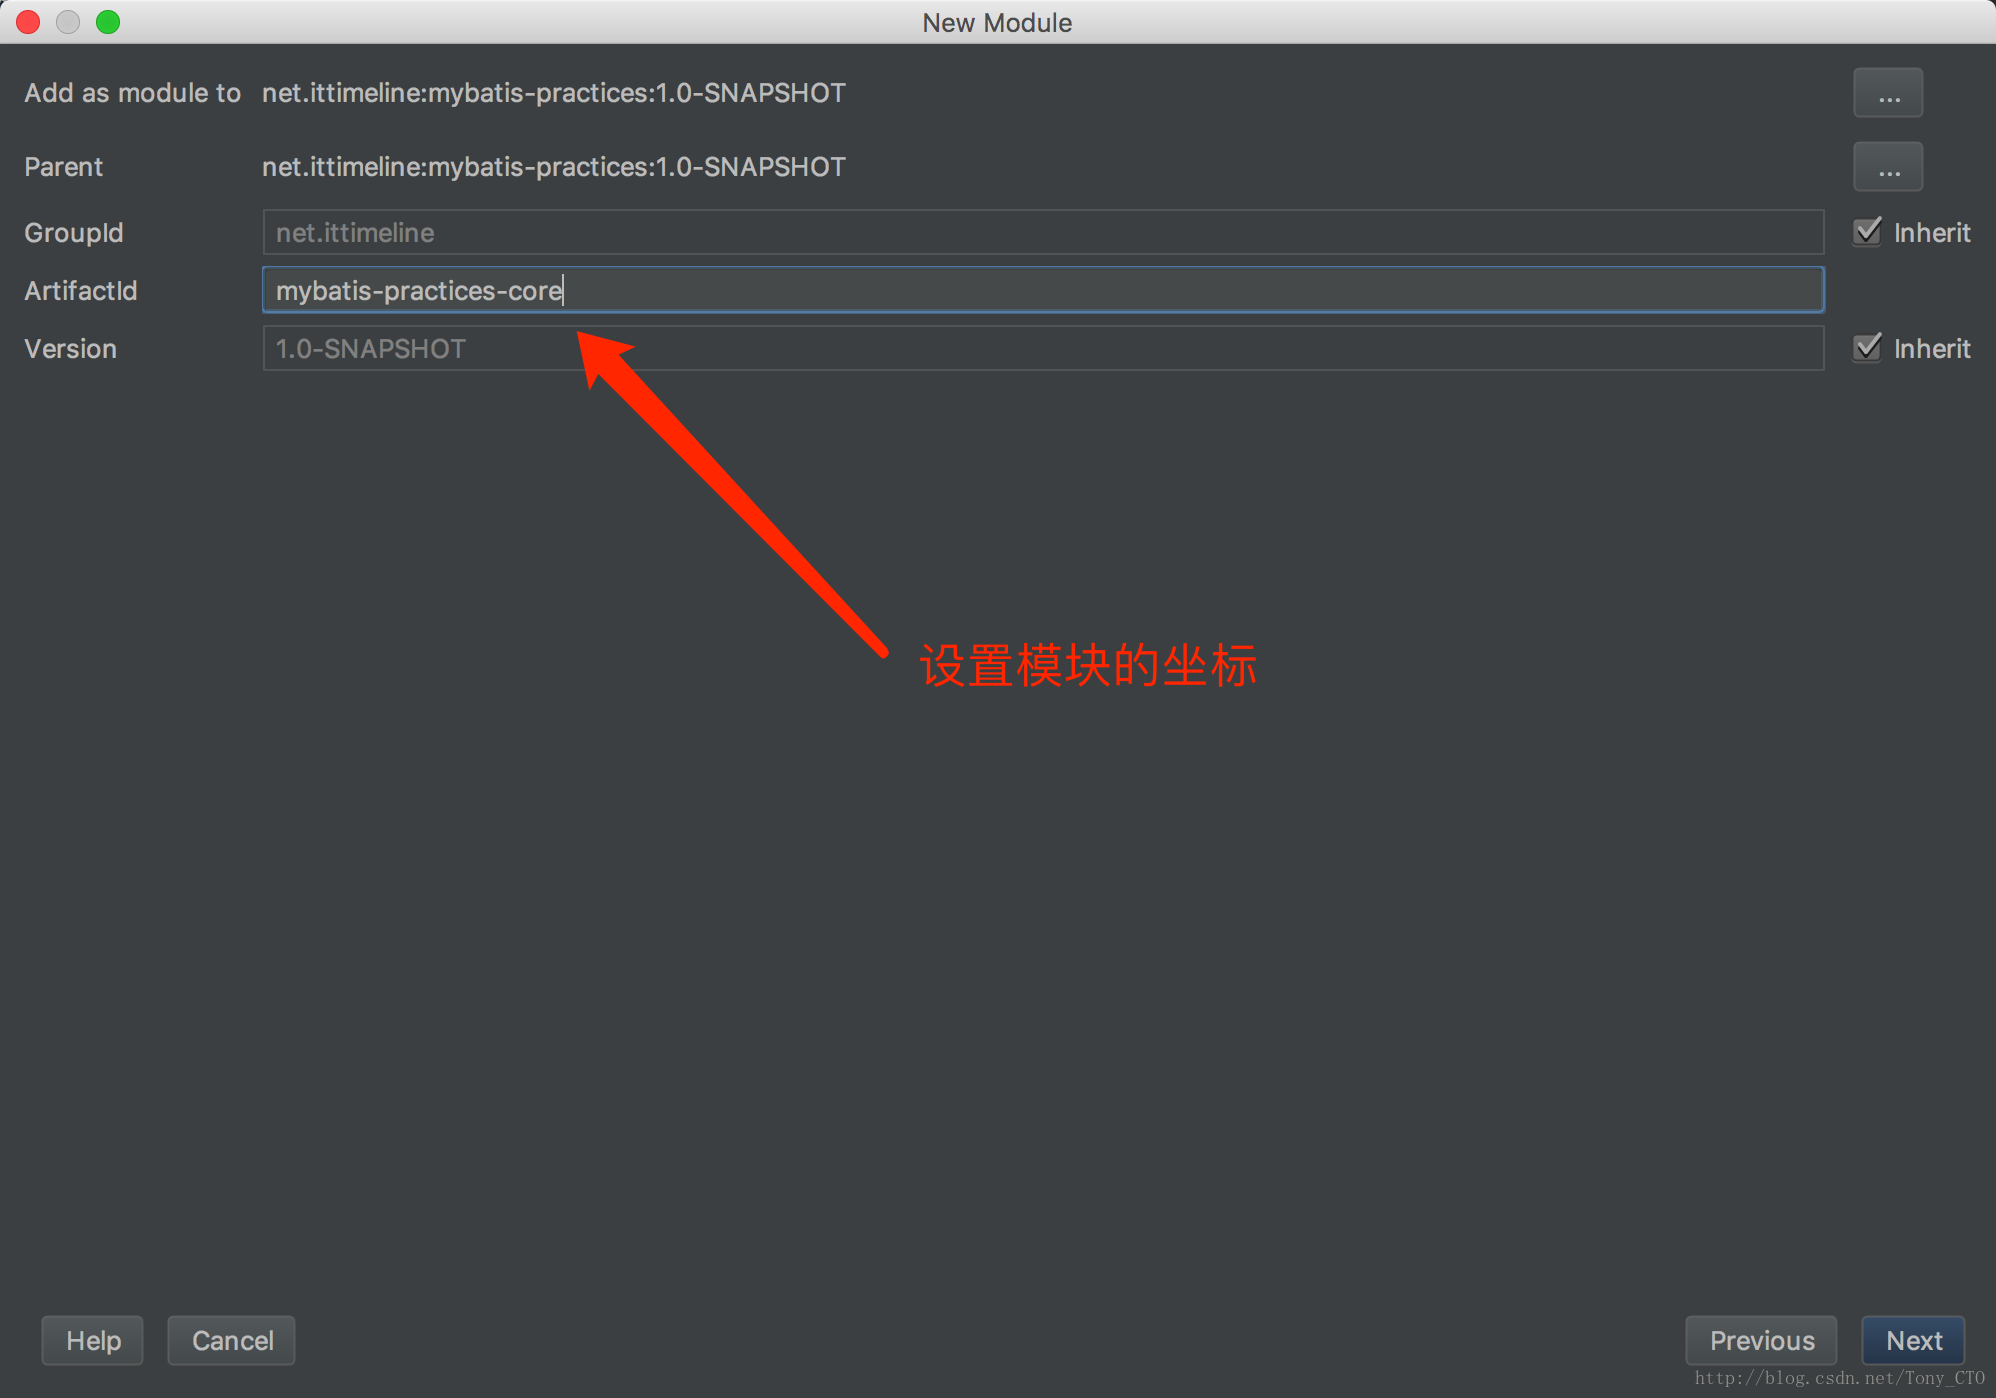
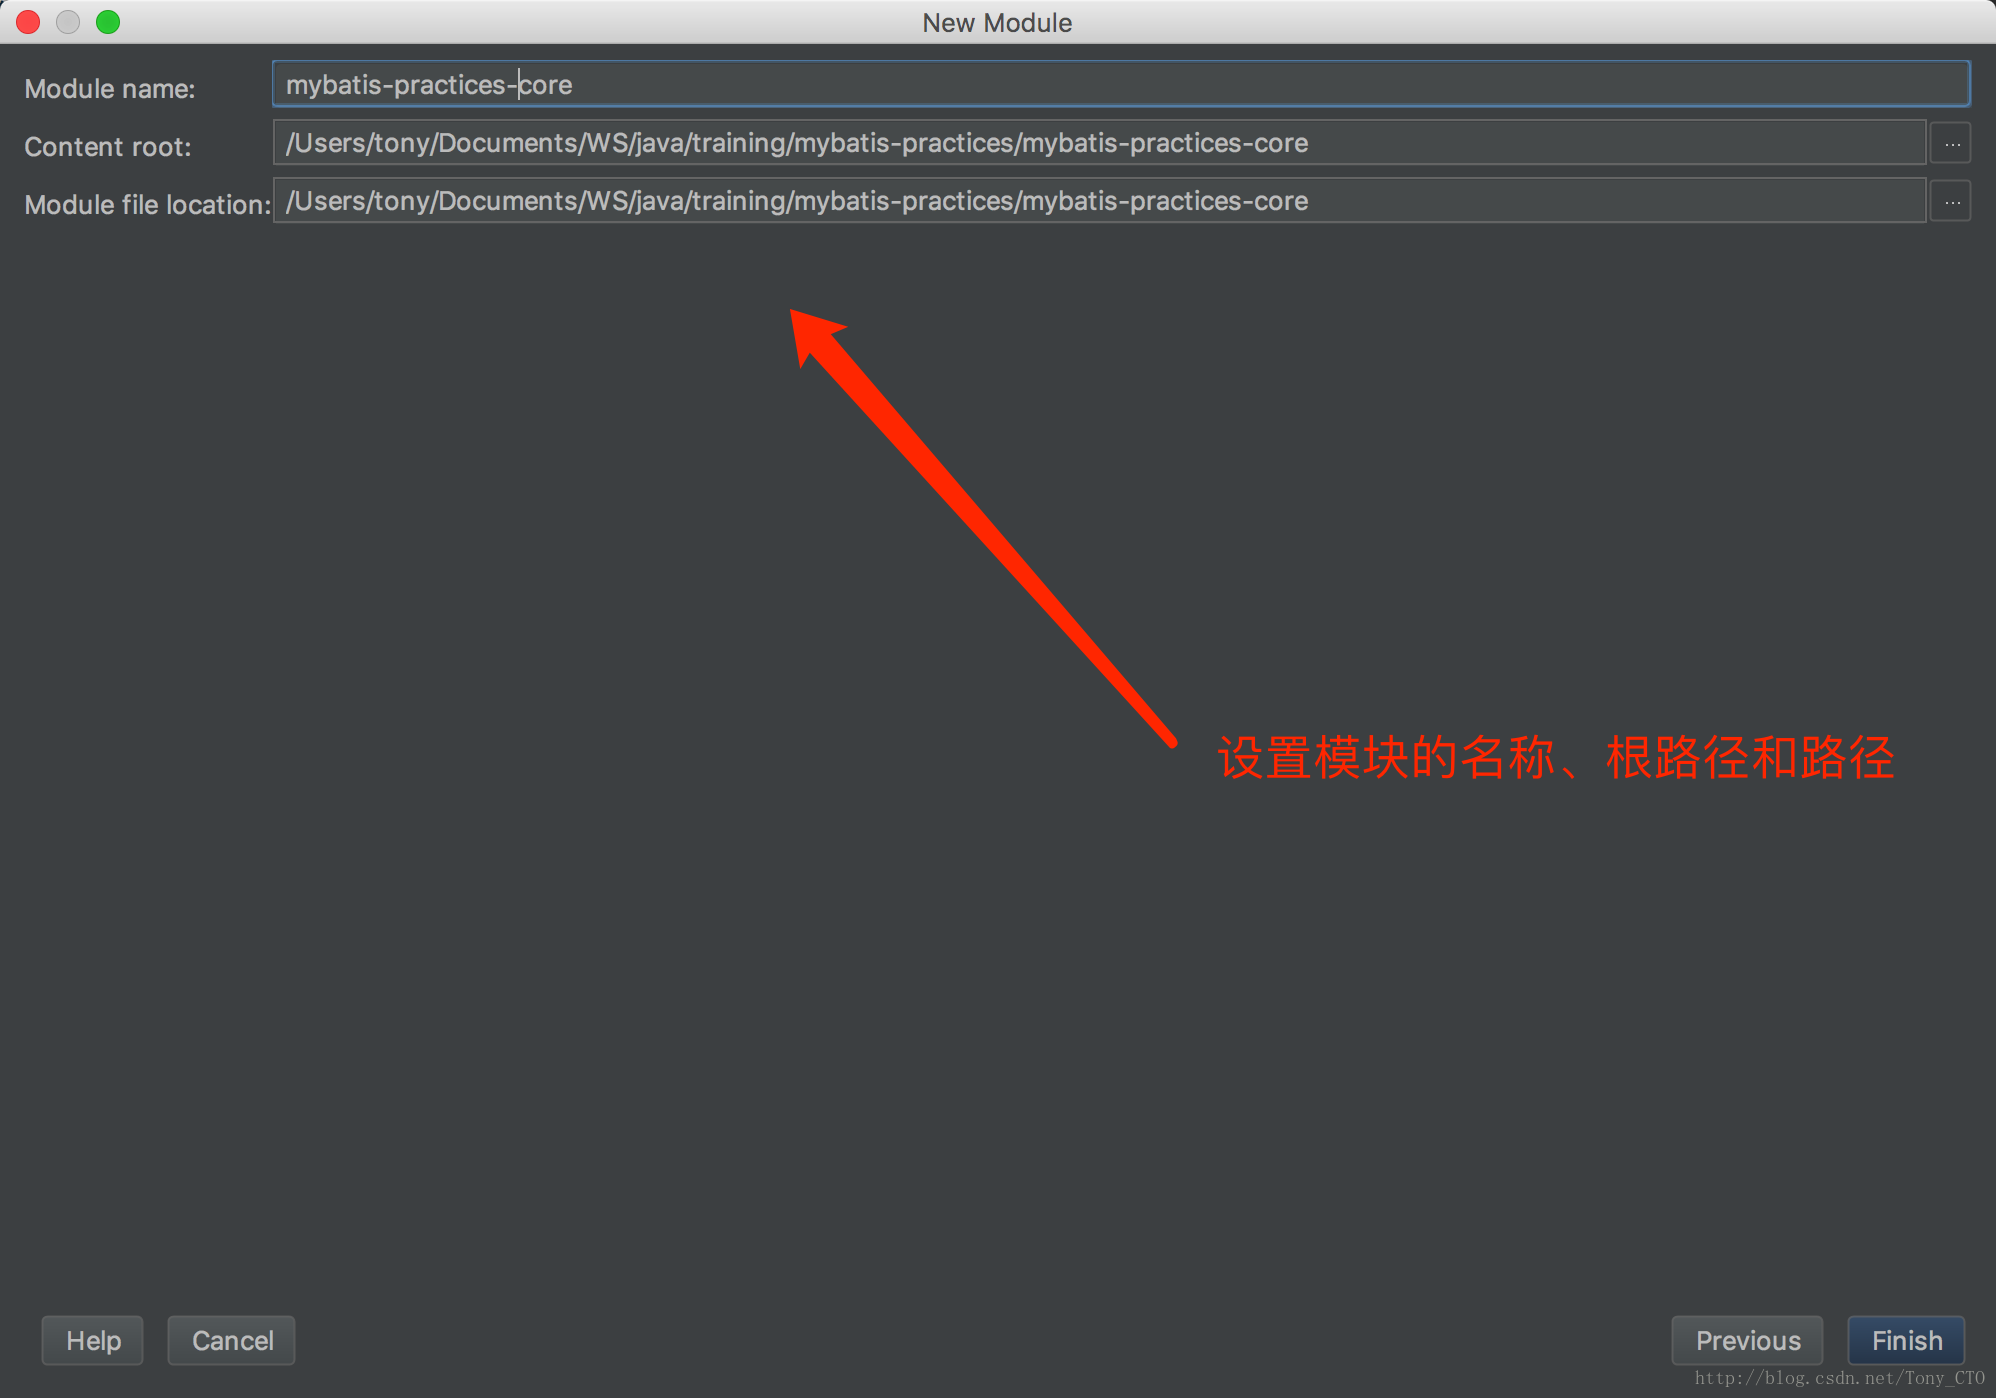
</project>然后再创建名为mybatis-practices-core的模块,具体流程如下所示
1创建新的模块
2 指定JDK和Maven骨架

3 设置模块的坐标
4 设置模块的名称,路径和根路径
5 项目总览
为了解决项目中的.iml和logs等目录不需要提交到代码仓库的问题,这里在项目根路径下添加一个.gitignore文件,凡是在该文件中配置的文件和目录都不会提交到GitHub中,模板的内容如下
/.idea/
*.idea/
*.iml
*logs/
*.log
*.classpath
*.project
*.settings/
*.metadata/
RemoteSystemsTempFiles/
Servers/
*/target/
*.DS_Store
/itfinls/src/main/webapp/js/config.js
/itfinls/logs/
项目分享至GitHub
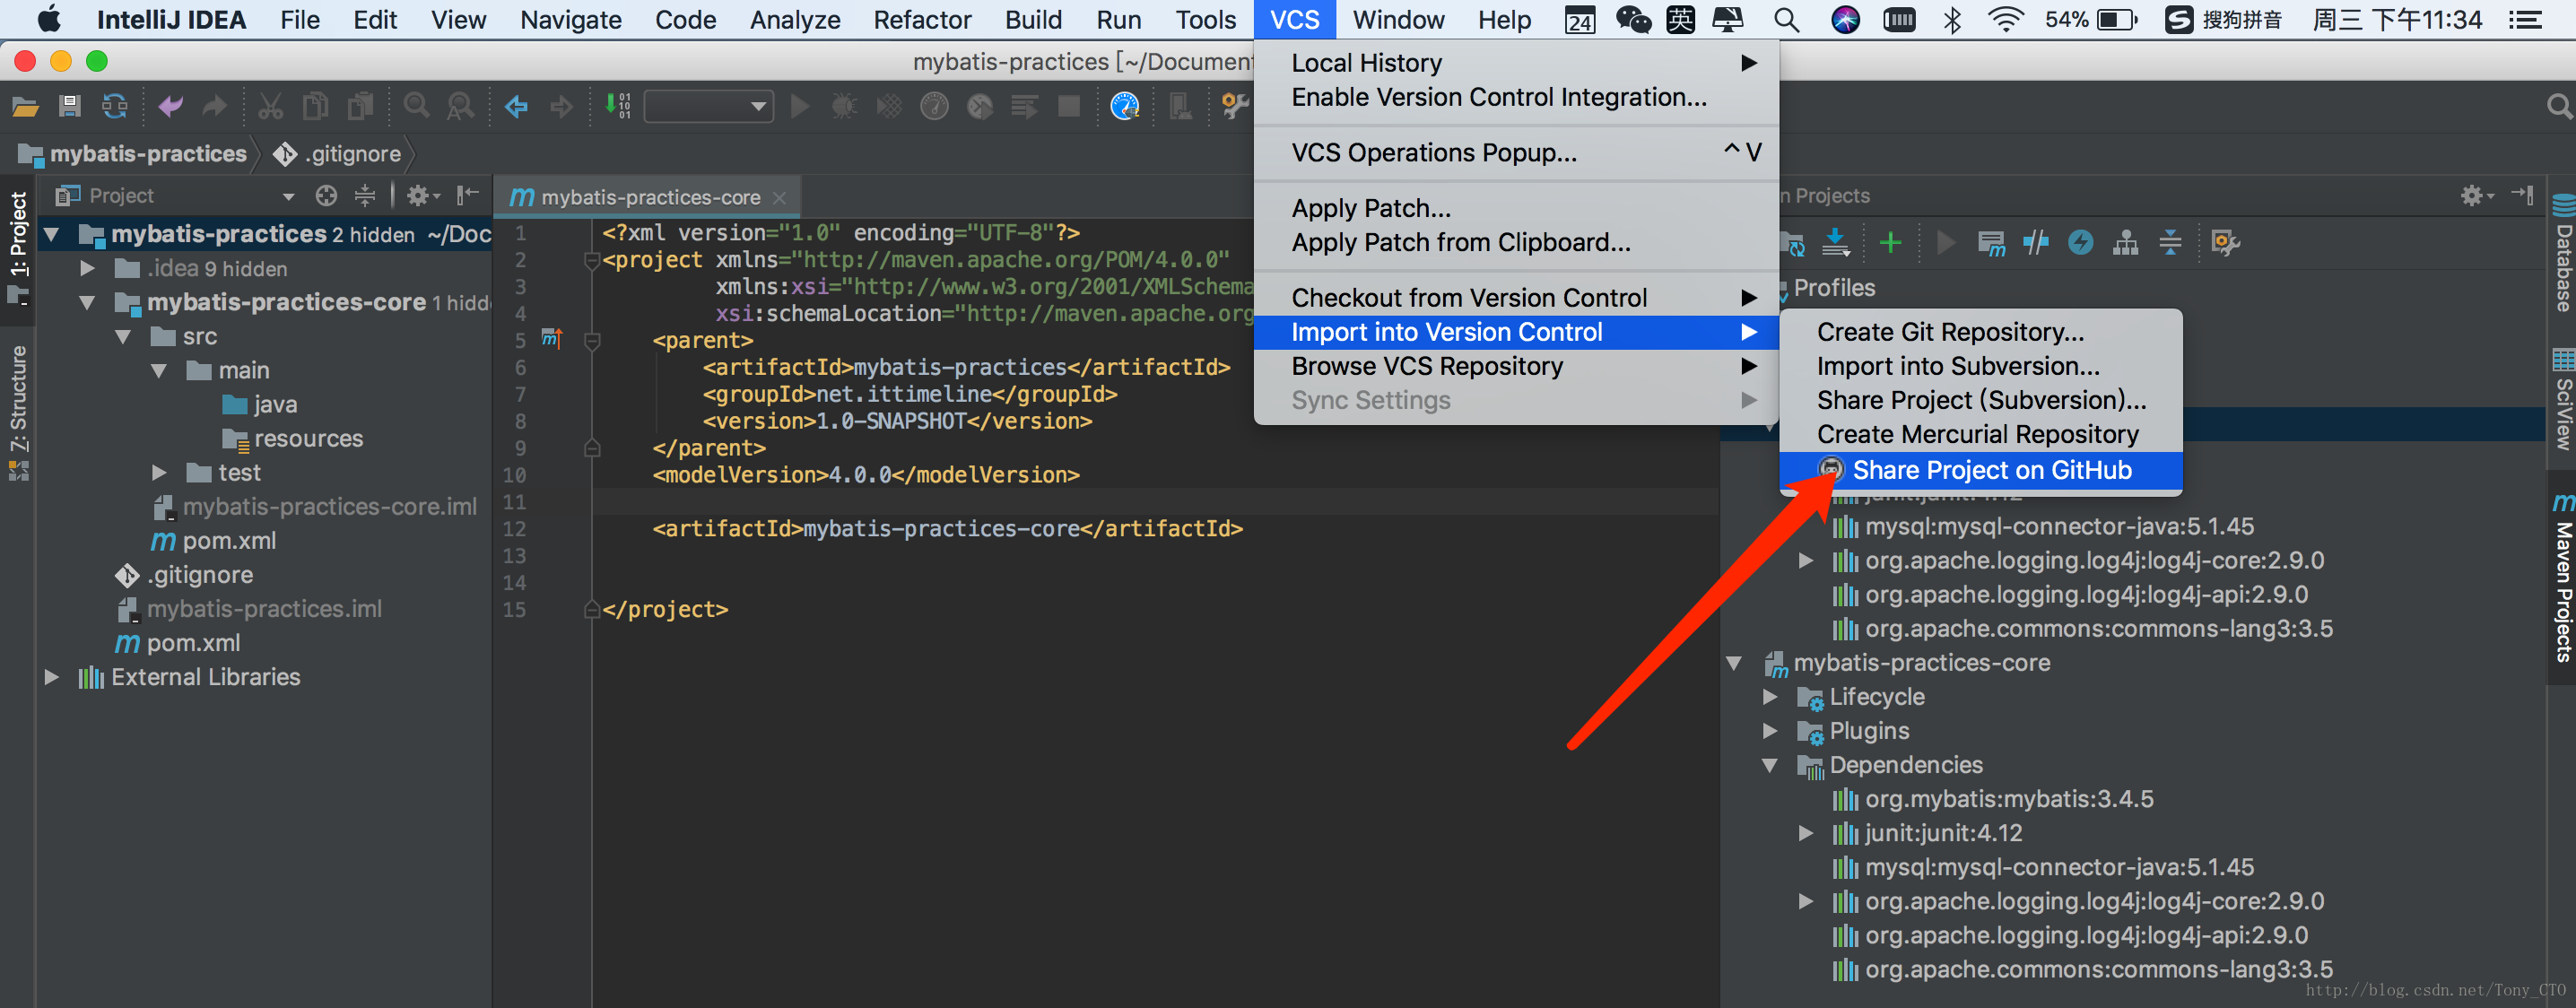
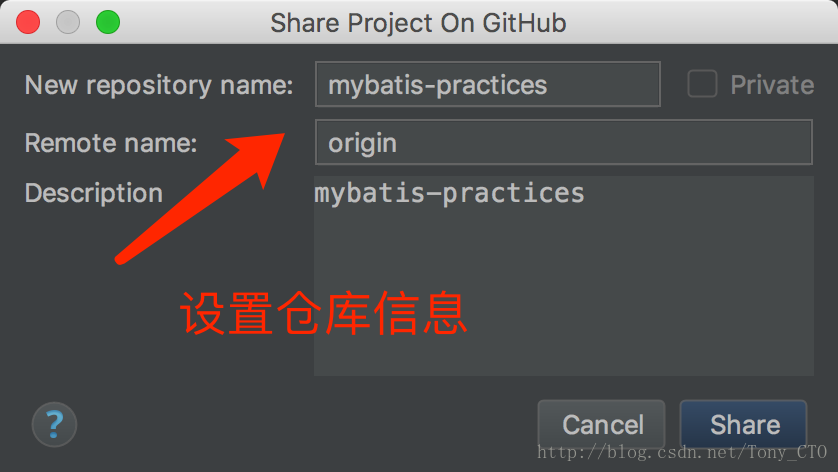
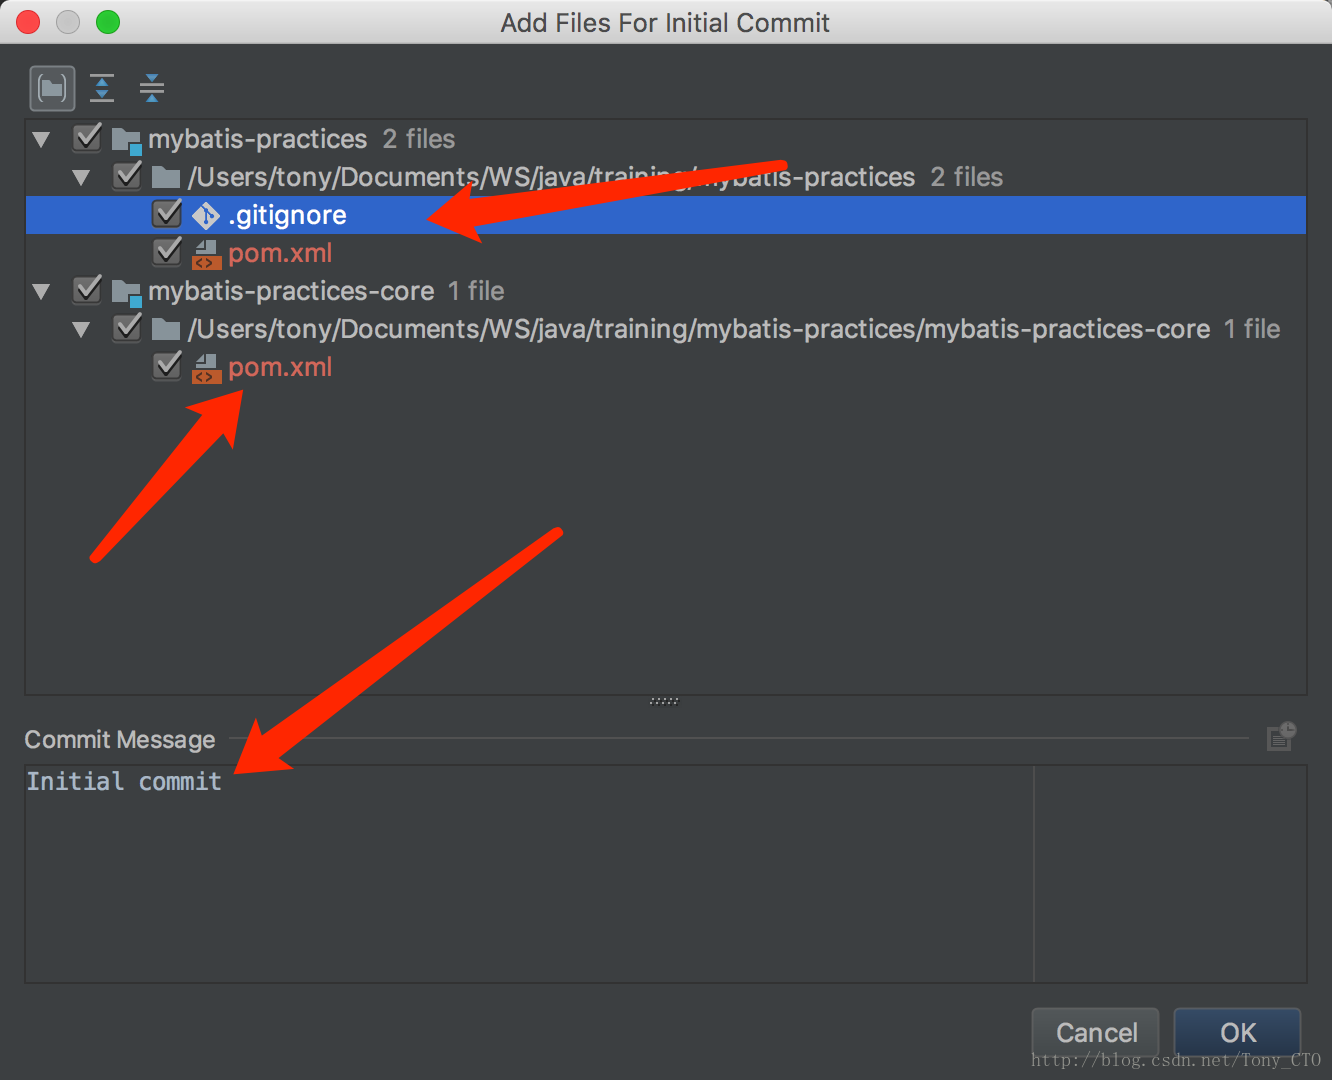
在IntelliJ IDEA中将项目分享至GitHub中也是非常的简单,具体流程如下所示
1 选中项目,并找到Share Project On GitHub
2 设置仓库信息
3 首次提交文件列表
4 访问远程GitHub项目
项目地址: https://github.com/ittimeline/mybatis-practices
只要在浏览器中输入项目地址:便可以访问了,如下图所示
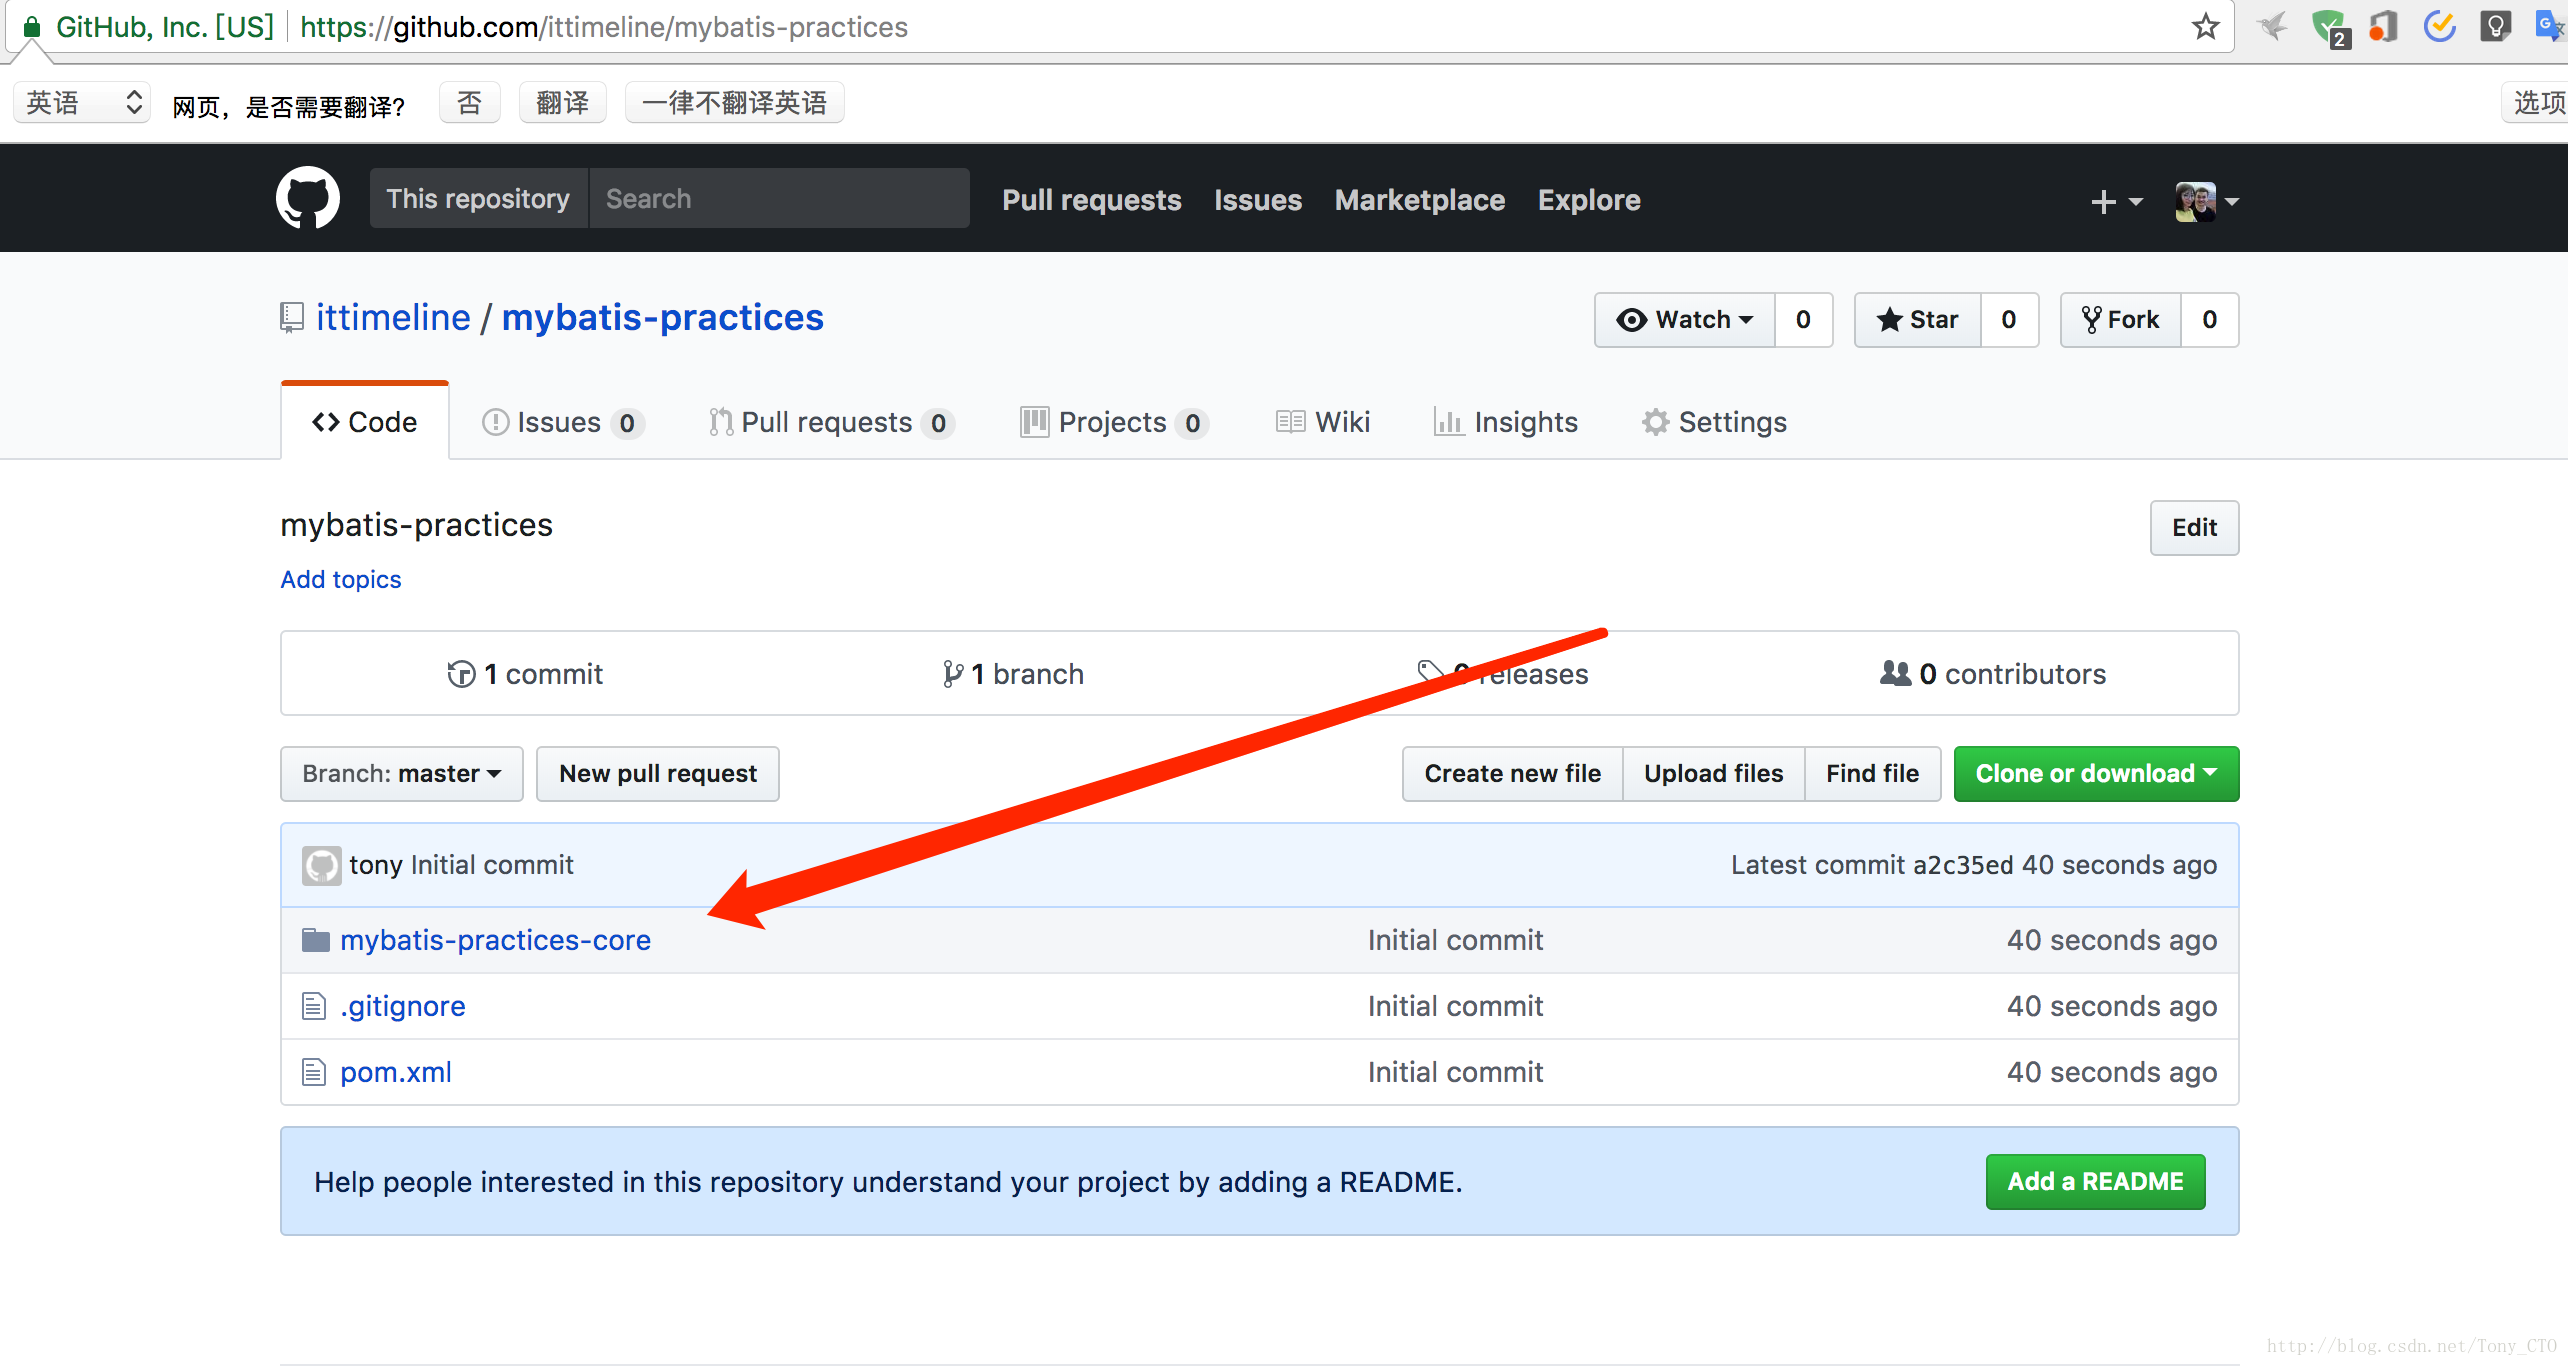
后续所有关于MyBatis的工程实践的代码都会存放到该仓库中。
由JDBC迈向MyBatis
读完本章你将收获以下几点
- JDBC访问数据库的那些痛点
- MyBatis介绍
- 使用MyBatis完成数据库的查询操作
JDBC访问数据库的那些痛点
JDBC是Oracle公司制定的数据库访问接口规范,而具体的实现由各个数据库产商去实现,Java程序员通过JDBC访问数据库,详细实现如下应用程序所示:
首先运行初始化数据的脚本,创建数据库mybatis和表t_country,同时插入5条测试数据,如下所示
drop DATABASE if EXISTS mybatis;
create database if not EXISTS mybatis DEFAULT CHARACTER SET utf8 COLLATE utf8_general_ci;

use mybatis;

create TABLE if not EXISTS t_country(

  country_id BIGINT not null AUTO_INCREMENT,
  country_name VARCHAR(255) NULL ,
  country_code VARCHAR(255),
  PRIMARY KEY (country_id)
);

insert into t_country(country_name,country_code)values('中国','CN'),('美国','US'),('俄罗斯','RU'),('英国','GB'),('法国','FR');

select * from t_country;然后定义数据库配置信息,目前使用的数据库是MySQL5.7.21,主要配置包含数据库的驱动,地址,用户名和密码,如下database.properties文件所示
jdbc.driver=com.mysql.jdbc.Driver
jdbc.url=jdbc:mysql://127.0.0.1:3306/mybatis?useUnicode=true&characterEncoding=UTF-8&useSSL=false
jdbc.username=root
jdbc.password=guanglei
然后定义数据库工具类 DatabaseUtils,主要用于读取datbase.properties的数据库配置然后获取数据库的连接信息,源码如下所示
package net.ittimeline.mybatis.practices.core.utils;

import org.apache.ibatis.io.Resources;

import java.io.IOException;
import java.io.Reader;
import java.sql.Connection;
import java.sql.DriverManager;
import java.sql.SQLException;
import java.util.Properties;

/**
 * 数据库工具类
 * 目前主要用于读取database.properties文件获取数据库连接
 * @author tony [email protected]
 * @date 2018-01-25-上午12:22
 * @website wwww.ittimeline.net
 * @see
 * @since JDK8u162
 */
public class DataBaseUtils {
    /**
     * 通过读取类路径下的database.properties文件获取数据库连接信息
     * @return
     */
    public static Connection getConnection() throws IOException, SQLException, ClassNotFoundException {


        Properties properties=new Properties();

        try(

                Reader reader= Resources.getResourceAsReader("database.properties");
        )
        {
            properties.load(reader);
        }


        String drivers=properties.getProperty("jdbc.driver");
        //加载驱动
        Class.forName(drivers);

        String url=properties.getProperty("jdbc.url");
        String username=properties.getProperty("jdbc.username");
        String password=properties.getProperty("jdbc.password");

        //建立连接
        return DriverManager.getConnection(url,username,password);

    }
}
然后编写JDBC代码实现访问数据库,实现通过ID获取指定的国家信息
package net.ittimeline.mybatis.practices.core.jdbc;

import net.ittimeline.mybatis.practices.core.entity.Country;
import net.ittimeline.mybatis.practices.core.utils.DataBaseUtils;
import org.apache.logging.log4j.LogManager;
import org.apache.logging.log4j.Logger;
import org.junit.Test;

import java.io.IOException;
import java.sql.Connection;
import java.sql.PreparedStatement;
import java.sql.ResultSet;
import java.sql.SQLException;
import java.util.ArrayList;
import java.util.List;

/**
 * @author tony [email protected]
 * @date 2018-01-25-上午12:24
 * @website wwww.ittimeline.net
 * @see
 * @since JDK8u162
 */
public class CountryDaoTest {

    private static final Logger LOGGER = LogManager.getLogger();


    /**
     * 定义SQL语句,?表示占位符
     */
    private static final String sql ="select country_id,country_name,country_code from t_country where country_id = ?";


    /**
     * 根据ID获取国家信息
     */
    @Test
    public void testGetCountryById() {

        //使用JDK7的新特性 自动关闭资源的try语句
        try (
                //获取数据库连接
                Connection connection = DataBaseUtils.getConnection();

                //创建PreparedStatement对象 预编译SQL 提高执行效率
                /*
                 * 相比Statement接口而言
                 * 创建PreparedStatement对象时SQL语句可以使用占位符,当SQL语句需要使用参数时,无需要拼接SQL字符串
                 * 而且PreparedStatement可以防止SQL注入,
                 * PreparedStatement预编译SQL语句,性能比Statement更好
                 *
                 **/
                PreparedStatement preparedStatement = connection.prepareStatement(sql)

        ) {

            preparedStatement.setLong(1,1L);


            try (

                    //执行查询的SQL语句并获取结果集
                    ResultSet resultSet = preparedStatement.executeQuery()

            ) {
                List<Country> countryList = new ArrayList<>();

                //遍历结果集,将查询到的数据封装到countryList对象中
                while (resultSet.next()) {

                    Country country = new Country();
                    country.setCountryId(resultSet.getLong("country_id"));
                    country.setCountryName(resultSet.getString("country_name"));
                    country.setCountryCode(resultSet.getString("country_code"));

                    countryList.add(country);
                }

                LOGGER.info("通过JDBC获取国家信息列表的结果是" + countryList);

            }


        } catch (IOException | ClassNotFoundException | SQLException exception) {

            exception.printStackTrace();

            LOGGER.error("使用JDBC访问MySQL数据库操作失败" + exception);
        }


    }

}
通过以上繁琐的步骤,就实现了JDBC访问MySQL数据库获取t_country表中根据指定的ID的国家信息。
首先总结下JDBC访问数据库的流程
- 加载驱动
- 通过读取数据库配置建立连接
- 定义SQL语句并设置参数
- 执行SQL语句并获取结果集
- 结果集转换
从以上流程分析JDBC的痛点以及改善方法
- 建立连接没有复用,影响性能,可以通过使用数据库连接池(Druid,DBCP2等等)管理数据库连接,提高数据库性能
- 硬编码SQL语句以及向PreparedStatement设置参数,一旦修改需要重新编译,可以将SQL语句以及参数写在XML配置文件中,那样即使修改SQL也无需重新编译原码
- 结果集转换,可以将结果集转换自动映射成Java对象
MyBatis介绍
MyBatis是一款优秀开源的Java持久层框架,解决了JDBC编程操作关系型数据库(例如MySQL,Oracle)的一些弊端,例如需要手动处理数据库的连接和关闭,处理JDBC底层事务,以及结果集的转换。
而MyBatis封装JDBC底层代码,通过使用XML或者注解的方式进行配置和映射,通过将参数映射到配置的SQL形成最终执行的SQL语句,最后将执行SQL的返回结果映射成Java对象返回。同时MyBatis允许用户充分利用数据库的各种功能,例如存储过程,视图、各种复杂的查询以及某种数据库的专有特性。
目前MyBatis是托管在著名的开源站点GitHub,项目地址是https://github.com/mybatis,可以通过访问该站点获取更多关于MyBatis信息。
使用MyBatis访问数据库
本章节的代码都位于mybatis-practices-core模块中
添加log4j2的配置
在模块mybatis-practices-core的src/main/reources目录中添加log4j2.xml,主要用于日志在控制台输出,文件的存储以及归档,同时配置了MyBatis在控制台中输出SQL语句,完整的配置如下所示
<?xml version="1.0" encoding="UTF-8"?>
<!--设置log4j2的自身log级别为warn -->
<configuration status="warn">
    <properties>

        <Property name="app_name">mybatis-practices-core</Property>
        <Property name="log_path">logs/${app_name}</Property>
        <Property name="log_file_size">100MB</Property>

    </properties>
    <appenders>
        <console name="Console" target="SYSTEM_OUT">
            <PatternLayout pattern="[%d][%t][%p][%l] %m%n" />
        </console>

        <RollingFile name="RollingFileInfo" fileName="${log_path}/info.log"
                     filePattern="${log_path}/$${date:yyyy-MM}/info-%d{yyyy-MM-dd}-%i.log.gz">
            <Filters>
                <ThresholdFilter level="INFO" />
                <ThresholdFilter level="WARN" onMatch="DENY"
                                 onMismatch="NEUTRAL" />
            </Filters>
            <PatternLayout pattern="[%d][%t][%p][%c:%L] %m%n" />
            <Policies>
                <!-- 归档每天的文件 -->
                <TimeBasedTriggeringPolicy interval="1" modulate="true" />
                <!-- 限制单个文件大小 -->
                <SizeBasedTriggeringPolicy size="${log_file_size}" />
            </Policies>
            <!-- 限制每天文件个数 -->
            <DefaultRolloverStrategy compressionLevel="0" max="10"/>
        </RollingFile>

        <RollingFile name="RollingFileWarn" fileName="${log_path}/warn.log"
                     filePattern="${log_path}/$${date:yyyy-MM}/warn-%d{yyyy-MM-dd}-%i.log.gz">
            <Filters>
                <ThresholdFilter level="WARN" />
                <ThresholdFilter level="ERROR" onMatch="DENY"
                                 onMismatch="NEUTRAL" />
            </Filters>
            <PatternLayout pattern="[%d][%t][%p][%c:%L] %m%n" />
            <Policies>
                <!-- 归档每天的文件 -->
                <TimeBasedTriggeringPolicy interval="1" modulate="true" />
                <!-- 限制单个文件大小 -->
                <SizeBasedTriggeringPolicy size="${log_file_size}" />
            </Policies>
            <!-- 限制每天文件个数 -->
            <DefaultRolloverStrategy compressionLevel="0" max="10"/>
        </RollingFile>

        <RollingFile name="RollingFileError" fileName="${log_path}/error.log"
                     filePattern="${log_path}/$${date:yyyy-MM}/error-%d{yyyy-MM-dd}-%i.log.gz">
            <ThresholdFilter level="ERROR" />
            <PatternLayout pattern="[%d][%t][%p][%c:%L] %m%n" />
            <Policies>
                <!-- 归档每天的文件 -->
                <TimeBasedTriggeringPolicy interval="1" modulate="true" />
                <!-- 限制单个文件大小 -->
                <SizeBasedTriggeringPolicy size="${log_file_size}" />
            </Policies>
            <!-- 限制每天文件个数 -->
            <DefaultRolloverStrategy compressionLevel="0" max="10"/>
        </RollingFile>

    </appenders>

    <loggers>
        <logger name="org.springframework" level="INFO"/>
        <logger name ="org.ibatis" level="info"/>

        <!-- MyBatis集成log4j2将SQL输出到控制台-->
        <logger name="net.ittimeline.mybatis.mapper" level="TRACE" additivity="false">
            <AppenderRef ref="Console"/>
        </logger>

        <root level="info">
            <appender-ref ref="Console" />
            <appender-ref ref="RollingFileInfo" />
            <appender-ref ref="RollingFileWarn" />
            <appender-ref ref="RollingFileError" />
        </root>

    </loggers>

</configuration>
添加MyBatis配置文件mybatis-config.xml
在编写具体的MyBatis代码之前还要配置mybatis-config.xml,该文件主要用于日志框架实现,类型别名以及配置数据库、事务信息,完整的配置文件如下所示
<?xml version="1.0" encoding="UTF-8" ?>
<!DOCTYPE configuration
PUBLIC "-//mybatis.org//DTD Config 3.0//EN"
"http://mybatis.org/dtd/mybatis-3-config.dtd">
<configuration>
<!-- 采用log4j2作为日志框架的实现-->
<settings>
<setting name="logImpl" value="LOG4J2"/>
</settings>
<!--
配置包的别名:在MyBatis中要大量使用类的全限定名例如net.ittimeline.mybatis.model.Country,为了方便使用Country,配置如下所示的包
这样在使用类的时候不需要全限定名,只需要写Country即可
-->
<typeAliases>
<package name="net.ittimeline.mybatis.practices.core.entity"/>
</typeAliases>
<!--配置数据库连接信息 -->
<environments default="development">
<environment id="development">
<transactionManager type="JDBC"></transactionManager>
<dataSource type="POOLED">
<property name="driver" value="com.mysql.jdbc.Driver"/>
<property name="url" value="jdbc:mysql://127.0.0.1:3306/mybatis?useUnicode=true&characterEncoding=UTF-8&useSSL=false"/>
<property name="username" value="root"/>
<property name="password" value="guanglei"/>
</dataSource>
</environment>
</environments>
<!-- 指定MyBatis的SQL语句和映射配置文件-->
<mappers>
<mapper resource="mapper/CountryMapper.xml"/>
</mappers>
</configuration>接下来就可以定义实体类,Mapper映射文件和Mapper接口了。
定义实体类Country
Country类主要是用来封装查询结果,主要包含了countryId,countryName,countryCode三个成员变量,注意这里的成员变量名和之前创建的t_country表的字段名字并不一样,完整的Country类如下所示
package net.ittimeline.mybatis.practices.core.entity;

import org.apache.commons.lang3.builder.ToStringBuilder;

/**
 * 国家实体类
 * @author tony [email protected]
 * @date 2018-01-25-上午12:03
 * @website wwww.ittimeline.net
 * @see
 * @since JDK8u162
 */
public class Country {
    private Long countryId;

    private String countryName;

    private String countryCode;


    public Long getCountryId() {
        return countryId;
    }

    public void setCountryId(Long countryId) {
        this.countryId = countryId;
    }

    public String getCountryName() {
        return countryName;
    }

    public void setCountryName(String countryName) {
        this.countryName = countryName;
    }

    public String getCountryCode() {
        return countryCode;
    }

    public void setCountryCode(String countryCode) {
        this.countryCode = countryCode;
    }


    @Override
    public String toString() {
        return new ToStringBuilder(this)
                .append("countryId", countryId)
                .append("countryName", countryName)
                .append("countryCode", countryCode)
                .toString();
    }
}
定义Mapper映射文件CountryMapper.xml
CountryMapper.xml文件中主要包含了id为selectAll和selectById的 两个查询语句
之前Country类中定义了和数据库表的字段不同的成员变量,这里在编写SQL语句时使用了别名,完成成员变量名到数据库字表段的映射,如果不使用别名,查询出来的结果将会是null。
<?xml version="1.0" encoding="UTF-8"?>
        <!DOCTYPE mapper PUBLIC "-//mybatis.org//DTD Mapper 3.0//EN" "http://mybatis.org/dtd/mybatis-3-mapper.dtd">

<mapper namespace="net.ittimeline.mybatis.practices.core.mapper.CountryMapper">

    <!-- SQL 获取所有的国家集合-->
    <!--
        id定义了该查询的唯一ID
        resultType:定义当前查询的返回类型,此处就是指Country,之前在mybatis-config.xml中配置的typeAliases主要用于这里,
        如果没有配置就要写成net.ittimeline.mybatis.practices.core.entity.Country

    -->
    <select id="selectAll" resultType="Country">
        select  country_id as countryId,country_name as countryName, country_code as countryCode from t_country
    </select>

    <!-- SQL 根据ID获取国家信息-->
    <select id="selectById" resultType="Country">

        select  country_id as countryId,country_name as countryName, country_code as countryCode from t_country WHERE country_id=#{id} ;
    </select>

</mapper>
定义Mapper接口CountryMapper.java
CountryMapper接口主要包含了最常用的selectAll()和selectById()两个查询方法,如下所示
package net.ittimeline.mybatis.practices.core.mapper;

import net.ittimeline.mybatis.practices.core.entity.Country;

import java.util.List;

/**
 * @author tony [email protected]
 * @date 2018-01-25-上午12:05
 * @website wwww.ittimeline.net
 * @see
 * @since JDK8u162
 */
public interface CountryMapper {


    /**
     * 根据ID获取国家信息
     * @param countryId
     * @return
     */
    Country selectById(Long countryId);


    /**
     * 获取所有的国家集合
     * @return
     */
    List<Country> selectAll();
}
编写测试用例
为了后面更加方便的编写测试用例,这里实现测试基类,主要用于读取mybatis-config.xml文件创建SqlSessionFactory对象,因为
MyBatis操作数据库都要依赖SqlSessionFactory.openSession()方法获取SqlSession对象后操作。完整的源码实现如下所示
package net.ittimeline.mybatis.practices.core.mybatis;

import org.apache.ibatis.io.Resources;
import org.apache.ibatis.session.SqlSession;
import org.apache.ibatis.session.SqlSessionFactory;
import org.apache.ibatis.session.SqlSessionFactoryBuilder;
import org.apache.logging.log4j.LogManager;
import org.apache.logging.log4j.Logger;
import org.junit.BeforeClass;

import java.io.IOException;
import java.io.Reader;

/**
 * @author tony [email protected]
 * @date 2018-01-25-上午12:35
 * @website wwww.ittimeline.net
 * @see
 * @since JDK8u162
 */
public abstract class BaseMappperTest {
    private static final Logger logger = LogManager.getLogger();


    /**
     * SqlSessionFactory一旦创建就应该在运行期间一直存在,没有任何理由对它进行清除或者重建,使用SqlSessionFactory的最佳实践
     * 是在运行期间不要重复创建多次。
     */
    private static SqlSessionFactory sqlSessionFactory;

    /**
     *
     */
    @BeforeClass
    public static void init(){

        try(
                //读取mybatis配置文件
                Reader reader= Resources.getResourceAsReader("mybatis-config.xml");
        ) {

            sqlSessionFactory=new SqlSessionFactoryBuilder().build(reader);
        } catch (IOException e) {
            e.printStackTrace();

            logger.error("读取mybatis配置文件错误",e);
        }

    }

    /**
     * 获取SqlSession
     * SqlSession的实例不是线程安全的,因此不能线程共享,它的最佳作用于是请求或者是方法方法作用域
     * 决不能将SqlSession实例的引用放在一个类的静态域,甚至一个类的实例变量也不行
     * @return
     */
    public SqlSession getSqlSession(){

        return sqlSessionFactory.openSession();
    }
}
测试用例
package net.ittimeline.mybatis.practices.core.mybatis;

import net.ittimeline.mybatis.practices.core.entity.Country;
import net.ittimeline.mybatis.practices.core.mapper.CountryMapper;
import org.apache.commons.collections4.CollectionUtils;
import org.apache.ibatis.session.SqlSession;
import org.apache.logging.log4j.LogManager;
import org.apache.logging.log4j.Logger;
import org.junit.Test;

import java.util.List;

/**
 * @author tony [email protected]
 * @date 2018-01-25-上午12:37
 * @website wwww.ittimeline.net
 * @see
 * @since JDK8u162
 */
public class CountryMapperTest extends  BaseMappperTest {
    private static final Logger logger = LogManager.getLogger();


    /**
     * 获取所有的国家列表
     */
    @Test
    public  void testSelectAll(){

        try(SqlSession sqlSession=getSqlSession();

        ){
            CountryMapper countryMapper=sqlSession.getMapper(CountryMapper.class);

            List<Country> countryList=countryMapper.selectAll();

            if(CollectionUtils.isNotEmpty(countryList)){
                logger.info("从数据库中获取国家列表"+countryList);

            }

        }


    }


    /**
     * 根据ID获取国家信息
     */
    @Test
    public void testSelectGetById(){
        try(SqlSession sqlSession=getSqlSession()){
            CountryMapper countryMapper=sqlSession.getMapper(CountryMapper.class);

            Country country=countryMapper.selectById(1L);

            if(null!=country){
                logger.info("根据指定的ID获取国家信息"+country);

            }

        }
    }

}
相信到这里大家应该明白MyBatis带来的好处了,而且在企业开发中几乎不会使用纯JDBC来访问数据库,常用的解决方案有MBatis和Spring-Data-JPA,后续文章会详细介绍其应用和源码分析。
项目地址:https://github.com/ittimeline/mybatis-practices
集成P6Spy显示Java应用执行的真正SQL
在应用程序开发过程中,为了方便调试,通常都需要知道在DAO层程序执行的SQL是什么,而P6spy这个组件正是提供了该功能。
p6spy项目地址:https://github.com/p6spy/p6spy
接下来将详细介绍P6Spy的详细使用。
首先添加P6Spy和阿里巴巴数据库连接池Druid的依赖,pom.xml文件的内容如下
<properties>
        <p6spy.version>3.6.0</p6spy.version>
        <druid.version>1.1.6</druid.version>
    </properties>

  <dependency>
            <groupId>p6spy</groupId>
            <artifactId>p6spy</artifactId>
            <version>${p6spy.version}</version>
        </dependency>

        <dependency>
            <groupId>com.alibaba</groupId>
            <artifactId>druid</artifactId>
            <version>${druid.version}</version>
        </dependency>
然后将p6spy的配置文件spy.properties放置项目的src/main/resources目录下,该文件只需要修改logfile,logMessageFormat,dateformat属性即可,如下图所示:
logfile=mybatis-practices-core.log
logMessageFormat= net.ittimeline.mybatis.practices.core.p6spy.CustomizeLineFormat
dateformat=yyyy-MM-dd HH:mm:ss
完整的spy.properties文件已经在mybatis-practice-core工程中给出,仅供参考。
然后实现自定义的SQL输出格式
为了输出的内容足够的简洁,这里只保留了当前时间,执行SQL的耗时以及执行的SQL语句,具体实现如下所示
package net.ittimeline.mybatis.practices.core.p6spy;

import com.alibaba.druid.sql.SQLUtils;
import com.p6spy.engine.spy.appender.MessageFormattingStrategy;

/**
 * @author tony [email protected]
 * @date 2018-01-30-下午10:45
 * @website wwww.ittimeline.net
 * @see
 * @since JDK8u162
 */
public class CustomizeLineFormat implements MessageFormattingStrategy {

    public String buildMessage(String now, long elapsed, String sql) {
        StringBuffer content = new StringBuffer();
        if (org.apache.commons.lang3.StringUtils.isNotEmpty(now) && org.apache.commons.lang3.StringUtils.isNotEmpty(Long.valueOf(elapsed).toString())
                && org.apache.commons.lang3.StringUtils.isNotEmpty(sql)) {
            content.append("当前时间:" + now);
            content.append(" SQL执行耗时(毫秒)为" + elapsed);
            content.append(" SQL执行的语句是\n" + SQLUtils.formatMySql(sql)+"\n\n");
        }
        return content.toString();
    }

    @Override
    public String formatMessage(int connectionId, String now, long elapsed, String category, String prepared, String sql) {
        return buildMessage(now, elapsed, sql);
    }

}
然后增加一个database.properties文件,配置内容如下
和传统的jdbc配置相比,不同之处在于驱动类和连接地址的配置。
jdbc.driver=com.p6spy.engine.spy.P6SpyDriver
jdbc.url=jdbc:p6spy:mysql://127.0.0.1:3306/mybatis?useUnicode=true&characterEncoding=UTF-8&useSSL=false
jdbc.username=root
jdbc.password=guanglei而mybatis-config.xml文件中只需要增加一行配置<properties resource="database.properties"/>,然后就可以采用${属性名}的方式获取数据库配置了,配置如下所示
<?xml version="1.0" encoding="UTF-8" ?>
<!DOCTYPE configuration
        PUBLIC "-//mybatis.org//DTD Config 3.0//EN"
        "http://mybatis.org/dtd/mybatis-3-config.dtd">
<configuration>


    <properties resource="database.properties"/>
    <!-- 采用log4j2作为日志框架的实现-->
    <settings>
        <setting name="logImpl" value="LOG4J2"/>
    </settings>

    <!--
    配置包的别名:在MyBatis中要大量使用类的全限定名例如net.ittimeline.mybatis.model.Country,为了方便使用Country,配置如下所示的包
    这样在使用类的时候不需要全限定名,只需要写Country即可
    -->
    <typeAliases>
        <package name="net.ittimeline.mybatis.practices.core.entity"/>
    </typeAliases>


    <!--配置数据库连接信息 -->
    <environments default="development">
        <environment id="development">
            <transactionManager type="JDBC"></transactionManager>
            <dataSource type="POOLED">
                <property name="driver" value="${jdbc.driver}"/>
                <property name="url" value="${jdbc.url}"/>
                <property name="username" value="${jdbc.username}"/>
                <property name="password" value="${jdbc.password}"/>
            </dataSource>
        </environment>
    </environments>

    <!-- 指定MyBatis的SQL语句和映射配置文件-->
    <mappers>
        <mapper resource="mapper/CountryMapper.xml"/>
    </mappers>
</configuration>
然后运行CountryMapperTest.selectAll()方法,会发现在mybatis-practices-core模块的根路径下存在一个mybatis-practices-core.log的文件,内容如下
当前时间:2018-01-30 23:03:07 SQL执行耗时(毫秒)为0 SQL执行的语句是

SELECT
 country_id
AS
 countryId, country_name
AS
 countryName, country_code
AS
 countryCode

FROM
t_country本文的项目地址:https://github.com/ittimeline/mybatis-practices/tree/master/mybatis-practices-core
基于JavaConfig实现Spring5集成MyBatis3
工程模块划分
目前在企业应用开发中为了能够更加方便开发、测试和部署,通常都会根据不同的业务以及功能来把项目划分为多个模块,这里在实现Spring5集成MyBaits3之前先划分下项目模块,模块名称及其说明如下所示
| 模块名称 | 模块说明 |
|---|---|
| mybatis-practices-pojo | 存放项目开发中的各种POJO对象 |
| mybatis-practices-utils | 存放项目开发中的各种第三方工具类 |
| mybatis-practices-spring5-integration | 基于javaconfig实现Spring5集成Mybatis3 |
| mybatis-practices-common | 存放项目中常用的通用工具 |
项目依赖说明
mybatis-practices-spring5-integration模块依赖总览图如下所示
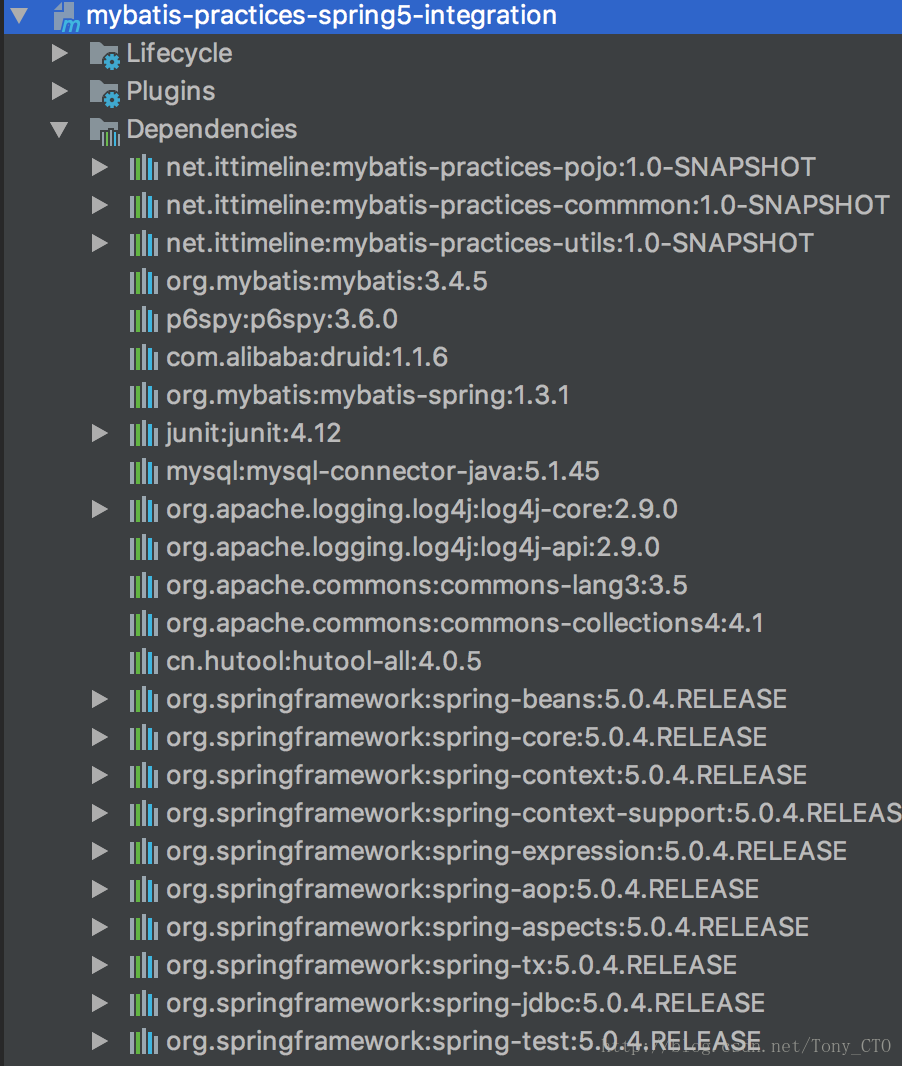
主要包含了mybatis-practices-pojo,mybatis-practices-utils,mybatis-practices-common三个基础模块,mybatis,spring集成相关依赖以及常用工具包的依赖,详细的依赖说明可以参考mybatis-practices的pom.xml文件中的描述。
集成Log4j2完成日志记录
首先添加Log4j2的依赖,pom.xml文件内容如下
    <properties>
        <log4j2.version>2.9.0</log4j2.version>
    </properties>

  <dependency>
            <groupId>org.apache.logging.log4j</groupId>
            <artifactId>log4j-core</artifactId>
            <version>${log4j2.version}</version>
        </dependency>

        <dependency>
            <groupId>org.apache.logging.log4j</groupId>
            <artifactId>log4j-api</artifactId>
            <version>${log4j2.version}</version>
        </dependency>
然后在模块mybatis-practices-spring5-integration的src/main/resources目录下添加log4j2的配置文件log4j2.xml,实现如下
<?xml version="1.0" encoding="UTF-8"?>
<!--设置log4j2的自身log级别为warn -->
<configuration status="warn" monitorInterval="3600" shutdownHook="disable">
    <properties>

        <Property name="app_name">mybatis-practices-spring5-integration</Property>
        <Property name="log_path">logs/${app_name}</Property>
        <Property name="log_file_size">100MB</Property>

    </properties>
    <appenders>
        <!--
          Console 的target是SYSTEM_OUT是输出到统一的输出流,没有指定日志文件
          配置文件log4j2.xml 中的<Console name="Console" target="SYSTEM_OUT">表示 log4j2将日志配置到System.out输入到控制到输出流。
      -->
        <console name="Console" target="SYSTEM_OUT">
            <PatternLayout pattern="[%d{yyyy-MM-dd HH:mm:ss SSS}][%t][%p][%l] %m%n" />
        </console>


        <!--info级别的日志记录配置-->

        <RollingFile name="RollingFileInfo" fileName="${log_path}/info.log"
                     filePattern="${log_path}/$${date:yyyy-MM}/info-%d{yyyy-MM-dd}-%i.log.gz">
            <Filters>
                <ThresholdFilter level="INFO" />
                <ThresholdFilter level="WARN" onMatch="DENY"
                                 onMismatch="NEUTRAL" />
            </Filters>
            <PatternLayout pattern="[%d%d{yyyy-MM-dd HH:mm:ss SSS}][%t][%p][%c:%L] %m%n" />
            <Policies>
                <!-- 归档每天的文件 -->
                <TimeBasedTriggeringPolicy interval="1" modulate="true" />
                <!-- 限制单个文件大小 -->
                <SizeBasedTriggeringPolicy size="${log_file_size}" />
            </Policies>
            <!-- 限制每天文件个数 -->
            <DefaultRolloverStrategy compressionLevel="0" max="10"/>
        </RollingFile>

        <!--warn级别的日志记录配置-->
        <RollingFile name="RollingFileWarn" fileName="${log_path}/warn.log"
                     filePattern="${log_path}/$${date:yyyy-MM}/warn-%d{yyyy-MM-dd}-%i.log.gz">
            <Filters>
                <ThresholdFilter level="WARN" />
                <ThresholdFilter level="ERROR" onMatch="DENY"
                                 onMismatch="NEUTRAL" />
            </Filters>
            <PatternLayout pattern="[%d%d{yyyy-MM-dd HH:mm:ss SSS}][%t][%p][%c:%L] %m%n" />
            <Policies>
                <!-- 归档每天的文件 -->
                <TimeBasedTriggeringPolicy interval="1" modulate="true" />
                <!-- 限制单个文件大小 -->
                <SizeBasedTriggeringPolicy size="${log_file_size}" />
            </Policies>
            <!-- 限制每天文件个数 -->
            <DefaultRolloverStrategy compressionLevel="0" max="10"/>
        </RollingFile>

        <!-- error级别的日志配置-->
        <RollingFile name="RollingFileError" fileName="${log_path}/error.log"
                     filePattern="${log_path}/$${date:yyyy-MM}/error-%d{yyyy-MM-dd}-%i.log.gz">
            <ThresholdFilter level="ERROR" />
            <PatternLayout pattern="[%d%d{yyyy-MM-dd HH:mm:ss SSS}][%t][%p][%c:%L] %m%n" />
            <Policies>
                <!-- 归档每天的文件 -->
                <TimeBasedTriggeringPolicy interval="1" modulate="true" />
                <!-- 限制单个文件大小 -->
                <SizeBasedTriggeringPolicy size="${log_file_size}" />
            </Policies>
            <!-- 限制每天文件个数 -->
            <DefaultRolloverStrategy compressionLevel="0" max="10"/>
        </RollingFile>

    </appenders>

    <loggers>
        <!--第三方框架显示的日志级别-->
        <logger name="org.springframework" level="INFO"/>
        <logger name ="org.ibatis" level="info"/>


        <root level="info">
            <appender-ref ref="Console" />
            <appender-ref ref="RollingFileInfo" />
            <appender-ref ref="RollingFileWarn" />
            <appender-ref ref="RollingFileError" />
        </root>

    </loggers>

</configuration>
程序中应用
    //类中实例化Logger对象
    private static final Logger LOGGER= LogManager.getLogger();

    //方法中调用对应的方法
    LOGGER.info("");
    LOGGER.error("");
集成P6Spy显示程序运行时的真实SQL
配置说明:http://p6spy.readthedocs.io/en/latest/configandusage.html
首先添加P6Spy和阿里巴巴数据库连接池Druid的依赖,pom.xml文件的内容如下
<properties>
        <p6spy.version>3.6.0</p6spy.version>
        <druid.version>1.1.6</druid.version>
    </properties>

  <dependency>
            <groupId>p6spy</groupId>
            <artifactId>p6spy</artifactId>
            <version>${p6spy.version}</version>
        </dependency>

        <dependency>
            <groupId>com.alibaba</groupId>
            <artifactId>druid</artifactId>
            <version>${druid.version}</version>
        </dependency>
然后将p6spy的配置文件spy.properties放置项目的src/main/resources目录下,该文件只需要修改logfile,logMessageFormat,dateformat属性即可,如下图所示:
logfile=mybatis-practices-core.log
logMessageFormat= net.ittimeline.mybatis.practices.common.p6spy.CustomizeLineFormat
dateformat=yyyy-MM-dd HH:mm:ss
完整的spy.properties文件已经在mybatis-practice-spring5-integration模块中给出,仅供参考。
然后实现自定义的SQL输出格式
为了输出的内容足够的简洁,这里只保留了当前时间,执行SQL的耗时以及执行的SQL语句,具体实现如下所示
package net.ittimeline.mybatis.practices.common.p6spy;

import com.alibaba.druid.sql.SQLUtils;
import com.p6spy.engine.spy.appender.MessageFormattingStrategy;

/**
 * 自定义SQL格式
 * @author tony [email protected]
 * @date 2018-01-30-下午10:45
 * @website wwww.ittimeline.net
 * @see
 * @since JDK8u162
 */
public class CustomizeLineFormat implements MessageFormattingStrategy {

    public String buildMessage(String now, long elapsed, String sql) {
        StringBuffer content = new StringBuffer();
        if (org.apache.commons.lang3.StringUtils.isNotEmpty(now) && org.apache.commons.lang3.StringUtils.isNotEmpty(Long.valueOf(elapsed).toString())
                && org.apache.commons.lang3.StringUtils.isNotEmpty(sql)) {
            content.append("当前时间:" + now);
            content.append(" SQL执行耗时(毫秒)为" + elapsed);
            content.append(" SQL执行的语句是\n" + SQLUtils.formatMySql(sql)+"\n\n");
        }
        return content.toString();
    }

    @Override
    public String formatMessage(int connectionId, String now, long elapsed, String category, String prepared, String sql) {
        return buildMessage(now, elapsed, sql);
    }

}
然后增加一个database.properties文件,配置内容如下
相对于未添加P6Spy之前,数据库的驱动类和URL不同,同时该文件还配置了阿里巴巴数据库连接池Druid的相关属性
#############数据库连接池druid配置########
datasource.druid.driverClassName=com.p6spy.engine.spy.P6SpyDriver
datasource.druid.url=jdbc:p6spy:mysql://127.0.0.1:3306/mybatis?useUnicode=true&characterEncoding=UTF-8&useSSL=false
datasource.druid.username=root
datasource.druid.password=guanglei

datasource.druid.initialSize=1
datasource.druid.minIdle=1
datasource.druid.maxActive=20
datasource.druid.maxWait=60000
datasource.druid.timeBetweenEvictionRunsMillis=60000
datasource.druid.minEvictableIdleTimeMillis=300000
datasource.druid.validationQuery=SELECT 'x'
datasource.druid.testWhileIdle=true
datasource.druid.testOnBorrow=false
datasource.druid.testOnReturn=false
datasource.druid.poolPreparedStatements=false
datasource.druid.maxPoolPreparedStatementPerConnectionSize=20
datasource.druid.filters=stat
集成阿里巴巴Druid数据库连接池
项目地址:https://github.com/alibaba/druid
完整实现如下所示
package net.ittimeline.mybatis.practices.spring5.integration.configuration;

import com.alibaba.druid.pool.DruidDataSource;
import org.apache.logging.log4j.LogManager;
import org.apache.logging.log4j.Logger;
import org.springframework.beans.factory.annotation.Value;
import org.springframework.context.annotation.Bean;
import org.springframework.context.annotation.Configuration;
import org.springframework.context.annotation.PropertySource;

import javax.sql.DataSource;
import java.sql.SQLException;

/**
 * 阿里巴巴数据库连接池Druid配置
 * @author tony [email protected]
 * @date 2018-02-26-上午11:30
 * @website wwww.ittimeline.net
 * @see
 * @since JDK8u162
 */
@Configuration
@PropertySource("classpath:database.properties")
public class DruidDataSourceConfiguraiton {

    private static final Logger LOGGER= LogManager.getLogger();


    /**********************读取位于ClassPath路径下的database.properties属性配置文件,然后将属性值设置到对应的成员变量中********************/
    @Value("${datasource.druid.driverClassName}")
    private String driverClassName;

    @Value("${datasource.druid.url}")
    private String url;

    @Value("${datasource.druid.username}")
    private String userName;

    @Value("${datasource.druid.password}")
    private String password;

    @Value("${datasource.druid.initialSize}")
    private int initialSize;

    @Value("${datasource.druid.minIdle}")
    private int minIdle;


    @Value("${datasource.druid.maxActive}")
    private int maxActive;


    @Value("${datasource.druid.maxWait}")
    private long maxWait;

    @Value("${datasource.druid.timeBetweenEvictionRunsMillis}")
    private long timeBetweenEvictionRunsMillis;


    @Value("${datasource.druid.minEvictableIdleTimeMillis}")
    private long minEvictableIdleTimeMillis;

    @Value("${datasource.druid.validationQuery}")
    private String validationQuery;

    @Value("${datasource.druid.testWhileIdle}")
    private boolean testWhileIdle;


    @Value("${datasource.druid.testOnBorrow}")
    private boolean testOnBorrow;


    @Value("${datasource.druid.testOnReturn}")
    private boolean testOnReturn;


    @Value("${datasource.druid.poolPreparedStatements}")
    private boolean poolPreparedStatements;


    @Value("${datasource.druid.maxPoolPreparedStatementPerConnectionSize}")
    private int maxPoolPreparedStatementPerConnectionSize;


    @Value("${datasource.druid.filters}")
    private String filters;


    /**
     * 基于阿里巴巴的Druid数据库连接池实现
     * @return
     */
    @Bean
    public DataSource dataSource(){


        DruidDataSource dataSource =new DruidDataSource();
        dataSource.setUsername(userName);
        dataSource.setPassword(password);
        dataSource.setUrl(url);
        dataSource.setDriverClassName(driverClassName);


        dataSource.setInitialSize(initialSize);
        dataSource.setMinIdle(minIdle);
        dataSource.setMaxActive(maxActive);
        dataSource.setMaxWait(maxWait);
        dataSource.setTimeBetweenEvictionRunsMillis(timeBetweenEvictionRunsMillis);
        dataSource.setMinEvictableIdleTimeMillis(minEvictableIdleTimeMillis);
        dataSource.setValidationQuery(validationQuery);
        dataSource.setTestWhileIdle(testWhileIdle);
        dataSource.setTestOnBorrow(testOnBorrow);
        dataSource.setTestOnReturn(testOnReturn);
        dataSource.setPoolPreparedStatements(poolPreparedStatements);
        dataSource.setMaxPoolPreparedStatementPerConnectionSize(maxPoolPreparedStatementPerConnectionSize);
        try {
            dataSource.setFilters(filters);
        } catch (SQLException e) {
            e.printStackTrace();

            LOGGER.info("build datasource fail "+e.getMessage());
        }
        return dataSource;
    }

}
其中@PropertySource注解用于读取类路径下的数据库配置文件database.properties,同时使用@Value注解结合Spring表达式赋值于对应的成员变量。
@Bean注解的作用就是相当于传统spring的xml配置的<bean/>
基于JavaConfig的MyBatis3集成Spring5
系统全局配置类
目前只配置了包扫描器
package net.ittimeline.mybatis.practices.spring5.integration.configuration;

import net.ittimeline.mybatis.practices.spring5.integration.constants.SystemConstants;
import org.springframework.context.annotation.ComponentScan;
import org.springframework.context.annotation.Configuration;

/**
 * 系统全局配置类
 * @author tony [email protected]
 * @date 2018-02-24-上午11:03
 * @website wwww.ittimeline.net
 * @see
 * @since JDK8u162
 */
@Configuration
@ComponentScan(basePackages = {SystemConstants.COMPONENT_SCAN_PACKAGE_NAME})
public class ApplicationConfiguartion {


}
系统常量类
package net.ittimeline.mybatis.practices.spring5.integration.constants;

/**
 * 系统常量配置
 * @author tony [email protected]
 * @date 2018-02-24-上午11:09
 * @website wwww.ittimeline.net
 * @see
 * @since JDK8u162
 */
public class SystemConstants {


    public static final String COMPONENT_SCAN_PACKAGE_NAME="net.ittimeline.mybatis.practices.spring5";

    public static final String MAPPER_BASE_PACKAGE="net.ittimeline.mybatis.practices.spring5.integration.mapper";
}
MyBatis3集成spring5的核心配置类
package net.ittimeline.mybatis.practices.spring5.integration.configuration;

import net.ittimeline.mybatis.practices.spring5.integration.constants.SystemConstants;
import org.apache.ibatis.session.SqlSessionFactory;
import org.apache.logging.log4j.LogManager;
import org.apache.logging.log4j.Logger;
import org.mybatis.spring.SqlSessionFactoryBean;
import org.mybatis.spring.SqlSessionTemplate;
import org.mybatis.spring.annotation.MapperScan;
import org.springframework.context.annotation.Bean;
import org.springframework.context.annotation.Configuration;
import org.springframework.context.annotation.Import;
import org.springframework.core.io.support.PathMatchingResourcePatternResolver;
import org.springframework.core.io.support.ResourcePatternResolver;

import javax.sql.DataSource;

/**
 * @author tony [email protected]
 * @date 2018-02-24-上午11:13
 * @website wwww.ittimeline.net
 * @see
 * @since JDK8u162
 */
@Configuration
@Import(DruidDataSourceConfiguraiton.class)
@MapperScan(basePackages = SystemConstants.MAPPER_BASE_PACKAGE)
public class MyBatisConfiguartion {


    private static final Logger LOGGER= LogManager.getLogger();


    private static final String TYPE_ALIASES_PACKAGE= "net.ittimeline.mybatis.practices.pojo.persist";


    @Bean(name = "sqlSessionFactory")
    public SqlSessionFactory sqlSessionFactoryBean(DataSource dataSource){

        SqlSessionFactoryBean sqlSessionFactoryBean=new SqlSessionFactoryBean();
        sqlSessionFactoryBean.setDataSource(dataSource);
        sqlSessionFactoryBean.setTypeAliasesPackage(TYPE_ALIASES_PACKAGE);


        //TODO 添加分页插件

        //添加mapper的XML目录
        ResourcePatternResolver resourcePatternResolver=new PathMatchingResourcePatternResolver();
        try {
            sqlSessionFactoryBean.setMapperLocations(resourcePatternResolver.getResources("classpath:mappers/*.xml"));

            return sqlSessionFactoryBean.getObject();
        } catch (Exception e) {
            e.printStackTrace();
            LOGGER.info("build sqlSessionFactory fail "+e.getMessage());
            throw new RuntimeException(e);
        }
    }

    /**
     *
     * @param sqlSessionFactory
     * @return
     */
    @Bean
    public SqlSessionTemplate sqlSessionTemplate(SqlSessionFactory sqlSessionFactory){
        return new SqlSessionTemplate(sqlSessionFactory);
    }


}
基于JavaConfig的Spring事务配置
package net.ittimeline.mybatis.practices.spring5.integration.configuration;

import org.springframework.aop.framework.autoproxy.BeanNameAutoProxyCreator;
import org.springframework.context.annotation.Bean;
import org.springframework.context.annotation.Configuration;
import org.springframework.context.annotation.Import;
import org.springframework.jdbc.datasource.DataSourceTransactionManager;
import org.springframework.transaction.PlatformTransactionManager;
import org.springframework.transaction.TransactionDefinition;
import org.springframework.transaction.interceptor.NameMatchTransactionAttributeSource;
import org.springframework.transaction.interceptor.RollbackRuleAttribute;
import org.springframework.transaction.interceptor.RuleBasedTransactionAttribute;
import org.springframework.transaction.interceptor.TransactionInterceptor;

import javax.sql.DataSource;
import java.util.ArrayList;
import java.util.Arrays;
import java.util.Collections;
import java.util.List;

/**
 * Spring事务配置
 * @author tony [email protected]
 * @date 2018-02-26-下午4:27
 * @website wwww.ittimeline.net
 * @see
 * @since JDK8u162
 */
@Configuration
@Import(DruidDataSourceConfiguraiton.class)
public class SpringTransactionConfiguration {


    /**
     * 自定义事务拦截名称
     */
    private static final String CUSTOMIZE_TRANSACTION_INTERCEPTOR_NAME="customizeTransactionInterceptor";

    /**
     * 默认只对*Service和*ServiceImpl Bean进行事务处理,"*"表示模糊匹配,比如userService,userServiceImpl
     */
    private static final String[] DEFAULT_TRANSACTION_BEAN_NAMES={"*Service","*ServiceImpl"};

    /**
     * 可传播事务配置
     */
    private static final String[] DEFAULT_REQUIRED_METHOD_RULE_TRANSACTION_ATTRIBUTES={"add","save","insert","delete","update","edit","batch","create","remove"};

    /**
     * 默认的只读事务
     */
    private static final String[] DEFAULT_READ_ONLY_METHOD_RULE_TRANSACTION_ATTRIBUTES={"get","count","find","query","select","list","*"};
    /**
     * 自定义事务 BeanName 拦截
     */
    private String[] customizeTransactionBeanNames                        = {};
    /**
     * 自定义方法名的事务属性相关联,可以使用通配符(*)字符关联相同的事务属性的设置方法; 只读事务
     */
    private String[] customizeReadOnlyMethodRuleTransactionAttributes     = {};
    /**
     * 自定义方法名的事务属性相关联,可以使用通配符(*)字符关联相同的事务属性的设置方法;
     * 传播事务(默认的){@link org.springframework.transaction.annotation.Propagation#REQUIRED}
     */
    private String[] customizeRequiredMethodRuleTransactionAttributes     = {};


    /**
     * 事务管理器
     * @param dataSource
     * @return
     */
    @Bean(name = "transactionManager")
    public PlatformTransactionManager transactionManager(DataSource dataSource){
        return new DataSourceTransactionManager(dataSource);
    }


    /**
     * 配置事务拦截器
     *
     * @param transactionManager : 事务管理器
     */
    @Bean( CUSTOMIZE_TRANSACTION_INTERCEPTOR_NAME )
    public TransactionInterceptor customizeTransactionInterceptor ( PlatformTransactionManager transactionManager ) {
        NameMatchTransactionAttributeSource transactionAttributeSource = new NameMatchTransactionAttributeSource();
        RuleBasedTransactionAttribute       readOnly                   = this.readOnlyTransactionRule();
        RuleBasedTransactionAttribute       required                   = this.requiredTransactionRule();
        // 默认的只读事务配置
        for ( String methodName : DEFAULT_READ_ONLY_METHOD_RULE_TRANSACTION_ATTRIBUTES ) {
            transactionAttributeSource.addTransactionalMethod( methodName , readOnly );
        }
        // 默认的传播事务配置
        for ( String methodName : DEFAULT_REQUIRED_METHOD_RULE_TRANSACTION_ATTRIBUTES ) {
            transactionAttributeSource.addTransactionalMethod( methodName , required );
        }
        // 定制的只读事务配置
        for ( String methodName : customizeReadOnlyMethodRuleTransactionAttributes ) {
            transactionAttributeSource.addTransactionalMethod( methodName , readOnly );
        }
        // 定制的传播事务配置
        for ( String methodName : customizeRequiredMethodRuleTransactionAttributes ) {
            transactionAttributeSource.addTransactionalMethod( methodName , required );
        }
        return new TransactionInterceptor( transactionManager , transactionAttributeSource );
    }

    /**
     * 配置事务拦截
     * <p>
     * {@link #customizeTransactionInterceptor(PlatformTransactionManager)}
     */
    @Bean
    public BeanNameAutoProxyCreator customizeTransactionBeanNameAutoProxyCreator () {
        BeanNameAutoProxyCreator beanNameAutoProxyCreator = new BeanNameAutoProxyCreator();
        // 设置定制的事务拦截器
        beanNameAutoProxyCreator.setInterceptorNames( CUSTOMIZE_TRANSACTION_INTERCEPTOR_NAME );
        List< String > transactionBeanNames = new ArrayList<>( DEFAULT_TRANSACTION_BEAN_NAMES.length + customizeTransactionBeanNames.length );
        // 默认
        transactionBeanNames.addAll( Arrays.asList( DEFAULT_TRANSACTION_BEAN_NAMES ) );
        // 定制
        transactionBeanNames.addAll( Arrays.asList( customizeTransactionBeanNames ) );
        // 归集
        for ( String transactionBeanName : transactionBeanNames ) {
            beanNameAutoProxyCreator.setBeanNames( transactionBeanName );
        }
        beanNameAutoProxyCreator.setProxyTargetClass( true );
        return beanNameAutoProxyCreator;
    }

    /**
     * 支持当前事务;如果不存在创建一个新的
     * {@link org.springframework.transaction.annotation.Propagation#REQUIRED}
     */
    private RuleBasedTransactionAttribute requiredTransactionRule () {
        RuleBasedTransactionAttribute required = new RuleBasedTransactionAttribute();
        required.setRollbackRules( Collections.singletonList( new RollbackRuleAttribute( Exception.class ) ) );
        required.setPropagationBehavior( TransactionDefinition.PROPAGATION_REQUIRED );
        required.setTimeout( TransactionDefinition.TIMEOUT_DEFAULT );
        return required;
    }

    /**
     * 只读事务
     * {@link org.springframework.transaction.annotation.Propagation#NOT_SUPPORTED}
     */
    private RuleBasedTransactionAttribute readOnlyTransactionRule () {
        RuleBasedTransactionAttribute readOnly = new RuleBasedTransactionAttribute();
        readOnly.setReadOnly( true );
        readOnly.setPropagationBehavior( TransactionDefinition.PROPAGATION_NOT_SUPPORTED );
        return readOnly;
    }
}项目地址:https://github.com/ittimeline/mybatis-practices
数据库说明
目前只有一张用户表,表中存储了用户注册、登录、修改手机号和用户名等信息,完整的SQL脚本位于mybatis-practices-practices模块的src/main/resources/schema/目录下,完整的内容如下所示,在运行程序之前需要先执行该脚本。
drop DATABASE if EXISTS mybatis;
create database if not EXISTS mybatis DEFAULT CHARACTER SET utf8 COLLATE utf8_general_ci;

use mybatis;
CREATE TABLE t_user
(
  user_id            BIGINT AUTO_INCREMENT
  COMMENT '用户ID'
    PRIMARY KEY,
  user_name          VARCHAR(64) NOT NULL
  COMMENT '用户名',
  mobile             VARCHAR(64) NULL
  COMMENT '手机号',
  email              VARCHAR(64) NULL
  COMMENT '邮件',
  password           VARCHAR(64) NULL
  COMMENT '密码:8-16位大小写字母+数字+特殊字符',
  cardNumber         VARCHAR(64) NULL
  COMMENT '身份证号:15位或者18位整数',
  register_ip        VARCHAR(64) NULL
  COMMENT '注册IP:例如192.168.1.97',
  register_date      DATETIME    NULL
  COMMENT '注册日期:例如2018-01-31',
  register_resources VARCHAR(32) NULL
  COMMENT '注册来源:H5,PC,Android,IOS
    ',
  CONSTRAINT t_user_user_id_uindex
  UNIQUE (user_id)
)
  COMMENT '用户信息'
  ENGINE = InnoDB;
mybatis-practices-pojo说明
该模块用于存放各种pojo对象,其中net.ittimeline.mybatis.practices.pojo.persist包用于存放DO(data object)对象,
net.ittimeline.mybatis.practices.pojo.dto用于存放DTO(Data Transfer Object)对象。
由于目前应用中只有一张t_user表,因此创建t_user表的DO和DTO即可。_
UserDO:对应于数据库t_user表
package net.ittimeline.mybatis.practices.pojo.persist;

import net.ittimeline.mybatis.practices.pojo.User;

/**
 * User Data Object 对应数据库表 t_user
 * @author tony [email protected]
 * @date 2018-01-30-下午11:37
 * @website wwww.ittimeline.net
 * @see
 * @since JDK8u162
 */
public class UserDO extends User {


    public UserDO(){}

    public UserDO(String userName){
        super(userName);
    }


}
UserDTO:业务层传输对象
package net.ittimeline.mybatis.practices.pojo.dto;

import net.ittimeline.mybatis.practices.pojo.User;

/**封装User业务数据
 * @author tony [email protected]
 * @date 2018-02-24-下午1:22
 * @website wwww.ittimeline.net
 * @see
 * @since JDK8u162
 */
public class UserDTO extends User {


    public UserDTO(){}

    public UserDTO(String userName,String password){
        super(userName,password);
    }

}
User:封装了公共的成员变量
package net.ittimeline.mybatis.practices.pojo;

import org.apache.commons.lang3.builder.ToStringBuilder;

import java.io.Serializable;
import java.util.Date;

/**
 * @author tony [email protected]
 * @date 2018-02-24-下午2:09
 * @website wwww.ittimeline.net
 * @see
 * @since JDK8u162
 */
public class User  implements Serializable{

    /**
     * 用户编号
     */
    private Long userId;

    /**用户登录:支持用户名/手机号/邮箱登录*/

    /**
     * 用户名
     */
    private String userName;

    /**
     * 手机号
     */
    private String mobile;

    /**
     * 邮箱
     */
    private String email;


    /**
     * 密码
     */
    private String password;

    /**
     * 身份证照
     */
    private String cardNumber;


    /*****************注册信息************/

    /**
     * 注册IP
     */
    private String registerIp;


    /**
     * 注册来源 PC/H5/Android/IOS
     */
    private String registerResource;

    /**
     * 注册日期
     */
    private Date registerDate;


    public Long getUserId() {
        return userId;
    }

    public void setUserId(Long userId) {
        this.userId = userId;
    }

    public String getUserName() {
        return userName;
    }

    public void setUserName(String userName) {
        this.userName = userName;
    }

    public String getMobile() {
        return mobile;
    }

    public void setMobile(String mobile) {
        this.mobile = mobile;
    }

    public String getEmail() {
        return email;
    }

    public void setEmail(String email) {
        this.email = email;
    }

    public String getPassword() {
        return password;
    }

    public void setPassword(String password) {
        this.password = password;
    }

    public String getCardNumber() {
        return cardNumber;
    }

    public void setCardNumber(String cardNumber) {
        this.cardNumber = cardNumber;
    }

    public String getRegisterIp() {
        return registerIp;
    }

    public void setRegisterIp(String registerIp) {
        this.registerIp = registerIp;
    }

    public String getRegisterResource() {
        return registerResource;
    }

    public void setRegisterResource(String registerResource) {
        this.registerResource = registerResource;
    }

    public Date getRegisterDate() {
        return registerDate;
    }

    public void setRegisterDate(Date registerDate) {
        this.registerDate = registerDate;
    }


    public User(){}

    public User(String userName){
        this.userName=userName;
    }

    public User(String userName,String password){
        this(userName);
        this.password=password;
    }

    @Override
    public String toString() {
        return new ToStringBuilder(this)
                .append("userId", userId)
                .append("userName", userName)
                .append("mobile", mobile)
                .append("email", email)
                .append("password", password)
                .append("cardNumber", cardNumber)
                .append("registerIp", registerIp)
                .append("registerResource", registerResource)
                .append("registerDate", registerDate)
                .toString();
    }
}
UserDOMapper接口方法声明
package net.ittimeline.mybatis.practices.spring5.integration.mapper;

import net.ittimeline.mybatis.practices.pojo.persist.UserDO;

/**
 * @author tony [email protected]
 * @date 2018-02-24-下午1:12
 * @website wwww.ittimeline.net
 * @see
 * @since JDK8u162
 */

public interface UserDOMapper {

    /**
     * 新增用户
     * @param user
     * @return
     */
    public int insert(UserDO user);

    /**
     * 修改用户信息
     * @param userDO
     * @return
     */
    public int update(UserDO userDO);


    /**
     * 根据用户信息(例如id,用户名和密码)获取单个用户
     * @param userDO
     * @return
     */
    public UserDO find(UserDO userDO);

    /**
     * 统计注册用户数量
     * @return
     */
    public Long countTotalUser();


}
UserDOMapper.xml
主要包含了针对t_user表的增加、修改和查询操作。
<?xml version="1.0" encoding="UTF-8"?>
        <!DOCTYPE mapper PUBLIC "-//mybatis.org//DTD Mapper 3.0//EN" "http://mybatis.org/dtd/mybatis-3-mapper.dtd">

<mapper namespace="net.ittimeline.mybatis.practices.spring5.integration.mapper.UserDOMapper">

    <!-- 新增用户-->
<insert id="insert" useGeneratedKeys="true" keyProperty="id">
    insert into t_user(user_name, mobile, email, password, cardNumber, register_ip, register_date, register_resources)
    VALUE (#{userName},#{mobile},#{email},#{password},#{cardNumber},#{registerIp},#{registerDate},#{registerResource})
</insert>

    <!-- 按照条件查找单个用户-->
    <select id="find" parameterType="UserDO" resultType="UserDO">
        select user_id as userId ,user_name as userName, mobile, email, password, cardNumber as cardNumber, register_ip as registerIp, register_date as registerDate, register_resources as registerResources from t_user
        <where>
            <if test="userId != null and userId !=''">
                and user_id=#{userId}
            </if>

            <if test="userName!=null and userName!=''">
                and user_name=#{userName}
            </if>

            <if test="password!=null and password !=''">
                and password=#{password}
            </if>

            <if test="mobile!=null and mobile !=''">
                and mobile=#{mobile}
            </if>
            <if test="email!=null and mobile !=''">
                and email=#{email}
            </if>
        </where>
    </select>


    <update id="update">
        update t_user

        <trim prefix="set" prefixOverrides=",">
            <if test="password !=null and password !=''">
                password=#{password},

            </if>
            <if test="mobile!=null and mobile !=''">
                mobile=#{mobile}
            </if>
        </trim>


        WHERE user_name=#{userName}
    </update>


    <select id="countTotalUser" resultType="java.lang.Long">
        select count(*) from t_user
    </select>


</mapper>
UserService接口方法声明
package net.ittimeline.mybatis.practices.spring5.integration.service;

import net.ittimeline.mybatis.practices.pojo.dto.UserDTO;

/**
 * 用户模块业务逻辑
 * 目前只包括登录、注册和修改密码,统计用户数量四个常用的功能
 * @author tony [email protected]
 * @date 2018-02-24-下午1:21
 * @website wwww.ittimeline.net
 * @see
 * @since JDK8u162
 */
 public interface UserService {


    /**
     * 用户登录
     * @param userDTO
     * @return
     */
     UserDTO login(UserDTO userDTO);

    /**
     * 用户注册
     * @param userDTO
     * @return
     */
     boolean register(UserDTO userDTO);


    /**
     * 用户修改信息 例如密码手机号 用户名等等
     * @param userDTO
     * @return
     */
     boolean updateUserInfo(UserDTO userDTO);


    /**
     * 检查用户是否存在 作为修改用户信息的依据
     * @param userDTO
     * @return
     */
    boolean exists(UserDTO userDTO);


    /**
     * 统计注册用户的数量
     * @return
     */
     long countTotalUser();


}
UserServiceImpl实现类
该类实现了UserService接口的所有方法,通过调用UserMapper接口访问数据库
package net.ittimeline.mybatis.practices.spring5.integration.service;

import cn.hutool.core.bean.BeanUtil;
import net.ittimeline.mybatis.practices.pojo.dto.UserDTO;
import net.ittimeline.mybatis.practices.pojo.persist.UserDO;
import net.ittimeline.mybatis.practices.spring5.integration.mapper.UserDOMapper;
import org.springframework.beans.BeanUtils;
import org.springframework.beans.factory.annotation.Autowired;
import org.springframework.stereotype.Service;

/**
 * @author tony [email protected]
 * @date 2018-02-24-下午1:51
 * @website wwww.ittimeline.net
 * @see
 * @since JDK8u162
 */
@Service
public class UserServiceImpl implements UserService {


    @Autowired
    private UserDOMapper userDOMapper;


    @Override
    public UserDTO login(UserDTO userDTO) {
        UserDO condition =new UserDO();
        condition.setUserName(userDTO.getUserName());
        condition.setPassword(userDTO.getPassword());
        UserDO userDO= userDOMapper.find(condition);
        UserDTO result=new UserDTO();
        BeanUtils.copyProperties(userDO,result);
        return result;
    }

    @Override
    public boolean register(UserDTO userDTO) {
        boolean registerResultFlag =false;

        UserDO userDO=new UserDO();
        BeanUtils.copyProperties(userDTO,userDO);
        int count= userDOMapper.insert(userDO);

        if(count>0){
            registerResultFlag=true;
        }
        return registerResultFlag;
    }


    @Override
    public boolean updateUserInfo(UserDTO userDTO) {
        boolean updateMobileFlag=false;

        UserDO userDO=new UserDO();
        BeanUtil.copyProperties(userDTO,userDO);
        int count= userDOMapper.update(userDO);
        if(count>0){
            updateMobileFlag=true;
        }

        return updateMobileFlag;
    }

    @Override
    public boolean exists(UserDTO userDTO) {
        UserDO userDO=new UserDO(userDTO.getUserName());
        UserDO findResult =userDOMapper.find(userDO);
        if(findResult!=null){
            return true;
        }

        return false;
    }

    @Override
    public long countTotalUser() {
        return userDOMapper.countTotalUser();
    }
}
Service接口及其实现类的管理方案
在企业项目开发中,通常会有几十个甚至上百个Service接口及其实现,而在Controller层调用Service层的Service层接口时,通常都是采用如下所示的形式调用。
@Autowired
private UserService userService;
而这里声明一个ServiceFactory及其实现类ServiceFactoryImpl,用来管理项目当中所有的Service接口及其实现,如下所示
ServiceFactory
package net.ittimeline.mybatis.practices.spring5.integration.service;

/**
 * @author tony [email protected]
 * @date 2018-02-26-下午5:37
 * @website wwww.ittimeline.net
 * @see
 * @since JDK8u162
 */
public interface ServiceFactory {

    UserService getUserService();
}
ServiceFactoryImpl
package net.ittimeline.mybatis.practices.spring5.integration.service;

import org.springframework.beans.factory.annotation.Autowired;
import org.springframework.stereotype.Service;

/**
 * @author tony [email protected]
 * @date 2018-02-26-下午5:37
 * @website wwww.ittimeline.net
 * @see
 * @since JDK8u162
 */
@Service
public class ServiceFactoryImpl implements ServiceFactory {


    @Autowired
    private UserService userService;

    @Override
    public UserService getUserService() {
        return userService;
    }
}
当要调用UserService时只需要通过注入serviceFactory,然后调用其getUserService()方法即可。
基于JavaConfig实现Spring5集成Junit4
package net.ittimeline.mybatis.practices.spring5.integration;

import net.ittimeline.mybatis.practices.spring5.integration.service.ServiceFactory;
import org.junit.runner.RunWith;
import org.springframework.beans.factory.annotation.Autowired;
import org.springframework.test.context.ContextConfiguration;
import org.springframework.test.context.junit4.SpringJUnit4ClassRunner;
import org.springframework.transaction.annotation.Transactional;
import net.ittimeline.mybatis.practices.spring5.integration.configuration.ApplicationConfiguartion;

/**
 * Spring5集成Junit
 * @author tony [email protected]
 * @date 2018-02-24-下午2:59
 * @website wwww.ittimeline.net
 * @see
 * @since JDK8u162
 */
//指定测试类的运行者
@RunWith(SpringJUnit4ClassRunner.class)
//指定spring配置类
@ContextConfiguration(classes = {ApplicationConfiguartion.class})
//事务配置
@Transactional
public abstract class BaseSpring5Junit4Test {


    @Autowired
    protected ServiceFactory serviceFactory;
}
UserService测试案例
package net.ittimeline.mybatis.practices.spring5.integration;

import net.ittimeline.mybatis.practices.pojo.dto.UserDTO;
import org.apache.logging.log4j.LogManager;
import org.apache.logging.log4j.Logger;
import org.junit.Test;

import java.util.Date;

/**
 * @author tony [email protected]
 * @date 2018-02-24-下午3:24
 * @website wwww.ittimeline.net
 * @see
 * @since JDK8u162
 */
public class UserServiceTest extends BaseSpring5Junit4Test {


    private static final Logger LOGGER= LogManager.getLogger();

    @Test
    public void testRegister(){

        UserDTO userDTO=new UserDTO();
        userDTO.setUserName("tony");
        userDTO.setPassword("666666");
        userDTO.setMobile("186xxxxxxxx");
        userDTO.setCardNumber("42102319xxxxxxxxxx");
        userDTO.setEmail("[email protected]");
        userDTO.setRegisterDate(new Date());
        userDTO.setRegisterIp("127.0.0.1");
        userDTO.setRegisterResource("Android客户端");
        boolean registerResult=serviceFactory.getUserService().register(userDTO);
        if(registerResult){
            LOGGER.info("注册成功,注册的来源是"+userDTO.getRegisterResource());
        }
        else{
            LOGGER.error("注册失败");
        }

    }

    @Test
    public void testUpdatePassword(){

        UserDTO userDTO=new UserDTO();
        userDTO.setUserName("tony");
        userDTO.setPassword("88888888");
        userDTO.setMobile("188********");


        boolean existsFlag =serviceFactory.getUserService().exists(userDTO);

        if(existsFlag){
            boolean updateResult =serviceFactory.getUserService().updateUserInfo(userDTO);

            if(updateResult){
                LOGGER.info("修改密码成功,新密码是"+userDTO.getPassword()+"新手机号是"+userDTO.getMobile());

            }

            else{
                LOGGER.error("修改密码失败");
            }
        }


    }


    @Test
    public void testLogin(){


        UserDTO userDTO=new UserDTO("tony","88888888");

        UserDTO loginResult =serviceFactory.getUserService().login(userDTO);

        LOGGER.info(loginResult);
    }


    @Test
    public void testCountTotalUser(){
        Long totalUser=serviceFactory.getUserService().countTotalUser();
        LOGGER.info("当前网站注册的人数是"+totalUser);
    }
}