Linux系统下如何安装Nexus(使用Nexus搭建Maven私服)-2.Nexus仓库设置,手动更新索引,自动更新索引
2018年08月27日 17:30:53 weixin_42828741 阅读数:64
还未安装的可阅读以下文章:
Linux系统下如何安装Nexus(使用Nexus搭建Maven私服)-1.安装配置
https://blog.csdn.net/weixin_42828741/article/details/82112360
还未更新索引的可阅读以下文章:
Linux系统下如何安装Nexus(使用Nexus搭建Maven私服)-2.Nexus仓库设置,手动更新索引,自动更新索引
https://blog.csdn.net/weixin_42828741/article/details/82116396
不懂如何手动上传第三方构件的阅读以下文章:
Linux系统下如何安装Nexus(使用Nexus搭建Maven私服)-3.手动上传到第三方构件3rd party
https://blog.csdn.net/weixin_42828741/article/details/82117331
不懂如何自动将项目相关资源上传发布到Nexus相关库中的阅读以下文章:
Linux系统下如何安装Nexus(使用Nexus搭建Maven私服)-4.自动将项目相关资源上传发布到Nexus相关库这个中
https://blog.csdn.net/weixin_42828741/article/details/82117900
想从Nexus下载构件的阅读以下文章:
Linux系统下如何安装Nexus(使用Nexus搭建Maven私服)-5.从Nexus仓库下载构件
https://blog.csdn.net/weixin_42828741/article/details/82119122
1.登录Nexus(默认用户名密码:admin/admin123)
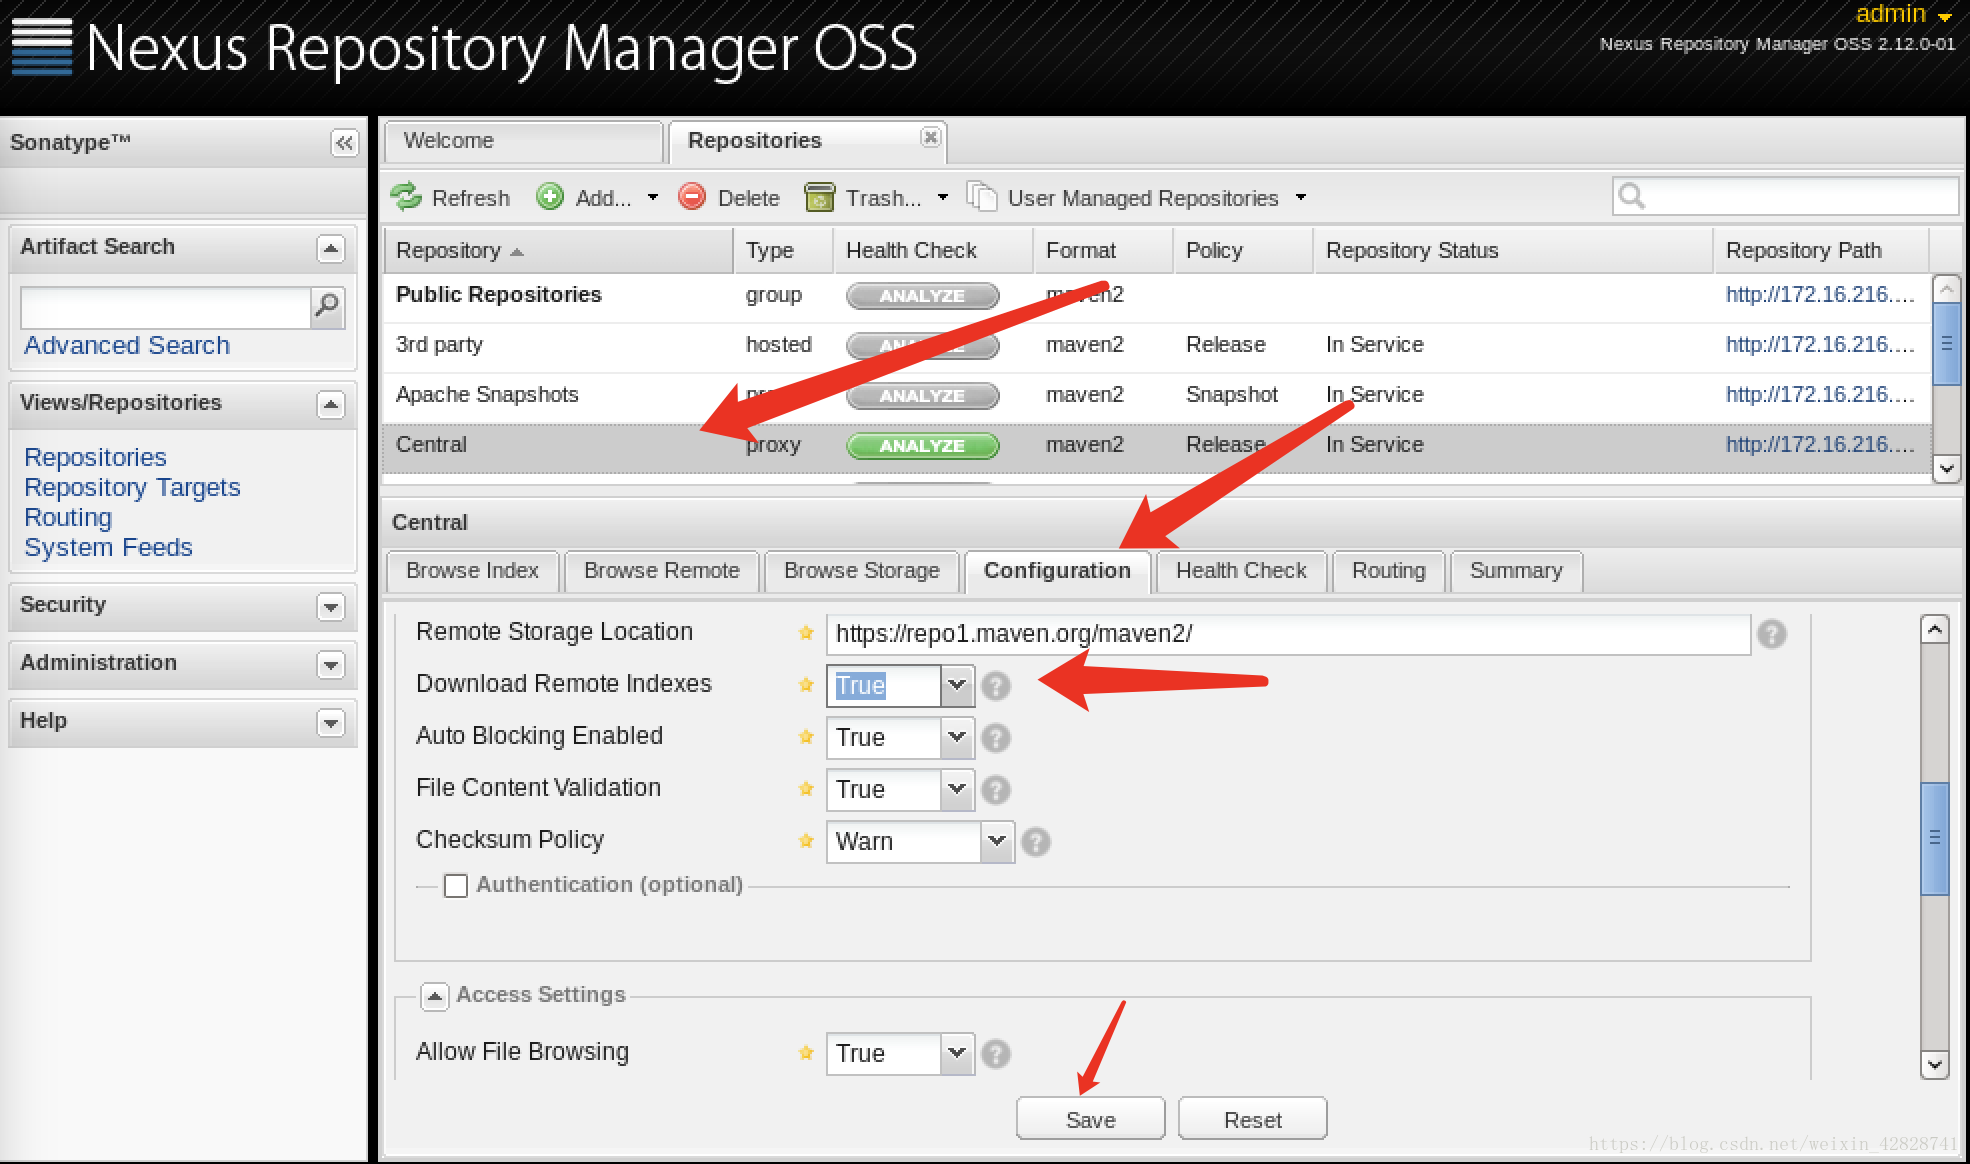
自动更新索引(适用于网络良好的小伙伴)
2.登录后点击左侧导航栏的Repositories,点击Central(Maven的中央仓库,默认不会下载index索引文件),点击Configuration,找到Download Remote Indexes将默认值改为true并保存
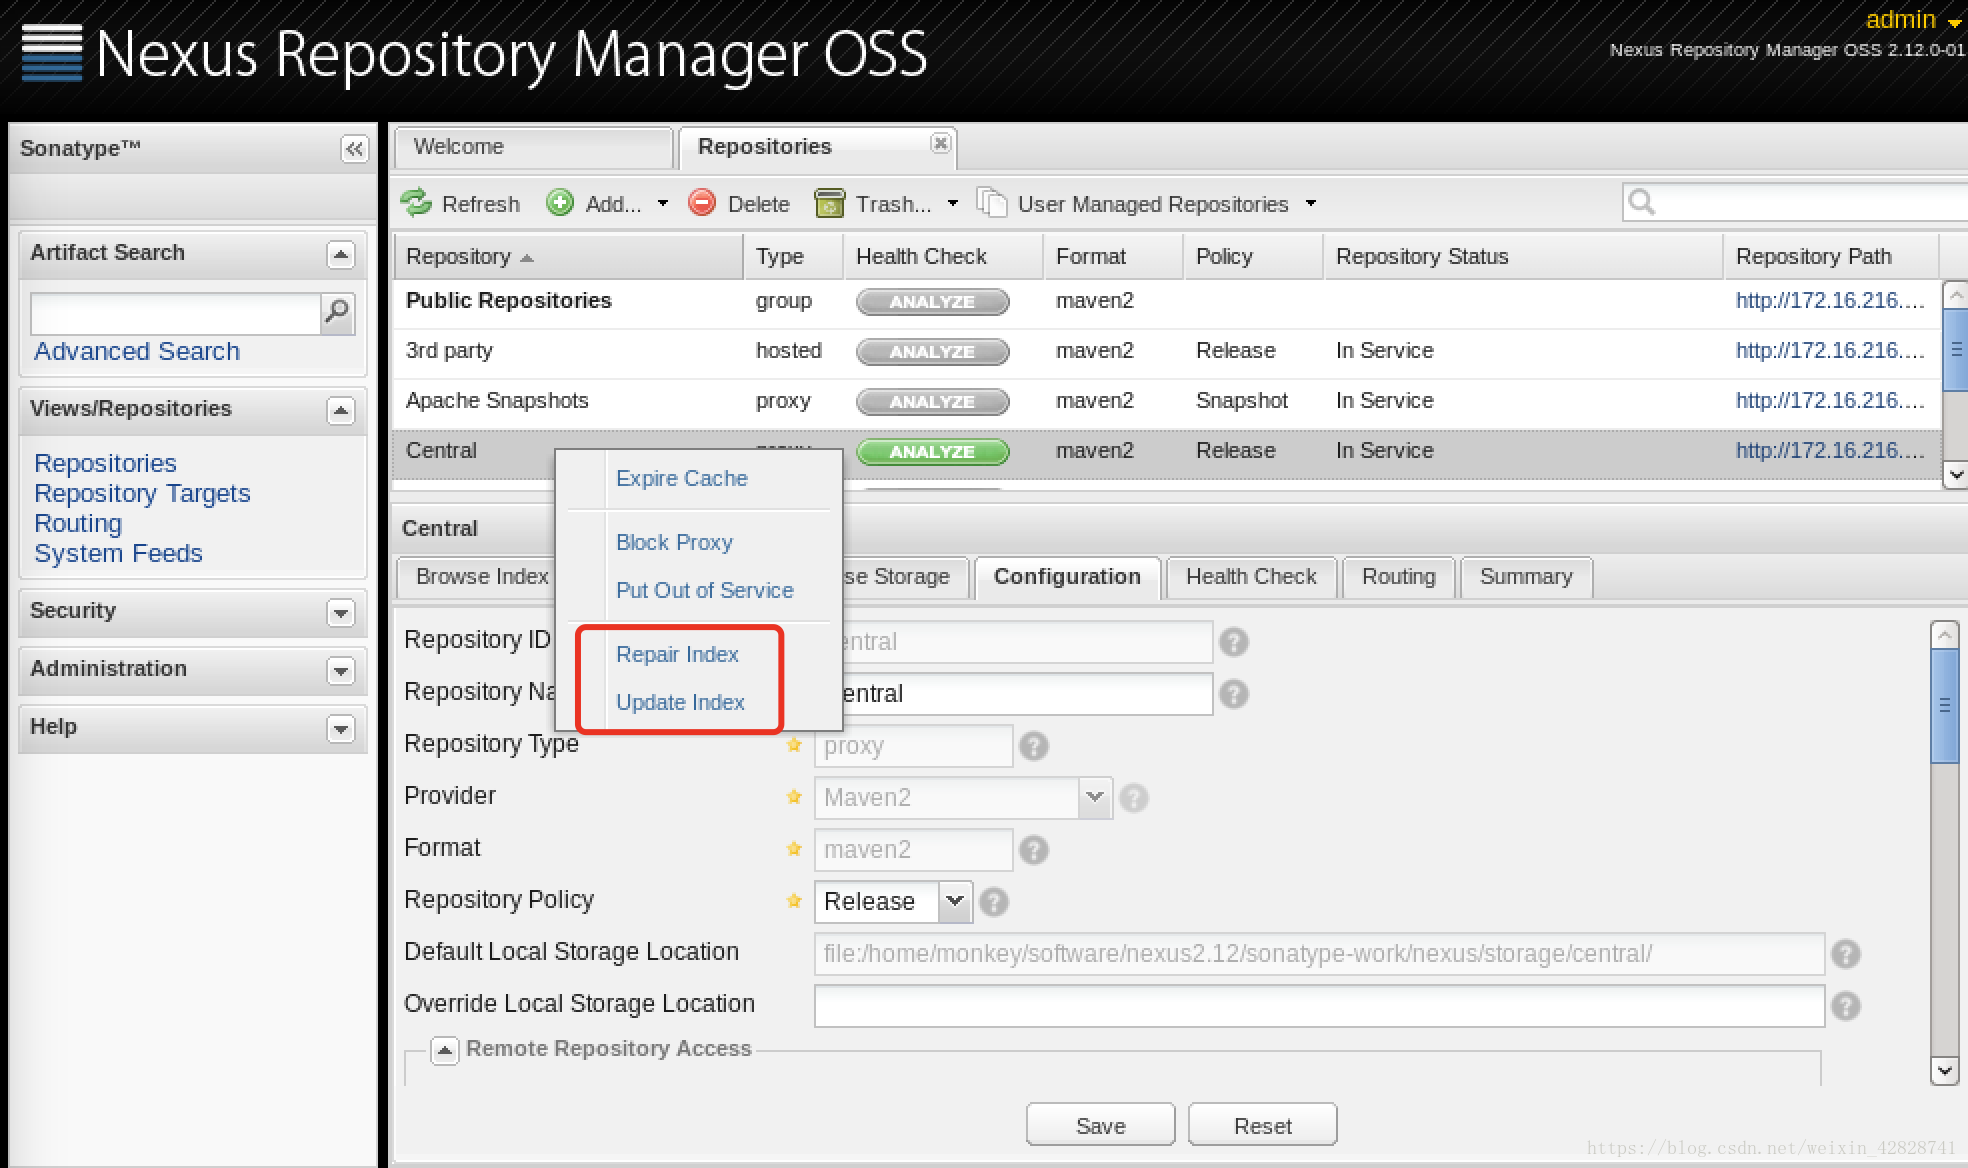
3.点击如下框中任意一项便可开始自动更新
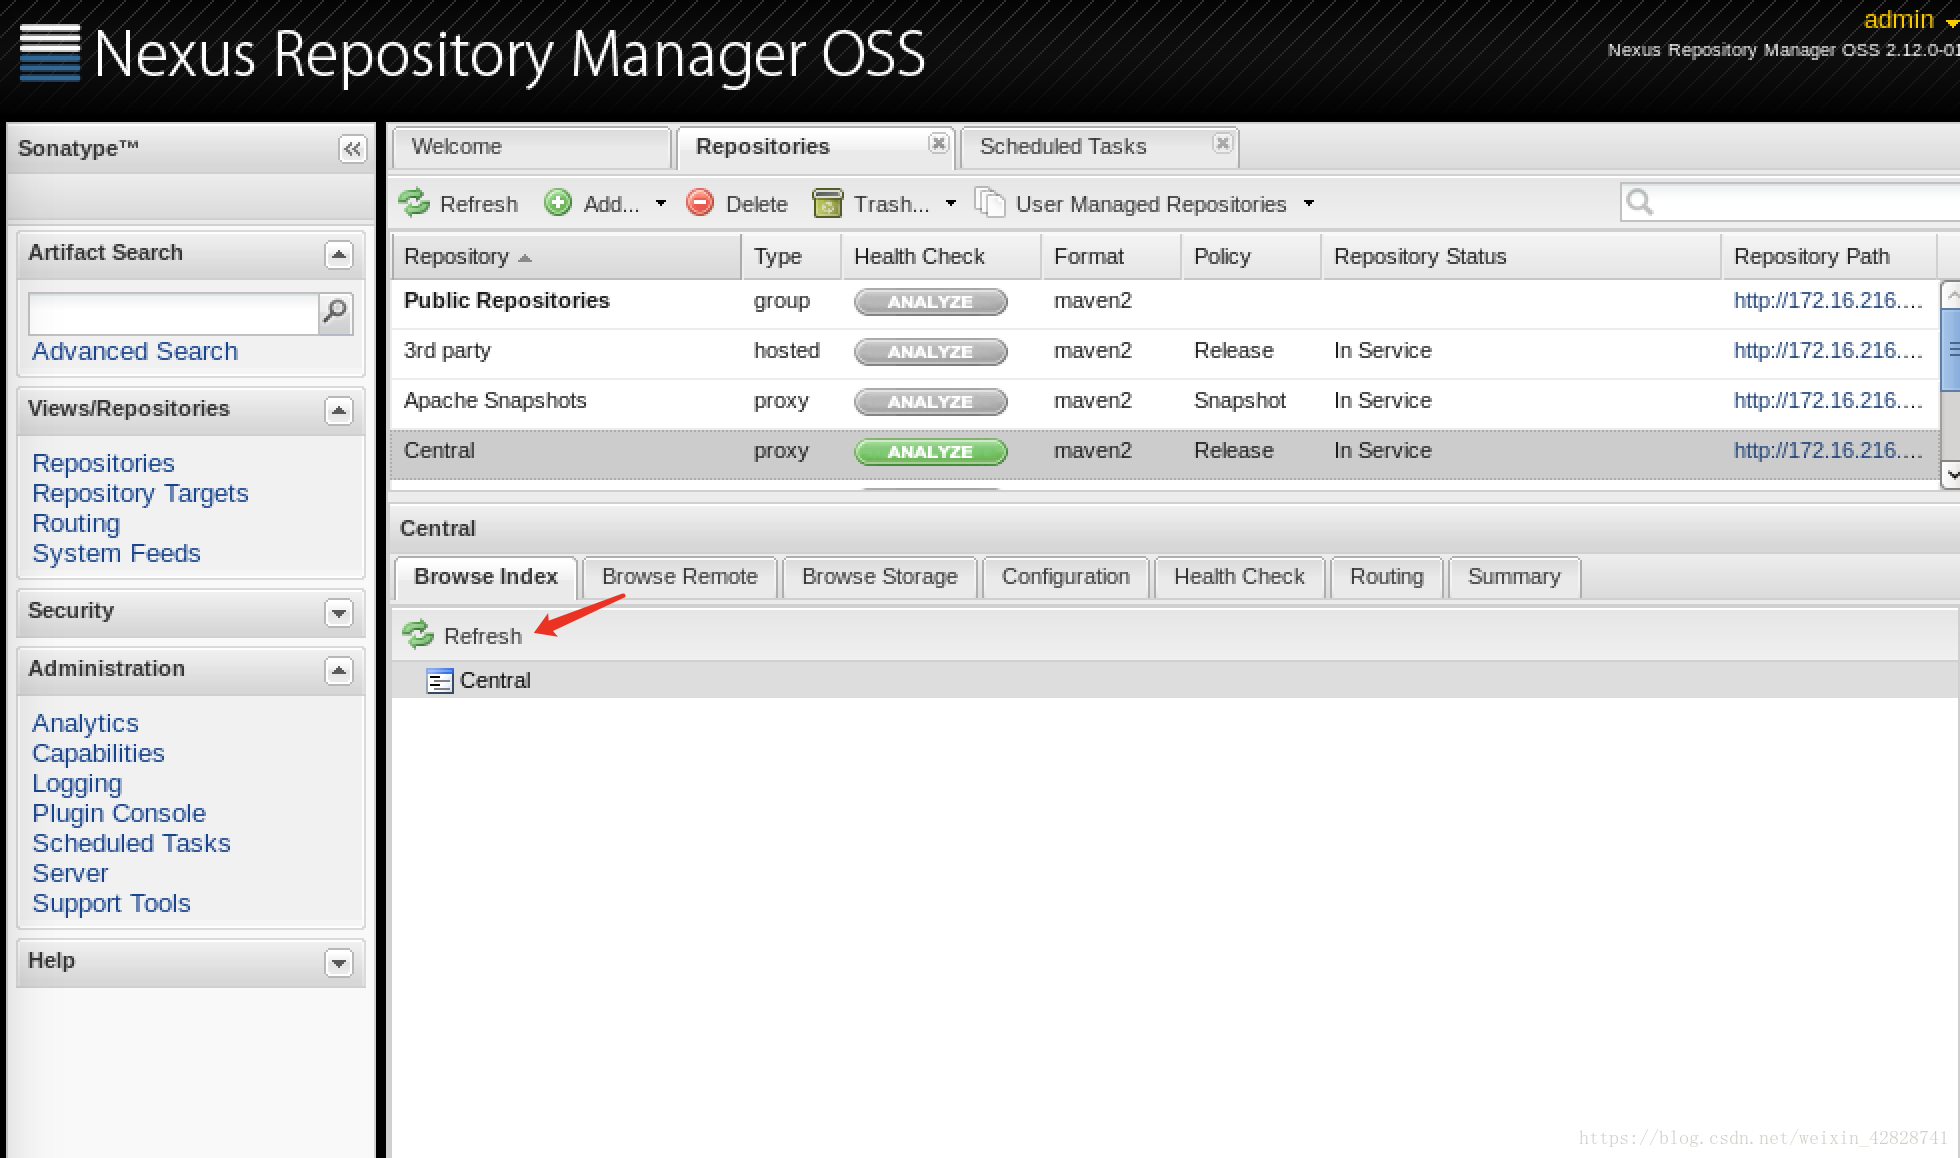
4.点击Browse Index,点击refresh,所看到的即是更新的
手动更新索引(适用于网络一般的小伙伴)
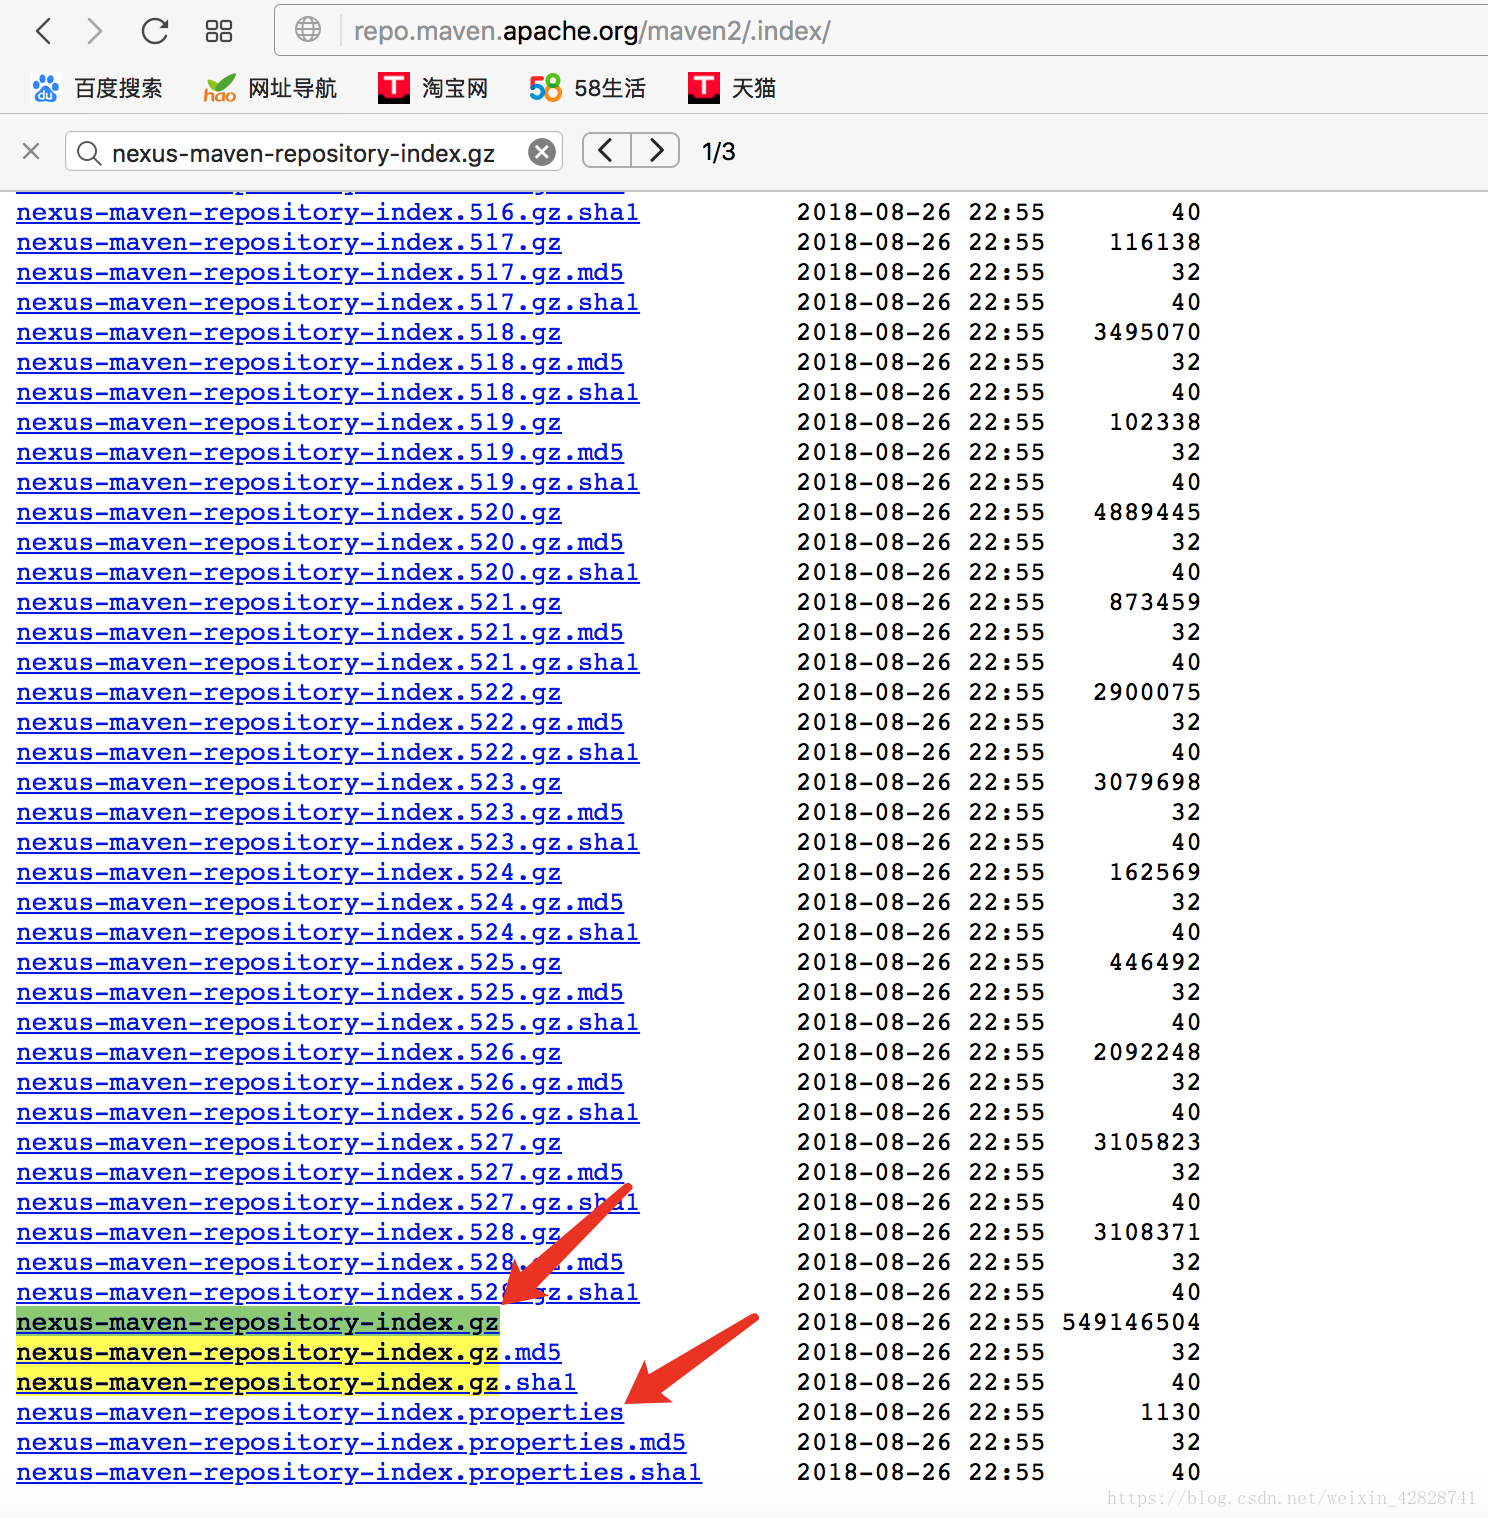
2.到索引网站下载所需索引文件(总共三个文件)
在这个网站下载两个文件:repo.maven.apache.org/maven2/.index
按control+f6搜索:nexus-maven-repository-index.gz
下载:
(1)nexus-maven-repository-index.gz
(2)nexus-maven-repository-index.properties
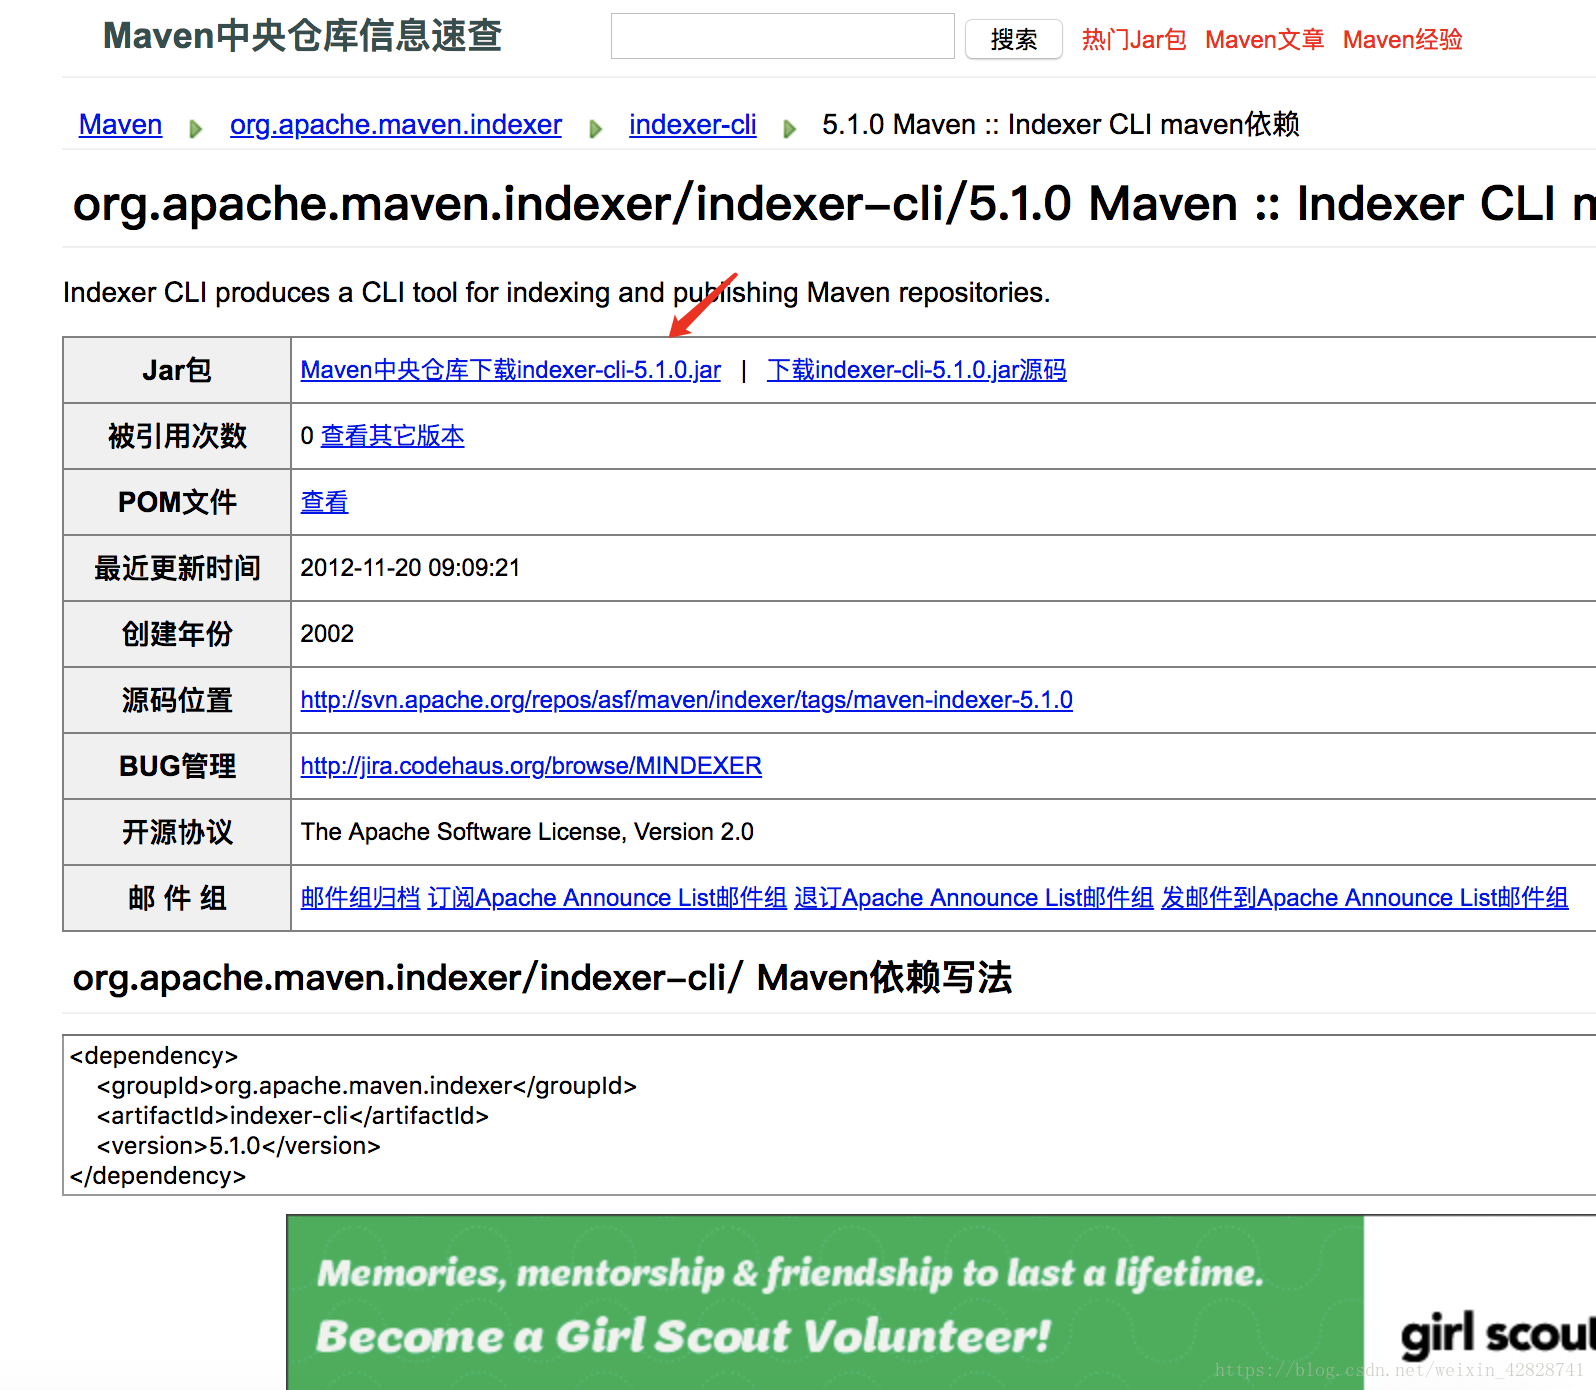
在这个网站下载一个文件:maven.outofmemory.cn/org.apache.maven.indexer/indexer-cli/5.1.0/
下载:
(3)indexer-cli-5.1.0.jar
3.Linux下的Nexus文件夹(如未配置可参考本文开头链接)下创建index文件夹,并将三个文件放入。
如果是从前一篇文章跟过来的,直接在终端机输入如下代码
[root@localhost nexus-2.12.0-01]# cd bin/
[root@localhost bin]# cd ..
[root@localhost nexus-2.12.0-01]# cd ..
[root@localhost nexus2.12]# ls
index  nexus-2.12.0-01  nexus-2.12.0-01-bundle.tar.gz  sonatype-work
[root@localhost nexus2.12]# cd index/
[root@localhost index]# ls
indexer-cli-5.1.0.jar            nexus-maven-repository-index.properties
nexus-maven-repository-index.gz
[root@localhost index]# java -jar indexer-cli-5.1.0.jar -u nexus-maven-repository-index.gz -d indexer- 1
- 2
- 3
- 4
- 5
- 6
- 7
- 8
- 9
- 10
如果不是的则自行用终端进入index,输入如下代码,回车(解压文件需等待一些时间,犹豫文件较大,虚拟机一定要注意留出足够的空间)[root@localhost index]# java -jar indexer-cli-5.1.0.jar -u nexus-maven-repository-index.gz -d indexer

4.关闭nexus,删除原有的索引文件
(1-1)如果按照上面操作的,则直接在终端机输入如下代码关闭nexus
[root@localhost index]# cd ..
[root@localhost nexus2.12]# ls
index  nexus-2.12.0-01  nexus-2.12.0-01-bundle.tar.gz  sonatype-work
[root@localhost nexus2.12]# cd nexus-2.12.0-01
[root@localhost nexus-2.12.0-01]# cd bin/
[root@localhost bin]# ./nexus stop- 1
- 2
- 3
- 4
- 5
- 6
(1-2)如果不是的则通过终端机找到nexus的bin并进入,然后输入如下代码关闭nexus
[root@localhost bin]# ./nexus stop- 1
(2-1)如果按照上面操作的,则直接在终端机输入如下代码删除原有索引
[root@localhost bin]# cd ..
[root@localhost nexus-2.12.0-01]# cd ..
[root@localhost nexus2.12]# ls
index  nexus-2.12.0-01  nexus-2.12.0-01-bundle.tar.gz  sonatype-work
[root@localhost nexus2.12]# cd sonatype-work/
[root@localhost sonatype-work]# cd nexus/
[root@localhost nexus]# cd indexer/
[root@localhost indexer]# cd central-ctx/
[root@localhost central-ctx]# ls
_0.cfs  segments_2  segments.gen
[root@localhost central-ctx]# rm *
rm:是否删除普通文件 "_0.cfs"?y(全部输入y)
rm:是否删除普通文件 "segments_2"?y
rm:是否删除普通文件 "segments.gen"?y
- 1
- 2
- 3
- 4
- 5
- 6
- 7
- 8
- 9
- 10
- 11
- 12
- 13
- 14
- 15
- 16
(2-2)如果不是的则通过终端机找到indexer的central-ctx并进入,然后输入如下代码删除原有索引
[root@localhost central-ctx]# rm *
rm:是否删除普通文件 "_0.cfs"?y(全部输入y)
rm:是否删除普通文件 "segments_2"?y
rm:是否删除普通文件 "segments.gen"?y- 1
- 2
- 3
- 4
5.将之前解压好的文件全部拷贝到sonatype-work/nexus/indexer/central-ctx/
在终端中输入如下代码[root@localhost indexer]# cp -r * /home/monkey/software/nexus2.12/sonatype-work/nexus/indexer/central-ctx
6.启动nexus进行自动更新索引
输入如下代码启动:
[root@localhost bin]# ./nexus start- 1
成功后通过浏览器打开nexus,点击刷需即可看到索引已经自动更新啦!
