一、前言
Spring Boot是Spring系列框架的集成,使用“习惯优于配置”的理念快速搭建项目,在项目打包时还能根据需求打包为jar(内置servlet容器)或war文件,相对以前的Spring、Spring MVC来说Spring Boot并没有技术上的升级,而是为我们做好了大部分场景下的配置,使得我们可以避免冗长的xml配置,专注于业务逻辑的开发,熟悉后可以极大的加快项目开发的速度。
二、开发环境
- JDK8 http://www.oracle.com/technetwork/java/javase/downloads/jdk8-downloads-2133151.html
- Eclipse 4.7.2 https://www.eclipse.org/downloads/
- STS 3.9.2(Spring Tools Suite Eclipse, 在Marketplace搜索即可安装) https://spring.io/tools/sts/
- Maven 3.5.0 http://maven.apache.org/download.cgi
- Spring Boot 1.5.9.release https://projects.spring.io/spring-boot/
Window 10
三、开始开发
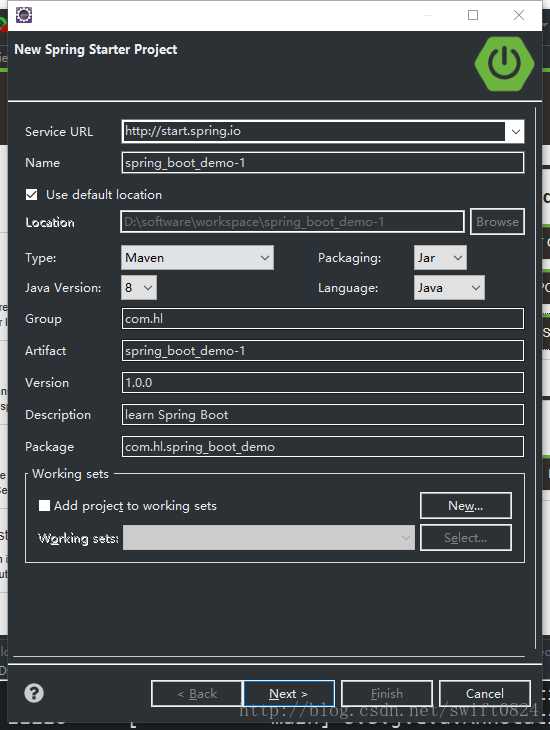
1.快速搭建Spring Boot项目
打开浏览器输入:https://start.spring.io/ ,可使用官方提供的构建工具选择我们需要的开发模块。如果安装了STS 3.9.2(Spring Tools Suite,到Eclipse Marketplace搜索安装即可),可直接在DashBorad中创建Starter项目,创建好的项目会直接导入Eclipse中
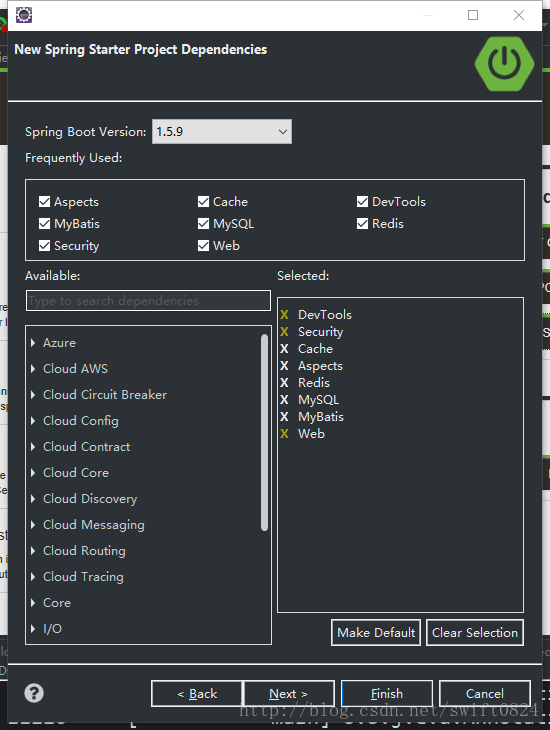
这里我们只选择web模块即可(就是spring mvc),打开创建好的项目查看项目结构
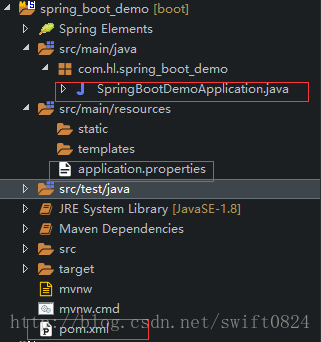
SpringBootDemoApplication.java,这个类是项目的入口类,里面含有main方法application.properties(或application.yml),可以说是唯一的配置文件,如果想要修改某些配置,如运行端口之类就可以在这里配置pom.xml,这个不用说maven配置文件,包含我们的依赖、打包配置。
2.运行项目
为了展示项目效果,我们只需做一件事,打开主类SpringBootDemoApplication,在class上加上@RestController(相当于@Controller+@ResponseBody),然后写一个简单方法返回消息
@SpringBootApplication
@RestController
public class SpringBootDemoApplication {

    @RequestMapping("/say")
    public String say(String msg) {
        return "Hello "+msg;
    }

    public static void main(String[] args) {
        SpringApplication.run(SpringBootDemoApplication.class, args);
    }
}
右键run as Spring Boot App启动项目,访问http://localhost:8080/say?msg=World,即可看到网页输出Hello World,一个简单的web项目就已经搭建完成了,在这个过程中我们没有手写任何xml配置,也没有烦人的web.xml了。接下来我们就来看看项目的主要构成,首先是pom.xml
<?xml version="1.0" encoding="UTF-8"?>
<project xmlns="http://maven.apache.org/POM/4.0.0" xmlns:xsi="http://www.w3.org/2001/XMLSchema-instance"
    xsi:schemaLocation="http://maven.apache.org/POM/4.0.0 http://maven.apache.org/xsd/maven-4.0.0.xsd">
    <modelVersion>4.0.0</modelVersion>
    <groupId>com.hl</groupId>
    <artifactId>spring_boot_demo</artifactId>
    <version>1.0.0</version>
    <packaging>jar</packaging>
    <name>spring_boot_demo</name>
    <description>learn Spring Boot</description>
    <parent>
        <!-- 添加Spring Boot 的父级依赖,可以省去version标签,因为parent已经为我们提供默认依赖了 -->
        <groupId>org.springframework.boot</groupId>
        <artifactId>spring-boot-starter-parent</artifactId>
        <version>1.5.9.RELEASE</version>
        <relativePath/> <!-- lookup parent from repository -->
    </parent>
    <properties>
        <!--
            项目编码设为utf-8,为了防止乱码,建议大家开发过程中统一使用utf-8编码,从代码到工具都是,
            eclipse wrokspace设置utf-8和unix模式,其他文本编辑工具如notepad++等也是如此,统一
            编码环境很好地避免了乱码问题,同时也增加了与linux的兼容性,因为项目部署基本都是在linux环境上
        -->
        <project.build.sourceEncoding>UTF-8</project.build.sourceEncoding>
        <project.reporting.outputEncoding>UTF-8</project.reporting.outputEncoding>
        <java.version>1.8</java.version>
    </properties>
    <dependencies>
        <dependency>
            <!-- 添加Spring MVC依赖 -->
            <groupId>org.springframework.boot</groupId>
            <artifactId>spring-boot-starter-web</artifactId>
        </dependency>
        <dependency>
            <groupId>org.springframework.boot</groupId>
            <artifactId>spring-boot-starter-test</artifactId>
            <scope>test</scope>
        </dependency>
    </dependencies>
    <build>
        <plugins>
            <plugin>
                <groupId>org.springframework.boot</groupId>
                <artifactId>spring-boot-maven-plugin</artifactId>
            </plugin>
        </plugins>
    </build>
</project>
其次是主类SpringBootDemoApplication,主类上的注解@SpringBootApplication 是项目唯一的,主要组合了@Configuration、@EnableAutoConfiguration、@ComponentScan,添加了此注解Spring会自动扫描该类同级包及其子包,因此一般将其放在groupId+artifactId包下。Spring Boot根据开发功能的不同提供了各种starter依赖,有的是第三方自己实现的,只要添加了功能对应的starter依赖,Spring Boot就会自动配置。如果一定要使用xml,可以通过Spring提供的@ImportResource来加载xml配置
@ImportResource({"classpath:spring-redis.xml","classpath:xxx"})官方提供的starter-pom
https://docs.spring.io/spring-boot/docs/1.5.9.RELEASE/reference/htmlsingle/#using-boot-starter
最后是配置文件application.properties,同时也可以使用yaml语言来配置文件,yaml是以数据为中心的语言,在配置数据的时候具有面向对象的特征,因此我们就采用yaml来进行配置,用法很简单此处不多赘述,具体请自行搜索
官方属性集合:
https://docs.spring.io/spring-boot/docs/current/reference/html/common-application-properties.html
3.Thymeleaf 模板引擎
Spring Boot提供了大量模板引擎,包括FreeMarker、Groovy、Thymeleaf、Velocity和Mustache,Spring Boot推荐使用Thymeleaf,因为其提供了完美的Spring MVC支持。
接下来我们将使用Thymeleaf显示一个简单页面,首先添加依赖
        <!-- 添加Thymeleaf支持,Spring Boot也将自动配置 -->
        <dependency>
            <groupId>org.springframework.boot</groupId>
            <artifactId>spring-boot-starter-thymeleaf</artifactId>
        </dependency>
        <!-- 使用webjar管理前端资源,此处引入bootstrap和jquery方便演示 -->
        <dependency>
            <groupId>org.webjars</groupId>
            <artifactId>jquery</artifactId>
            <version>2.1.1</version>
        </dependency>
        <dependency>
            <groupId>org.webjars</groupId>
            <artifactId>bootstrap</artifactId>
            <version>3.3.7</version>
        </dependency>
        <!-- 辅助定位静态资源 ,省略版本号-->
        <dependency>
            <groupId>org.webjars</groupId>
            <artifactId>webjars-locator</artifactId>
</dependency>接下来要创建演示用的实体类Person,根据Spring Boot官方文档,推荐项目结构为:
com
 +- example
     +- myproject
         +- Application.java
         |
         +- domain
         |   +- Customer.java
         |   +- CustomerRepository.java
         |
         +- service
         |   +- CustomerService.java
         |
         +- web
             +- CustomerController.java
因此我们在domain包下创建Person类
public class Person {

    private String name;

    private Integer age;

    public String getName() {
        return name;
    }

    public void setName(String name) {
        this.name = name;
    }

    public Integer getAge() {
        return age;
    }

    public void setAge(Integer age) {
        this.age = age;
    }
}
在web包下创建ThymeleafController:
@Controller
public class ThymeleafController {


    @RequestMapping("/")
    public String toIndex(Model model) {
        Person p1 = new Person("aa",11);
        Person p2 = new Person("bb",22);
        Person p3 = new Person("cc",33);
        Person p4 = new Person("dd",44);
        Person p5 = new Person("ee",55);
        List<Person> plist = new ArrayList<Person>();
        plist.add(p1);
        plist.add(p2);
        plist.add(p3);
        plist.add(p4);
        plist.add(p5);
        model.addAttribute("person", p1);
        model.addAttribute("people", plist);
        return "index";
    }
}最后是演示页面,在src/main/resources/template下新建index.html,内容如下:
<!DOCTYPE html>
<html xmlns:th="http://www.thymeleaf.org">
<head>
<meta http-equiv="Content-Type" content="text/html; charset=utf-8"/>
<meta http-equiv="X-UA-Compatible" content="IE=edge"/>
<meta name="viewport" content="width=device-width, initial-scale=1"/>
<link th:src="@{/webjars/bootstrap/css/bootstrap.min.css}" rel="stylesheet"/>
<link th:src="@{/webjars/bootstrap/css/bootstrap-theme.min.css}" rel="stylesheet"/>
<script th:src="@{/webjars/jquery/jquery.min.js}" type="text/javascript"></script>
<script th:src="@{/webjars/bootstrap/js/bootstrap.min.js}" type="text/javascript"></script>
<title>Thymeleaf Demo</title>
</head>
<body>
      <hr/>
      <div class="panel panel-primary">
          <div class="panel-heading">
              <h3 class="panel-title">访问model数据</h3>
          </div>
          <div class="panel-body">
              <span th:text="${person.name}"></span>
          </div>
      </div>
      <hr/>
      <div th:if="${not #lists.isEmpty(people)}">
          <div class="panel panel-primary">
          <div class="panel-heading">
              <h3 class="panel-title">遍历集合数据</h3>
          </div>
          <div class="panel-body">
              <ul class="list-group">
                  <li class="list-group-item" th:each="p:${people}">
                      <span th:text="${p.name}"></span>
                      <span th:text="${p.age}"></span>
                      <button class="btn" th:onclick="'getName(\''+${p.name}+'\');'">
                                                                   获取名字
                      </button>
                  </li>
              </ul>
          </div>
      </div>
      </div>
      <script th:inline="javascript">
          var person = [[${person}]];
          console.log(person.name+"/"+person.age);

          function getName(name){
            console.log(name);
          }
      </script>
</body>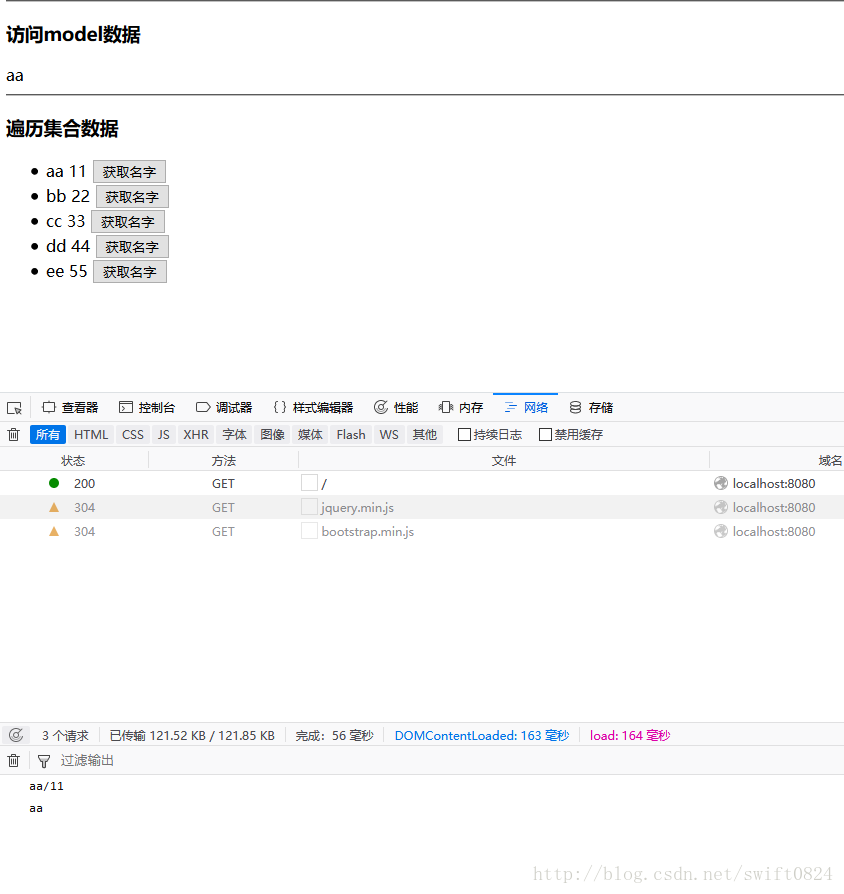
</html>运行项目,访问http://localhost:8080 即可查看效果
Spring Boot 通过 org.springframework.boot.autoconfigure.thymeleaf包对Thymeleaf进行了配置,查看其中的ThymeleafProperties类可以看到其默认配置了
@ConfigurationProperties(prefix = "spring.thymeleaf")
public class ThymeleafProperties {
    //模板编码默认为utf-8
    private static final Charset DEFAULT_ENCODING = Charset.forName("UTF-8");
    private static final MimeType DEFAULT_CONTENT_TYPE = MimeType.valueOf("text/html");
    //默认前缀,放置在classpath:/templates/下
    public static final String DEFAULT_PREFIX = "classpath:/templates/";
    //默认后缀为.html
    public static final String DEFAULT_SUFFIX = ".html";
    //模板引擎模式默认为html5
    private String mode = "HTML5";
......
}可以看到配置前缀是spring.thymeleaf,因此我们可以通过application.yml配置Thymeleaf的一些属性
spring:
    thymeleaf:
        #关闭Thymeleaf缓存,开发时配置
        cache: false
        #设置模板模式为html,默认为html5
        mode: HTML
注:Spring Boot 默认使用Thymeleaf版本为2.1.6,如果要使用新版本可直接在pom.xml中配置
        <!-- 此版本为官方支持的最新版本,建议与官方同步,避免出现未知bug -->
        <thymeleaf.version>3.0.2.RELEASE</thymeleaf.version>
        <thymeleaf-layout-dialect.version>2.1.1</thymeleaf-layout-dialect.version>
4.杂项
1)全局配置文件application.peoperties(application.yml)支持不同环境下使用不同配置,首先主配置文件是固定,我们将固定的配置放在里面,然后定义开发环境和生成环境的配置,来区分一些线上需要更改的属性,如数据库连接密码、模板缓存、日志级别等等,同时也可以包含更多的文件。
(详细见 https://docs.spring.io/spring-boot/docs/current/reference/html/boot-features-profiles.html)
比如说要使用三个配置文件:
-application.yml //主配置
-application-dev.yml //开发环境配置
-application-prod.yml //生产环境配置
-application-db.yml //数据库配置
//启用开发环境配置和数据库配置则在主配置文件这么写,此时主配置、dev、db将生效
spring:
profiles:
active: dev
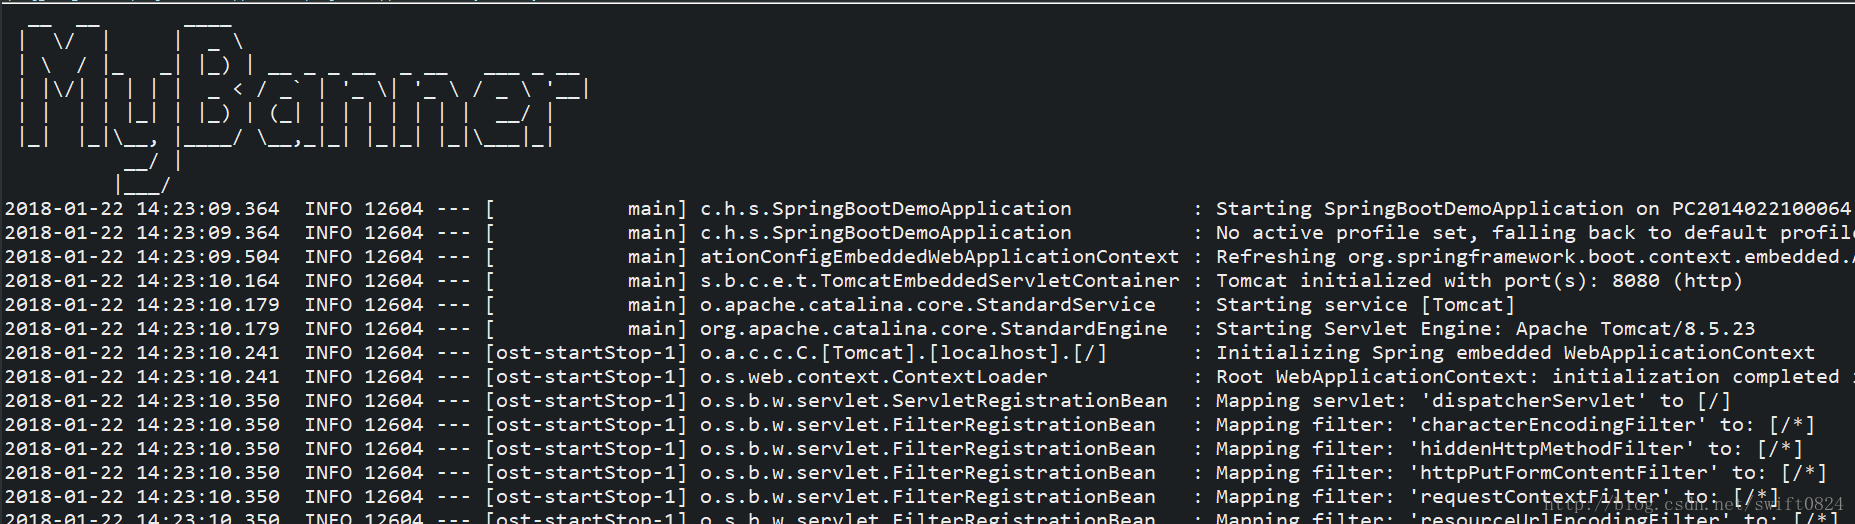
include: db2)Spring Boot项目启动时控制台会显示banner,默认是Spring Boot的banner,如需更换的话只需在src/main/resources下新建banner.txt文件,将banner写入其中即可,banner生成网站
http://patorjk.com/software/taag/#p=display&f=Chiseled&t=Type%20Something%20
如果要关闭banner显示的话可以修改主类main方法
        //SpringApplication.run(SpringBootDemoApplication.class, args);
        SpringApplication app = new SpringApplication(SpringBootDemoApplication.class);
        app.setBannerMode(Banner.Mode.OFF);
app.run(args);3)将项目打包为war发布到tomcat中。此时的项目默认是打包为jar包的,并且内嵌Servlet容器(默认为Tomcat7),开发时很方便直接右键运行或者命令行mvn spring-boot:run或者java -jar xxx.jar,但发布到生成环境时也许不需要内置tomcat,官方也提供了打包为war的方法,只需三步(我建议再加一步,与Spring Boot无关,所有maven项目都该加,防止xml等配置文件打包时丢失):
1. 主类继承 SpringBootServletInitializer

@SpringBootApplication
public class Application extends SpringBootServletInitializer {

    @Override
    protected SpringApplicationBuilder configure(SpringApplicationBuilder application) {
        return application.sources(Application.class);
    }

    public static void main(String[] args) throws Exception {
        SpringApplication.run(Application.class, args);
    }

}
2. 修改pom.xml
<packaging>war</packaging>

3. 修改tomcat scope为provided

<dependency>
        <groupId>org.springframework.boot</groupId>
        <artifactId>spring-boot-starter-tomcat</artifactId>
        <scope>provided</scope>
    </dependency>
4.强制将配置文件打到war包中
    ......
    </plugins>
        <resources>
            <resource>
                <directory>src/main/resources</directory>
            </resource>
            <resource>
                <directory>src/main/java</directory>
                <includes>
                    <include>**/*.xml</include>
                </includes>
                <filtering>false</filtering>
            </resource>
        </resources>
    ......
    </build>
</project>
四、后记
本文主要记录了如何快速搭建一个Spring Boot项目,并利用Thymeleaf进行了前端展示,在此过程中我们只用了很少的几步就完成了一个简单web项目的搭建,以前使用Spring MVC时大量的xml配置都帮我们省去了,当然不代表我们就不用修改配置了,在之后的web开发中我们也会慢慢接触到必须修改配置的情况,所以配置虽然省了但我们还是要详细了解。
参考文献:
《javaee开发的颠覆者 Spring Boot实战》
官方文档 https://docs.spring.io/spring-boot/docs/1.5.9.RELEASE/reference/htmlsingle/