主要内容:
Docker Client在Docker中的定位,以及Docker Client源码的初步分析。
本文选取Docker拆分为DockerCE(社区版)和DockerEE(企业版)之后的Docker-CE的第一个稳定版本v17.06.0-ce。
https://github.com/docker/docker-ce
Docker背景:
Docker Client是绝大部分用户使用Docker的入口,例如一次docker pull请求,需要经过很多层调用,如下图:
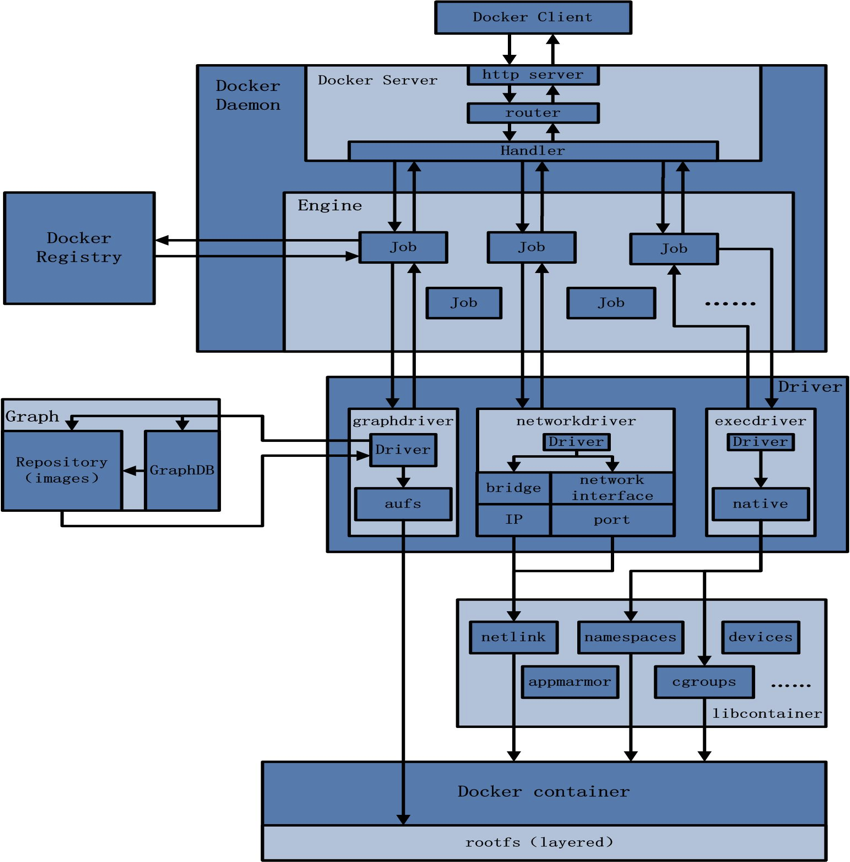
Client创建一个docker pull的请求,发送给Deamon的http server,server接受之后通过Router路由到相应的的Handler, Handler便会创建一个PostImageCreate的Job交给Engine执行(不同的Job功能不同,需要的底层功能也不同), 该Job会先去Docker Registory拉取镜像,之后交给Graph Dirver,Graph Dirver再将镜像存储到本地的roootfs中。 上述过程中,我们发现Client不做任何的操作,而是构建请求,发送给Deamon执行。
那么我们会想,如果绕过Client,是否也可以向Deamon发送请求呢?答案是可以的,如下图:
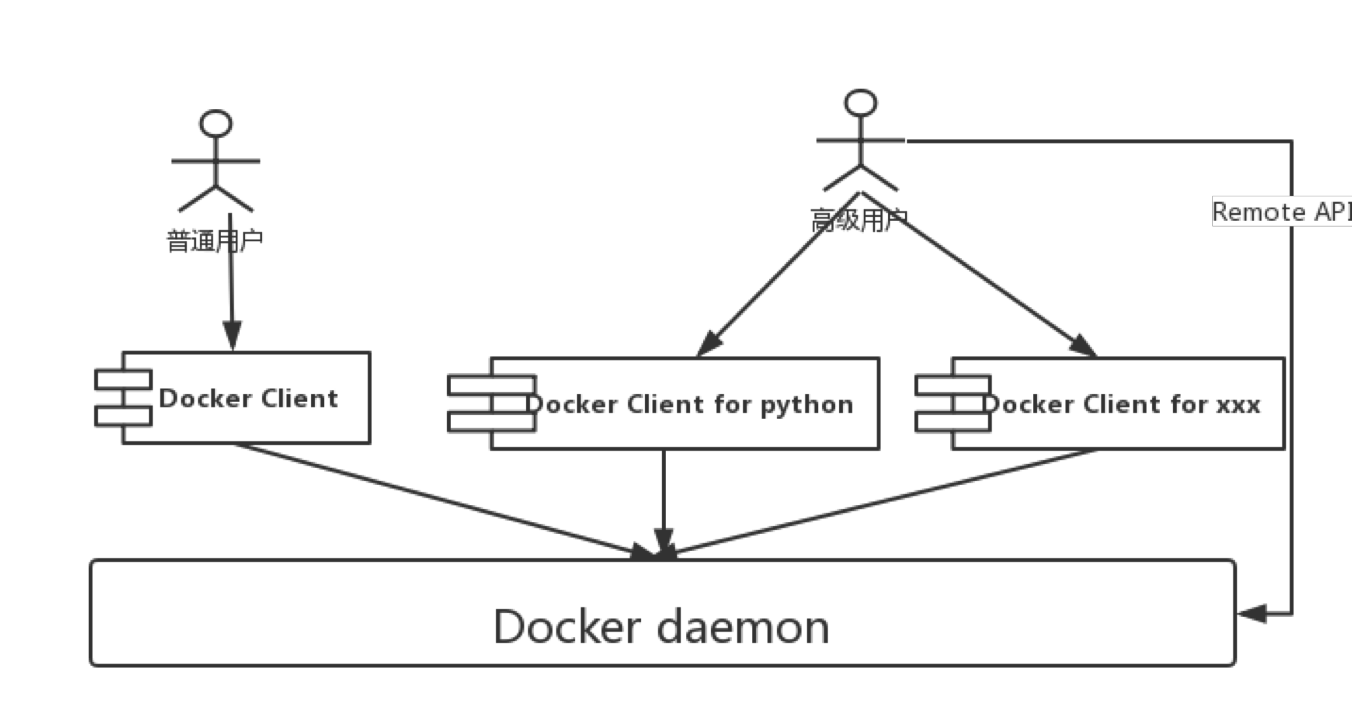
Client可以访问Deamon的API,那么用户也可以直接访问Deamon的API,而且为了方便二次开发,Docker同时提供了很多语言的SDK供开发者选择,例如Docker Client for python。 下面我们正式进入Client。
Docker Client为什么选择了golang?
这个问题其实准确的说是“为什么Docker会选择golang来开发”,go有很多优点,下面我们细数一下
- python的那种简洁
- 行末不强制分号
- 支持多值返回
- c的那种高效
- 编译性语言
- 保留指针(被称为21世纪的C语言)
- 极少的运行时依赖(部署简单)
- java的那种安全
- 内存管理(垃圾回收)
- 语言层面支持并发
- 关键字支持:go select chan
博主认为Docker创建之初,最重要的一点是部署简单,运行时依赖极少,仅仅依赖glibc,它是linux最底层的API,几乎其他任何库都会依赖于glibc。Docker是部署到用户的机器上的,最重要的是通用性,所以运行时依赖越少越好。此些恰恰原因也是Docker Client使用golang开发的主要原因。
有的读者会想,我没学习过golang,会不会影响我学习Docker Client源码?其实语言只是一种工具,编程语言大同小异,简单看看语法,就能够阅读个大概,博主写了一些Java于golang针对相同需求的不同实现的例子,简单查看过后,便可以进行接下来的阅读。https://www.cnblogs.com/langshiquan/p/9937866.html
Docker Client执行流程
一.initialization阶段
- 初始化日志配置
- 初始化DockerCli实例,填充Stdin,Stdout,Stderr
- 初始化Command根命令并组装
- 添加Help等通用配置
- 添加所有支持的子命令的配置
具体见下面的代码:
Client入口:components/cli/cmd/docker/docker.go
package main
// import省略
func main() {
    // Set terminal emulation based on platform as required.
        // 获取Stdin,Stdout,Stderr
    stdin, stdout, stderr := term.StdStreams()
        // 1.初始化日志配置
    logrus.SetOutput(stderr)
        //  2.初始化DockerCli实例,填充Stdin,Stdout,Stderr
    dockerCli := command.NewDockerCli(stdin, stdout, stderr)
        // 3.初始化Command根命令并组装
    cmd := newDockerCommand(dockerCli)
        // 执行,判断err结果
    if err := cmd.Execute(); err != nil {
        if sterr, ok := err.(cli.StatusError); ok {
            if sterr.Status != "" {
                fmt.Fprintln(stderr, sterr.Status)
            }
            // StatusError should only be used for errors, and all errors should
            // have a non-zero exit status, so never exit with 0
            if sterr.StatusCode == 0 {
                os.Exit(1)
            }
            os.Exit(sterr.StatusCode)
        }
        fmt.Fprintln(stderr, err)
        os.Exit(1)
    }
}
上面提到了一个DockerCli和Command二个对象,接下来对其进行一些说明
DockerCli数据结构
// DockerCli is an instance the docker command line client.
// 此结构体是核心的结构体,每个子命令的执行都会用到它
type DockerCli struct {
    configFile         *configfile.ConfigFile    // ~/.docker/config.json文件的配置信息
    in                    *InStream                   // Stdin
    out                  *OutStream                // Stdout
    err                   io.Writer                     // Stderr
    client               client.APIClient            //  用于与deamon通讯(重要)
    defaultVersion  string                          //  版本信息
    server              ServerInfo                    // ServerInfo信息
                                HasExperimental bool    // 是否开启试验性功能
                                OSType          string     // 操作系统类型
}
Command数据结构
// Command is just that, a command for your application.
type Command struct{
    Use string
// Use is the one-line usage message. 代表的命令,例如image
    Short string
// Short is the short description shown in the 'help' output.  help的简单信息
    PersistentPreRunE func(cmd *Command, args []string) error
// PersistentPreRunE: PersistentPreRun but returns an error.    // 在运行前执行
    RunE func(cmd *Command, args []string) error
// RunE: Run but returns an error.    // 真正的运行
    commands []*Command
// commands is the list of commands supported by this program.    // 支持的子命令集合
    parent *Command
// parent is a parent command for this command.        // 父命令
    Args PositionalArgs
// Expected arguments  举例:docker pull tomcat   此次的tomcat对应此处
    flags *flag.FlagSet
// flags is full set of flags.            // 参数的集合
// 省略其他不常用的属性
}
Command组装代码:
对于docker组装子Command:components/cli/command/commands/commands.go
对于docker image组装子Command:components/cli/command/images/cmd.go
二.PreRun阶段
Client的生命周期很短,用户按下回车的时候开始,运行完便结束,Client的声明周期绝大程度上绑定在命令行框架(Docker Client使用的命令行框架是cobra)之上,所以几乎所有的命令行工具,都会存在这几个过程。
PreRun阶段无非做一些参数解析、全局的配置等等,接下来,我们看看Docker Client在此阶段都做了哪些事情。
- 解析参数
- Client级别的配置
- 是否开启debug
- 设置日志级别
- 配置文件位置
- 版本号
- 初始化DockerCli上下文(上一步实例化,但是并不完整,一些属性依赖与用户的输入参数)
- 初始化DockerCli.APIClient
- 初始化Server的基本信息(操作系统类型等)
- 初始化配置文件位置
- 校验命令
- 版本是否支持
- 操作系统类型是否支持
- 实验性功能是否支持
// components/cli/cmd/docker/docker.go
func newDockerCommand(dockerCli *command.DockerCli) *cobra.Command {
        // 绑定在根命令上的参数,即docker命令
    opts := cliflags.NewClientOptions()
    var flags *pflag.FlagSet
        // docker根命令
    cmd := &cobra.Command{
        Use:              "docker [OPTIONS] COMMAND [ARG...]",
        Short:            "A self-sufficient runtime for containers",
        SilenceUsage:     true,
        SilenceErrors:    true,
        TraverseChildren: true,
        Args:             noArgs,
        RunE: func(cmd *cobra.Command, args []string) error {
            if opts.Version {
                showVersion()
                return nil
            }
            return command.ShowHelp(dockerCli.Err())(cmd, args)
        },
                // 二、PreRun阶段的入口
        PersistentPreRunE: func(cmd *cobra.Command, args []string) error {
            // daemon command is special, we redirect directly to another binary
            if cmd.Name() == "daemon" {
                return nil
            }
            // flags must be the top-level command flags, not cmd.Flags()
            opts.Common.SetDefaultOptions(flags)
            dockerPreRun(opts)
                        // 3. 初始化DockerCli上下文,重要函数dockerCli.Initialize,见下面代码块
            if err := dockerCli.Initialize(opts); err != nil {
                return err
            }
                        // 4. 校验命令
            return isSupported(cmd, dockerCli)
        },
    }
    cli.SetupRootCommand(cmd)

    flags = cmd.Flags()
        // 通过传递地址,讲解析之后的参数,传递到options中
    flags.BoolVarP(&opts.Version, "version", "v", false, "Print version information and quit")
    flags.StringVar(&opts.ConfigDir, "config", cliconfig.Dir(), "Location of client config files")
    opts.Common.InstallFlags(flags)

    setFlagErrorFunc(dockerCli, cmd, flags, opts)

    setHelpFunc(dockerCli, cmd, flags, opts)

    cmd.SetOutput(dockerCli.Out())
        // 加入docker deamon命令
    cmd.AddCommand(newDaemonCommand())
        // 组装所有子命令入口
    commands.AddCommands(cmd, dockerCli)

    setValidateArgs(dockerCli, cmd, flags, opts)

    return cmd
}
// dockerCli.Initialize函数
func (cli *DockerCli) Initialize(opts *cliflags.ClientOptions) error {
// LoadDefaultConfigFile尝试加载默认配置文件,如果没有找到,则返回初始化的ConfigFile结构
cli.configFile = LoadDefaultConfigFile(cli.err)
var err error
// 此client是向docker deamon发送请求的APIClient
// client.APIClient是一个很大的接口,有很多函数
cli.client, err = NewAPIClientFromFlags(opts.Common, cli.configFile)
if tlsconfig.IsErrEncryptedKey(err) {
var (
passwd string
giveup bool
)
passRetriever := passphrase.PromptRetrieverWithInOut(cli.In(), cli.Out(), nil)
for attempts := 0; tlsconfig.IsErrEncryptedKey(err); attempts++ {
// some code and comments borrowed from notary/trustmanager/keystore.go
passwd, giveup, err = passRetriever("private", "encrypted TLS private", false, attempts)
// Check if the passphrase retriever got an error or if it is telling us to give up
if giveup || err != nil {
return errors.Wrap(err, "private key is encrypted, but could not get passphrase")
}
opts.Common.TLSOptions.Passphrase = passwd
// NewAPIClientFromFlags creates a new APIClient from command line flags
cli.client, err = NewAPIClientFromFlags(opts.Common, cli.configFile)
}
}
if err != nil {
return err
}
cli.defaultVersion = cli.client.ClientVersion()
if ping, err := cli.client.Ping(context.Background()); err == nil {
cli.server = ServerInfo{
HasExperimental: ping.Experimental,
OSType: ping.OSType,
}
// since the new header was added in 1.25, assume server is 1.24 if header is not present.
if ping.APIVersion == "" {
ping.APIVersion = "1.24"
}
// if server version is lower than the current cli, downgrade
if versions.LessThan(ping.APIVersion, cli.client.ClientVersion()) {
cli.client.UpdateClientVersion(ping.APIVersion)
}
}
return nil
}
三.Run阶段
真正的具体的命令执行也很简单,Docker的Client不做任何实质性的功能,所有的请求都是发送给deamon来处理,所以做的事情很简单,具体如下- 参数处理,构建请求
- 向Docker daemon发送请求
- 处理响应
- 打印结果
- 返回状态
下文将以docker image list = docker images 命令为例:

// 组装的时候,会调取这个方法
func newListCommand(dockerCli command.Cli) *cobra.Command {
cmd := *NewImagesCommand(dockerCli)
cmd.Aliases = []string{"images", "list"}
cmd.Use = "ls [OPTIONS] [REPOSITORY[:TAG]]"
return &cmd
}
// NewImagesCommand creates a new `docker images` command
func NewImagesCommand(dockerCli command.Cli) *cobra.Command {
// images命令需要的所有参数,不同的命令的options不同
options := imagesOptions{filter: opts.NewFilterOpt()}
cmd := &cobra.Command{
Use: "images [OPTIONS] [REPOSITORY[:TAG]]",
Short: "List images",
Args: cli.RequiresMaxArgs(1),
RunE: func(cmd *cobra.Command, args []string) error {
if len(args) > 0 {
options.matchName = args[0]
}
// 真正的执行方法,见下
return runImages(dockerCli, options)
},
}
flags := cmd.Flags()
// 将参数解析的结果,放到options
flags.BoolVarP(&options.quiet, "quiet", "q", false, "Only show numeric IDs")
flags.BoolVarP(&options.all, "all", "a", false, "Show all images (default hides intermediate images)")
flags.BoolVar(&options.noTrunc, "no-trunc", false, "Don't truncate output")
flags.BoolVar(&options.showDigests, "digests", false, "Show digests")
flags.StringVar(&options.format, "format", "", "Pretty-print images using a Go template")
flags.VarP(&options.filter, "filter", "f", "Filter output based on conditions provided")
return cmd
}
// 真正的执行方法
func runImages(dockerCli command.Cli, options imagesOptions) error {
// go语言的context包的功能
ctx := context.Background()
// 获取用户输入--fiter的内容
filters := options.filter.Value()
// 用户输入的arg
if options.matchName != "" {
filters.Add("reference", options.matchName)
}
listOptions := types.ImageListOptions{
// 用户输入的-a参数
All: options.all,
Filters: filters,
}
// 通过此Client访问deamon,拿到镜像列表
images, err := dockerCli.Client().ImageList(ctx, listOptions)
if err != nil {
return err
}
// 用户输入的--format参数
format := options.format
if len(format) == 0 {
// 如果无用户输入的format,则读取配置文件中的配置,且非静默模式(-q),否则使用静默模式的format
if len(dockerCli.ConfigFile().ImagesFormat) > 0 && !options.quiet {
format = dockerCli.ConfigFile().ImagesFormat
} else {
format = formatter.TableFormatKey
}
}
imageCtx := formatter.ImageContext{
Context: formatter.Context{
// 输出配置
Output: dockerCli.Out(),
// 格式信息
Format: formatter.NewImageFormat(format, options.quiet, options.showDigests),
// 用户输入的--no-trunc信息,意思为全量打印
Trunc: !options.noTrunc,
},
// 用户输入的--digests 是否显示摘要信息
Digest: options.showDigests,
}
// 具体的格式化打印细节暂略
return formatter.ImageWrite(imageCtx, images)
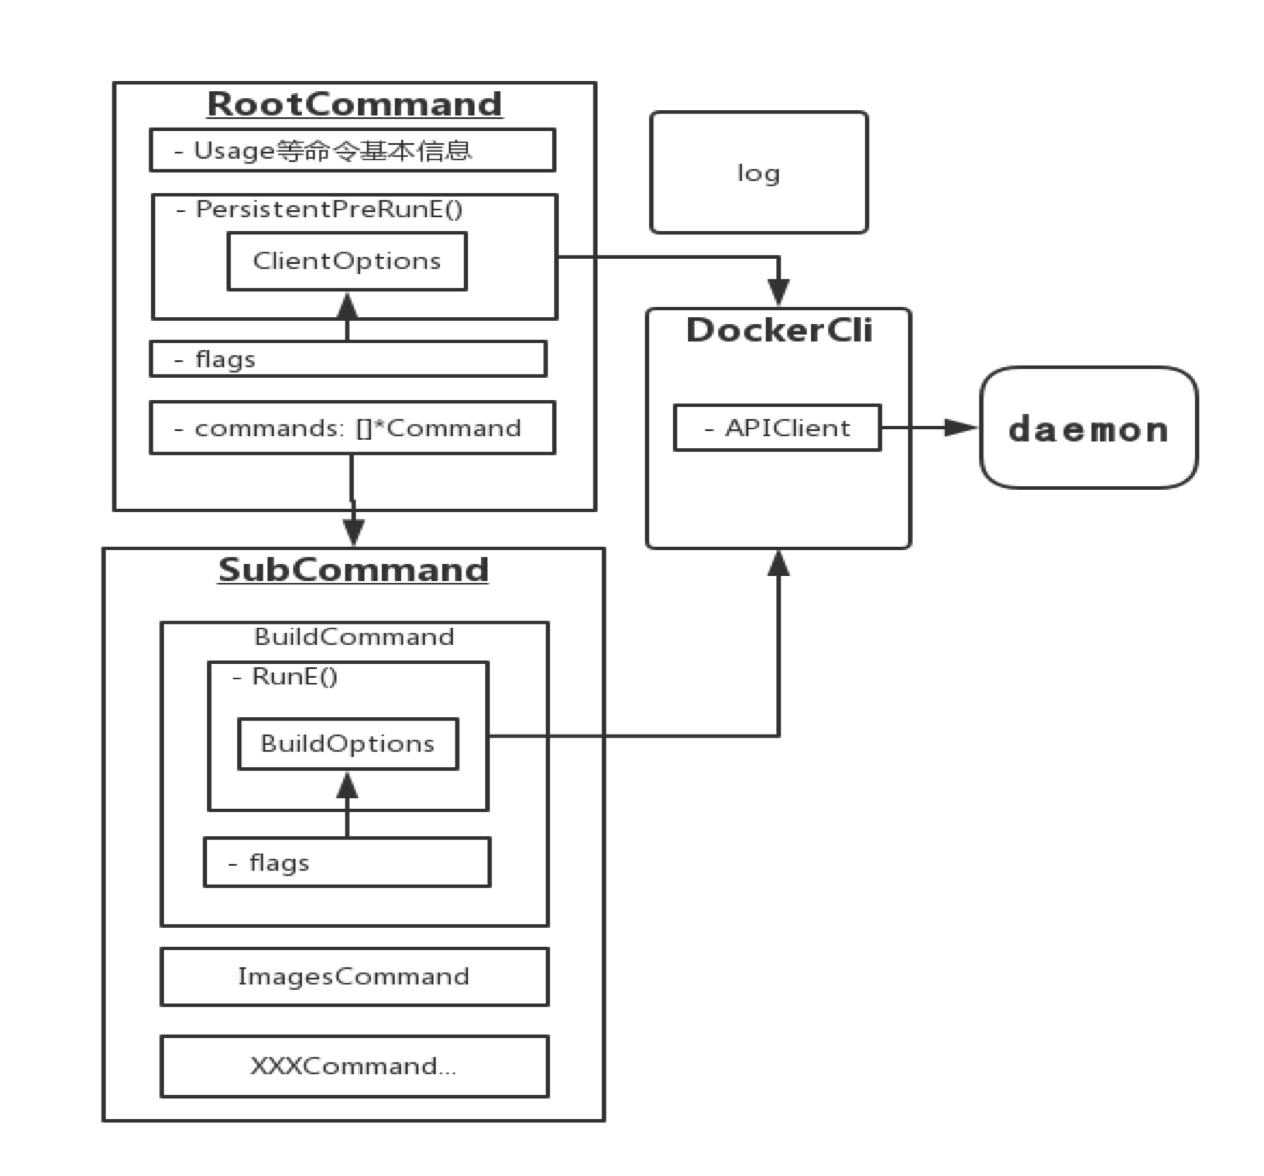
}Docker Cli架构总结:
此处主要是分析如何组装如此多的命令,是一个大体的图示。