这段时间在研究CAS单点登录,已做了十几个软件的集成登录,有demo,有实际的各种应用软件,目前最难啃的就是这个webmail集成登录,一是因为邮箱系统本身安全性高,二是要通过扩展插件和 API接口,三是网上没有找到有价值的资料,该修改那个文件,全靠看源代码调试摸索。
1.集成效果
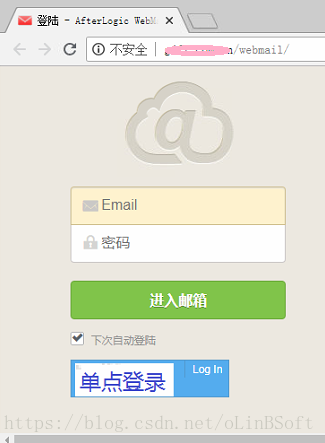
点击单点登录,如果已登录CAS,会直接跳入邮箱界面,没有登录CAS,会先跳转到CAS登录,登录后再自动跳转到邮箱界面。

2. cas集成Oauth2.0技术,参见昨天写的文章:https://blog.csdn.net/oLinBSoft/article/details/82493745
3. Afterlogic webmail 要开通ouath2.0登录,主要设置如下
4. 测试oauth模块。使用的是php 第三方的oauth模块
在目录 htdocs\webmail\libraries\OAuthClient 有很多如facebook,twitter,github等等的连接代码,我复制的是login_with_twitter.php文件到caslogin.php 文件,再做修改,修改后原文如下:
<?php
require('http.php');
require('oauth_client.php');
$client = new oauth_client_class;
$client->debug = 1;
$client->debug_http = 1;
$client->server = 'Linbsoft'; //你的服务名称
$client->redirect_uri = 'http://'.$_SERVER['HTTP_HOST'].
dirname(strtok($_SERVER['REQUEST_URI'],'?')).'/caslogin.php';
$client->client_id = '88889999'; //你在cas oauth service设置的应用Id
$application_line = __LINE__;
$client->client_secret = '12345678acedfrfrf'; //你在cas oauth service设置的应用client_secret
$client->grant_type = 'authorization_code';
if(strlen($client->client_id) == 0
|| strlen($client->client_secret) == 0)
die('没有client_id或client_secret');
if(($success = $client->Initialize()))
{
if(($success = $client->Process()))
{
if(strlen($client->access_token))
{
$success = $client->CallAPI(
'https://author.linbsoft.com/cas/oauth2.0/profile',
'GET', array(), array('FailOnAccessError'=>true), $user);
}
else
$success = strlen($client->error = $client->access_token_error) === 0;
}
$success = $client->Finalize($success);
}
if($client->exit)
exit;
if($success)
{
?>
<!DOCTYPE HTML PUBLIC "-//W3C//DTD HTML 4.01 Transitional//EN">
<html>
<head>
<title>CAS OAuth 2 client results</title>
</head>
<body>
<?php
echo '<h1>Retrieved the CAS profile of ', HtmlSpecialChars($user->id),
' successfully!</h1>';
echo '<pre>', HtmlSpecialChars(print_r($user, 1)), '</pre>';
?>
</body>
</html>
<?php
}
else
{
?>
<!DOCTYPE HTML PUBLIC "-//W3C//DTD HTML 4.01 Transitional//EN">
<html>
<head>
<title>OAuth client error</title>
</head>
<body>
<h1>OAuth client error</h1>
<pre>Error: <?php echo HtmlSpecialChars($client->error); ?></pre>
</body>
</html>
<?php
}
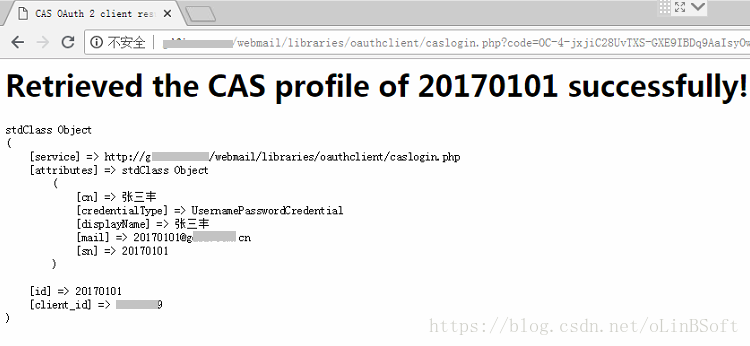
?>5.如果顺利,可以测试与cas服务器 oauth2.0连接成功取回用户信息
6.但真正起作用的并不是这个文件,这只是测试说明可以配置了,现在开始配置webmail的单点登录
7.修改htdocs\webmail\libraries\OAuthClient\oauth_client.php文件,在相应位置增加如下几行
			case 'Linbsoft':
				$this->oauth_version = '2.0';
				$this->dialog_url = 'https://author.linbsoft.comn/cas/oauth2.0/authorize?response_type=code&client_id={CLIENT_ID}&redirect_uri={REDIRECT_URI}';
				$this->access_token_url = 'https://author.linbsoft.com/cas/oauth2.0/accessToken';
				break;
8. 在 htdocs\webmail\data\plugins\external-services\connectors目录,原来有facebook,google,twitter等目录,把twitter目录复制到同目录下linbsoft目录,修改linbsoft目录下的index.php,完整代码如下:
<?php
class CExternalServicesConnectorLinbsoft extends CExternalServicesConnector
{
public static $ConnectorName = 'linbsoft';
public static function GetSupportedScopes()
{
return array('auth');
}
public static function CreateClient($oTenant)
{
$oClient = null;
$oSocial = $oTenant->getSocialByName(self::$ConnectorName);
if(isset($oSocial) && $oSocial->SocialAllow)
if(isset($oSocial))
{
$sRedirectUrl = rtrim(\MailSo\Base\Http::SingletonInstance()->GetFullUrl(), '\\/ ').'/?external-services=' . self::$ConnectorName;
if (!strpos($sRedirectUrl, '://localhost'))
{
$sRedirectUrl = str_replace('http:', 'http:', $sRedirectUrl);
}
require(PSEVEN_APP_ROOT_PATH.'libraries/OAuthClient/http.php');
require(PSEVEN_APP_ROOT_PATH.'libraries/OAuthClient/oauth_client.php');
$oClient = new \oauth_client_class;
$oClient->debug = self::$Debug;
$oClient->debug_http = self::$Debug;
$oClient->server = 'Linbsoft';
$oClient->redirect_uri = $sRedirectUrl;
$oClient->client_id = $oSocial->SocialId;
$oClient->client_secret = $oSocial->SocialSecret;
$oClient->grant_type = 'authorization_code';
}
return $oClient;
}
public static function Init($oTenant = null)
{
parent::Init($oTenant);
$bResult = false;
$oUser = null;
$oClient = self::CreateClient($oTenant);
if($oClient)
{
if(($success = $oClient->Initialize()))
{
if(($success = $oClient->Process()))
{
if(strlen($oClient->access_token))
{
$success = $oClient->CallAPI(
'https://author.linbsoft.com/cas/oauth2.0/profile',
'GET',
array(),
array('FailOnAccessError'=>true),
$oUser
);
}
}
$success = $oClient->Finalize($success);
}
if($oClient->exit)
{
$bResult = false;
exit;
}
if($success && $oUser)
{
$aSocial = array(
'type' => self::$ConnectorName,
'id' => $oUser->id,
'name' => $oUser->cn,
'email' => isset($oUser->attributes->mail) ? $oUser->attributes->mail : '',
'access_token' => $oClient->access_token,
'scopes' => self::$Scopes
);
\CApi::Log('social_user_' . self::$ConnectorName);
\CApi::LogObject($oUser);
$bResult = $aSocial;
}
else
{
$bResult = false;
$oClient->ResetAccessToken();
self::_socialError($oClient->error, self::$ConnectorName);
}
}
return $bResult;
}
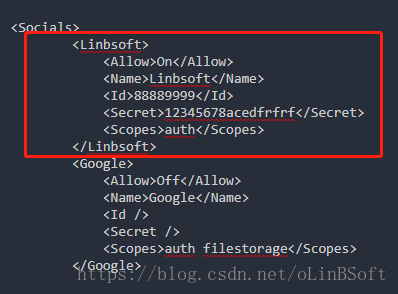
}9. 修改htdocs\webmail\data\settings\config.php文件
增加如红框所示

10. 修改htdocs\data\settings\settings.php文件
11.重启apache24和hmailserver服务,即可看见登录页多了一个单点登录的图标。
使用单点登录后,除非关闭浏览器,否则,退出邮箱系统,输入地址可以无需登录再次进入邮箱,因此,退出邮箱后,要记得关闭浏览器。