一、Linux下redis的安装
单台安装,测试用
打开https://redis.io/download,往下翻,Installation ,有详细的安装、启动和简单测试的命令
二、整合redis服务
下面就是在study项目中整合redis服务(根据自己的项目进行相应的修改):
1、pom.xml文件中增加redis需要的jar包配置


 <properties>
               <redis.version>2.9.0</redis.version>
    </properties>

<!-- https://mvnrepository.com/artifact/redis.clients/jedis -->
    <dependency>
        <groupId>redis.clients</groupId>
        <artifactId>jedis</artifactId>
        <version>${redis.version}</version>
    </dependency>
2、applicationContext.xml文件增加配置
    <!-- jedisPool配置信息 -->
    <bean id="poolConfig" class="redis.clients.jedis.JedisPoolConfig">
        <property name="maxIdle" value="${redis.maxIdle}" />
        <property name="maxTotal" value="${redis.maxActive}" />
        <property name="maxWaitMillis" value="${redis.maxWaitMillis}" />
        <property name="testOnBorrow" value="${redis.testOnBorrow}" />
    </bean>
    <!--配置redis数据源-->
    <bean id="jedisPool" class="redis.clients.jedis.JedisPool" destroy-method="destroy">
        <constructor-arg name="poolConfig" ref="poolConfig" /> <!-- 加载jedisPool配置信息 -->
        <constructor-arg name="host" value="${redis.host}" /><!-- redis主机地址 -->
        <constructor-arg name="port" value="${redis.port}"/> <!-- redis连接端口 -->
        <!-- <constructor-arg name="password" value="${redis.pass}"/> --> <!-- 密码 -->
        <!--<constructor-arg name="database" value="${redis.database}"/> 数据库 -->
        <constructor-arg name="timeout" value="${redis.timeout}"/> <!--连接超时 -->
    </bean>
3、增加redis.properties配置文件,路径:src/main/resources
# Redis配置
redis.host=192.168.25.128
redis.port=6379

#验证密码
redis.pass=

# 超时时间
redis.timeout=2000

# 最大连接数
redis.maxTotal=100

# 最大空闲数
redis.maxIdle=10

# 最小空闲数
redis.minIdle=5

redis.maxActive=600

# 获取连接时等待的最长时间
redis.maxWaitMillis=1000

# 测试连接可用性
redis.testOnBorrow=true
4、新增redisService.java文件,只写了几个简单的方法
package com.su.study.service;

import org.springframework.beans.factory.annotation.Autowired;
import org.springframework.stereotype.Service;

import redis.clients.jedis.Jedis;
import redis.clients.jedis.JedisPool;

@Service("redis")
public class RedisService {

    /**
     * 连接池
     */
    @Autowired
    private JedisPool jedisPool;

    public String set(String key, String value) {
        Jedis jedis = jedisPool.getResource();
        try {
            return jedis.set(key, value);
        } catch (Exception e) {
            e.printStackTrace();
            return null;
        }
    }

    public  String get(String key) {
        Jedis jedis = jedisPool.getResource();
        try {
            return jedis.get(key);
        } catch (Exception e) {
            e.printStackTrace();
            return null;
        }
    }

    public String setex(String key, String value, int seconds) {
        Jedis jedis = jedisPool.getResource();
        try {
            return jedis.setex(key, seconds, value);
        } catch (Exception e) {
            e.printStackTrace();
            return null;
        }
    }

    public Long del(String key) {
        Jedis jedis = jedisPool.getResource();
        try {
            return jedis.del(key);
        } catch (Exception e) {
            e.printStackTrace();
            return null;
        }
    }

    public Boolean exists(String key) {
        Jedis jedis = jedisPool.getResource();
        try {
            return jedis.exists(key);
        } catch (Exception e) {
            e.printStackTrace();
            return false;
        }
    }

}
5、新增TestController.java文件
package com.su.study.controller;

import org.springframework.beans.factory.annotation.Autowired;
import org.springframework.stereotype.Controller;
import org.springframework.web.bind.annotation.RequestMapping;
import org.springframework.web.bind.annotation.RequestMethod;
import org.springframework.web.bind.annotation.ResponseBody;

import com.su.study.service.RedisService;

@Controller
@RequestMapping("/test")
public class TestController {

    /**
     * redis服务
     */
    @Autowired
    private RedisService redis;

    @RequestMapping(value = "/redis", method=RequestMethod.POST)
    @ResponseBody
    public Object redisTest() {
        redis.set("test", "abc");
        return redis.get("test");
    }

}
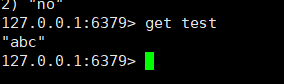
启动项目,使用postman模拟请求,http://localhost:8080/study/test/redis

查看redis
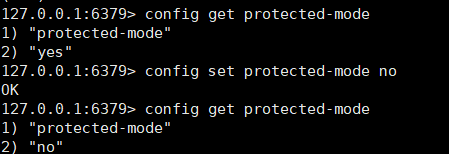
可能遇到的问题:
i、项目连不上redis
redis拒绝我们的连接是因为redis.conf 文件中默认打开bind 127.0.0.1,打开这个设置后redis 只接收来自于该 IP 地址的请求,如果不进行设置,那么将处理所有请求,所以可以把这个注释掉或者修改成0.0.0.0(或者使用redis服务的ip);如果还不能连接,检查下是否是因为防火墙原因导致的,自行百度下。
ii、启动项目后,postman请求出现错误,Unable to validate object,修改redis.conf文件中配置protected-mode,关闭保护模式。 命令:config set protected-mode no