【OpenCV3图像处理】Mat中元素的获取与赋值 ( 对比.at<>()函数 和 .ptr<>()函数)
2017年04月12日 10:08:55 阅读数:7542 标签: opencvopencv3 更多
个人分类: Opencv
所属专栏: OpenCV3 入门
版权声明:本文为博主原创文章,欢迎转载,请注明出处 https://blog.csdn.net/u011574296/article/details/70139563
Mat中像素的获取与赋值
计算机视觉中,图像的读取是图像处理的基础,图像就是一系列像素值,OpenCV使用数据结构cv::Mat来存储图像。cv::Mat是一个矩阵类,矩阵中每一个元素都代表一个像素,对于灰度图像,像素用8位无符号数,0表示黑色,255表示白色。对于彩色像素而言,每个像素需要三位这样的8位无符号数来表示,即三个通道(R,G,B),矩阵则依次存储一个像素的三个通道的值,然后再存储下一个像素点。
cv::Mat中,
cols代表图像的宽度(图像的列数),
rows代表图像的高度(图像的行数),
step代表以字节为单位的图像的有效宽度,
elemSize返回像素的大小,
channels()方法返回图像的通道数,
total函数返回图像的像素数。
像素的大小 = 颜色大小(字节)*通道数,
比如:
三通道short型矩阵(CV_16SC3)的大小为2*3 = 6,
三通道Byte型矩阵(CV_8UC3)的大小为1*3= 3,像素的channels方法返回图像的通道数,total函数返回图像的像素数。
RGB图像的颜色数目是256*256*256,本文对图像进行量化,缩减颜色数目到256的1/8(即32*32*32)为目标,分别利用一下几种方法实现,比较几种方法的安全和效率。
方法一:使用Mat的成员函数ptr<>()
cv::Mat中提供ptr函数访问任意一行像素的首地址,特别方便图像的一行一行的横向访问,如果需要一列一列的纵向访问图像,就稍微麻烦一点。但是ptr访问效率比较高,程序也比较安全,有越界判断。
int nl = image.rows; //行数
int nc = image.cols * image.channels();
for (int j = 0; j<nl; j++)
{
	uchar* data = image.ptr<uchar>(j);
	for (int i = 0; i<nc; i++)
	{
		data[i] = data[i] / div*div + div / 2;
	}
}
方法二:使用迭代器遍历图像
cv::Mat同样有标准模板库(STL),可以使用迭代器访问数据。
用迭代器来遍历图像像素,可简化过程降低出错的机会,比较安全,不过效率较低;如果想避免修改输入图像实例cv::Mat,可采用const_iterator。iterator有两种调用方法,cv::MatIterator_<cv::Vec3b>it;cv::Mat_<cv::Vec3b>::iterator it;中间cv::Vec3b是因为图像是彩色图像,3通道,cv::Vec3b可以代表一个像素。
cv::Mat_<cv::Vec3b>::iterator it = image.begin<cv::Vec3b>();
cv::Mat_<cv::Vec3b>::iterator itend = image.end<cv::Vec3b>();
for (; it != itend; ++it)
{
	(*it)[0] = (*it)[0] / div*div + div / 2;
	(*it)[1] = (*it)[1] / div*div + div / 2;
	(*it)[2] = (*it)[2] / div*div + div / 2;
}
方法三:使用Mat的成员函数at<>()
cv::Mat也是向量,可以使at方法取值,使用调用方法image.at<cv::Vec3b>(j,i),at方法方便,直接给i,j赋值就可以随意访问图像中任何一个像素,其中j表示第j行,i表示该行第i个像素。但是at方法效率是这3中访问方法中最慢的一个,所以如果遍历图像或者访问像素比较多时,建议不要使用这个方法,毕竟程序的效率还是比程序的可读性要重要的。下面是完整的调用方法,其运行时间在下面会介绍。
for (int j = 0; j< image.rows; j++)
{
	for (int i = 0; i< image.cols; i++)
	{
		image.at<cv::Vec3b>(j, i)[0] = image.at<cv::Vec3b>(j, i)[0] / div*div + div / 2;
		image.at<cv::Vec3b>(j, i)[1] = image.at<cv::Vec3b>(j, i)[1] / div*div + div / 2;
		image.at<cv::Vec3b>(j, i)[2] = image.at<cv::Vec3b>(j, i)[2] / div*div + div / 2;
	} // end of line
}
注意:使用at函数时,应该知道矩阵元素的类型和通道数,根据矩阵元素类型和通道数来确定at函数传递的类型,使用的是Vec3b这个元素类型,他是一个包含3个unsigned char类型向量。之所以采用这个类型来接受at的返回值,是因为,我们的矩阵im是3通道,类型为unsigned char类型
完整实例:
#include <iostream>
#include < opencv.hpp>
using namespace cv;
using namespace std;
int main()
{
//新建一个uchar类型的3通道矩阵
Mat img(5, 3, CV_8UC3, Scalar(50,50,50));
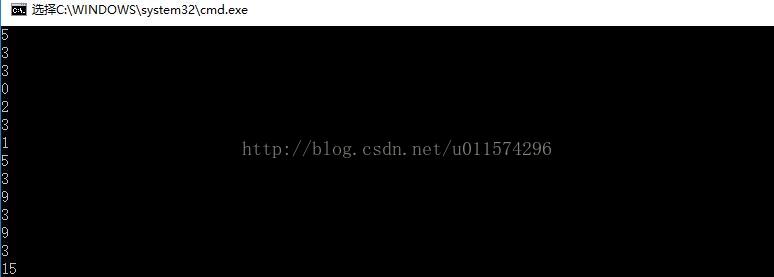
cout << img.rows << endl; //5
cout << img.cols << endl; //3
cout << img.channels() << endl; //3
cout << img.depth() << endl; //CV_8U 0
cout << img.dims << endl; //2
cout << img.elemSize() << endl; //1 * 3,一个位置,三个通道的CV_8U
cout << img.elemSize1() << endl; //1
cout << img.size[0] << endl; //5
cout << img.size[1] << endl; //3
cout << img.step[0] << endl; //3 * ( 1 * 3 )
cout << img.step[1] << endl; //1 * 3
cout << img.step1(0) << endl; //3 * 3
cout << img.step1(1) << endl; //3
cout << img.total() << endl; //3*5
//-------------------------------------- 地址运算 --------------------------------//
for (int row = 0; row < img.rows; row++)
{
for (int col = 0; col < img.cols; col++)
{
//[row, col]像素的第 1 通道地址被 * 解析(blue通道)
*(img.data + img.step[0] * row + img.step[1] * col) += 15;
//[row, col]像素的第 2 通道地址被 * 解析(green通道)
*(img.data + img.step[0] * row + img.step[1] * col + img.elemSize1()) += 15;
//[row, col]像素的第 3 通道地址被 * 解析(red通道)
*(img.data + img.step[0] * row + img.step[1] * col + img.elemSize1() * 2) += 15;
}
}
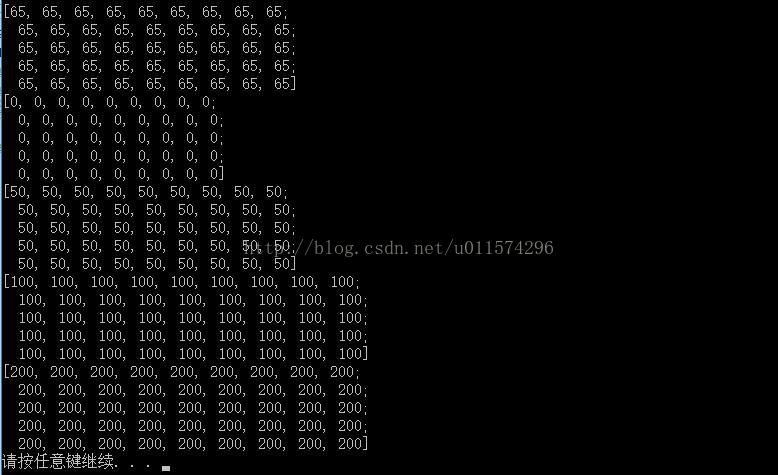
cout << img << endl;
//-------------------------------------- Mat的成员函数at<>( ) --------------------------------//
for (int row = 0; row < img.rows; row++)
{
for (int col = 0; col < img.cols; col++)
{
img.at<Vec3b>(row, col) = Vec3b(0, 0, 0);
}
}
cout << img << endl;
//-------------------------------------- 使用Mat的成员函数ptr<>() --------------------------------//
for (int row = 0; row < img.rows; row++)
{
// data 是 uchar* 类型的, m.ptr(row) 返回第 row 行数据的首地址
// 需要注意的是该行数据是按顺序存放的,也就是对于一个 3 通道的 Mat, 一个像素3个通道值, [B,G,R][B,G,R][B,G,R]...
// 所以一行长度为:sizeof(uchar) * m.cols * m.channels() 个字节
uchar* data = img.ptr(row);
for (int col = 0; col < img.cols; col++)
{
data[col * 3] = 50; //第row行的第col个像素点的第一个通道值 Blue
data[col * 3 + 1] = 50; // Green
data[col * 3 + 2] = 50; // Red
}
}
cout << img << endl;
Vec3b *pix(NULL);
for (int r = 0; r < img.rows; r++)
{
pix = img.ptr<Vec3b>(r);
for (int c = 0; c < img.cols; c++)
{
pix[c] = pix[c] * 2;
}
}
cout << img << endl;
//-------------------------------------- 使用Mat的成员函数ptr<>() --------------------------------//
MatIterator_<Vec3b> it_im, itEnd_im;
it_im = img.begin<Vec3b>();
itEnd_im = img.end<Vec3b>();
for(; it_im != itEnd_im; it_im++)
{
*it_im = (*it_im) * 2;
}
cout << img << endl;
cvWaitKey();
return 0;
}