react生命周期理解
渲染的过程
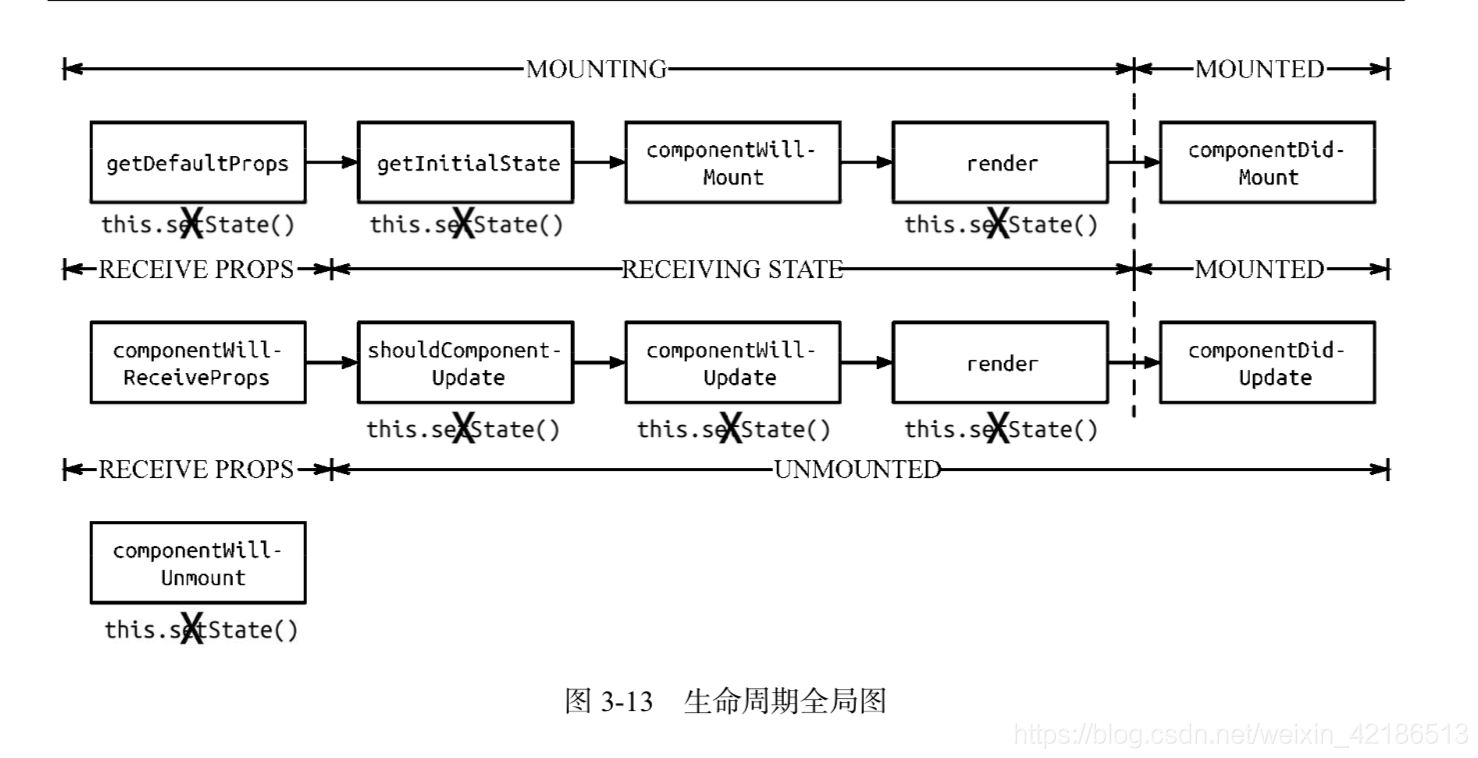
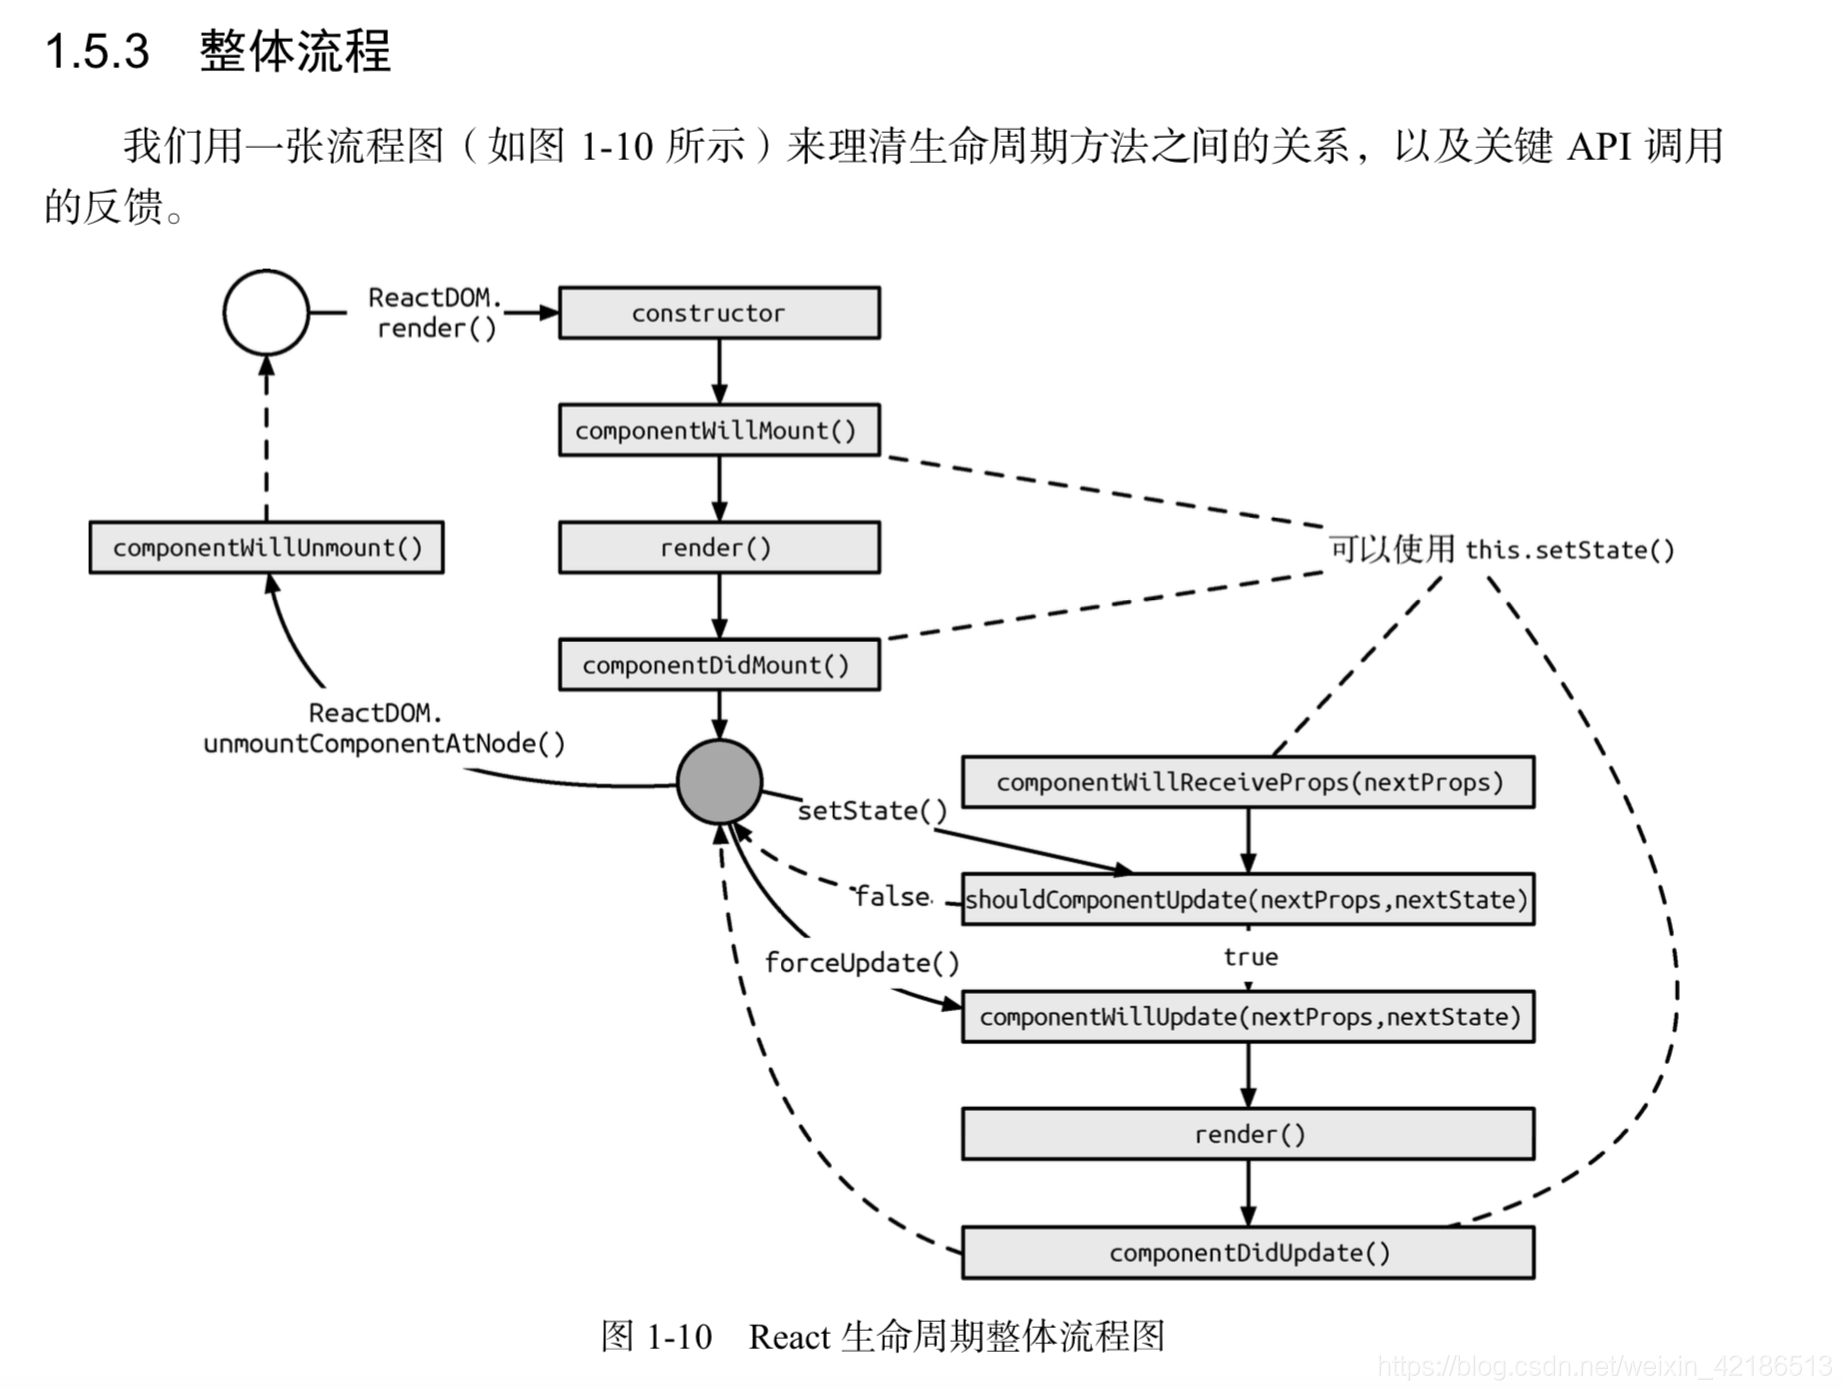
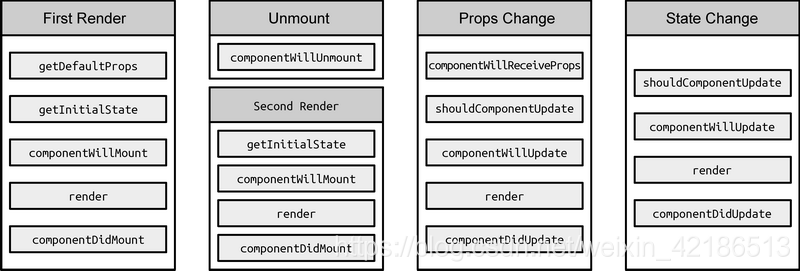
react 生命周期在不同状态下的执行顺序
-
当首次装载组件时,按顺序执行 getDefaultProps、getInitialState、componentWillMount、render 和 componentDidMount;
-
当卸载组件时,执行 componentWillUnmount;
-
当重新装载组件时,此时按顺序执行 getInitialState、componentWillMount、render 和 componentDidMount,但并不执行 getDefaultProps;
-
当再次渲染组件时,组件接受到更新状态,此时按顺序执行 componentWillReceiveProps、shouldComponentUpdate、componentWillUpdate、render 和 componentDidUpdate。
疑问
-
为何 React 会按上述顺序执行生命周期?
-
为何 React 多次 render 时,会执行生命周期的不同阶段?
-
为何 getDefaultProps 只执行了1次?
详解
自定义组件的生命周期主要通过三种状态进行管理:MOUNTING,RECIVE_PROPS,UNMOUNTING;他们负责通知组件当前所处的状态,应该执行生命周期中的哪个步骤,是否可以更新 state 。
三个状态对应三种方法:
- MOUNTING -> mountComponent
- RECIVE_PROPS -> updateComponent
- UNMOUNTING -> unmountComponent
每个方法都提供了两种处理方法,will 在进入状态之前调用,did 在进入状态之后调用
createClass 创建自定义组件
createClass 创建自定义组件的入口方法,负责管理生命周期中的 getDefaultProps。getDefaultProps() 只执行一次,这样所有实例初始化的 props 将会共享。
通过 createClass 创建自定义组件,利用原型继承 ReactCompositeComponentBase 父类,按顺序合并 mixins,设置初始化 defaultProps,创建元素ReactElement.
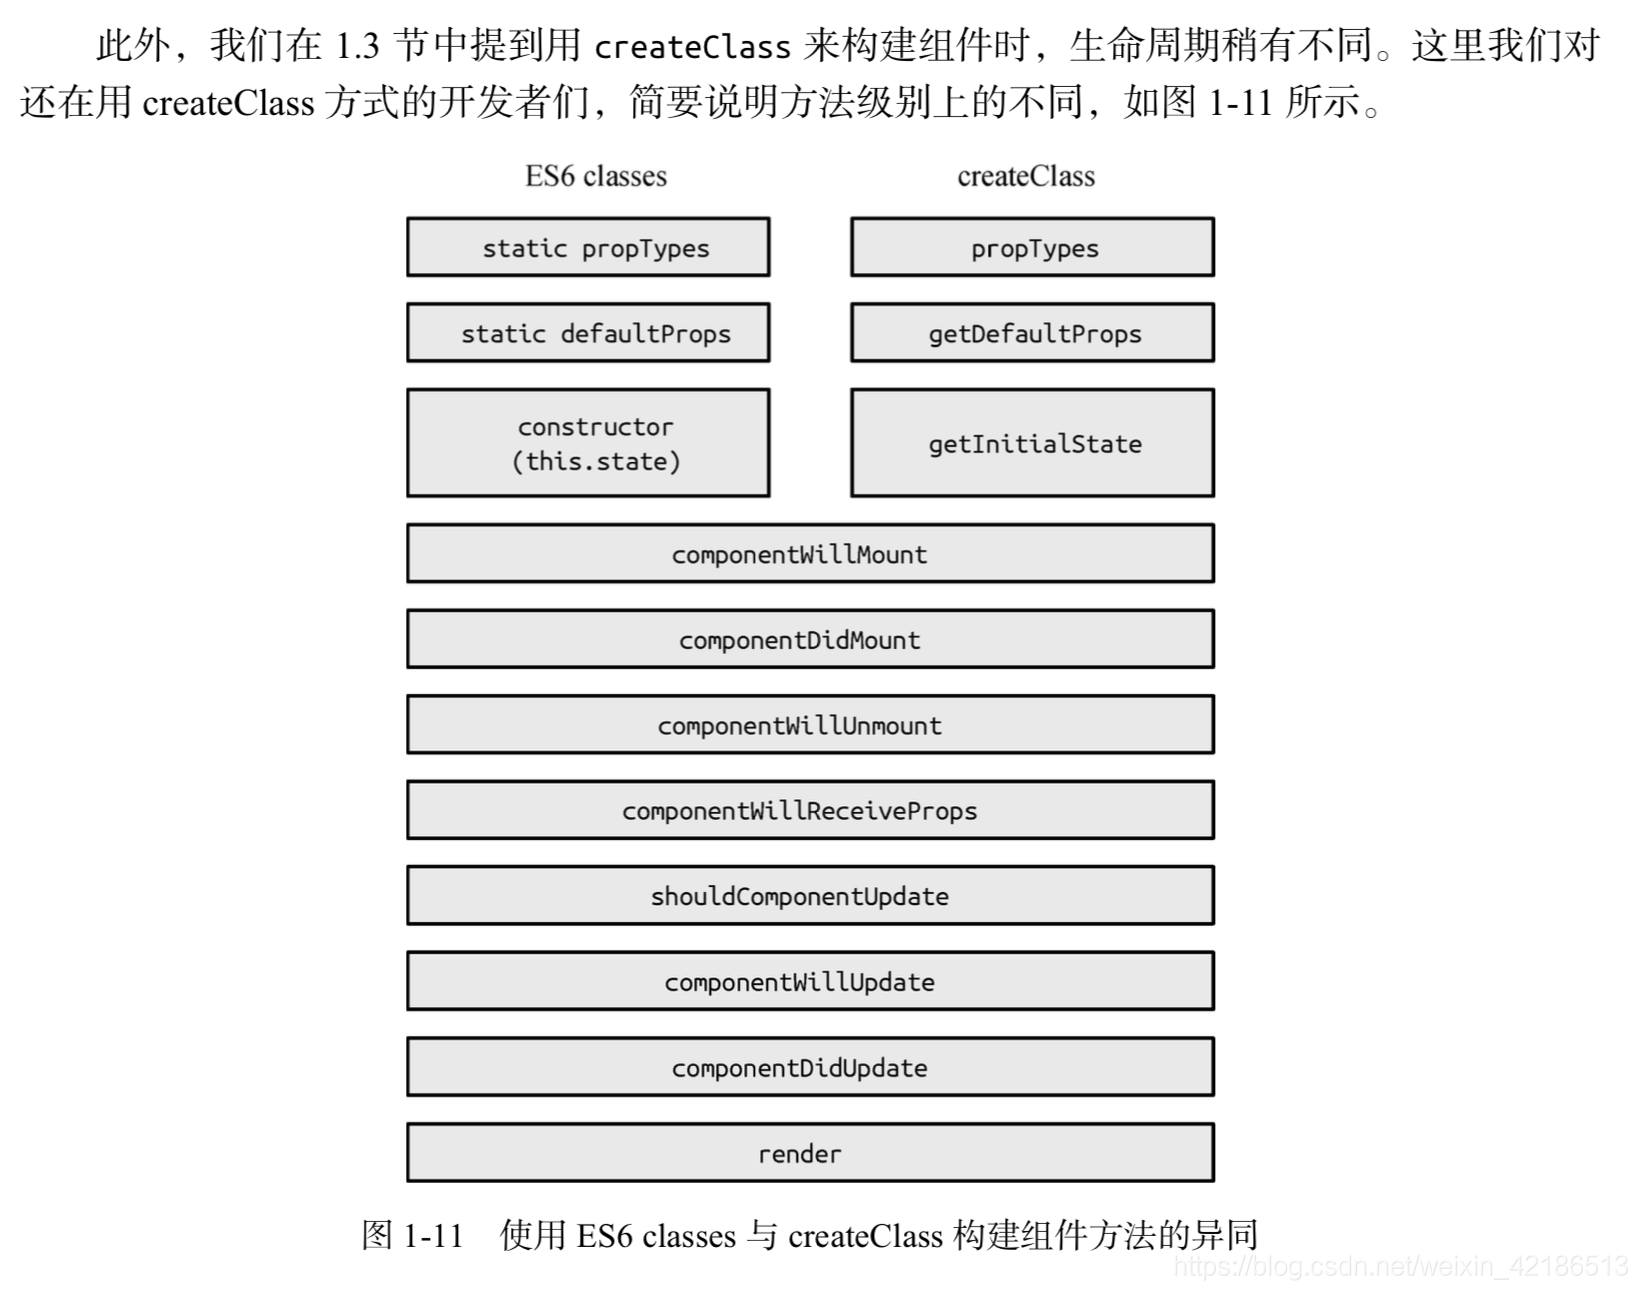
当使用 ES6 classes 编写 React 组件时,其实就是调用内部方法 createClass 创建组件, 该方法返回一个Constructor(props, context, updater) 用来生成组件实例,我们发现在调用React.createClass,已经执行了getDefaultProps() 和 getInitialState() ,并将其赋值于Constructor的原型中
// ReactCompositeComponent 的基类
var ReactCompositeComponentBase = function() {};

// 将 Mixin 合并到 ReactCompositeComponentBase 的原型上
assign(
  ReactCompositeComponentBase.prototype,
  ReactComponent.Mixin,
  ReactOwner.Mixin,
  ReactPropTransferer.Mixin,
  ReactCompositeComponentMixin
);

var ReactCompositeComponent = {
  LifeCycle: CompositeLifeCycle,
  Base: ReactCompositeComponentBase,

  // 创建组件
  createClass: function(spec) {
    // 构造函数
    var Constructor = function(props, context) {
      this.props = props;
      this.context = context;
      this.state = null;
      var initialState = this.getInitialState ? this.getInitialState() : null;
      this.state = initialState;
    };

    // 原型继承父类
    Constructor.prototype = new ReactCompositeComponentBase();
    Constructor.prototype.constructor = Constructor;

    // 合并 mixins
    injectedMixins.forEach(
      mixSpecIntoComponent.bind(null, Constructor)
    );
    mixSpecIntoComponent(Constructor, spec);

    // mixins 合并后装载 defaultProps (React整个生命周期中 getDefaultProps 只执行一次)
    if (Constructor.getDefaultProps) {
      Constructor.defaultProps = Constructor.getDefaultProps();
    }

    for (var methodName in ReactCompositeComponentInterface) {
      if (!Constructor.prototype[methodName]) {
        Constructor.prototype[methodName] = null;
      }
    }

    return ReactElement.createFactory(Constructor);
  }
}
状态一 MOUNTING
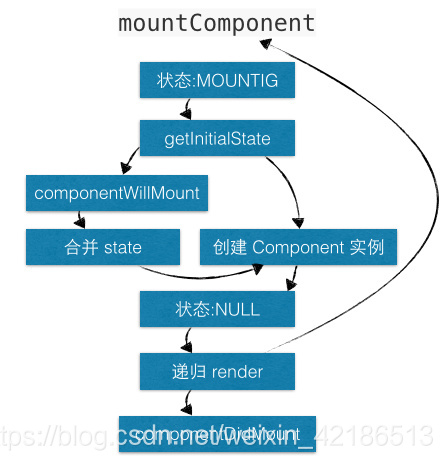
mountComponent 负责管理生命周期中的 getInitialState、componentWillMount、render 和 componentDidMount。
由于 getDefaultProps 是通过 Constrouctor 进行管理,因此也是整个生命周期中最先开始执行的。mountComponent 无法调用到 getDefaultProps ,所以getDefaultProps 只执行一次。
由于通过 ReactCompositeComponentBase 返回的是一个虚拟节点,因此需要利用 instantiateReactComponent 去得到实例,再使用 mountComponent 拿到结果作为当前自定义元素的结果。
首先通过 mountComponent 装载组件,此时,将状态设置为 MOUNTING ,利用 getInitialState 获取初始 state, 初始化更新队列。
若存在 componentWillMount ,则执行。如果此时在 componentWillMount 中调用 setState 是不会触发 reRender, 而是进行 state 合并。
到此时,已经完成 MOUNTING 的工作,更新状态为 NULL,同时 state 也将执行更新操作,此刻在 render 中可以获取更新后的 this.state 数据。
其实,mountComponent 本质上是通过 递归渲染 内容的,由于递归的特性,父组件的 componentWillMount 一定在其子组件的 componentWillMount 之前调用,而父组件的 componentDidMount 肯定在其子组件的 componentDidMount 之后调用。
当渲染完成之后,若存在 componentDidMount 则触发。这就解释了 componentWillMount - render - componentDidMount 三者之间的执行顺序。
// 装载组件
mountComponent: function(rootID, transaction, mountDepth) {
  // 当前状态为 MOUNTING
  this._compositeLifeCycleState = CompositeLifeCycle.MOUNTING;

  // 当前元素对应的上下文
  this.context = this._processContext(this._currentElement._context);

  // 当前元素对应的 props
  this.props = this._processProps(this.props);

  // 获取初始化 state
  this.state = this.getInitialState();

  // 初始化更新队列
  this._pendingState = null;
  this._pendingForceUpdate = false;

  // componentWillMount 调用setstate,不会触发rerender而是自动提前合并
  if (this.componentWillMount) {
    this.componentWillMount();
    if (this._pendingState) {
      this.state = this._pendingState;
      this._pendingState = null;
    }
  }

  // 得到 _currentElement 对应的 component 类实例
  this._renderedComponent = instantiateReactComponent(
    this._renderValidatedComponent(),
    this._currentElement.type
  );

  // 完成 MOUNTING,更新 state
  this._compositeLifeCycleState = null;

  // render 递归渲染
  var markup = this._renderedComponent.mountComponent(
    rootID,
    transaction,
    mountDepth + 1
  );

  // 如果存在 this.componentDidMount,则渲染完成后触发
  if (this.componentDidMount) {
    transaction.getReactMountReady().enqueue(this.componentDidMount, this);
  }

  return markup;
}
状态二:RECEIVE_PROPS
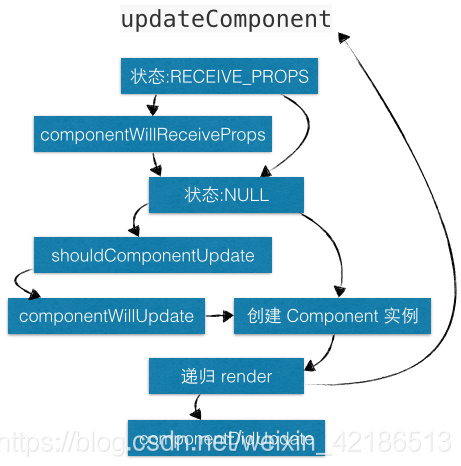
updateComponent 负责管理生命周期中的 componentWillReceiveProps、shouldComponentUpdate、componentWillUpdate、render 和 componentDidUpdate。
首先通过 updateComponent 更新组件,如果前后元素不一致说明组件需要更新,此时将状态更新为 RECEIVE_PROPS。
如果存在 componentWillReceiveProps,则执行。如果此时在 componentWillReceiveProps 中调用 setState ,不会触发 reRender ,只会合并 state。
到此时,已经完成 RECEIVE_PROPS ,更新状态为 null ,同时 state 也将执行更新操作,此时调用 this.state 会获取到更新后的 数据。
注意:此时 this.state 虽然获取到更新数据,但只能在内部源码中使用,我们在开发时,若在 componentWillReceiveProps 中调用 setState,那么在
componentWillReceiveProps、shouldComponentUpdate 和 componentWillUpdate 中还是无法获取到更新后的 this.state,即此时访问的 this.state
仍然是未更新的数据,只有在 render 和 componentDidUpdate 中才能获取到更新后的 this.state。
调用 shouldComponentUpdate 判断是否需要进行组件更新,如果存在 componentWillUpdate,则执行。
updateComponent 本质上也是通过 递归渲染 内容的,由于递归的特性,父组件的 componentWillUpdate 一定在其子组件的 componentWillUpdate 之前调用,而父组件的 componentDidUpdate 肯定在其子组件 componentDidUpdate 之后调用。
当渲染完成之后,若存在 componentDidUpdate ,则执行。这就解释了 componentWillReceiveProps - componentWillUpdate - render - componentDidUpdate 它们之间的执行顺序。
注意:禁止在 shouldComponentUpdate 和 componentWillUpdate 中调用setState,会造成循环调用,直至耗光浏览器内存后崩溃。
// 更新组件
updateComponent: function(transaction, prevParentElement, nextParentElement) {
  var prevContext = this.context;
  var prevProps = this.props;
  var nextContext = prevContext;
  var nextProps = prevProps;

  if (prevParentElement !== nextParentElement) {
    nextContext = this._processContext(nextParentElement._context);
    nextProps = this._processProps(nextParentElement.props);
    // 当前状态为 RECEIVING_PROPS
    this._compositeLifeCycleState = CompositeLifeCycle.RECEIVING_PROPS;

    // 如果存在 componentWillReceiveProps,则执行
    if (this.componentWillReceiveProps) {
      this.componentWillReceiveProps(nextProps, nextContext);
    }
  }

  // 设置状态为 null,更新 state
  this._compositeLifeCycleState = null;
  var nextState = this._pendingState || this.state;
  this._pendingState = null;
  var shouldUpdate =
    this._pendingForceUpdate ||
    !this.shouldComponentUpdate ||
    this.shouldComponentUpdate(nextProps, nextState, nextContext);
  if (!shouldUpdate) {
    // 如果确定组件不更新,仍然要设置 props 和 state
    this._currentElement = nextParentElement;
    this.props = nextProps;
    this.state = nextState;
    this.context = nextContext;
    this._owner = nextParentElement._owner;
    return;
  }
  this._pendingForceUpdate = false;

  ......

  // 如果存在 componentWillUpdate,则触发
  if (this.componentWillUpdate) {
    this.componentWillUpdate(nextProps, nextState, nextContext);
  }

  // render 递归渲染
  var nextMarkup = this._renderedComponent.mountComponent(
    thisID,
    transaction,
    this._mountDepth + 1
  );

  // 如果存在 componentDidUpdate,则触发
  if (this.componentDidUpdate) {
    transaction.getReactMountReady().enqueue(
      this.componentDidUpdate.bind(this, prevProps, prevState, prevContext),
      this
    );
  }
}
状态三:UNMOUNTING
unmountComponent 负责管理生命周期中的 componentWillUnmount。
首先将状态设置为 UNMOUNTING,若存在 componentWillUnmount,则执行;如果此时在 componentWillUnmount 中调用 setState,是不会触发 reRender,因为所有更新队列和更新状态都被重置为 NULL,完成了组件卸载操作。
// 卸载组件
unmountComponent: function() {
  // 设置状态为 UNMOUNTING
  this._compositeLifeCycleState = CompositeLifeCycle.UNMOUNTING;

  // 如果存在 componentWillUnmount,则触发
  if (this.componentWillUnmount) {
    this.componentWillUnmount();
  }

  // 更新状态为 null
  this._compositeLifeCycleState = null;
  this._renderedComponent.unmountComponent();
  this._renderedComponent = null;

  ReactComponent.Mixin.unmountComponent.call(this);
}
setState 更新机制
当调用 setState 时,会对 state 以及 _pendingState 更新队列进行合并操作,但其实真正更新 state 的幕后黑手是 replaceState。
replaceState 会先判断当前状态是否为 MOUNTING,如果不是即会调用ReactUpdates.enqueueUpdate 执行更新。
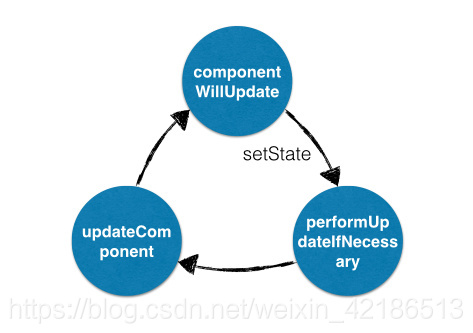
当状态不为 MOUNTING 或 RECEIVING_PROPS 时,performUpdateIfNecessary 会获取 _pendingElement、_pendingState、_pendingForceUpdate,并调用 updateComponent 进行组件更新。
如果在 shouldComponentUpdate 或 componentWillUpdate 中调用 setState,此时的状态已经从 RECEIVING_PROPS -> NULL,则 performUpdateIfNecessary 就会调用 updateComponent 进行组件更新,但 updateComponent 又会调用 shouldComponentUpdate 和 componentWillUpdate,因此造成循环调用,使得浏览器内存占满后崩溃。
// 更新 state
replaceState: function(completeState, callback) {
  validateLifeCycleOnReplaceState(this);

  // 更新队列
  this._pendingState = completeState;

  // 判断状态是否为 MOUNTING,如果不是,即可执行更新
  if (this._compositeLifeCycleState !== CompositeLifeCycle.MOUNTING) {
    ReactUpdates.enqueueUpdate(this, callback);
  }
},

// 如果存在 _pendingElement、_pendingState、_pendingForceUpdate,则更新组件
performUpdateIfNecessary: function(transaction) {
  var compositeLifeCycleState = this._compositeLifeCycleState;

  // 当状态为 MOUNTING 或 RECEIVING_PROPS时,则不更新
  if (compositeLifeCycleState === CompositeLifeCycle.MOUNTING ||
      compositeLifeCycleState === CompositeLifeCycle.RECEIVING_PROPS) {
    return;
  }

  var prevElement = this._currentElement;
  var nextElement = prevElement;
  if (this._pendingElement != null) {
    nextElement = this._pendingElement;
    this._pendingElement = null;
  }

  // 调用 updateComponent
  this.updateComponent(
    transaction,
    prevElement,
    nextElement
  );
}
总结
-
React 通过三种状态:MOUNTING、RECEIVE_PROPS、UNMOUNTING,管理整个生命周期的执行顺序;
-
setState 会先进行 _pendingState 更新队列的合并操作,不会立刻 reRender,因此是异步操作,且通过判断状态(MOUNTING、RECEIVE_PROPS)来控制 reRender 的时机;
-
不建议在 getDefaultProps、getInitialState、shouldComponentUpdate、componentWillUpdate、render 和 componentWillUnmount 中调用 setState,特别注意:不能在 shouldComponentUpdate 和 componentWillUpdate 中调用 setState,会导致循环调用。