根据上一篇我们所创的项目进行项目属性配置
1、删除掉我们不需要的配置:
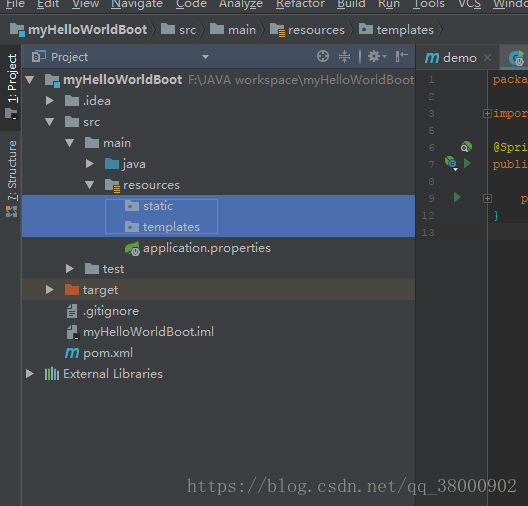
配置application.properties文件:
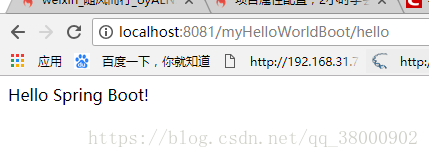
server.port=8081  //设定端口
server.servlet.context-path=/myHelloWorldBoot   //设定项目名
启动SpringBoot并访问:
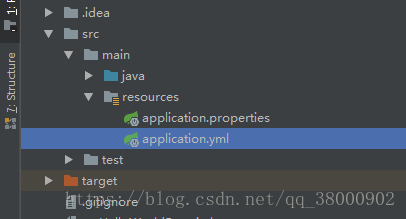
第二种配置方法:
新建个配置文件application.yml:
代码如下:
server:
  port: 8082
  servlet:
    context-path: /myHelloWorldBoot
两个配置文件保留一个即可,我保留yml文件,访问:
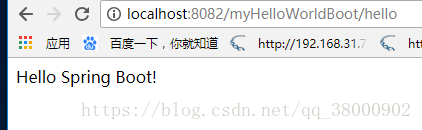
访问成功,接着在application.yml文件配置变量 :
myLong: A
server:
  port: 8080
配置变量myLong(注意,变量myLong和server是同一等级,如果写在server下面也要顶格写,否则语法错误会找不到变量,我为这问题浪费半天时间),接着在HelloController类写入注解,代码修改如下:
package com.lvzhihao.demo;


import org.springframework.beans.factory.annotation.Value;
import org.springframework.web.bind.annotation.RequestMapping;
import org.springframework.web.bind.annotation.RequestMethod;
import org.springframework.web.bind.annotation.RestController;

@RestController
public class HelloController {


 @Value("${myLong}")
 private String myLong;

    @RequestMapping(value="/hello",method = RequestMethod.GET)
    public String say( ) {

        return myLong;
    }
}
重启访问项目如下,见到如下:

在application.yml配置文件再使用当前配置,首先application.yml文件修改如下:
#server:
# port: 8082
# servlet:
# context-path: /myHelloWorldBoot
myLong: A
kabisou: 卡比兽
atk: 350
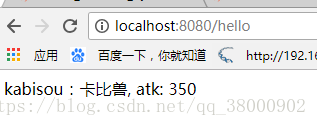
content: "kabisou:${kabisou}, atk: ${atk}"
server:
port: 8080
HelloController文件增加注解变量,修改后如下:package com.lvzhihao.demo;
import org.springframework.beans.factory.annotation.Value;
import org.springframework.web.bind.annotation.RequestMapping;
import org.springframework.web.bind.annotation.RequestMethod;
import org.springframework.web.bind.annotation.RestController;
@RestController
public class HelloController {
@Value("${myLong}")
private String myLong;
@Value("${content}")
private String content;
@RequestMapping(value="/hello",method = RequestMethod.GET)
public String say( ) {
// return myLong;
return content;
}
}
这样就可以只注解一个变量传递多个变量的参数:
由于我们可能在开发过程中会面临很多变量的情况,所以一个个去注解就显得太杂,所以我们要用封装的方式把变量封装并映射配置文件里,首先修改 MyHelloWorldBootApplication 文件,修改如下:
kaBiSou:
     name: 卡比兽
     atk: 350

server:
  port: 8080
接着新增一个封装类KaBiSouProperties:
package com.lvzhihao.demo;


import org.springframework.boot.context.properties.ConfigurationProperties;
import org.springframework.stereotype.Component;

@Component
@ConfigurationProperties(prefix = "kaBiSou")//获取前缀为“kaBiSou”的配置
public class KaBiSouProperties {
    private String name;
    private Integer atk;

    public String getName() {
        return name;
    }

    public void setName(String name) {
        this.name = name;
    }

    public Integer getAtk() {
        return atk;
    }

    public void setAtk(Integer atk) {
        this.atk = atk;
    }
}
HelloController类修改如下:
package com.lvzhihao.demo;


import org.springframework.beans.factory.annotation.Autowired;
import org.springframework.beans.factory.annotation.Value;
import org.springframework.web.bind.annotation.RequestMapping;
import org.springframework.web.bind.annotation.RequestMethod;
import org.springframework.web.bind.annotation.RestController;

@RestController
public class HelloController {
@Autowired
private KaBiSouProperties kaBiSouProperties;


// @Value("${myLong}")
// private String myLong;


// @Value("${content}")
// private String content;

    @RequestMapping(value="/hello",method = RequestMethod.GET)
    public String say( ) {

//        return myLong;
//        return content;
        return kaBiSouProperties.getName();
    }
}
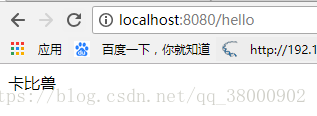
重启项目访问:
配置多个环境,切换多个配置文件,我们在开发中 会遇到需要切换配置的时候,复制多个application.yml文件并改名:

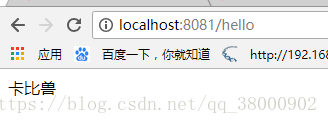
修改第三个文件的端口为8081,修改application.yml文件如下:
spring:
  profiles:
    active: prod
这是调用prod的配置环境,重启项目访问:
参考来自至慕课网