运行Android APP的设备繁多,屏幕大小更是多种多样。针对不同屏幕尺寸,通常情况下,开发者都是先针对手机开发一套源代码,然后拷贝一份,修改布局以适应大屏幕设备,或平板,电视等。为了决解这样的麻烦,Google推出了Fragment。你可以把Fragment当成Activity的一个界面的一个组成部分,甚至Activity的界面可以完全有不同的Fragment组成,Fragment拥有自己的生命周期和接收、处理用户的事件,这样就不必在Activity写一堆控件的事件处理的代码了。更为重要的是,你可以动态的添加、替换和移除某个Fragment。
Fragment是一个非常先进的概念,初学程序员可能会接近它惶恐不安,但背后的基本概念很简单。 如果我们将某项活动视为一项活动,我们用户界面的组合单元,将Fragment视为迷你活动 - 它是一个较小的组合单元。 您通常会在运行时显示(并隐藏)Fragment以响应某些内容用户做了; 例如,倾斜设备,从纵向切换到横向,从而提供更多的屏幕空间。 您甚至可以使用片段作为策略适应设备外形; 当应用程序在较小的屏幕上运行时,您将只显示一些Fragment。
Fragment与activity一样,由两部分组成 - Java程序和布局文件。 这个想法几乎相同:在XML文件中定义UI元素,然后在Java程序中实现XML文件,以便XML中的所有视图对象都将成为Java对象。 之后,我们可以使用R.class引用XML中的每个视图对象。 一旦我们围绕这个概念包裹我们的大脑,只需将片段视为普通视图对象,我们可以拖放到主布局文件上 - 当然,片段不是普通视图(但它们是视图)。
The following workflow summarizes the steps on how to get started using Fragments. We will explore them in more detail in the demo project.
1. Create an Activity
2. Create a Fragment class (Java file) and a fragment layout resource (XML file)
3. In the fragment layout resource, compose the UI by dragging and dropping view elements in it—like how we do it in an activity
resource file
4. In the Fragment class, override the onCreateViewmethod and inflate the XML file
5. To add the fragment to the activity statically, add a fragment element to activity_mainand associate this element to Fragment class
6. To add the fragment during runtime;
a. In the activity_mainlayout file, insert a ViewGroup object that will act as a placeholder for the fragment
b. In MainActivity.java, create an instance of the Fragment classc. Get a FragmentManagerobject; the getManager()method of the
Activity class should do that
d. Get a FragmentTransactionobject by calling the beginTransaction()method of the fragment manager
e. Add the fragment to the activity by calling the add()method of the transaction object
一、Fragment的生命周期
Fragment必须是依存与Activity而存在的,因此Activity的生命周期会直接影响到Fragment的生命周期。官网这张图很好的说明了两者生命周期的关系:
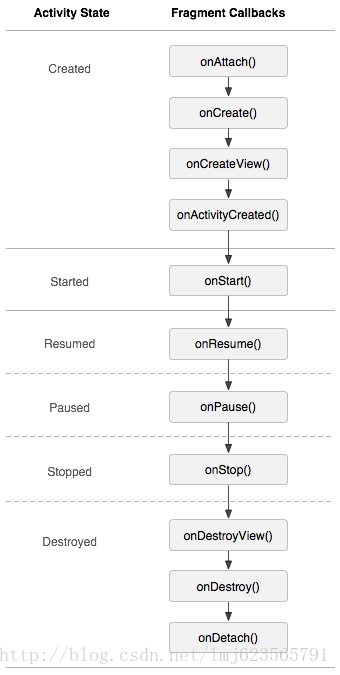
可以看到Fragment比Activity多了几个额外的生命周期回调方法:
onAttach(Activity)当Fragment与Activity发生关联时调用。
onCreateView(LayoutInflater, ViewGroup,Bundle)创建该Fragment的视图
onActivityCreated(Bundle)当Activity的onCreate方法返回时调用
onDestoryView()与onCreateView想对应,当该Fragment的视图被移除时调用
onDetach()与onAttach相对应,当Fragment与Activity关联被取消时调用
注意:除了onCreateView,其他的所有方法如果你重写了,必须调用父类对于该方法的实现
二、测试一
1、创建一个Fragments的新项目
2、从主菜单栏File ➤ New ➤ Java class,创建一个新类。 将其命名为FragmentA并扩展Fragment类。 确保它与MainActivity类位于同一个包中。

注意:当你输入代码片段扩展Fragment时,AS3会建议两种可能包裹。 一个是android.app.Fragment(这是我们想要的),另一个是android.support.v4.app.Fragment(我们不需要这个)。 后一个包是以防万一您打算在API 11以下的Android版本上运行此应用程序,但我们的应用程序的min SDK是API 23,因此我们不需要v4的支持库。
package com.example.administrator.fragments;


import android.app.Fragment;

public class FragmentA extends Fragment {
}
3、创建一个新的布局文件; 这将是Fragment的布局文件类。 您可以从项目工具窗口执行此操作。 右键单击res下layout文件夹,New ➤ Layout Resource file。将新文件命名为fragment_a,保留默认的根元素,并确保它在“布局”上目录。

4、将一个TextView对象放在fragment_a上。 片段资源文件不是与MainActivity的资源文件有很大不同。 他们都是Viewgroups,因此,它们意味着包含其他查看对象。 所以,我们学会了如何撰写的所有技巧布局资源文件中的视图对象也适用于片段。该片段使用约束布局(与activity_main相同),所以您可以使用约束检查器和属性检查器自定义片段的外观。 TextView的外观在这个例子中已经进行了一些调整。

<?xml version="1.0" encoding="utf-8"?>
<android.support.constraint.ConstraintLayout xmlns:android="http://schemas.android.com/apk/res/android"
    xmlns:app="http://schemas.android.com/apk/res-auto"
    xmlns:tools="http://schemas.android.com/tools"
    android:layout_width="match_parent"
    android:layout_height="match_parent">

    <TextView
        android:id="@+id/textView"
        android:layout_width="203dp"
        android:layout_height="78dp"
        android:layout_marginStart="16dp"
        android:layout_marginTop="94dp"
        android:layout_marginEnd="16dp"
        android:gravity="center"
        android:text="Hello"
        android:textSize="18sp"
        app:layout_constraintEnd_toEndOf="parent"
        app:layout_constraintStart_toStartOf="parent"
        app:layout_constraintTop_toTopOf="parent" />
</android.support.constraint.ConstraintLayout>
5、将片段布局文件与Fragment类相关联。 在FragmentA.java,我们将覆盖onCreateViewMethod并进行关联片段资源文件。
public View onCreateView(LayoutInflater inflater, @Nullable ViewGroup container, Bundle
savedInstanceState) {
View v = inflater.inflate(R.layout.fragment_a,container,attachToRoot:false);
return v;
}
与Activity的setContentView方法一样,inflate读取XML资源文件(第一个参数),创建实际的Java对象,以便我们稍后可以在R.class中引用它们,然后附加创建的Java对象到嵌入片段的任何地方(第二个参数) - 在这里case,容器对象是我们的Activity。 回调中的最后一个语句是简单地返回inflater创建的View对象。
6、我们将片段资源文件放在activity_main布局中,就像它是另一个视图对象(例如,TextView或Button)。 打开设计模式中的activity_main。 从调色板中,转到 Container➤<fragment>

7、从对话框窗口中选择我们创建的片段


8、该片段是一个ViewGroup对象,这意味着它只是另一个查看对象。 你可以在activity_main中移动它,就像任何一样其他小部件。 将其移动到大致位置并使用中的工具来确定其位置


运行ok

我们没有在MainActivity.java中做任何事情,因为添加了片段静态或陈述性地。 我们做的是简单地将片段嵌入activity_main中,
因为它只是另一个View对象。
三、以编程方式添加片段
虽然我们可以在设计时使用Fragments构建UI,但在运行时添加Fragments会使我们的应用程序更具响应性。 您可以隐藏或显示片段,具体取决于设备的屏幕大小或其当前方向。 要在运行时添加片段,我们需要FragmentManager和FragmentTransaction对象。 片段事务对象是负责从活动中添加和删除片段的对象,为了获得片段事务,我们需要片段管理器。
1、新建项目Fragments2
- 创建一个片段类FragmentA.java(与之前相同)
- 为片段fragment_a创建一个布局文件(与之前相同),但不要在activity_main中添加片段布局。相反,我们将使用MainActivity.java添加片段


2、现在设置完成,我们可以将片段添加到MainActivity.java。
package com.example.administrator.fragments2;

import android.app.FragmentManager;
import android.app.FragmentTransaction;
import android.support.v7.app.AppCompatActivity;
import android.os.Bundle;

public class MainActivity extends AppCompatActivity {

    @Override
    protected void onCreate(Bundle savedInstanceState) {
        super.onCreate(savedInstanceState);
        setContentView(R.layout.activity_main);

        //Create an instance of FragmentA
        FragmentA f = new FragmentA();
        //Get the fragment manager for this activity (MainActivity)
        FragmentManager fm = getFragmentManager();
        //When a fragment manager begins a transaction, that call will return a TransactionManager object
        FragmentTransaction ft = fm.beginTransaction();
/*
We can now add our fragment during runtime using the add method. This method takes in three
parameters, but only the first two are important for us. The first parameter is a view resource ID
(we haven’t created that yet; we will create it in activity_main.xml), and the second parameter is the
instance of our fragment class (FragmentA)
*/
        ft.add(R.id.frag_placeholder,f,"");
        ft.commit();
    }
}
activity_main.xml中添加 FrameLayout和

运行ok

四、 再来个例子(静态的使用Fragment)
这是使用Fragment最简单的一种方式,把Fragment当成普通的控件,直接写在Activity的布局文件中。步骤:
- 继承Fragment,重写onCreateView决定Fragemnt的布局
- 在Activity中声明此Fragment,就当和普通的View一样
使用2个Fragment作为Activity的布局,一个Fragment用于标题布局,一个Fragment用于内容布局
1、新建项目Fragments3
创建一个Fragment类TitleFragment.java(与之前相同), 为Fragment创建布局文件fragment_title.xml


package com.example.administrator.fragments3;

import android.os.Bundle;
import android.support.v4.app.Fragment;
import android.view.LayoutInflater;
import android.view.View;
import android.view.ViewGroup;
import android.widget.ImageButton;
import android.widget.Toast;

public class TitleFragment extends Fragment {

    private ImageButton im_button;

    @Override
    public View onCreateView(LayoutInflater inflater, ViewGroup container, Bundle savedInstanceState) {

        View view = inflater.inflate(R.layout.fragment_title,container,false);
        im_button = (ImageButton) view.findViewById(R.id.im_button);

        im_button.setOnClickListener(new View.OnClickListener() {
            @Override
            public void onClick(View v) {
                Toast.makeText(getContext(),"业务逻辑写在Fragment上,Activity是不是很整洁了?",Toast.LENGTH_SHORT).show();
            }
        });


        return view;
    }
}
<?xml version="1.0" encoding="utf-8"?>
<android.support.constraint.ConstraintLayout
    xmlns:android="http://schemas.android.com/apk/res/android" android:layout_width="match_parent"
    android:layout_height="match_parent">
    <ImageButton
        android:id="@+id/im_button"
        android:layout_width="wrap_content"
        android:layout_height="wrap_content"
        android:src="@android:drawable/star_on"
        />

    <TextView
        android:textSize="25sp"
        android:textColor="@android:color/holo_red_dark"
        android:gravity="center"
        android:text="Fragment制作标题栏"
        android:layout_width="match_parent"
        android:layout_height="match_parent" />

</android.support.constraint.ConstraintLayout>
创建一个Fragment类ContentFragment.java(与之前相同), 为Fragment创建布局文件fragment_content.xml
package com.example.administrator.fragments3;

import android.os.Bundle;
import android.support.v4.app.Fragment;
import android.view.LayoutInflater;
import android.view.View;
import android.view.ViewGroup;

public class ContentFragment extends Fragment {

    @Override
    public View onCreateView(LayoutInflater inflater, ViewGroup container, Bundle savedInstanceState) {
        View view = inflater.inflate(R.layout.fragment_content,container,false);

        return view;
    }
}
<?xml version="1.0" encoding="utf-8"?>
<android.support.constraint.ConstraintLayout
    xmlns:android="http://schemas.android.com/apk/res/android"
    xmlns:app="http://schemas.android.com/apk/res-auto"
    xmlns:tools="http://schemas.android.com/tools"
    android:layout_width="match_parent"
    android:layout_height="match_parent">

    <TextView
        android:layout_width="wrap_content"
        android:layout_height="wrap_content"
        android:layout_marginStart="8dp"
        android:layout_marginTop="300dp"
        android:layout_marginEnd="8dp"
        android:gravity="center"
        android:text="Fragment当作主面板"
        android:textSize="25sp"
        app:layout_constraintEnd_toEndOf="parent"
        app:layout_constraintStart_toStartOf="parent"
        app:layout_constraintTop_toTopOf="parent" />

</android.support.constraint.ConstraintLayout>
主程序设置
<?xml version="1.0" encoding="utf-8"?>
<android.support.constraint.ConstraintLayout xmlns:android="http://schemas.android.com/apk/res/android"
    xmlns:app="http://schemas.android.com/apk/res-auto"
    xmlns:tools="http://schemas.android.com/tools"
    android:layout_width="match_parent"
    android:layout_height="match_parent"
    tools:context=".MainActivity">

    <fragment
        android:id="@+id/fg_title"
        android:layout_width="match_parent"
        android:layout_height="45dp"
        android:name="com.example.administrator.fragments3.TitleFragment"
        />

    <fragment
        android:layout_below="@id/fg_title"
        android:id="@+id/fg_content"
        android:layout_width="match_parent"
        android:layout_height="match_parent"
        android:name="com.example.administrator.fragments3.ContentFragment"
        />

</android.support.constraint.ConstraintLayout>
package com.example.administrator.fragments3;
import android.support.v7.app.AppCompatActivity;
import android.os.Bundle;
/**
* 因为Android Studio新建Activity是自动继承AppCompatActivity,所以我也没有改成
* Activity,这个和本案例没有关系哈。
*/
public class MainActivity extends AppCompatActivity {
@Override
protected void onCreate(Bundle savedInstanceState) {
super.onCreate(savedInstanceState);
// setContentView(R.layout.activity_main);
// requestWindowFeature(Window.FEATURE_NO_TITLE);
//因为继承的是AppCompatActivity,所以requestWindowFeature()失效了
getSupportActionBar().hide();
setContentView(R.layout.activity_main);
}
}
运行ok


静态使用Fragment其实就是把Fragment当成普通的View一样声明在Activity的布局文件中,然后所有控件的事件处理等代码都由各自的Fragment去处理,瞬间觉得Activity好干净有木有~~代码的可读性、复用性以及可维护性是不是瞬间提升了