1. Queue consumer cluster
ActiveMQ支持Consumer对消息的高可靠性的负载均衡消费,如果一个Consumer死掉,该消息会转发到其他的Consumer消费的Queue。如果一个Consumer获得消息比其他Consumer快,那么他将获得更多的消息。因此推荐ActiveMQ的Broker和Client使用failover://transport的方式来配置连接
2. Broker clusters
大部分情况下是使用一系列的Broker和Client连接到一起。如果一个Broker死掉了,那么Client可以自动连接到其他的Broker上。实现以上行为需用failover协作Client.
如果启动了多个Broker,Client可以使用static discovery或者Dynamic discovery容易从一个broker到另一个broker直接连接。这样当一个broker上没有Consumer的话,那么它的消息不会被消费,然而该broker会通过存储和转发的策略来把该消息发送到其他broker上。
特别注意:ActiveMQ默认的两个Broker, static链接后是单方向的,broker-A可以访问消费Broker-b的消息,如果要支持双向通信,需要在networConnector配置的时候,设置duplex=true。
这里的集群使用的是静态网络连接,访问broker的时创建ConnectionFactory的路径应写为:
ConnectionFactory factory = new ActiveMQConnectionFactory("failover:(tcp://localhost:61616,tcp://localhost:61716)?randomize=false");
使用三个消费者,一个消费者连接端口61716,另外两个消费者连接61616端口。
三个消费者使用如下代码如下
package com.wangx.activemq.master;

import org.apache.activemq.ActiveMQConnectionFactory;

import javax.jms.*;

public class QR1 {

    public static void main(String[] args) {
        //创建链接工厂
        ConnectionFactory factory = new ActiveMQConnectionFactory("failover:(tcp://localhost:61616,tcp://localhost:61716)?randomize=false");
        Connection connection = null;

        try{
            //创建链接
            connection =  factory.createConnection();
            //启动链接
            connection.start();
            //获取会话
            final Session session = connection.createSession(Boolean.TRUE, Session.AUTO_ACKNOWLEDGE);
            //创建队列
            Destination queue = session.createQueue("myQueue");
            MessageConsumer consumer1 = session.createConsumer(queue);
            MessageConsumer consumer2 = session.createConsumer(queue);
            new Thread(new MasterRunnable(consumer1, session, "consumer1")).start();
            new Thread(new MasterRunnable(consumer2, session, "consumer2")).start();
        }catch (Exception e) {
            e.printStackTrace();
        }
    }
}
线程任务类:开两个线程同时使用两个消费者同时监听61616端口
package com.wangx.activemq.master;

import javax.jms.JMSException;
import javax.jms.MessageConsumer;
import javax.jms.Session;

public class MasterRunnable implements Runnable {

    private MessageConsumer consumer;

    private Session session;

    private String name;
    public  MasterRunnable(MessageConsumer consumer, Session session, String name) {
        this.consumer = consumer;
        this.session = session;
        this.name = name;
    }
    @Override
    public void run() {
        try {
            consumer.setMessageListener(new MyMessageListener(session, name));
        } catch (JMSException e) {
            e.printStackTrace();
        }
    }
}
消息监听类:
package com.wangx.activemq.master;

import javax.jms.*;

public class MyMessageListener implements MessageListener {

    private Session session = null;
    private String name;
    public MyMessageListener(Session session, String name) {
        this.session = session;
        this.name = name;
    }
    @Override
    public void onMessage(Message message) {
        TextMessage textMessage = (TextMessage) message;
        try {
            System.out.println(name + "接受到消息:" + textMessage.getText());
            session.commit();
        } catch (JMSException e) {
            e.printStackTrace();
        }
    }
}
连接61716端口的consumer
package com.wangx.activemq.master;

import org.apache.activemq.ActiveMQConnectionFactory;

import javax.jms.*;

public class QR2 {

    public static void main(String[] args) {
        //创建链接工厂
        ConnectionFactory factory = new ActiveMQConnectionFactory("failover:(tcp://localhost:61616,tcp://localhost:61716)?randomize=false");
        Connection connection = null;
        try{
            //创建链接
            connection =  factory.createConnection();
            //启动链接
            connection.start();
            //获取会话
            final Session session = connection.createSession(Boolean.TRUE, Session.AUTO_ACKNOWLEDGE);
            //创建队列
            Destination queue = session.createQueue("myQueue");
            //创建消费者
            MessageConsumer messageConsumer = session.createConsumer(queue);
            //监听消息
            messageConsumer.setMessageListener(new MessageListener() {
                @Override
                public void onMessage(Message message) {
                    TextMessage textMessage = (TextMessage) message;
                    try {
                        System.out.println("QR2 接受到消息:" + textMessage.getText());
                        session.commit();
                    } catch (JMSException e) {
                        e.printStackTrace();
                    }
                }
            });
        }catch (Exception e) {

        }
    }
}
向端口61716发送消息
package com.wangx.activemq.master;
import org.apache.activemq.ActiveMQConnectionFactory;

import javax.jms.*;

public class MessageSender {

    public static void main(String[] args) throws JMSException {
        //创建链接工厂
        ConnectionFactory factory = new ActiveMQConnectionFactory("tcp://localhost:61716");

        Connection connection = null;
        Session session = null;
        try{
            //创建链接
            connection =  factory.createConnection();
            //启动链接
            connection.start();
            //获取会话
            session = connection.createSession(Boolean.TRUE, session.AUTO_ACKNOWLEDGE);
            //创建队列
            Destination queue = session.createQueue("myQueue");
            //创建生产者对象
            MessageProducer messageProducer = session.createProducer(queue);

            for (int i = 0; i < 30; i++) {
                //创建消息对象
                TextMessage textMessage = session.createTextMessage("hello:" + i);
                //发送消息
                messageProducer.send(textMessage);
                System.out.println(textMessage.getText());
            }
            session.commit();
            session.close();
            connection.close();
        }catch (Exception e) {

        }finally {
        }

    }
}
分别启动两个消息监听类,可以发现,此时两个不同broker所连接的消费者所消费的消息是均分的,尽管此时有一个broker中有两个consumer,这是因为ActiveMQ默认的认为网络上的broker作为一个consumer,此时将conduitSubscriptions设置为false即可是整个集群上的所有consumer都有均分消费消息的可能。
2. Master Slave
在5.9的版本中,废除了Pure Master Slave的方式,目前支持
1. Shared File System Master Slave:基于共享存储的Master-Slave;多个broker实例使用一个存储文件,谁拿到文件锁谁就是master,其他处于待启动状态,如果master挂掉了,某个抢到文件锁的slave变成master
2. JDBC Master Slave: 基于JDBC的Master-Slave:使用同一个数据库,拿到LOCK表的写锁的broker成为master.
3. Replicated LeveDB Store:基于zookeeper复制LeveDB存储的Master-Slave机制,这个是5.9新家的机制。
具体的可以查看官方文档:
http://activemq.apache.org/masterslave.html
3. JDBC Master Slave方式
利用数据库作为数据源,采用Master/Slave模式,其中启动的时候Master首先获得独有锁,其他Slaves Broker等待获取独有锁。
推荐客户端使用Failover来连接Brokers.
具体如下图:
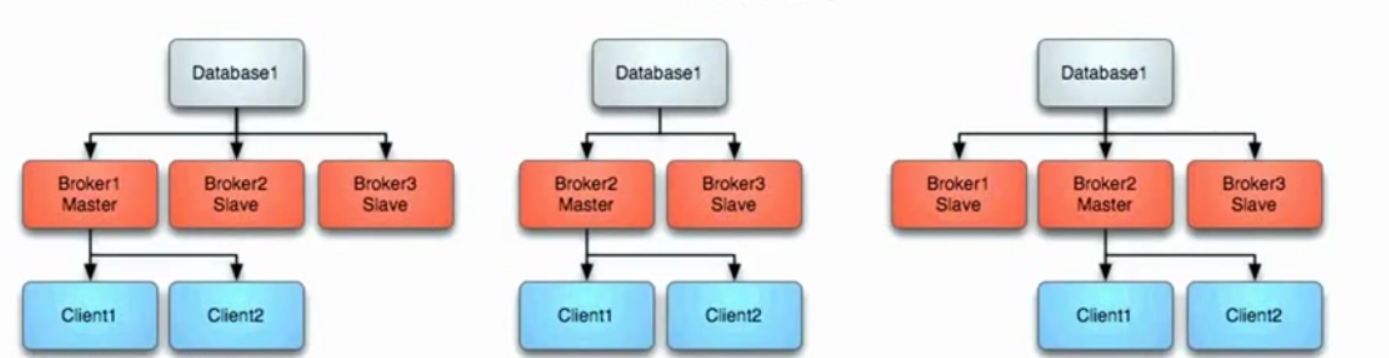
3.1. Master失败
如果master失败,则它释放独有锁,其他Slave获独有锁,其他Slave立即获得独有锁后它将变成Master,并且启动所有的传输连接。同时,Client将停止连接之前的Master并且它将会轮询其他可以利用到的Broker,即新的Master.如上中图所示。
3.2 Master重启
任何时候启动新的Broker,都会作为新的Slave来加入集群,如上右图所示。
3.3 JDBC Master Slave的配置
使用<jdbcPersistenceAdapter dataSource="#mysql-ds"/>来配置消息持久化,自动就会使用MasterSlave的方式。具体配置如下:
<!-- Licensed to the Apache Software Foundation (ASF) under one or more contributor license agreements. See the NOTICE file distributed with this work for additional information regarding copyright ownership. The ASF licenses this file to You under the Apache License, Version 2.0 (the "License"); you may not use this file except in compliance with the License. You may obtain a copy of the License at http://www.apache.org/licenses/LICENSE-2.0 Unless required by applicable law or agreed to in writing, software distributed under the License is distributed on an "AS IS" BASIS, WITHOUT WARRANTIES OR CONDITIONS OF ANY KIND, either express or implied. See the License for the specific language governing permissions and limitations under the License. --> <!-- START SNIPPET: example --> <beans xmlns="http://www.springframework.org/schema/beans" xmlns:xsi="http://www.w3.org/2001/XMLSchema-instance" xsi:schemaLocation="http://www.springframework.org/schema/beans http://www.springframework.org/schema/beans/spring-beans.xsd http://activemq.apache.org/schema/core http://activemq.apache.org/schema/core/activemq-core.xsd"> <!-- Allows us to use system properties as variables in this configuration file --> <bean class="org.springframework.beans.factory.config.PropertyPlaceholderConfigurer"> <property name="locations"> <value>file:${activemq.conf}/credentials.properties</value> </property> </bean> <!-- Allows accessing the server log --> <bean id="logQuery" class="io.fabric8.insight.log.log4j.Log4jLogQuery" lazy-init="false" scope="singleton" init-method="start" destroy-method="stop"> </bean> <!-- The <broker> element is used to configure the ActiveMQ broker. --> <broker xmlns="http://activemq.apache.org/schema/core" brokerName="localhost" dataDirectory="${activemq.data}"> <destinationPolicy> <policyMap> <policyEntries> <!--<policyEntry topic=">" > The constantPendingMessageLimitStrategy is used to prevent slow topic consumers to block producers and affect other consumers by limiting the number of messages that are retained For more information, see: http://activemq.apache.org/slow-consumer-handling.html <pendingMessageLimitStrategy> <constantPendingMessageLimitStrategy limit="1000"/> </pendingMessageLimitStrategy> </policyEntry>--> <policyEntry queue=">" enableAudit="false"> <networkBridgeFilterFactory> <conditionalNetworkBridgeFilterFactory replayWhenNoConsumers="true"/> </networkBridgeFilterFactory> </policyEntry> </policyEntries> </policyMap> </destinationPolicy> <!-- The managementContext is used to configure how ActiveMQ is exposed in JMX. By default, ActiveMQ uses the MBean server that is started by the JVM. For more information, see: http://activemq.apache.org/jmx.html --> <managementContext> <managementContext createConnector="false"/> </managementContext> <!-- Configure message persistence for the broker. The default persistence mechanism is the KahaDB store (identified by the kahaDB tag). For more information, see: http://activemq.apache.org/persistence.html --> <persistenceAdapter> <!--<kahaDB directory="${activemq.data}/kahadb_2"/>--> <jdbcPersistenceAdapter dataSource="#mysql-ds"/> </persistenceAdapter> <!-- The systemUsage controls the maximum amount of space the broker will use before disabling caching and/or slowing down producers. For more information, see: http://activemq.apache.org/producer-flow-control.html --> <systemUsage> <systemUsage> <memoryUsage> <memoryUsage percentOfJvmHeap="70" /> </memoryUsage> <storeUsage> <storeUsage limit="100 gb"/> </storeUsage> <tempUsage> <tempUsage limit="50 gb"/> </tempUsage> </systemUsage> </systemUsage> <!-- The transport connectors expose ActiveMQ over a given protocol to clients and other brokers. For more information, see: http://activemq.apache.org/configuring-transports.html --> <transportConnectors> <!-- DOS protection, limit concurrent connections to 1000 and frame size to 100MB --> <transportConnector name="openwire" uri="tcp://0.0.0.0:61616?maximumConnections=1000&wireFormat.maxFrameSize=104857600"/> <transportConnector name="amqp" uri="amqp://0.0.0.0:9999?maximumConnections=1000&wireFormat.maxFrameSize=104857600"/> <transportConnector name="stomp" uri="stomp://0.0.0.0:61613?maximumConnections=1000&wireFormat.maxFrameSize=104857600"/> <transportConnector name="mqtt" uri="mqtt://0.0.0.0:1883?maximumConnections=1000&wireFormat.maxFrameSize=104857600"/> <transportConnector name="ws" uri="ws://0.0.0.0:61614?maximumConnections=1000&wireFormat.maxFrameSize=104857600"/> </transportConnectors> <!-- destroy the spring context on shutdown to stop jetty --> <shutdownHooks> <bean xmlns="http://www.springframework.org/schema/beans" class="org.apache.activemq.hooks.SpringContextHook" /> </shutdownHooks> </broker> <bean id="mysql-ds" class="org.apache.commons.dbcp2.BasicDataSource" destroy-method="close"> <property name="driverClassName" value="com.mysql.jdbc.Driver"/> <property name="url" value="jdbc:mysql://localhost:3306/activemq?useSSL=false"/> <property name="username" value="wangx"/> <property name="password" value="wangx"/> <property name="poolPreparedStatements" value="true"/> </bean> <!-- Enable web consoles, REST and Ajax APIs and demos The web consoles requires by default login, you can disable this in the jetty.xml file Take a look at ${ACTIVEMQ_HOME}/conf/jetty.xml for more details --> <import resource="jetty.xml"/> </beans> <!-- END SNIPPET: example -->
去掉静态网络连接配置,将持久化方式改为jdbc数据的方式,去掉消息回流的配置。这里每个Broker都需要如此配置,只需要端口不一致即可,启动两个broker,使用如上连接61716端口的Client像Broker发送消息,此时停掉端口为61716的Broker,启动消费者接受消息,使用了容错配置,此时仍然可以接收到前面一个Broker存活时接收到的消息并进行消费。其实这是由于当61716接受到消息之后做了持久化,所以当它死掉后,61616升级为Master,它会获取到前一个master存活时未被消费的消息,所以我们在访问61616端口的broker时仍然可以消费消息。
说明:使用了failover协议之后,当61716死掉后,client会停止与61716的连接。自动轮询集群中可用的broker,即新的master(61616端口的broker)