端口映射
默认情况下,宿主机是无法访问容器内部网络的,但是可以使用端口映射来解决这个问题,在之前文章中已经提到过Docker的端口映射。主要通过docker run 跟 -P(大写) 或 -p(小写)参数来实现。
docker run -P 会把容器中监听的端口随机绑定到宿主机的可用端口上:
[root@localhost ~]# docker run -d -P nginx:latest
994f802ea65d09009c9b48111d53e8c3959d3e0e76b48ddef88b5c40ebbe007c
[root@localhost ~]# docker ps
CONTAINER ID        IMAGE               COMMAND                CREATED             STATUS              PORTS                   NAMES
994f802ea65d        nginx:latest        "nginx -g 'daemon of   22 seconds ago      Up 21 seconds       0.0.0.0:32768->80/tcp   jolly_ritchie
[root@localhost ~]# curl '127.0.0.1:32768'
<!DOCTYPE html>
<html>
<head>
<title>Welcome to nginx!</title>
<style>
    body {
        width: 35em;
        margin: 0 auto;
        font-family: Tahoma, Verdana, Arial, sans-serif;
    }
</style>
</head>
<body>
<h1>Welcome to nginx!</h1>
<p>If you see this page, the nginx web server is successfully installed and ....
上面就是把容器中的80端口绑定到了宿主机的32768端口上。
docker run -p HostPort:ContainerPort 可以让我们指定需要映射的容器和宿主机端口:
[root@localhost ~]# docker run -d -p 8080:80 nginx:latest
0a5bcae4c18c32fdc5528d90739f5df5087e83df8ae7ca9f3257b90044af3ad0
[root@localhost ~]# docker ps
CONTAINER ID        IMAGE               COMMAND                CREATED             STATUS              PORTS                  NAMES
0a5bcae4c18c        nginx:latest        "nginx -g 'daemon of   4 seconds ago       Up 4 seconds        0.0.0.0:8080->80/tcp   determined_bardeen
[root@localhost ~]# curl '127.0.0.1:8080'
<!DOCTYPE html>
<html>
<head>
<title>Welcome to nginx!</title>
<style>
    body {
        width: 35em;
        margin: 0 auto;
        font-family: Tahoma, Verdana, Arial, sans-serif;
    }
</style>
</head>
<body>
<h1>Welcome to nginx!</h1>
<p>If you see this page, the nginx web server is successfully installed and
....
上述端口映射是映射到宿主机的所有地址的8080端口上,如果只想映射到宿主机的本地回环地址(127.0.0.1),可以指定宿主机的ip地址:
[root@localhost ~]# docker run -d -p 127.0.0.1:8080:80 nginx:latest
e5a99b2144be15635f1e667b0efa9e3ffad3ef0f67c281501720d42bc097373d
[root@localhost ~]#
[root@localhost ~]#
[root@localhost ~]# docker ps
CONTAINER ID        IMAGE               COMMAND                CREATED             STATUS              PORTS                    NAMES
e5a99b2144be        nginx:latest        "nginx -g 'daemon of   7 seconds ago       Up 7 seconds        127.0.0.1:8080->80/tcp   lonely_sinoussi
[root@localhost ~]# curl '127.0.0.1:8080'
<!DOCTYPE html>
<html>
<head>
<title>Welcome to nginx!</title>...
在做端口映射时,也可以指定容器的网络传输协议,默认是tcp协议,如果是udp协议,则可以显示指定:
[root@localhost ~]# docker run -d -p 127.0.0.1:8080:80/udp nginx:latest
083ef5554664a7fa87f1f3a39c380f6822f82b0cf9b29600b418dcff7c97fdd3
[root@localhost ~]# docker ps
CONTAINER ID        IMAGE               COMMAND                CREATED             STATUS              PORTS                            NAMES
083ef5554664        nginx:latest        "nginx -g 'daemon of   6 seconds ago       Up 5 seconds        80/tcp, 127.0.0.1:8080->80/udp   cocky_hawking
以上就是关于Docker端口映射的基本使用。
如果说端口映射解决了宿主机和容器之间的互访问问题,那另一个问题就是容器和容器之间如何互访问。
容器互联
docker run 的 --link 参数可以指定连接到一个容器,从而使得容器之间可以通过容器名来访问。下面以搭建 nginx + php-fpm 为例演示容器间互访问。
我这里分别有一个 php-fpm 和 nginx 镜像。

先启动php-fpm 容器, 并使用 --name 参数指定容器名
[root@localhost ~]# docker run -d --name php-fpm php:5.6.32-fpm
3e4b04174da9a91f77d9560113d3021f90a9638165968ccff44fede6c7961871
[root@localhost ~]# docker ps
CONTAINER ID        IMAGE               COMMAND           CREATED             STATUS             PORTS                    NAMES
3e4b04174da9        php:5.6.32-fpm      "docker-php-entrypoi   11 seconds ago      Up 10 seconds       9000/tcp                 php-fpm
每一个运行中的Docker容器都有一块虚拟网卡和一个内网ip,我们可以进到上面的容器来查看:
先安装ifconfig命令,然后使用ifconfig查看ip地址信息
[root@localhost ~]# docker exec -it php-fpm /bin/bash
root@3e4b04174da9:/var/www/html# apt-get update
Get:1 http://security.debian.org jessie/updates InRelease [63.1 kB]
Get:2 http://security.debian.org jessie/updates/main amd64 Packages [588 kB]
Ign http://deb.debian.org jessie InRelease
Get:3 http://deb.debian.org jessie-updates InRelease [145 kB]
Get:4 http://deb.debian.org jessie Release.gpg [2373 B]
Get:5 http://deb.debian.org jessie-updates/main amd64 Packages [23.2 kB]
Get:6 http://deb.debian.org jessie Release [148 kB]
Get:7 http://deb.debian.org jessie/main amd64 Packages [9063 kB]
Fetched 10.0 MB in 5s (1918 kB/s)
Reading package lists... Done
root@3e4b04174da9:/var/www/html# apt-get install net-tools
Reading package lists... Done
Building dependency tree
Reading state information... Done
The following NEW packages will be installed:
  net-tools
0 upgraded, 1 newly installed, 0 to remove and 1 not upgraded.
Need to get 225 kB of archives.
After this operation, 803 kB of additional disk space will be used.
Get:1 http://deb.debian.org/debian/ jessie/main net-tools amd64 1.60-26+b1 [225 kB]
Fetched 225 kB in 0s (227 kB/s)
debconf: delaying package configuration, since apt-utils is not installed
Selecting previously unselected package net-tools.
(Reading database ... 12716 files and directories currently installed.)
Preparing to unpack .../net-tools_1.60-26+b1_amd64.deb ...
Unpacking net-tools (1.60-26+b1) ...
Setting up net-tools (1.60-26+b1) ...

root@3e4b04174da9:/var/www/html# ifconfig
eth0      Link encap:Ethernet  HWaddr 02:42:ac:11:00:36
          inet addr:172.17.0.54  Bcast:0.0.0.0  Mask:255.255.0.0
          inet6 addr: fe80::42:acff:fe11:36/64 Scope:Link
          UP BROADCAST RUNNING MULTICAST  MTU:1500  Metric:1
          RX packets:12800 errors:0 dropped:0 overruns:0 frame:0
          TX packets:6126 errors:0 dropped:0 overruns:0 carrier:0
          collisions:0 txqueuelen:0
          RX bytes:10960525 (10.4 MiB)  TX bytes:333911 (326.0 KiB)

lo        Link encap:Local Loopback
          inet addr:127.0.0.1  Mask:255.0.0.0
          inet6 addr: ::1/128 Scope:Host
          UP LOOPBACK RUNNING  MTU:65536  Metric:1
          RX packets:0 errors:0 dropped:0 overruns:0 frame:0
          TX packets:0 errors:0 dropped:0 overruns:0 carrier:0
          collisions:0 txqueuelen:0
          RX bytes:0 (0.0 B)  TX bytes:0 (0.0 B)

root@3e4b04174da9:/var/www/html#
可以看到php-fpm容器有一块 eth0 网卡, 其ip地址为 172.17.0.54,还可以查看hosts信息
root@3e4b04174da9:/var/www/html# cat /etc/hosts
172.17.0.54	3e4b04174da9
127.0.0.1	localhost
::1	localhost ip6-localhost ip6-loopback
fe00::0	ip6-localnet
ff00::0	ip6-mcastprefix
ff02::1	ip6-allnodes
ff02::2	ip6-allrouters
容器ID解析到了该容器局域网IP
再启动nginx容器,同样指定一个名字,并使用 --link 连接到之前的php-fpm容器。
[root@localhost ~]# docker run -d -p 8080:80 --name nginx --link php-fpm nginx:latest
03fe0d3fbd43b5db157992703f70dd6eff4555c4e49c3620e7a212c81824778f
[root@localhost ~]# docker ps
CONTAINER ID        IMAGE               COMMAND          CREATED           STATUS              PORTS         NAMES
03fe0d3fbd43        nginx:latest        "nginx -g 'daemon of   5 seconds ago       Up 4 seconds      0.0.0.0:8080->80/tcp      nginx
3e4b04174da9        php:5.6.32-fpm      "docker-php-entrypoi   20 minutes ago      Up 20 minutes       9000/tcp            php-fpm
此时 nginx 容器就连接到 php-fpm 容器上了,可以进入nginx容器查看相关环境变量和hosts信息:
[root@localhost ~]# docker exec -it nginx /bin/bash
root@03fe0d3fbd43:/#
root@03fe0d3fbd43:/#
root@03fe0d3fbd43:/# env
PHP_FPM_PORT_9000_TCP=tcp://172.17.0.54:9000
PHP_FPM_ENV_GPG_KEYS=0BD78B5F97500D450838F95DFE857D9A90D90EC1 6E4F6AB321FDC07F2C332E3AC2BF0BC433CFC8B3
PHP_FPM_ENV_PHP_SHA256=8c2b4f721c7475fb9eabda2495209e91ea933082e6f34299d11cba88cd76e64b
PHP_FPM_ENV_PHP_ASC_URL=https://secure.php.net/get/php-5.6.32.tar.xz.asc/from/this/mirror
PHP_FPM_PORT_9000_TCP_ADDR=172.17.0.54
HOSTNAME=03fe0d3fbd43
NJS_VERSION=1.13.7.0.1.15-1~stretch
PHP_FPM_ENV_PHPIZE_DEPS=autoconf 		dpkg-dev 		file 		g++ 		gcc 		libc-dev 		make 		pkg-config 		re2c
NGINX_VERSION=1.13.7-1~stretch
PHP_FPM_ENV_PHP_CFLAGS=-fstack-protector-strong -fpic -fpie -O2
PHP_FPM_NAME=/nginx/php-fpm
PHP_FPM_PORT_9000_TCP_PROTO=tcp
PHP_FPM_ENV_PHP_MD5=
PWD=/
HOME=/root
PHP_FPM_ENV_PHP_URL=https://secure.php.net/get/php-5.6.32.tar.xz/from/this/mirror
PHP_FPM_PORT_9000_TCP_PORT=9000
PHP_FPM_ENV_PHP_INI_DIR=/usr/local/etc/php
PHP_FPM_ENV_PHP_EXTRA_CONFIGURE_ARGS=--enable-fpm --with-fpm-user=www-data --with-fpm-group=www-data
PHP_FPM_ENV_PHP_VERSION=5.6.32
SHLVL=1
PHP_FPM_PORT=tcp://172.17.0.54:9000
PHP_FPM_ENV_PHP_CPPFLAGS=-fstack-protector-strong -fpic -fpie -O2
PATH=/usr/local/sbin:/usr/local/bin:/usr/sbin:/usr/bin:/sbin:/bin
PHP_FPM_ENV_PHP_LDFLAGS=-Wl,-O1 -Wl,--hash-style=both -pie
_=/usr/bin/env


root@03fe0d3fbd43:/# cat /etc/hosts
172.17.0.55	03fe0d3fbd43
127.0.0.1	localhost
::1	localhost ip6-localhost ip6-loopback
fe00::0	ip6-localnet
ff00::0	ip6-mcastprefix
ff02::1	ip6-allnodes
ff02::2	ip6-allrouters
172.17.0.54	php-fpm 3e4b04174da9
能够看到 nginx 容器中有很多 PHP_FPM相关的环境变量,而hosts中除了有本身容器ID与自身IP地址的解析关系外,还包含了php-fpm 容器的解析,我们可以使用 ping 或 telnet 命令查看两个容器之间的网络是否畅通。
先安装 ping 和 telnet :
root@03fe0d3fbd43:/# apt-get update
Get:1 http://nginx.org/packages/mainline/debian stretch InRelease [2857 B]
Get:2 http://nginx.org/packages/mainline/debian stretch/nginx amd64 Packages [19.9 kB]
Ign:3 http://cdn-fastly.deb.debian.org/debian stretch InRelease
Get:4 http://cdn-fastly.deb.debian.org/debian stretch-updates InRelease [91.0 kB]
Get:5 http://security.debian.org stretch/updates InRelease [63.0 kB]
Get:6 http://cdn-fastly.deb.debian.org/debian stretch Release [118 kB]
Get:7 http://cdn-fastly.deb.debian.org/debian stretch-updates/main amd64 Packages [6499 B]
Get:8 http://cdn-fastly.deb.debian.org/debian stretch Release.gpg [2479 B]
Get:9 http://cdn-fastly.deb.debian.org/debian stretch/main amd64 Packages [9500 kB]
Get:10 http://security.debian.org stretch/updates/main amd64 Packages [294 kB]
Fetched 10.1 MB in 9s (1093 kB/s)
Reading package lists... Done
root@03fe0d3fbd43:/# apt-get install iputils-ping
...........
root@03fe0d3fbd43:/# apt-get install telnet
...........
测试网络:
root@03fe0d3fbd43:/# ping php-fpm
PING php-fpm (172.17.0.54) 56(84) bytes of data.
64 bytes from php-fpm (172.17.0.54): icmp_seq=1 ttl=64 time=0.181 ms
64 bytes from php-fpm (172.17.0.54): icmp_seq=2 ttl=64 time=0.067 ms
64 bytes from php-fpm (172.17.0.54): icmp_seq=3 ttl=64 time=0.068 ms
64 bytes from php-fpm (172.17.0.54): icmp_seq=4 ttl=64 time=0.064 ms
64 bytes from php-fpm (172.17.0.54): icmp_seq=5 ttl=64 time=0.067 ms
^C
--- php-fpm ping statistics ---
5 packets transmitted, 5 received, 0% packet loss, time 4000ms
rtt min/avg/max/mdev = 0.064/0.089/0.181/0.046 ms
root@03fe0d3fbd43:/#
root@03fe0d3fbd43:/#
root@03fe0d3fbd43:/# telnet php-fpm 9000
Trying 172.17.0.54...
Connected to php-fpm.
Escape character is '^]'.
看到连接了容器之后可以直接用容器名来访问,非常方便
现在我们可以配置 nginx 的 fastcgi, 转发php请求到 php-fpm 容器
先安装VI:
root@03fe0d3fbd43:/# apt-get install vim-tiny
.......
然后修改 /etc/nginx/conf.d/default.nginx
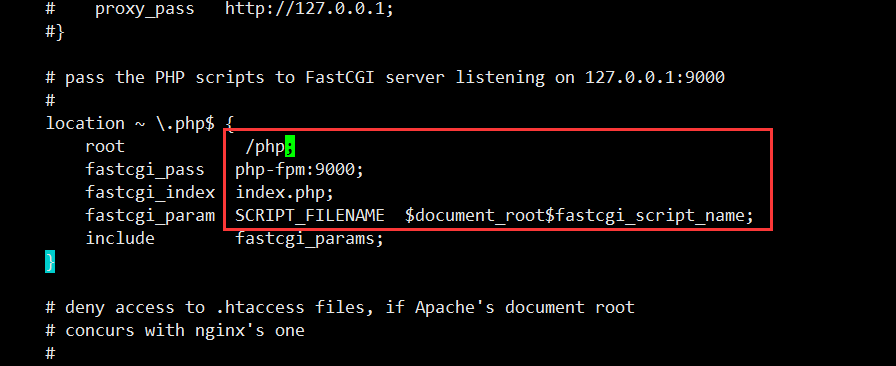
记得修改好后 reload 一下nginx
root@03fe0d3fbd43:/# /etc/init.d/nginx reload
在php-fpm容器的 /php 目录下创建一个 test.php,并添加相应的权限 :
[root@localhost ~]# docker exec -it php-fpm /bin/bash
root@0805ea04f2c8:/var/www/html# mkdir /php
root@0805ea04f2c8:/var/www/html# echo '<?php echo time() . "\n";' > /php/test.php
root@0805ea04f2c8:/var/www/html# chmod 777 /php/test.php

root@3e4b04174da9:/php# ls -l /php/test.php
-rwxrwxrwx. 1 root root 26 Dec  6 13:23 /php/test.php
然后在宿主机下访问该php文件:
[root@localhost ~]# curl '127.0.0.1:8080/test.php'
1509695115
[root@localhost ~]# curl '127.0.0.1:8080/test.php'
1509695138
这样 nginx + php 的运行环境就搭建好了,我们还可以把php的存放目录当作数据卷 和 宿主机绑定(参考前一篇文章),这样可以方便我们的开发。
以上就是关于Docker 端口映射和容器互联的简单介绍,希望对大家有帮助^^