版权声明:本文为博主原创文章,未经博主允许不得转载。 https://blog.csdn.net/lipinganq/article/details/79303309
一.概述
Spring Boot推荐使用java配置完全代替XML配置,java配置是通过@Configration和@Bean注解实现的
- @Configration注解声明当前类是一个配置类,相当于Spring中的一个XML文件
- @Bean注解作用在方法上,声明当前方法的返回值是一个Bean
二.@Bean注解
@Target({ElementType.METHOD, ElementType.ANNOTATION_TYPE})
@Retention(RetentionPolicy.RUNTIME)
@Documented
public @interface Bean {
    // name的别名
    @AliasFor("name")
    String[] value() default {};

    @AliasFor("value")
    String[] name() default {};

    /**
     * 是否通过名称name或类型type来注入依赖项,Autowire.NO表示外部驱动的自动装配
     * Autowire.BY_NAME
     * Autowire.BY_TYPE
     */
    Autowire autowire() default Autowire.NO;

    /**
     * 初始方法
     * @see org.springframework.beans.factory.InitializingBean
     * @see org.springframework.context.ConfigurableApplicationContext#refresh()
     */
    String initMethod() default "";

    /**
     * Spring上下文关闭时调用
     * @see org.springframework.beans.factory.DisposableBean
     * @see org.springframework.context.ConfigurableApplicationContext#close()
     */
    String destroyMethod() default AbstractBeanDefinition.INFER_METHOD;
}- @Bean注解作用在方法上
- @Bean指示一个方法返回一个Spring容器管理的Bean
- @Bean方法名与返回类名一致,首字母小写
- @Bean 一般和 @Component或者@Configuration 一起使用
- @Bean注解默认作用域为单例singleton作用域,可通过@Scope(“prototype”)设置为原型作用域
2.1 Bean名称
- @Bean注解方法返回Bean名称默认为类名,首字母小写
- @Bean注解可以使用value属性或别名name
- @Bean注解接受一个String数组,允许为一个Bean配置多个名称(包含一个主名称和一个或多个别名)
1.默认Bean名称
默认Bean名称为 - myBean
@Bean
public MyBean myBean() {
    return new MyBean();
}
2.设置Bean名称
设置的Bean名称为 - myBean1
@Bean("myBean1")
public MyBean myBean() {
    return new MyBean();
}
3.设置多个Bean名称
设置的Bean的名称为 - myBean1和myBean2
@Bean({"myBean1", "myBean2"})
public MyBean myBean() {
    return new MyBean();
}
2.2 @Bean与其他注解一起使用
@Bean注解没有提供profile,scope,lazy,depends-on或primary的属性,相反,@Bean注解应该与@Scope、@Lazy,@DependsOn和@link Primary注解一起使用来声明这些语义
- @Profile注解为在不同环境下使用不同的配置提供了支持,如开发环境和生产环境的数据库配置是不同的额
- @Scope注解将Bean的作用域从单例改变为指定的作用域
- @Lazy注解只有在默认单例作用域的情况下才有实际效果
- @DependsOn注解表示在当前Bean创建之前需要先创建特定的其他Bean
@Bean()
@Scope("prototype")
public MyBean myBean() {
    return new MyBean();
}
2.3 Bean的初始化和销毁
实际开发中,经常会遇到在Bean使用之前或使用之后做些必要的操作,Spring对Bean的生命周期的操作提供了支持
- Java配置方式:使用Bean的initMethod和destrodMethod
- 注解方法:利用JSR-250的@ConstConstruct和@PreDestroy
public class MyBean {

    public void init() {
        System.out.println("MyBean开始初始化...");
    }

    public void destroy() {
        System.out.println("MyBean销毁...");
    }

    public String get() {
        return "MyBean使用...";
    }
}@Bean(initMethod="init", destroyMethod="destroy")
@Scope("prototype")
public MyBean myBean() {
return new MyBean();
}三.@Configration注解
Spring提供了@Configration注解,可以用来配置多个Bean
@Target(ElementType.TYPE)
@Retention(RetentionPolicy.RUNTIME)
@Documented
@Component
public @interface Configuration {
@AliasFor(annotation = Component.class)
String value() default "";
}
- @Configration注解作用在类、接口(包含注解)上
- @Configuration用于定义配置类,可替换xml配置文件
- @Configration注解类中可以声明一个或多个@Bean方法
- @Configration注解作用的类不能是final类型
- 嵌套的@Configration类必须是static的
3.1 @Configration + @Bean注解
功能类的Bean:
此处没有使用@Service等注解声明Bean
public class MyBean {
public void init() {
System.out.println("MyBean开始初始化...");
}
public void destroy() {
System.out.println("MyBean销毁...");
}
public String get() {
return "MyBean使用...";
}
}@Configuration
public class MyConfigration {
@Bean(initMethod="init", destroyMethod="destroy")
@Scope("prototype")
public MyBean myBean() {
    return new MyBean();
}
}@SpringBootApplication
@RestController
public class DemoApplication {
public static void main(String[] args) {
ConfigurableApplicationContext context = SpringApplication.run(DemoApplication.class, args);
MyBean myBean1 = (MyBean) context.getBean("myBean");
System.out.println(myBean1.toString());
System.out.println();
MyBean myBean2 = (MyBean) context.getBean("myBean");
System.out.println(myBean2.toString());
}
}
测试结果:
2018-02-10 10:58:12.301  INFO 11068 --- [           main] o.s.b.w.embedded.tomcat.TomcatWebServer  : Tomcat started on port(s): 8090 (http) with context path ''
2018-02-10 10:58:12.321  INFO 11068 --- [           main] com.example.demo.DemoApplication         : Started DemoApplication in 7.233 seconds (JVM running for 8.628)
MyBean开始初始化...
com.example.demo.chapter1.useannotation.configration.MyBean@3b545206

MyBean开始初始化...
com.example.demo.chapter1.useannotation.configration.MyBean@77bb48d5
扫描二维码关注公众号,回复:
3861768 查看本文章

3.2 @Configration + @Bean + Environment
通过使用@Autowired}注释将org.springframework.core.env.Environment注入 @Configuration类,可以查找外部值:
public class MyBean {
    private String port;

    public String get() {
        return "端口号: " + getPort();
    }

    public String getPort() {
        return port;
    }

    public void setPort(String port) {
        this.port = port;
    }
}
@Configuration
public class MyConfig {
@Autowired
private Environment environment;
@Bean("myEnvBean")
public MyBean myBean() {
MyBean myBean = new MyBean();
myBean.setPort(environment.getProperty("server.port", "8080"));
return myBean;
}
}@SpringBootApplication
@RestController
public class DemoApplication {
public static void main(String[] args) {
ConfigurableApplicationContext context = SpringApplication.run(DemoApplication.class, args);
MyBean myEnvBean = (MyBean) context.getBean("myEnvBean");
System.out.println(myEnvBean.get());
}
}测试结果:
2018-02-10 11:24:47.492  INFO 2788 --- [           main] o.s.b.w.embedded.tomcat.TomcatWebServer  : Tomcat started on port(s): 8090 (http) with context path ''
2018-02-10 11:24:47.505  INFO 2788 --- [           main] com.example.demo.DemoApplication         : Started DemoApplication in 7.76 seconds (JVM running for 8.712)
端口号: 8090
3.3 @Configration + @Bean + Environment + @PropertySource
@PropertySource注解可以读取自定义的properties配置文件,自定义的properties文件放在src/main/resources文件路径下
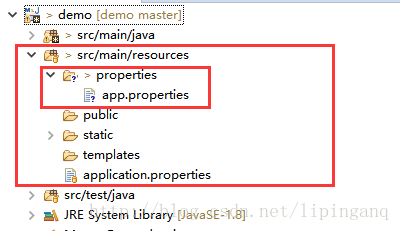
配置文件:app.properties
jdbc.username="admin"
jdbc.password="admin"
public class MyBean {
    private String userName;

    private String passWord;

    public MyBean(String userName, String passWord) {
        this.userName = userName;
        this.passWord = passWord;
    }

    public String get() {
        return "用户名:  " + this.userName + ",  密码 : " + this.passWord;
    }
}配置文件路径:@PropertySource(“classpath:properties/app.properties”)
@Configuration
@PropertySource("classpath:properties/app.properties")
public class MyPropertySourceConfigration {

    @Autowired
    private Environment environment;

    @Bean("myPSBean")
    public MyBean myBean() {
        MyBean myBean = new MyBean(environment.getProperty("jdbc.username", "请设置用户名"), environment.getProperty("jdbc.password", "请设置密码"));
        return myBean;
    }
}
@SpringBootApplication
@RestController
public class DemoApplication {
public static void main(String[] args) {
ConfigurableApplicationContext context = SpringApplication.run(DemoApplication.class, args);
MyBean myEnvBean = (MyBean) context.getBean("myPSBean");
System.out.println(myEnvBean.get());
}
}测试结果:
2018-02-10 17:18:38.670  INFO 2204 --- [           main] o.s.b.w.embedded.tomcat.TomcatWebServer  : Tomcat started on port(s): 8090 (http) with context path ''
2018-02-10 17:18:38.703  INFO 2204 --- [           main] com.example.demo.DemoApplication         : Started DemoApplication in 7.4 seconds (JVM running for 8.339)
用户名:  "admin",  密码 : "admin"