1.概述
Spring Boot简化了Spring应用的开发,不需要繁琐的XML配置就能开发。
那Spring Boot是怎么实现自动配置的呢?
这就要用到Spring Boot中提供的许多注解:
- Spring提供XML配置、注解配置或Java配置来实现Bean的创建和注入
- Spring IoC(ApplicationContext)容器负责进行扫描Bean,进行Bean的初始化、配置和依赖管理
本节介绍注解:
- @Component
- @Service
- @Scope
- @Repository
- @Controller
- @RestController
- @RequestMapping
- @PathVariable
- @ResponseBody
2.声明Bean的注解
如何吸引Spring容器的注意而“有幸”成为Spring 容器管理的Bean呢?
在Spring Boot中就依靠注解,Spring提供了多个注解来声明Bean为Spring容器管理的Bean,注解不同代表的含义不同,但是对Spring容器来说都是Spring管理的Bean
声明Bean的注解有:
- @Component 没有明确角色的组件
- @Service 在业务逻辑层(Service层)使用
- @Repositpry 在数据访问层(dao层)使用
- @Controller 用于标注控制层组件
- @RestController
3. @Component注解
@Component源码:
package org.springframework.stereotype;

import java.lang.annotation.Documented;
import java.lang.annotation.ElementType;
import java.lang.annotation.Retention;
import java.lang.annotation.RetentionPolicy;
import java.lang.annotation.Target;

/**
 * @since 2.5
 * @see Repository
 * @see Service
 * @see Controller
 * @see org.springframework.context.annotation.ClassPathBeanDefinitionScanner // 扫描包中Bean,注册
 */
@Target(ElementType.TYPE)
@Retention(RetentionPolicy.RUNTIME)
@Documented
@Indexed
public @interface Component {

    // 如果有返回组件名称,否则返回空字符串
    String value() default "";

}
- @Component作用在类上
- @Component注解作用域默认为singleton
- 使用注解配置和类路径扫描时,被@Component注解标注的类会被Spring扫描并注册为Bean
- @Component使用在不确定哪一个层的时候使用,可以作用在任何层次,把普通pojo实例化到spring容器
- 不推荐使用@Component注解,而应该使用它的扩展,如@Service、@Repository
3.1 @Component注解使用
package com.example.demo.annotation;

public interface IUser {
    public String get();
}

package com.example.demo.annotation.component;

@Component
public class UserComponentImpl implements IUser {
    private String name = "UserComponentImpl";

    @Override
    public String get() {
        return name;
    }
}

//@Component("componentBeanId")
@Component(value="componentBeanId")
public class UserComponentImplWithParam implements IUser {
    private String name = "UserComponentImplWithParam";

    @Override
    public String get() {
        return name;
    }
}
@Component注解测试:
package com.example.demo.annotation.component;
import org.springframework.boot.SpringApplication;
import org.springframework.boot.autoconfigure.SpringBootApplication;
import org.springframework.context.ConfigurableApplicationContext;
import com.example.demo.annotation.IUser;
@SpringBootApplication
public class ComponentApplication {
public static void main(String[] args) {
ConfigurableApplicationContext context = SpringApplication.run(ComponentApplication.class, args);
IUser userComponentImpl1 = (UserComponentImpl)context.getBean("userComponentImpl");
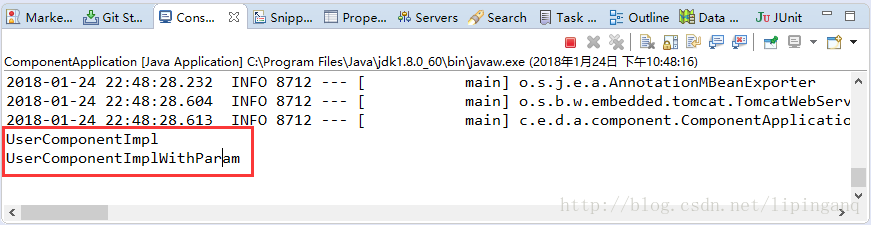
System.out.println(userComponentImpl1.get());
IUser userComponentImpl2 = (UserComponentImplWithParam)context.getBean("componentBeanId");
System.out.println(userComponentImpl2.get());
}
}@Component注解测试结果:
4. @Service注解
@Service注解源码:
package org.springframework.stereotype;

import java.lang.annotation.Documented;
import java.lang.annotation.ElementType;
import java.lang.annotation.Retention;
import java.lang.annotation.RetentionPolicy;
import java.lang.annotation.Target;

import org.springframework.core.annotation.AliasFor;

/**
 * @since 2.5
 * @see Component
 * @see Repository
 */
@Target({ElementType.TYPE})
@Retention(RetentionPolicy.RUNTIME)
@Documented
@Component
public @interface Service {

    @AliasFor(annotation = Component.class)
    String value() default "";

}- @Service是@Component注解的一个特例,作用在类上
- @Service注解作用域默认为singleton
- 使用注解配置和类路径扫描时,被@Service注解标注的类会被Spring扫描并注册为Bean
- @Service用于标注业务层组件,表示定义一个bean
- @Service使用时没有传参数,Bean名称默认为当前类的类名,首字母小写
- @Service(“serviceBeanId”)或@Service(value=”serviceBeanId”)使用时传参数,使用value作为Bean名字
4.1 @service注解使用
package com.example.demo.annotation;

public interface IUser {
    public String get();
}

package com.example.demo.annotation.service;

@Service
public class UserServiceImpl implements IUser {
    private final String name = "UserServiceImpl";

    public String get () {
        return name;
    }
}

//@Service("userService")
@Service(value="userService")
public class UserServiceImplWithParam implements IUser {
    private String name = "UserServiceImplWithParam";

    public String get() {
        return name;
    }
}
@Service注解测试:
package com.example.demo.annotation.service;
import org.springframework.boot.SpringApplication;
import org.springframework.boot.autoconfigure.SpringBootApplication;
import org.springframework.context.ConfigurableApplicationContext;
import com.example.demo.DemoApplication;
import com.example.demo.annotation.IUser;
@SpringBootApplication
public class ServiceApplication {
public static void main(String[] args) {
ConfigurableApplicationContext context = SpringApplication.run(DemoApplication.class, args);
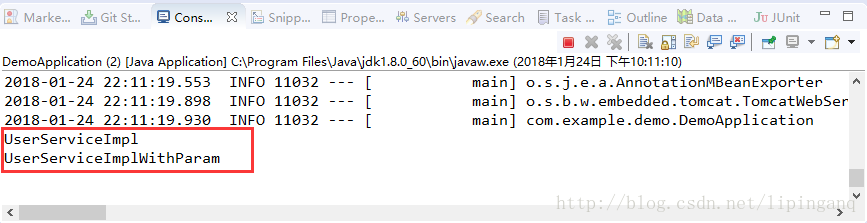
IUser serviceImpl1 = (UserServiceImpl) context.getBean("userServiceImpl");
System.out.println(serviceImpl1.get());
IUser serviceImpl2 = (UserServiceImplWithParam)context.getBean("userService");
System.out.println(serviceImpl2.get());
}
}@Service注解测试结果:
说明:

- @Service注解使用时不传参Bean名默认为当前类名,首字母小写
- @Service注解使用时传参Bean名为参数value的值
4.2 @Scope注解
@Scope注解源码:
package org.springframework.context.annotation;

/**
 1. @since 2.5
 2. @see org.springframework.stereotype.Component
 3. @see org.springframework.context.annotation.Bean
 */
@Target({ElementType.TYPE, ElementType.METHOD})
@Retention(RetentionPolicy.RUNTIME)
@Documented
public @interface Scope {

    @AliasFor("scopeName")
    String value() default "";

    @AliasFor("value")
    String scopeName() default "";

    ScopedProxyMode proxyMode() default ScopedProxyMode.DEFAULT;
}

@Scope有5中取值:
基本作用域:
org.springframework.beans.factory.config.ConfigurableBeanFactory.SCOPE_SINGLETON = "singleton"
org.springframework.beans.factory.config.ConfigurableBeanFactory.SCOPE_PROTOTYPE = "prototype"

Web作用域:
org.springframework.web.context.WebApplicationContext#SCOPE_REQUEST = "request"
org.springframework.web.context.WebApplicationContext#SCOPE_SESSION = "session"
org.springframework.web.context.WebApplicationContext#SCOPE_APPLICATION = "application"- @Scope作用在类上和方法上
- @Scope用来配置 spring bean 的作用域,它标识 bean 的作用域
4.2.1 singleton单例模式
Spring 容器中有且只有一个Bean实例,只要Spring容器不销毁或退出,该Bean实例就会一直存活
4.2.2 prototype原型模式
每次获取Bean的时候会有一个新的实例,Spring容器不能对返回Bean实例的整个生命周期负责
4.2.3 request模式
request只适用于Web程序,每一次HTTP请求都会产生一个新的bean,同时该bean仅在当前HTTP request内有效,当请求结束后,该对象的生命周期即告结束
4.2.4 session模式
session只适用于Web程序,session作用域表示该针对每一次HTTP请求都会产生一个新的bean,同时该bean仅在当前HTTP session内有效
4.2.5 application模式
application只适用于Web程序,全局作用域
4.3 @Service和@Scope注解一起使用
package com.example.demo.annotation.scope;

import org.springframework.context.annotation.Scope;
import org.springframework.stereotype.Service;

// 单例
@Service
@Scope("singleton")
public class SingletonScope {
    public SingletonScope() {

    }
}

//原型
@Service
@Scope("prototype")
public class PrototypeScope {
    public PrototypeScope() {

    }
}
@Service和@Scope注解测试:
package com.example.demo.annotation.scope;
import org.springframework.boot.SpringApplication;
import org.springframework.boot.autoconfigure.SpringBootApplication;
import org.springframework.context.ConfigurableApplicationContext;
@SpringBootApplication
public class ScopeApplication {
public static void main(String[] args) {
ConfigurableApplicationContext context = SpringApplication.run(ScopeApplication.class, args);
SingletonScope singletonScope1 = (SingletonScope) context.getBean("singletonScope");
SingletonScope singletonScope2 = (SingletonScope) context.getBean("singletonScope");
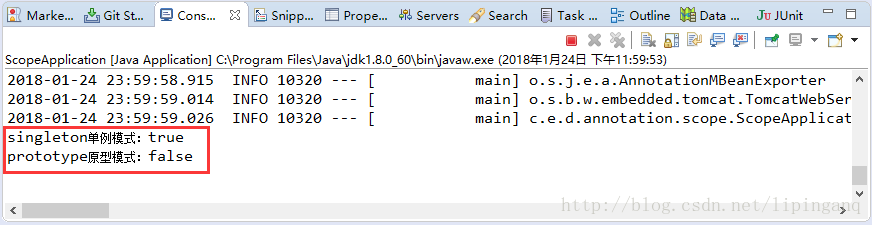
System.out.println("singleton单例模式:" + singletonScope1.equals(singletonScope2));
PrototypeScope prototypeScope1 = (PrototypeScope) context.getBean("prototypeScope");
PrototypeScope prototypeScope2 = (PrototypeScope) context.getBean("prototypeScope");
System.out.println("prototype原型模式:" + prototypeScope1.equals(prototypeScope2));
}
}@Service和@Scope注解测试结果:
说明:
- singleton模式得到的Bean是相同的,单例
- prototype模式每次得到的Bean是不同的
5.@Repository注解
@Repository注解源码:
package org.springframework.stereotype;

import java.lang.annotation.Documented;
import java.lang.annotation.ElementType;
import java.lang.annotation.Retention;
import java.lang.annotation.RetentionPolicy;
import java.lang.annotation.Target;

import org.springframework.core.annotation.AliasFor;

/**
 * @since 2.0
 * @see Component
 * @see Service
 * @see org.springframework.dao.DataAccessException
 * @see org.springframework.dao.annotation.PersistenceExceptionTranslationPostProcessor
 */
@Target({ElementType.TYPE})
@Retention(RetentionPolicy.RUNTIME)
@Documented
@Component
public @interface Repository {

    @AliasFor(annotation = Component.class)
    String value() default "";

}
- @Repository注解作用在类上
- @Repository注解作用域默认为singleton
- 使用注解配置和类路径扫描时,被@Reposito注解标注的类会被Spring扫描并注册为Bean
- @Repository注解用于标注数据访问组件,即DAO组件
- @Repository注解的作用不只是将类识别为Bean,同时它还能将所标注的类中抛出的数据访问异常封装为 Spring 的数据访问异常类型
5.1 @Repository注解使用
package com.example.demo.chapter1.annotation.repository;

import org.springframework.stereotype.Repository;

// @Repository注解默认作用域为singleton

@Repository
public class UserRepositoryImpl {
    public  UserRepositoryImpl () {

    }
}
@Repository注解测试:
package com.example.demo.chapter1.annotation.repository;
import org.springframework.boot.SpringApplication;
import org.springframework.boot.autoconfigure.SpringBootApplication;
import org.springframework.context.ConfigurableApplicationContext;
// @Repository注解测试
@SpringBootApplication
public class RepopsitoryApplication {
public static void main(String[] args) {
ConfigurableApplicationContext context = SpringApplication.run(RepopsitoryApplication.class, args);
UserRepositoryImpl userRepositoryImpl1 = (UserRepositoryImpl) context.getBean("userRepositoryImpl");
UserRepositoryImpl userRepositoryImpl2 = (UserRepositoryImpl) context.getBean("userRepositoryImpl");
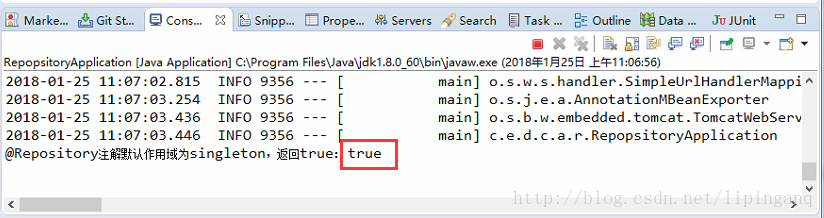
System.out.println("@Repository注解默认作用域为singleton,返回true: " + userRepositoryImpl1.equals(userRepositoryImpl2));
}
}
@Repository注解测试结果:
说明:
- @Repository注解默认作用域为singlton,单例
- @Repository与@Scope注解一起使用可以修改Bean的作用域
6.@Controller注解
@Controller注解源码:
package org.springframework.stereotype;

import java.lang.annotation.Documented;
import java.lang.annotation.ElementType;
import java.lang.annotation.Retention;
import java.lang.annotation.RetentionPolicy;
import java.lang.annotation.Target;

import org.springframework.core.annotation.AliasFor;

/**
 * @since 2.5
 * @see Component
 * @see org.springframework.web.bind.annotation.RequestMapping
 * @see org.springframework.context.annotation.ClassPathBeanDefinitionScanner
 */
@Target({ElementType.TYPE})
@Retention(RetentionPolicy.RUNTIME)
@Documented
@Component
public @interface Controller {

    @AliasFor(annotation = Component.class)
    String value() default "";

}- @Controller注解作用在类上
- 使用注解配置和类路径扫描时,被@Controller注解标注的类会被Spring扫描并注册为Bean
- @Controller用于标注Web中控制层组件
- 被@Controller标注的类负责处理由DispatcherServlet分发的请求,它把用户请求的数据经过业务处理层处理之后封装成一个Model ,然后再把该Model返回给对应的View进行展示
- @Controller和@RequestMapping、@RequestParam等一些注解共同处理URL的映射
7.@RequestMapping注解
@RequestMapping注解源码:
package org.springframework.web.bind.annotation;

import java.lang.annotation.Documented;
import java.lang.annotation.ElementType;
import java.lang.annotation.Retention;
import java.lang.annotation.RetentionPolicy;
import java.lang.annotation.Target;

import org.springframework.core.annotation.AliasFor;

/**
 * @since 2.5
 * @see GetMapping
 * @see PostMapping
 * @see PutMapping
 * @see DeleteMapping
 * @see PatchMapping
 * @see RequestParam
 * @see RequestAttribute
 * @see PathVariable
 * @see ModelAttribute
 * @see SessionAttribute
 * @see SessionAttributes
 * @see InitBinder
 * @see org.springframework.web.servlet.mvc.method.annotation.RequestMappingHandlerAdapter
 * @see org.springframework.web.reactive.result.method.annotation.RequestMappingHandlerAdapter
 */
@Target({ElementType.METHOD, ElementType.TYPE})
@Retention(RetentionPolicy.RUNTIME)
@Documented
@Mapping
public @interface RequestMapping {

    String name() default "";

    @AliasFor("path")
    String[] value() default {};

    @AliasFor("value")
    String[] path() default {};

    RequestMethod[] method() default {};

    String[] params() default {};

    String[] headers() default {};

    String[] consumes() default {};

    String[] produces() default {};
}- @RequestMapping注解作用在类或方法上
- @RequestMapping注解用来处理请求地址映射
- @RequestMapping注解有7个属性
7.1 value和path参数
指定请求的实际地址,指定的地址可以是URI Template 模式
使用示例:
@RequestMapping("/test")
@RequestMapping(value="/test")
@RequestMapping(path="/test")
@RequestMapping(path="/test/*.do")
7.2 method参数
指定请求的method类型,请求类型:
package org.springframework.web.bind.annotation

public enum RequestMethod {
    GET, HEAD, POST, PUT, PATCH, DELETE, OPTIONS, TRACE
}
Spring Boot也提供了简化版后的@RequestMapping
- @GetMapping
- @PostMapping
- @PutMapping
- @DeleteMapping
- @PatchMapping
使用示例:
@RequestMapping(value="/test", method=RequestMethod.GET)
@RequestMapping(value="/test", method=RequestMethod.POST)
@GetMapping("/test")
@PostMapping("/test")
7.3 consumes参数
指定处理允许的媒体类型,例如application/json, text/html
类型参考值见:org.springframework.http.MediaType
// 仅处理request Content-Type为“text/plain”类型的请求
@RequestMapping(value="/test", consumes="text/plain")
@RequestMapping(value="/test", consumes={"text/plain", "application/*"})
7.4 produces参数
指定返回的内容类型,仅当request请求头中的(Accept)类型中包含该指定类型才返回
// 仅处理request请求中Accept头中包含了"text/plain"的请求,同时暗示了返回的内容类型为text/plain
@RequestMapping(value="/test", products="text/plain")
@RequestMapping(value="/test", produces={"text/plain", "application/*"})
7.5 params参数
指定request中必须包含的请求参数,才会进入此方法
// 仅处理请求中包含了名为“action”,值为“query”的请求
@RequestMapping(value = "/test", params="action=query")
7.6 headers参数
指定请求中必须包含的请求头,才能进入此方法
// 仅处理request的header中包含了指定content-type=text/*的请求;
@RequestMapping(value = "/pets", headers = "content-type=text/*")
7.7 @RequestMapping注解使用
- 方法上的@RequestMapping会继承在类上的@RequestMapping
- 返回字符串,默认是视图名
- Spring Boot视图默认路径:resources/templates
package com.example.demo.chapter1.annotation.controller;

import org.springframework.stereotype.Controller;
import org.springframework.web.bind.annotation.RequestMapping;

@Controller
@RequestMapping("/test")
public class ControllerTest {

    /**
     * http://localhost:8080/test
     * 返回字符串, 默认是视图的名称
     * 1.Spring Boot的视图默认保存路径是:resources/templates
     * 2.视图后缀根据选用的视图模板决定,如ftl,html
     * 2.本方法返回的视图是:resources/templates/html/index.ftl
     * */
    public String getX() {
        return "/html/index";
    }

    /**
     * http://localhost:8080/test/get.do
     *
     * 方法上的@RequestMapping会继承在类上的@RequestMapping
     * */
    @RequestMapping("/index.do")
    public String getY() {
        return "/html/index";
    }
}
7.8 @RequestMapping请求路径匹配
- 符号 * 匹配任一字符
- 符号 ** 匹配任意路径
- 符号 ? 匹配单个字符
- 如果一个请求有多个@Requestmapping能够匹配,通过匹配更具体的方法处理此请求
@Controller
@RequestMapping("/test")
public class ControllerTest {

    /**
     * http://localhost:8080/test/welcome/index.do
     * http://localhost:8080/test/welcome/hello.do
     *
     * 路径匹配
     * */
    @RequestMapping("/welcome/*.do")
    public String getZ() {
        return "/html/welcome";
    }
}
7.9 @RequestMapping方法参数
@RequestMapping注解标注的方法可以接受多种类型的参数:
详细参考书籍:Spring Boot精髓 从构建小系统到架构分布式大系统
- @PathVariable - 将URL中的值映射到方法参数中
- Model - Spring MVC中通用的模型
- ModelAndView - 包含了模型和视图路径的对象
- JavaBean - 将HTTP参数映射到JavaBean对象
- MultipartFile - 用于处理文件上传
- @ModelAttribute - 用于将该注解的变量作为Model的一个属性
7.9.1 @PathVariable注解
@PathVariable注解从请求URL中获取参数并映射到方法的参数中
- 符号 {} 中的变量名与方法参数名一一对应
- 如果不想对应,如@RequestMapping中的变量名为id,方法参数名为index,可以使用@PathVariable(“id”) String index来对应
@Controller
@RequestMapping("/test/{id}")
public class PathVariableTest {

    @GetMapping("/{name}/index.do")
    public String get (@PathVariable Integer id, @PathVariable String name) {
        return id + "_" + name;
    }
}
7.9.2 Model做方法参数
- MVC框架中存在一个类似Map结构的Model,可以向Mdel中添加视图需要的变量
- Model对象用于方法参数的时候,Spring MVC在调用方法前自动创建Model
@Controller
@RequestMapping("/test/{id}")
public class PathVariableTest {

    @RequestMapping("/{name}/get.do")
    public String get (@PathVariable("id") Integer index, Model model) {
        model.addAttribute("id", index);
        return "/index";
    }
}
7.9.3 ModelAndView
- ModelAndView类似于Model,但额外提供了一个视图名称
- ModelAndView既可以通过自动创建,也可以在方法中自己创建
    @RequestMapping("/{name}/get.do")
    public ModelAndView get (@PathVariable("name") Integer index, ModelAndView view) {
        view.addObject("id", index);
        view.setViewName("/index.ftl");
        return view;
    }

    @RequestMapping("/{name}/get.do")
    public ModelAndView get (@PathVariable("name") Integer index) {
        ModelAndView view = new ModelAndView();
        view.addObject("id", index);
        view.setViewName("/index.ftl");
        return view;
    }
8.@ResponseBody注解
@ResponseBody注解支持将返回值放在response体内,而不是返回一个视图
- @ResponseBody注解直接将返回的对象输出到客户端
- 如果返回字符串,直接返回
- 如果返回不是字符串,默认使用Jackson将对象序列化成JSON字符串后输出
package com.example.demo.chapter1.annotation.controller;

import org.springframework.stereotype.Controller;
import org.springframework.web.bind.annotation.RequestMapping;
import org.springframework.web.bind.annotation.ResponseBody;

@Controller
@RequestMapping("/bi")
public class ResponseBodyTest {

    @RequestMapping("/login")
    @ResponseBody
    public String get () {
        return "Hello Spring Boot!";
    }
}- 启动Spring Boot应用
- 在浏览器输入:http://localhost:8080/bi/login
- 返回结果:

9.@RestController注解
@RestController注解源码:
package org.springframework.web.bind.annotation;

import java.lang.annotation.Documented;
import java.lang.annotation.ElementType;
import java.lang.annotation.Retention;
import java.lang.annotation.RetentionPolicy;
import java.lang.annotation.Target;

import org.springframework.core.annotation.AliasFor;
import org.springframework.stereotype.Controller;

/**
 * @since 4.0
 */
@Target(ElementType.TYPE)
@Retention(RetentionPolicy.RUNTIME)
@Documented
@Controller
@ResponseBody
public @interface RestController {

    @AliasFor(annotation = Controller.class)
    String value() default "";

}- @RestController是一个组合注解
- @RestController = @Controller + @ResponseBody
- @RestController注解直接将返回的对象输出到客户端
- 如果返回字符串,直接返回
- 如果返回不是字符串,默认使用Jackson将对象序列化成JSON字符串后输出
@RestController注解测试:
package com.example.demo.chapter1.annotation.controller;

import java.util.HashMap;
import java.util.Map;

import org.springframework.web.bind.annotation.RequestMapping;
import org.springframework.web.bind.annotation.RestController;

@RestController
public class RestControllerTest {

    @RequestMapping("/restControllerTest")
    public Map get () {
        HashMap<String, Object> map = new HashMap<>();
        map.put("姓名", "张三");
        map.put("年龄", 22);
        map.put("课程", new String[] {"数据结构", "Spring Boot", "Redis"});
        return map;
    }
}
- 启动Spring Boot应用
- 在浏览器输入:http://localhost:8080/restControllerTest
- 返回结果:

10.小结
其实,@Service、@Repository、@Component、@Controller、@RestController这5个注解的效果都是一样的,Spring会将被这5个注解标注的类加载到Spring上下文中
但是在项目中,却建议你严格按照除Componen的其余几个注解的含义使用在项目中。这对分层结构的web架构很有好处