【Web 集群实战】22_Nagios
标签(空格分隔): Web集群实战
文章目录
1. Nagios 监控工具及原理
1.1 Nagios 特点
- 监控网络服务(HTTP、TCP、PING、SMTP、POP3等)
- 监控主机资源(CPU、负载、I/O 状况、虚拟及正式内存及磁盘利用率等)
- 简单的插件设计模式使得用户可以很方便地定制符合自己服务的检测方法
- 并行服务检查机制
- 具备定义网络分层结构的能力,用 “parent” 主机定义来表达网络间的关系,这种关系可被用来发现和明晰主机宕机或不可达的状态
- 当服务或主机问题产生与解决后将及时通报联系人(mail/im/sms/sound)
- 具备定义事件句柄功能,它可以在主机或服务的事件发生时获取更多问题定位
- 自动的日志回滚
- 可以支持并实现对主机的冗余监控(支持分布式监控)
- 可选的 Web 界面用于查看当前的网络状态、通知和故障历史、日志文件等
1.2 Nagios 监控构成
- Nagios 监控一般由一个主程序(Nagios)、一个插件程序(Nagios-plugins)和一些可选的附加程序(NRPE、NSClient++、NSCA 和 NDOUtils)等组成。
2. Nagios 服务器端安装
2.1 Nagios 安装准备
(1)准备 3 台服务器或 VM 虚拟机
| HOSTNAME | IP | 说明 |
|---|---|---|
| nagios-server | 192.168.2.151 | Nagios 服务器端 |
| web001 | 192.168.2.152 | 被监控的客户端服务器 |
| web002 | 192.168.2.144 | 被监控的客户端服务器 |
(2)设置 yum 安装源
[root@nagios-server ~]# cp /etc/yum.repos.d/CentOS-Base.repo /etc/yum.repos.d/CentOS-Base.repo.bak
[root@nagios-server ~]# wget /etc/yum.repos.d/CentOS-Base.repo http://mirrors.163.com/.help/CentOS7-Base-163.repo
(3) 解决 Perl 软件编译问题
[root@nagios-server ~]# echo 'export LC_ALL=C'>> /etc/profile
[root@nagios-server ~]# tail -1 /etc/profile
export LC_ALL=C
[root@nagios-server ~]# source /etc/profile
[root@nagios-server ~]# echo $LC_ALL
C
(4)关闭 Nagios Server 端防火墙及 SELinux
[root@nagios-server ~]# systemctl disable firewalld.service
[root@nagios-server ~]# systemctl stop firewalld.service
[root@nagios-server ~]# systemctl status firewalld.service
* firewalld.service - firewalld - dynamic firewall daemon
   Loaded: loaded (/usr/lib/systemd/system/firewalld.service; disabled; vendor preset: enabled)
   Active: inactive (dead)
     Docs: man:firewalld(1)

[root@nagios-server ~]# sed -i 's/SELINUX=enforcing/SELINUX=disabled/' /etc/selinux/config
# 修改配置文件可使配置永久生效,需重启系统
[root@nagios-server ~]# cat /etc/selinux/config|grep SELINUX=disabled
SELINUX=disabled
[root@nagios-server ~]# getenforce
Disabled
(5)解决系统时间同步问题
[root@nagios-server ~]# echo '#time sync by nagios-server at 2018-09-16' >>/var/spool/cron/root
[root@nagios-server ~]# echo '*/5 * * * * /usr/sbin/ntpdate ntp1.aliyun.com >/dev/null 2&1' >> /var/spool/cron/root
[root@nagios-server ~]# crontab -l
#time sync by nagios-server at 2018-10-13
*/2 * * * * /usr/sbin/ntpdate ntp1.aliyun.com
>/dev/null 2>&1
(6) 安装 Nagios 服务器端所需软件包(LAMP 环境)
[root@nagios-server ~]# yum install gcc glibc glibc-common -y
[root@nagios-server ~]# yum install gd gd-devel -y
[root@nagios-server ~]# yum install httpd php php-gd -y
[root@nagios-server ~]# rpm -qa httpd php
httpd-2.4.6-80.el7.centos.1.x86_64
php-5.4.16-45.el7.x86_64
MySQL 安装参见【Web 集群实战】12_LNMP 之 MySQL 的安装与配置
(7)创建 Nagios 服务器端需要的用户及组
[root@nagios-server ~]# /usr/sbin/useradd nagios
[root@nagios-server ~]# /usr/sbin/useradd apache -M -s /sbin/nologin
useradd: user 'apache' already exists
[root@nagios-server ~]# /usr/sbin/groupadd nagcmd
[root@nagios-server ~]# /usr/sbin/usermod -a -G nagcmd nagios
[root@nagios-server ~]# /usr/sbin/usermod -a -G nagcmd apache
[root@nagios-server ~]# id -n -G nagios
nagios nagcmd
[root@nagios-server ~]# id -n -G apache
apache nagcmd
[root@nagios-server ~]# groups nagios
nagios : nagios nagcmd
[root@nagios-server ~]# groups apache
apache : apache nagcmd
(8)下载所需软件包
[root@nagios-server ~]# cd /home/ylt/tools/
[root@nagios-server tools]# mkdir nagios -p
[root@nagios-server tools]# cd nagios/

[root@nagios-server nagios]# wget https://sourceforge.net/projects/nagios/files/nagios-3.x/nagios-3.5.1/nagios-3.5.1.tar.gz/download
[root@nagios-server nagios]# ll
total 1724
-rw-r--r-- 1 root root 1763584 Aug 31  2013 nagios-3.5.1.tar.gz

[root@nagios-server nagios]# wget https://nagios-plugins.org/download/nagios-plugins-2.2.1.tar.gz#_ga=2.27512634.762344303.1539496511-137884230.1539496511
[root@nagios-server nagios]# ll nagios-plugins-2.2.1.tar.gz
-rw-r--r-- 1 root root 2728818 Apr 20  2017 nagios-plugins-2.2.1.tar.gz

[root@nagios-server nagios]# wget https://sourceforge.net/projects/nagios/files/nrpe-2.x/nrpe-2.12/nrpe-2.12.tar.gz/download
[root@nagios-server nagios]# ll nrpe-2.12.tar.gz
-rw-r--r-- 1 root root 405725 Mar 11  2008 nrpe-2.12.tar.gz
(9)启动 LAMP 环境的 HTTP 服务
[root@nagios-server tools]# systemctl start httpd
[root@nagios-server tools]# lsof -i:80
COMMAND  PID   USER   FD   TYPE DEVICE SIZE/OFF NODE NAME
httpd   1352   root    4u  IPv6  21968      0t0  TCP *:http (LISTEN)
httpd   1353 apache    4u  IPv6  21968      0t0  TCP *:http (LISTEN)
httpd   1354 apache    4u  IPv6  21968      0t0  TCP *:http (LISTEN)
httpd   1355 apache    4u  IPv6  21968      0t0  TCP *:http (LISTEN)
httpd   1356 apache    4u  IPv6  21968      0t0  TCP *:http (LISTEN)
httpd   1357 apache    4u  IPv6  21968      0t0  TCP *:http (LISTEN)
2.2 安装 Nagios 服务器端
[root@nagios-server nagios]# tar xf nagios-3.5.1.tar.gz
[root@nagios-server nagios]# ll
total 1728
drwxrwxr-x 15 root root    4096 Aug 31  2013 nagios
-rw-r--r--  1 root root 1763584 Aug 31  2013 nagios-3.5.1.tar.gz
[root@nagios-server nagios]# cd nagios/
[root@nagios-server nagios]# ./configure --with-command-group=nagcmd
Review the options above for accuracy.  If they look okay,
type 'make all' to compile the main program and CGIs.

[root@nagios-server nagios]# make all

Enjoy.

[root@nagios-server nagios]# make install
  make install-init
     - This installs the init script in /etc/rc.d/init.d

  make install-commandmode
     - This installs and configures permissions on the
       directory for holding the external command file

  make install-config
     - This installs sample config files in /usr/local/nagios/etc

make[1]: Leaving directory `/home/ylt/tools/nagios/nagios'

[root@nagios-server nagios]# make install-init

*** Init script installed ***

[root@nagios-server nagios]# make install-commandmode

*** External command directory configured ***

[root@nagios-server nagios]# make install-config

*** Config files installed ***
(1) 安装 Nagios Web 配置文件及创建登录用户
- 安装 Nagios Web 配置文件
[root@nagios-server nagios]# make install-webconf

*** Nagios/Apache conf file installed ***
- 创建登录用户
[root@nagios-server nagios]# cd ..
[root@nagios-server nagios]# htpasswd -bc /usr/local/nagios/etc/htpasswd.users nagios nagios
Adding password for user ylt
[root@nagios-server nagios]# cat /usr/local/nagios/etc/htpasswd.users
nagios:$apr1$l7AGreUZ$LUP7tkFCcLoJ21cACkOvU/
- 重新加载 Apache 服务
[root@nagios-server nagios]# systemctl reload httpd
(2)添加监控报警信息接收的 Email 地址
[root@nagios-server nagios]# sed -i 's#nagios@localhost#[email protected]#g' /usr/local/nagios/etc/objects/contacts.cfg
[root@nagios-server nagios]# sed -n '35p' /usr/local/nagios/etc/objects/contacts.cfg
        email                           [email protected]       ;
- 使用第三方邮件服务商提供的服务发送邮件
[root@nagios-server nagios]# tail -2 /etc/mail.rc
set [email protected]
smtp=smtp.qq.com smtp-auth-user=1622320046 smtp-auth-password=password smtp-auto=login
(3)解决 Web 端用户 nagios 没有被许可查看服务资源的问题,将 nagiosadmin 改成 nagios
[root@nagios-server etc]# cat cgi.cfg|grep ^authorized_for
authorized_for_system_information=nagios
authorized_for_configuration_information=nagios
authorized_for_system_commands=nagios
authorized_for_all_services=nagios
authorized_for_all_hosts=nagios
authorized_for_all_service_commands=nagios
authorized_for_all_host_commands=nagios
(4)配置启动 Apache 服务
[root@nagios-server nagios]# systemctl enable httpd
Created symlink from /etc/systemd/system/multi-user.target.wants/httpd.service to /usr/lib/systemd/system/httpd.service.
[root@nagios-server nagios]# systemctl restart httpd
[root@nagios-server nagios]# netstat -lntup|grep httpd
tcp6       0      0 :::80                   :::*                    LISTEN      1932/httpd
- 客户端计算机上的浏览器访问
(4)安装 Nagios 插件软件包
- 首先安装基础依赖包
[root@nagios-server nagios]# yum install perl-devel openssl-devel -y
- 然后安装 Nagios plugins 插件包
[root@nagios-server nagios]# tar xf nagios-plugins-2.2.1.tar.gz
[root@nagios-server nagios]# cd nagios-plugins-2.2.1/
[root@nagios-server nagios-plugins-2.2.1]# ./configure --with-nagios-user=nagios --with-nagios-group=nagios --enable-perl-modules --with-mysql
[root@nagios-server nagios-plugins-2.2.1]# make
[root@nagios-server nagios-plugins-2.2.1]# make install
- 检查插件个数
[root@nagios-server nagios-plugins-2.2.1]# ls /usr/local/nagios/libexec/|wc -l
62
(5)安装 nrpe 软件
[root@nagios-server nagios-plugins-2.2.1]# ls /usr/local/nagios/libexec/check_nrpe
ls: cannot access /usr/local/nagios/libexec/check_nrpe: No such file or directory
[root@nagios-server nagios-plugins-2.2.1]# cd ../
[root@nagios-server nagios]# tar xf nrpe-2.12.tar.gz
[root@nagios-server nagios]# cd nrpe-2.12/
[root@nagios-server nrpe-2.12]# ./configure
[root@nagios-server nrpe-2.12]# make all
[root@nagios-server nrpe-2.12]# make install-plugin
[root@nagios-server nrpe-2.12]# make install-daemon
[root@nagios-server nrpe-2.12]# make install-daemon-config
- 检查 check_nrpe 插件
[root@nagios-server nagios]# ls /usr/local/nagios/libexec/check_nrpe
/usr/local/nagios/libexec/check_nrpe
[root@nagios-server nagios]# ls /usr/local/nagios/libexec/|wc -l
63
(6)配置并启动 Nagios 服务
- 添加 Nagios 服务到开机自启动
[root@nagios-server nagios]# /sbin/chkconfig nagios on
[root@nagios-server nagios]# chkconfig --list nagios
nagios          0:off   1:off   2:on    3:on    4:on    5:on    6:off

[root@nagios-server ~]# echo "/etc/init.d/nagios start" >>/etc/rc.local
[root@nagios-server ~]# tail -1 /etc/rc.local
/etc/init.d/nagios start
- 验证 Nagios 配置文件
[root@nagios-server ~]# /etc/init.d/nagios checkconfig
Running configuration check... OK.
[root@nagios-server ~]# /usr/local/nagios/bin/nagios -v /usr/local/nagios/etc/nagios.cfg
Total Warnings: 0
Total Errors:   0

Things look okay - No serious problems were detected during the pre-flight check
- 修改 /etc/init.d/nagios 实现上述命令行检查语法的详细输出
[root@nagios-server ~]# grep 'checkconfig)' -n -A 2 /etc/init.d/nagios
181:    checkconfig)
182-            printf "Running configuration check..."
183-            $NagiosBin -v $NagiosCfgFile > /dev/null 2>&1;
# 删除脚本中的 > /dev/null 2>&1
[root@nagios-server ~]# vim /etc/init.d/nagios
[root@nagios-server ~]# grep 'checkconfig)' -n -A 2 /etc/init.d/nagios
181:    checkconfig)
182-            printf "Running configuration check..."
183-            $NagiosBin -v $NagiosCfgFile;
- 检查语法
[root@nagios-server ~]# /etc/init.d/nagios checkconfig
Total Warnings: 0
Total Errors:   0

Things look okay - No serious problems were detected during the pre-flight check
 OK.
- 启动 Nagios 服务
[root@nagios-server ~]# /etc/init.d/nagios restart
Restarting nagios (via systemctl):  Warning: nagios.service changed on disk. Run 'systemctl daemon-reload' to reload units.
                                                           [  OK  ]
[root@nagios-server ~]# systemctl daemon-reload

[root@nagios-server ~]# /etc/init.d/nagios restart
Restarting nagios (via systemctl):                         [  OK  ]
[root@nagios-server ~]# ps -ef|grep nagios|grep -v grep
nagios     1408      1  0 15:54 ?        00:00:00 /usr/local/nagios/bin/nagios -d /usr/local/nagios/etc/nagios.cfg
[root@nagios-server ~]# netstat -lntup|grep nagios
# 无输出
3. Nagios 客户端安装
3.1 Nagios 客户端安装准备
(1)准备 2 台服务器或 VM 虚拟机
| HOSTNAME | IP | 说明 |
|---|---|---|
| web001 | 192.168.2.152 | 被监控的客户端服务器 |
| web002 | 192.168.2.144 | 被监控的客户端服务器 |
(2)环境准备和服务器端步骤相同
3.2 在 Nagios 客户端安装软件
(1)下载所需软件包
[root@web001 ~]# yum install gcc glibc-common -y

[root@web001 ~]# mkdir /home/ylt/tools/nagios
[root@web001 ~]# cd /home/ylt/tools/nagios
[root@web001 nagios]# wget https://sourceforge.net/projects/nagios/files/nagios-3.x/nagios-3.5.1/nagios-3.5.1.tar.gz/download
[root@web001 nagios]# wget https://nagios-plugins.org/download/nagios-plugins-2.2.1.tar.gz#_ga=2.27512634.762344303.1539496511-137884230.1539496511
[root@web001 nagios]# wget https://sourceforge.net/projects/nagios/files/nrpe-2.x/nrpe-2.12/nrpe-2.12.tar.gz/download

[root@web001 nagios]# ll
total 4792
-rw-r--r-- 1 root root 1763584 Aug 31  2013 nagios-3.5.1.tar.gz
-rw-r--r-- 1 root root 2728818 Apr 20  2017 nagios-plugins-2.2.1.tar.gz
-rw-r--r-- 1 root root  405725 Mar 11  2008 nrpe-2.12.tar.gz
(2) 添加 nagios 用户
[root@web001 nagios]# /usr/sbin/useradd nagios -M -s /sbin/nologin
[root@web001 nagios]# id nagios
uid=1003(nagios) gid=1003(nagios) groups=1003(nagios)
(3)安装 nagios-plugins 插件
[root@web001 nagios]# yum install perl-devel perl-CPAN openssl-devel -y

root@web001 nagios]# tar xf nagios-plugins-2.2.1.tar.gz
[root@web001 nagios]# cd nagios-plugins-2.2.1/
[root@web001 nagios-plugins-2.2.1]# ./configure --with-nagios-user=nagios --with-nagios-group=nagios --enable-perl-modules --with-mysql
[root@web001 nagios-plugins-2.2.1]# make
[root@web001 nagios-plugins-2.2.1]# make install
[root@web001 nagios-plugins-2.2.1]# cd ../

[root@web001 nagios]# ls /usr/local/nagios/libexec/|wc -l
62
(4)安装 Nagios 客户端 nrpe 软件
[root@web001 nagios]# tar xf nrpe-2.12.tar.gz
[root@web001 nagios]# cd nrpe-2.12/
[root@web001 nrpe-2.12]# ./configure
[root@web001 nrpe-2.12]# make all
[root@web001 nrpe-2.12]# make install-plugin
[root@web001 nrpe-2.12]# make install-daemon
[root@web001 nrpe-2.12]# make install-daemon-config
(5)配置监控内存、磁盘 I/O 脚本插件
[root@web001 nagios]# wget https://github.com/yanglt7/picture/blob/master/check_iostat
[root@web001 nagios]# wget https://github.com/yanglt7/picture/blob/master/check_memory.pl
[root@web001 nagios]# yum install dos2unix -y
[root@web001 nagios]# /bin/cp /home/ylt/tools/nagios/check_memory.pl /usr/local/nagios/libexec/
[root@web001 nagios]# /bin/cp /home/ylt/tools/nagios/check_iostat /usr/local/nagios/libexec/
[root@web001 nagios]# chmod 755 /usr/local/nagios/libexec/check_memory.pl
[root@web001 nagios]# chmod 755 /usr/local/nagios/libexec/check_iostat
[root@web001 nagios]# dos2unix /usr/local/nagios/libexec/check_memory.pl
dos2unix: converting file /usr/local/nagios/libexec/check_memory.pl to Unix format ...
[root@web001 nagios]# dos2unix /usr/local/nagios/libexec/check_iostat
dos2unix: converting file /usr/local/nagios/libexec/check_iostat to Unix format ...
[root@web001 nagios]# chmod a+x /usr/local/nagios/libexec/check_iostat
[root@web001 nagios]# chmod a+x /usr/local/nagios/libexec/check_memory.pl
3.3 配置 Nagios 客户端 nrpe 服务
- 配置监控当前 client 的 nagios server 端的 IP
[root@web001 nagios]# cd /usr/local/nagios/etc/
[root@web001 etc]# sed -n '79p' nrpe.cfg
allowed_hosts=127.0.0.1
[root@web001 etc]# sed -i 's#allowed_hosts=127.0.0.1#allowed_hosts=127.0.0.1,192.168.2.151#g' nrpe.cfg
[root@web001 etc]# sed -n '79p' nrpe.cfg
allowed_hosts=127.0.0.1,192.168.2.151
- 将 199~203行内容注释掉,添加要监控的内容
[root@web001 etc]# vim nrpe.cfg
command[check_load]=/usr/local/nagios/libexec/check_load -w 15,10,5 -c 30,25,20
command[check_mem]=/usr/local/nagios/libexec/check_memory.pl -w 10 -c 3
command[check_disk]=/usr/local/nagios/libexec/check_disk -w 15% -c 7% -p /
command[check_swap]=/usr/local/nagios/libexec/check_swap -w 20% -c 10%
command[check_iostat]=/usr/local/nagios/libexec/check_iostat -s sda -w 30,200,20 -c 50,250,50
- 启动 nagios client nrpe 守护进程
[root@web001 etc]# /usr/local/nagios/bin/nrpe -c /usr/local/nagios/etc/nrpe.cfg -d
- 检查启动结果
[root@web001 etc]# netstat -lntup|grep nrpe
tcp        0      0 0.0.0.0:5666            0.0.0.0:*               LISTEN      3063/nrpe
[root@web001 etc]# ps -ef|grep nrpe|grep -v grep
nagios     3152      1  0 19:18 ?        00:00:00 /usr/local/nagios/bin/nrpe -c /usr/local/nagios/etc/nrpe.cfg -d
- 将 nrpe 加入开机自启
[root@web001 etc]# echo "#nagios nrpe process cmd by ylt at 20181014" >>/etc/rc.local
[root@web001 etc]# echo "/usr/local/nagios/bin/nrpe -c /usr/local/nagios/etc/nrpe.cfg -d" >>/etc/rc.local
[root@web001 etc]# tail -2 /etc/rc.local
#nagios nrpe process cmd by ylt at 20181014
/usr/local/nagios/bin/nrpe -c /usr/local/nagios/etc/nrpe.cfg -d
4. Nagios 服务器端监控
4.1 Nagios 服务器端监控基础介绍
(1)nagios 服务器端核心配置文件
- nagios 主配置文件为 nagios.cfg,默认在 /usr/local/nagios/etc 目录下,/usr/local/nagios/etc 目录下有个 objects (类似 Nginx 的 extra 目录),里面放的是主配置文件 nagios.cfg 包含的其他 Nagios 配置文件。
[root@nagios-server ~]# cd /usr/local/nagios/etc
[root@nagios-server etc]# tree
.
|-- cgi.cfg
|-- htpasswd.users
|-- nagios.cfg
|-- nrpe.cfg
|-- objects
|   |-- commands.cfg
|   |-- contacts.cfg
|   |-- localhost.cfg
|   |-- printer.cfg
|   |-- switch.cfg
|   |-- templates.cfg
|   |-- timeperiods.cfg
|   `-- windows.cfg
`-- resource.cfg

1 directory, 13 files
(2)配置主配置文件 nagios.cfg
- 在 nagios.cfg 找到 cfg_file,增加如下主机和服务的配置文件
[root@nagios-server etc]# vim nagios.cfg
  34 cfg_file=/usr/local/nagios/etc/objects/hosts.cfg
  35 cfg_file=/usr/local/nagios/etc/objects/services.cfg
  36 cfg_dir=/usr/local/nagios/etc/objects/services
- 注释掉如下行
#cfg_file=/usr/local/nagios/etc/objects/localhost.cfg
- 保存后根据已有数据生成 hosts.cfg 主机文件
[root@nagios-server etc]# cd objects/
[root@nagios-server objects]# head -51 localhost.cfg >hosts.cfg
[root@nagios-server objects]# chown nagios.nagios /usr/local/nagios/etc/objects/hosts.cfg
- 生成新的空的 service.cfg 文件
[root@nagios-server objects]# touch services.cfg
[root@nagios-server objects]# chown nagios.nagios services.cfg
- 生成服务的配置文件目录,所有放到此目录下的配置(*.cfg)都会自动被包含到主配置文件中生效
[root@nagios-server objects]# mkdir services
[root@nagios-server objects]# chown -R nagios.nagios services
- 检查生成结果
[root@nagios-server objects]# ls -lrt
total 56
-rw-rw-r-- 1 nagios nagios 10812 Oct 14 14:21 templates.cfg
-rw-rw-r-- 1 nagios nagios  7716 Oct 14 14:21 commands.cfg
-rw-rw-r-- 1 nagios nagios  3208 Oct 14 14:21 timeperiods.cfg
-rw-rw-r-- 1 nagios nagios  5403 Oct 14 14:21 localhost.cfg
-rw-rw-r-- 1 nagios nagios  4019 Oct 14 14:21 windows.cfg
-rw-rw-r-- 1 nagios nagios  3124 Oct 14 14:21 printer.cfg
-rw-rw-r-- 1 nagios nagios  3293 Oct 14 14:21 switch.cfg
-rw-rw-r-- 1 nagios nagios  2165 Oct 14 14:37 contacts.cfg
-rw-r--r-- 1 nagios nagios  1870 Oct 14 19:35 hosts.cfg
-rw-r--r-- 1 nagios nagios     0 Oct 14 19:36 services.cfg
drwxr-xr-x 2 nagios nagios  4096 Oct 14 19:37 services
4.2 配置 Nagios 服务器端监控项
(1)配置 hosts.cfg,定义要监控的 Nagios 客户端主机
[root@nagios-server objects]# cat hosts.cfg
#
# HOST DEFINITION
#

# Define a host for the local machine

define host{
        use                     linux-server            ; Name of host template to use
                                                        ; This host definition will inherit all variables that are defined
                                                        ; in (or inherited by) the linux-server host template definition.
        host_name               web001
        alias                   web001
        address                 192.168.2.152
        }
define host{
        use                     linux-server            ; Name of host template to use
                                                          ; This host definition will inherit all variables that are defined
                                                          ; in (or inherited by) the linux-server host template definition.
        host_name               web002
        alias                   web002
        address                 192.168.2.144
        }
#
# HOST GROUP DEFINITION
#

# Define an optional hostgroup for Linux machines

define hostgroup{
        hostgroup_name  linux-servers ; The name of the hostgroup
        alias           Linux Servers ; Long name of the group
        members         web001,web002     ; Comma separated list of hosts that belong to this group
        }
(2)配置 services.cfg,定义要监控的资源服务
define service {
        use                     generic-service
        host_name               web001,web002
        service_description     Disk Partition
        check_command                   check_nrpe!check_disk
}
define service {
        use                     generic-service
        host_name               web001,web002
        service_description     Swap Useage
        check_command                   check_nrpe!check_swap
}
define service {
        use                     generic-service
        host_name               web001,web002
        service_description     MEM Useage
        check_command                   check_nrpe!check_mem
}
define service {
        use                     generic-service
        host_name               web001,web002
        service_description     Current Load
        check_command                   check_nrpe!check_load
}
define service {
        use                     generic-service
        host_name               web001,web002
        service_description     Disk Iostat
        check_command                   check_nrpe!check_iostat!5!11
}
define service {
        use                     generic-service
        host_name               web001,web002
        service_description     PING
        check_command                   check_ping!100.0,20%!500.0,60%
}
(3)配置 command.cfg,加入 check_nrpe 的插件配置
[root@nagios-server objects]# tail -5 commands.cfg
# 'check_nrpe' command definition
define command{
        command_name    check_nrpe
        command_line    $USER1$/check_nrpe -H $HOSTADDRESS$ -c $ARG1$
}
(4)检查语法
[root@nagios-server objects]# /etc/init.d/nagios checkconfig
Total Warnings: 0
Total Errors:   0

Things look okay - No serious problems were detected during the pre-flight check
 OK.
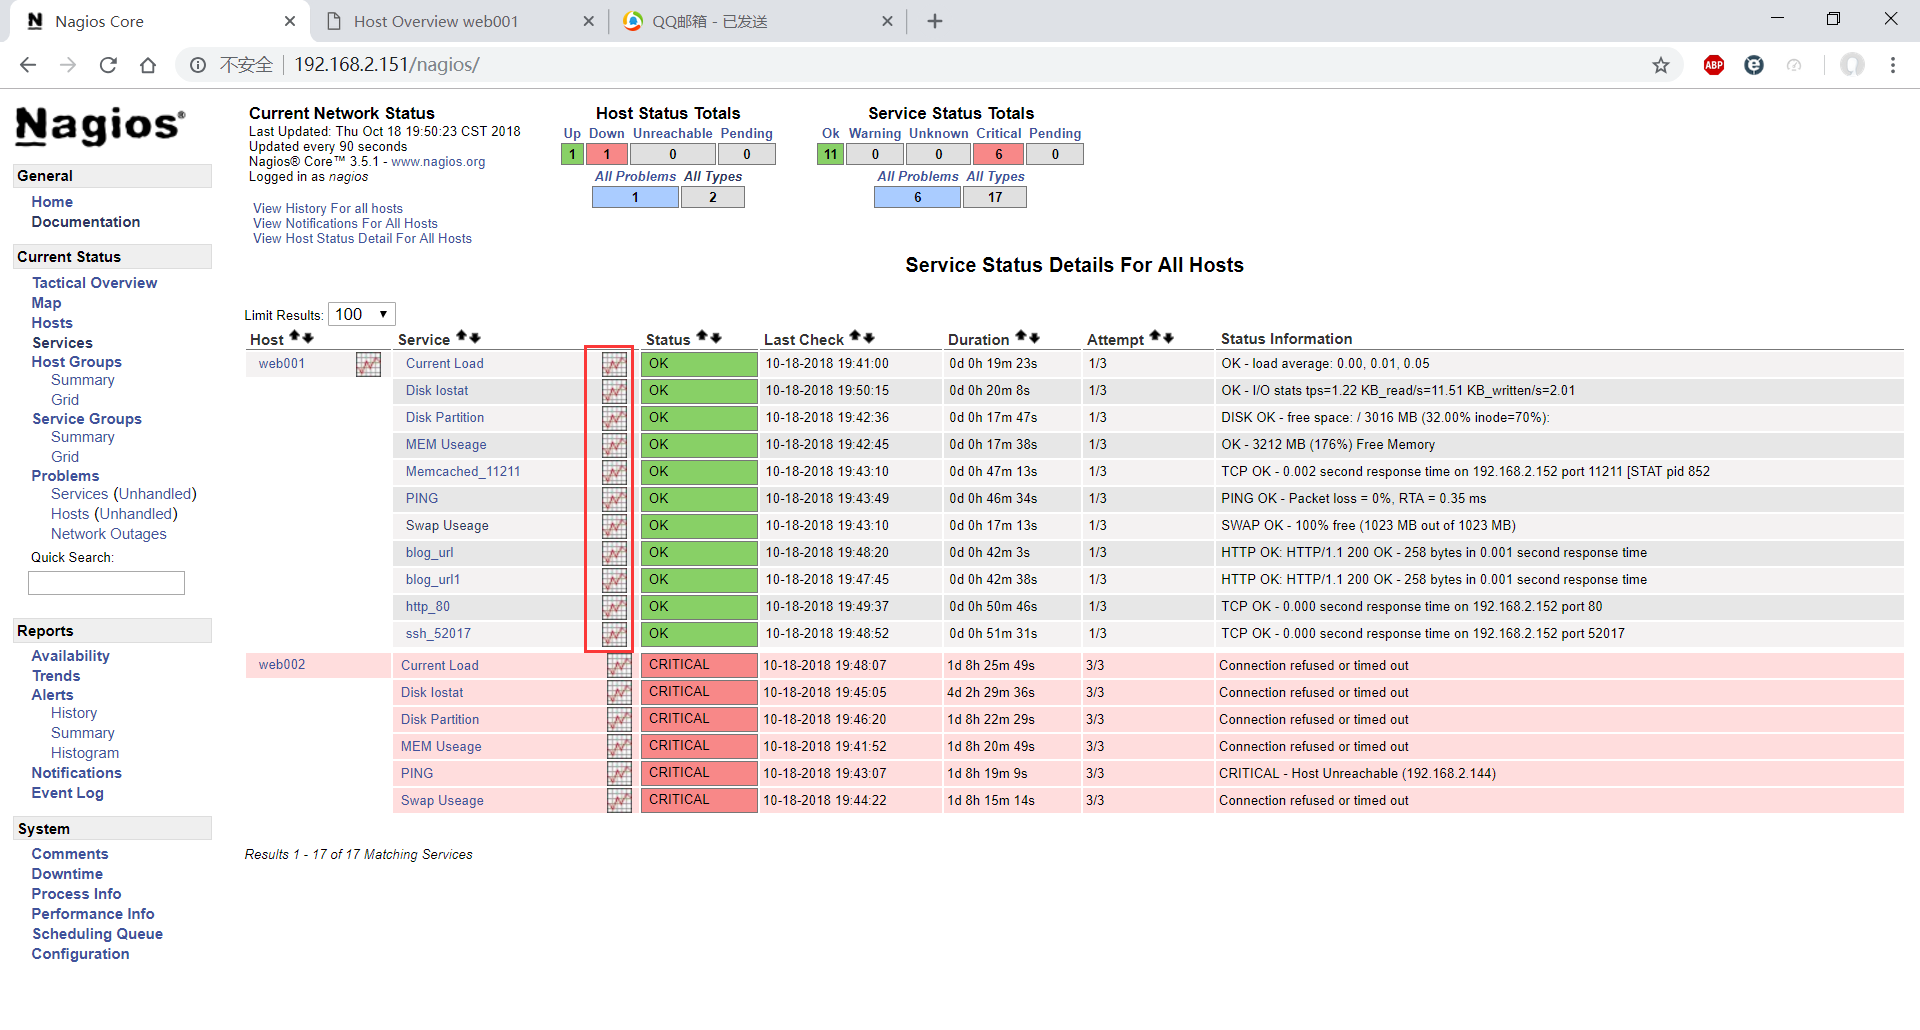
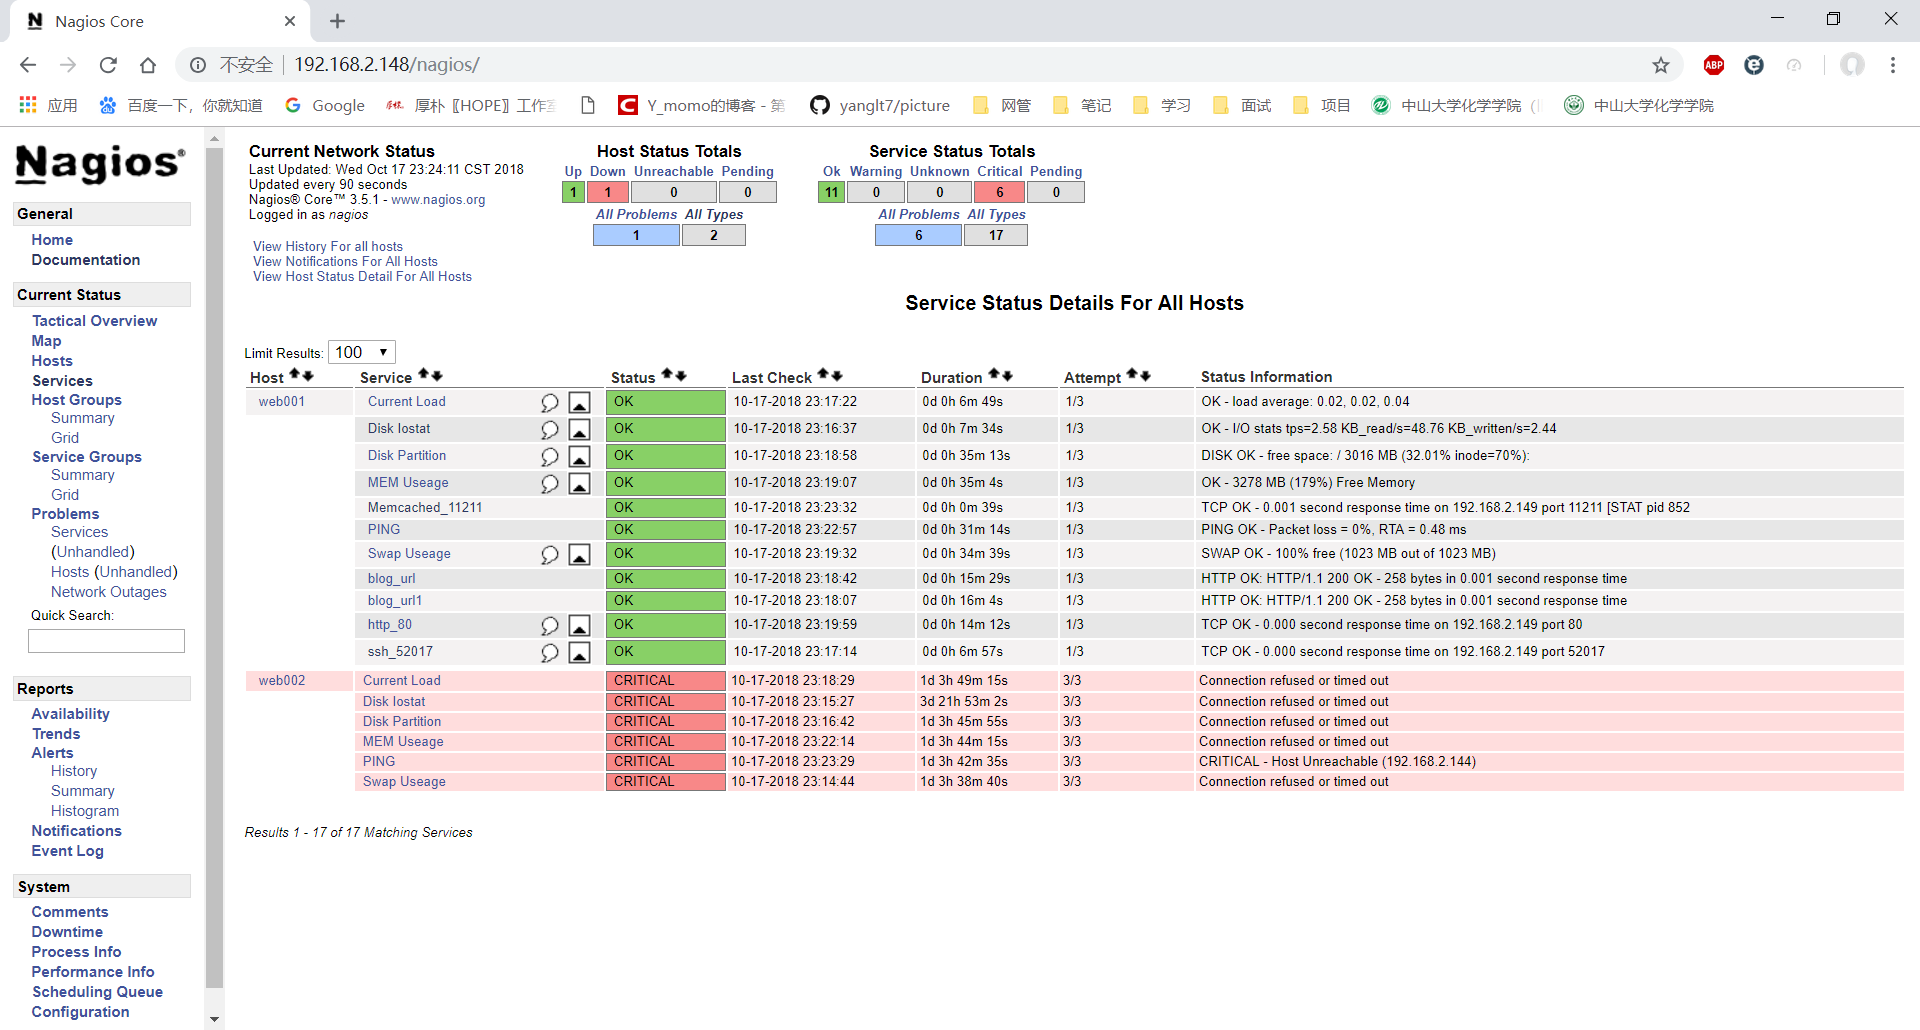
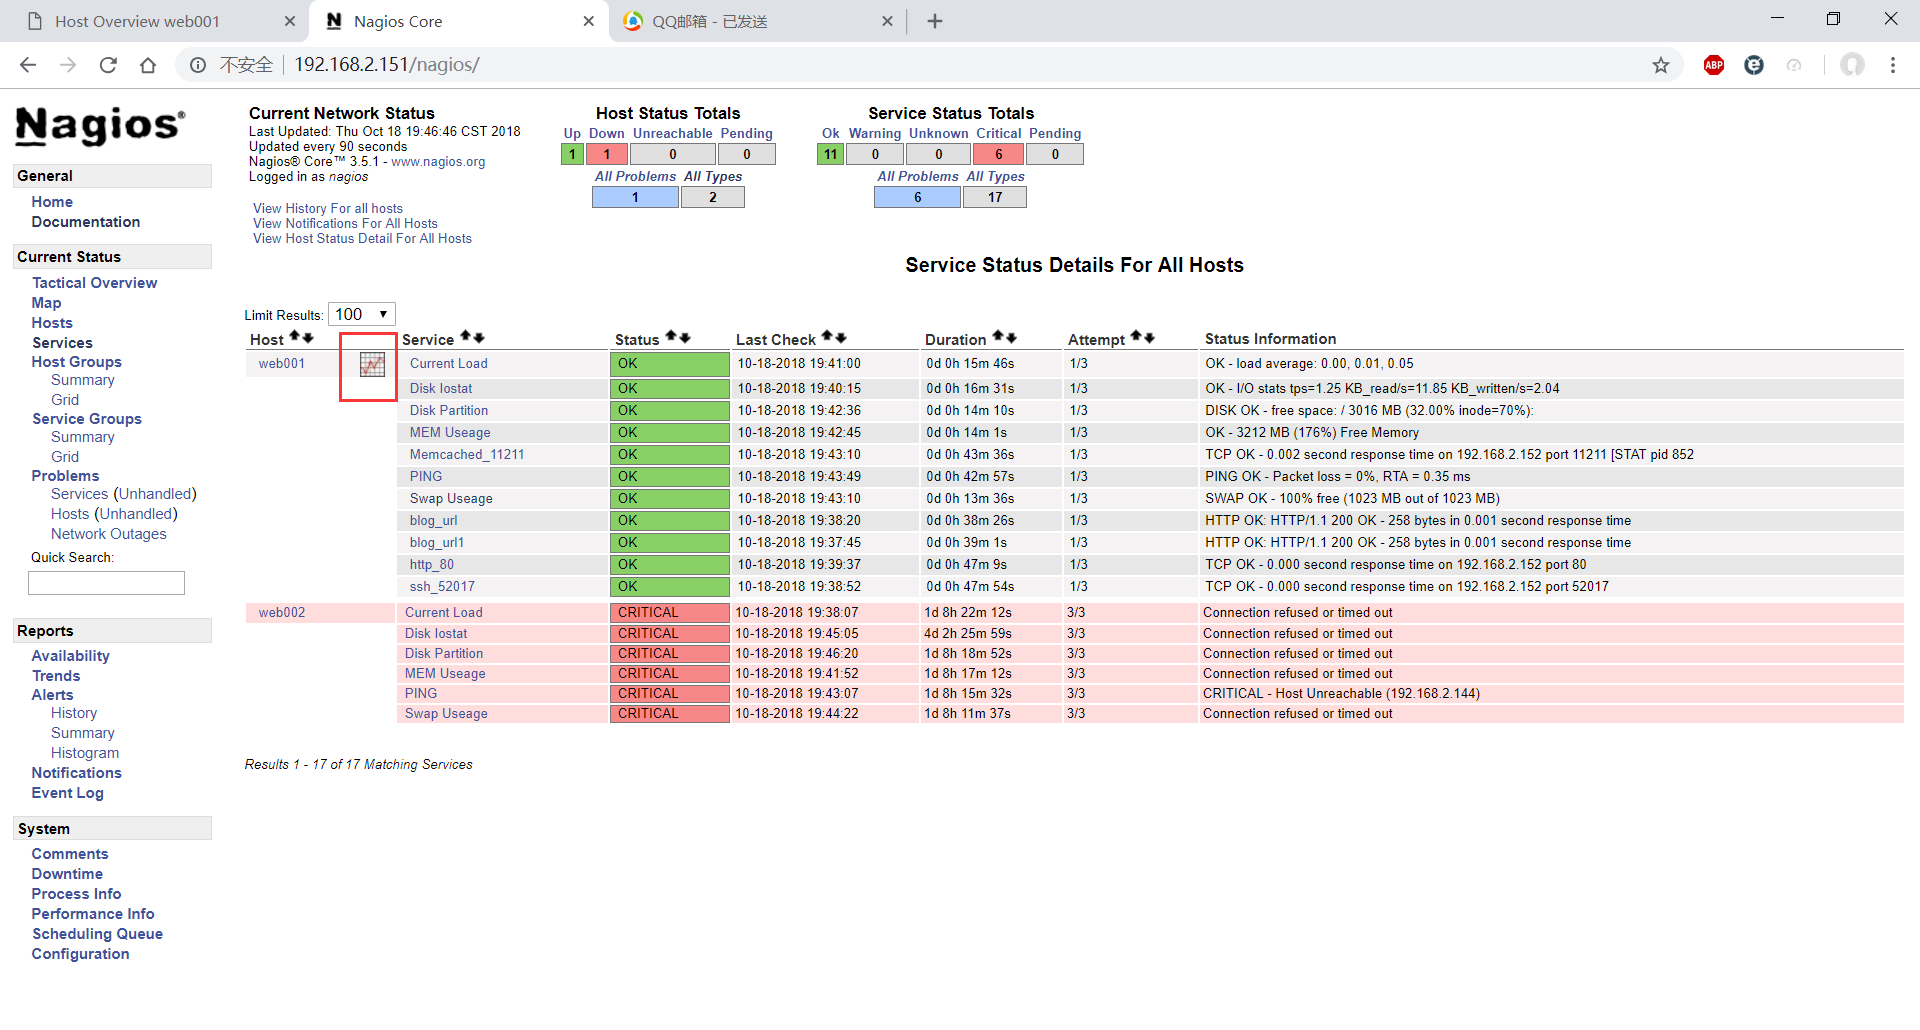
- 监控成果
(5) 添加 http 服务的 URL 地址及端口监控
- 从 Nagios 服务器端发起的监控,如 URL 地址、端口监控等。此类服务一般都开启了对外提供服务的业务。这样的业务,一般采用主动监控的方式。
- URL 监控的实质是通过命令行理解 HTTP 的监控原理
[root@nagios-server ~]# /usr/local/nagios/libexec/check_http -H 192.168.2.152
HTTP OK: HTTP/1.1 200 OK - 258 bytes in 0.001 second response time |time=0.000986s;;;0.000000 size=258B;;;0
-
下面是对域名 URL 地址 进行监控的配置
-
编辑 services.cfg 文件
[root@nagios-server objects]# sed -n '37,49p' services.cfg
#url examples http://blog.yangyangyang.org
define service {
        use                     generic-service
        host_name               web001
        service_description     blog_url
        check_command                   check_weburl!-H blog.yangyangyang.org
        }
define service {
        use                                     generic-service
        host_name                               web001
        service_description                     blog_url1
        check_command                   check_weburl!-H blog.yangyangyang.org -u /ylt.html
        }
# -u 后加域名后面的地址,即检查真正的 URL 地址 http://blog.yangyangyang.org/ylt.html
- 编辑 commands.cfg,增加 check_weburl 插件配置
[root@nagios-server objects]# sed -n '144,154p' commands.cfg
# 'check_http' command definition
define command{
        command_name    check_http
        command_line    $USER1$/check_http -I $HOSTADDRESS$ $ARG1$
        }

# 'check_weburl' command definition
define command{
        command_name    check_weburl
        command_line    $USER1$/check_http $ARG1$ -w 10 -c 30
        }
(6)配置好 URL 后检查 Nagios 语法
- 测试域名 URL 监控,需要修改 Nagios 服务器端的 hosts 文件
192.168.2.148 blog.yangyangyang.org
- 如果被监控端没有新建域名下的 HTML 文件,将产生 403 或 404 错误,需:
[root@web001 ~]# touch /var/www/html/index.html
[root@web001 ~]# touch /var/www/html/ylt.html
- 此时检查语法
[root@nagios-server objects]# /etc/init.d/nagios checkconfig
- 使其生效
[root@nagios-server ~]# /etc/init.d/nagios reload
[root@nagios-server objects]# /usr/local/nagios/libexec/check_http -H blog.yangyangyang.org
HTTP OK: HTTP/1.1 200 OK - 258 bytes in 0.001 second response time |time=0.000952s;;;0.000000 size=258B;;;0

[root@nagios-server objects]# /usr/local/nagios/libexec/check_http -H blog.yangyangyang.org -u /ylt.html
HTTP OK: HTTP/1.1 200 OK - 258 bytes in 0.001 second response time |time=0.001255s;;;0.000000 size=258B;;;0
(7)监控任意端口实例
[root@nagios-server ~]# /usr/local/nagios/libexec/check_tcp -H 192.168.2.152 -p 80
TCP OK - 0.000 second response time on 192.168.2.152 port 80|time=0.000350s;;;0.000000;10.000000
[root@nagios-server objects]# sed -n '50,60p' services.cfg
define service {
        use                                     generic-service
        host_name                               web001
        service_description                     ssh_52017
        check_command                   check_tcp!52017
        }
define service {
        use                                     generic-service
        host_name                               web001
        service_description                     http_80
        check_command                   check_tcp!80
[root@nagios-server objects]# tail -4 commands.cfg
define command{
        command_name    check_memcached_11211
        command_line    $USER1$/check_tcp -H $HOSTADDRESS$ -p 11211 -t 5 -E -s 'stats\r\nquit\r\n' -e 'uptime' -M crit
        }

[root@nagios-server objects]# tail -6 services.cfg
define service {
        use                                     generic-service
        host_name                               web001
        service_description                     Memcached_11211
        check_command                   check_memcached_11211
        }
(8)监控 Memcached 服务
- 最终监控成果
4.3 Nagios 的调试
(1)检查 Nagios 语法并优化配置 Nagios 启动脚本,见 2.2 安装 Nagios 服务器端(6)配置并启动 Nagios 服务
(2)通过日志排查问题
[root@nagios-server ~]# tail /usr/local/nagios/var/nagios.log
[1539792000] CURRENT SERVICE STATE: web002;Swap Useage;CRITICAL;HARD;3;Connection refused or timed out
[1539837678] Warning: A system time change of 0d 12h 41m 9s (forwards in time) has been detected.  Compensating...
[1539837700] HOST NOTIFICATION: nagiosadmin;web002;DOWN;notify-host-by-email;CRITICAL - Host Unreachable (192.168.2.144)
[1539838070] SERVICE ALERT: web001;Disk Iostat;CRITICAL;SOFT;1;CHECK_NRPE: Error - Could not complete SSL handshake.
[1539838120] SERVICE ALERT: web001;Current Load;CRITICAL;SOFT;1;CHECK_NRPE: Error - Could not complete SSL handshake.
[1539838190] SERVICE ALERT: web001;Disk Iostat;CRITICAL;SOFT;2;CHECK_NRPE: Error - Could not complete SSL handshake.
[1539838210] SERVICE ALERT: web001;Disk Partition;CRITICAL;SOFT;1;CHECK_NRPE: Error - Could not complete SSL handshake.
[1539838220] SERVICE ALERT: web001;MEM Useage;CRITICAL;SOFT;1;CHECK_NRPE: Error - Could not complete SSL handshake.
[1539838240] SERVICE ALERT: web001;Current Load;CRITICAL;SOFT;2;CHECK_NRPE: Error - Could not complete SSL handshake.
[1539838250] SERVICE ALERT: web001;Swap Useage;CRITICAL;SOFT;1;CHECK_NRPE: Error - Could not complete SSL handshake.

[root@nagios-server ~]# tail /var/log/messages
Oct 18 12:50:20 nagios-server nagios: SERVICE ALERT: web001;MEM Useage;CRITICAL;SOFT;1;CHECK_NRPE: Error - Could not complete SSL handshake.
Oct 18 12:50:35 nagios-server systemd: Started Session 89 of user ylt.
Oct 18 12:50:35 nagios-server systemd-logind: New session 89 of user ylt.
Oct 18 12:50:35 nagios-server systemd: Starting Session 89 of user ylt.
Oct 18 12:50:35 nagios-server dbus[646]: [system] Activating service name='org.freedesktop.problems' (using servicehelper)
Oct 18 12:50:35 nagios-server dbus[646]: [system] Successfully activated service 'org.freedesktop.problems'
Oct 18 12:50:40 nagios-server nagios: SERVICE ALERT: web001;Current Load;CRITICAL;SOFT;2;CHECK_NRPE: Error - Could not complete SSL handshake.
Oct 18 12:50:50 nagios-server nagios: SERVICE ALERT: web001;Swap Useage;CRITICAL;SOFT;1;CHECK_NRPE: Error - Could not complete SSL handshake.
Oct 18 12:51:10 nagios-server systemd-logind: Removed session 83.
Oct 18 12:51:15 nagios-server su: (to root) ylt on pts/1
5. 服务器端 Nagios 图形监控显示和管理
5.1 服务器端安装 PNP 生成图形
(1)PNP 出图基础依赖软件安装
[root@nagios-server ~]# yum install cairo pango zlib zlib-level freetype freetype-devel gd gd-devel -y
[root@nagios-server ~]# rpm -qa cairo pango zlib zlib-level freetype freetype-devel gd gd-devel
zlib-1.2.7-17.el7.x86_64
gd-devel-2.0.35-26.el7.x86_64
gd-2.0.35-26.el7.x86_64
freetype-2.4.11-15.el7.x86_64
freetype-devel-2.4.11-15.el7.x86_64
pango-1.40.4-1.el7.x86_64
cairo-1.14.8-2.el7.x86_64
[root@nagios-server ~]# yum install libart_lgpl libart_lgpl-devel -y
[root@nagios-server ~]# rpm -qa libart_lgpl libart_lgpl-devel
libart_lgpl-2.3.21-10.el7.x86_64
libart_lgpl-devel-2.3.21-10.el7.x86_64
[root@nagios-server ~]# yum install rrdtool rrdtool-devel -y
[root@nagios-server ~]# rpm -qa rrdtool rrdtool-devel
rrdtool-1.4.8-9.el7.x86_64
rrdtool-devel-1.4.8-9.el7.x86_64

[root@nagios-server ~]# which rrdtool
/bin/rrdtool
(2)安装出图 Web 界面展示软件 PNP
[root@nagios-server ~]# cd /home/ylt/tools/

[root@nagios-server tools]# wget https://sourceforge.net/projects/pnp4nagios/files/PNP/pnp-0.4.14/pnp-0.4.14.tar.gz/download
[root@nagios-server tools]$ yum install perl-Time-HiRes -y
[root@nagios-server tools]# tar zxf pnp-0.4.14.tar.gz
[root@nagios-server pnp-0.4.14]# ./configure --with-rrdtool --with-perfdata-dir=/usr/local/nagios/share/perfdata
[root@nagios-server pnp-0.4.14]# make all
[root@nagios-server pnp-0.4.14]# make install
[root@nagios-server pnp-0.4.14]# make install-config
[root@nagios-server pnp-0.4.14]# make install-init

[root@nagios-server pnp-0.4.14]# ll /usr/local/nagios/libexec/ |grep process
-rwxr-xr-x 1 nagios nagios  31804 Oct 18 18:50 process_perfdata.pl
(3)Nagios 出图相关配置
- vim nagios.cfg +834,将参数对应的值从 0 改成 1
[root@nagios-server etc]# sed -n '834p' nagios.cfg
process_performance_data=1
- 继续修改,在 846 行开始,取消两项参数开头的注释
[root@nagios-server etc]# sed -n '846,847p' nagios.cfg
host_perfdata_command=process-host-perfdata
service_perfdata_command=process-service-perfdata
- 修改 commands.cfg,定义出图获取数据的命令
[root@nagios-server etc]# sed -n '234,245p' objects/commands.cfg
# 'process-host-perfdata' command definition
define command{
        command_name    process-host-perfdata
        command_line    /usr/bin/printf "%b" "$LASTHOSTCHECK$\t$HOSTNAME$\t$HOSTSTATE$\t$HOSTATTEMPT$\t$HOSTSTATETYPE$\t$HOSTEXECUTIONTIME$\t$HOSTOUTPUT$\t$HOSTPERFDATA$\n" >> /usr/local/nagios/var/host-perfdata.out
        }


# 'process-service-perfdata' command definition
define command{
        command_name    process-service-perfdata
        command_line    /usr/bin/printf "%b" "$LASTSERVICECHECK$\t$HOSTNAME$\t$SERVICEDESC$\t$SERVICESTATE$\t$SERVICEATTEMPT$\t$SERVICESTATETYPE$\t$SERVICEEXECUTIONTIME$\t$SERVICELATENCY$\t$SERVICEOUTPUT$\t$SERVICEPERFDATA$\n" >> /usr/local/nagios/var/service-perfdata.out
        }
- 检查语法,使配置生效
[root@nagios-server etc]# /etc/init.d/nagios checkconfig
[root@nagios-server etc]# /etc/init.d/nagios reload
5.2 配置主机及服务获取状态数据出图
(1)设置让被监控的主机记录数据
[root@nagios-server ~]# cd /usr/local/nagios/etc/objects/

[root@nagios-server objects]# sed -n '23,42p' hosts.cfg
# Define a host for the local machine

define host{
        use                     linux-server            ; Name of host template to use
                                                        ; This host definition will inherit all variables that are defined
                                                        ; in (or inherited by) the linux-server host template definition.
        host_name               web001
        alias                   web001
        address                 192.168.2.152
        process_perf_data       1 #<==此行表示将记录 web001 主机的状态数据
        }
define host{
        use                     linux-server            ; Name of host template to use
                                                          ; This host definition will inherit all variables that are defined
                                                          ; in (or inherited by) the linux-server host template definition.
        host_name               web002
        alias                   web002
        address                 192.168.2.144
        process_perf_data       1
        }
(2)设置让被监控主机对应的服务记录数据
[root@nagios-server objects]# head -7 services.cfg
define service {
        use                     generic-service
        host_name               web001,web002
        service_description     Disk Partition
        check_command                   check_nrpe!check_disk
        process_perf_data       1 #<==此行表示将记录 web001 主机的剩余磁盘空间状态数据
}
- 也可直接采取在所有服务对应的统一模板里添加配置参数的方式,这样可使所有的服务都生效。这里每个服务使用的模板就是由服务里的 “ use generic-service ” 这个选项确定的。
[root@nagios-server objects]# sed -n '154,176p' templates.cfg |sed -r 's#(.*);.*$#\1#g'
        name                            generic-service
        active_checks_enabled           1
        passive_checks_enabled          1
        parallelize_check               1
        obsess_over_service             1
        check_freshness                 0
        notifications_enabled           1
        event_handler_enabled           1
        flap_detection_enabled          1
        failure_prediction_enabled      1
        process_perf_data               1
        retain_status_information       1
        retain_nonstatus_information    1
        is_volatile                     0
        check_period                    24x7
        max_check_attempts              3
        normal_check_interval           10
        retry_check_interval            2
        contact_groups                  admins
        notification_options            w,u,c,r
        notification_interval           60
        notification_period             24x7
         register                        0
- 检查语法,使配置生效
[root@nagios-server etc]# /etc/init.d/nagios checkconfig
[root@nagios-server etc]# /etc/init.d/nagios reload
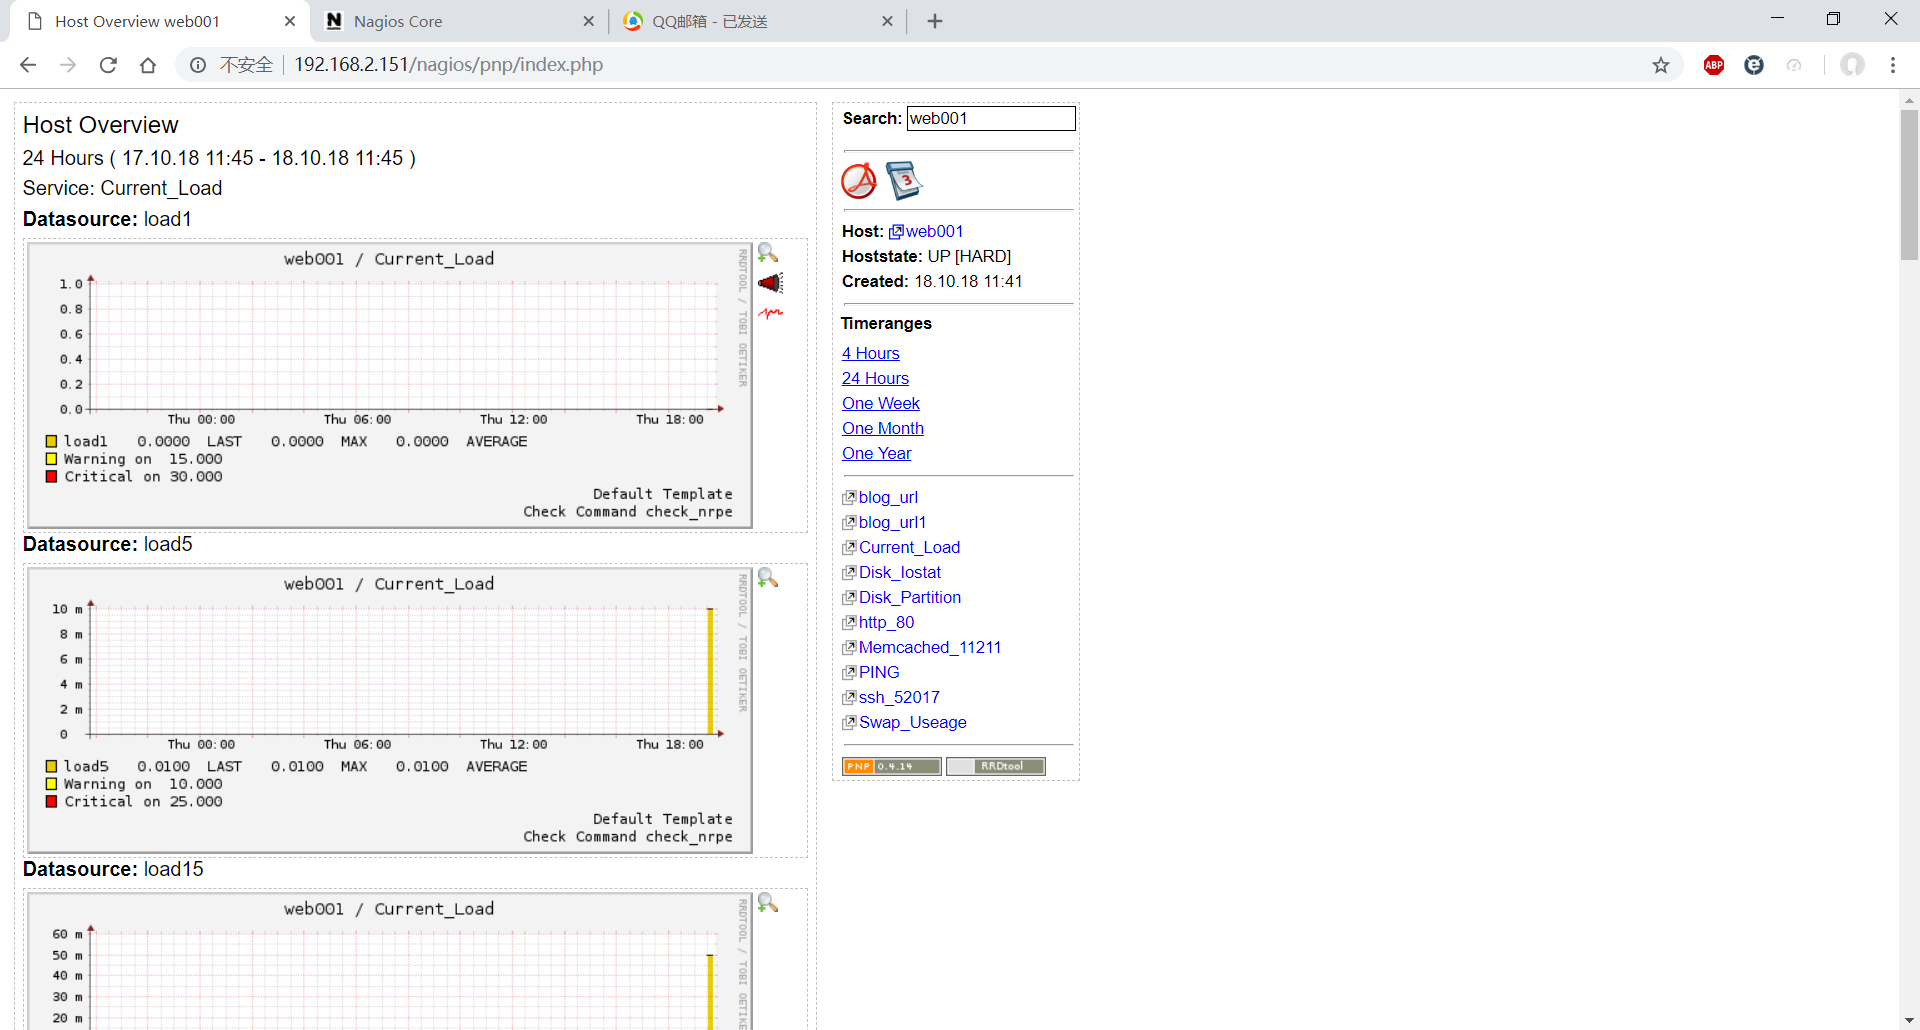
- 此时在浏览器输入 http://192.168.2.151/nagios/pnp/index.php ,打开页面,如下图所示
5.3 整合 PNP URL 超链接到 Nagios Web 界面
(1)给被监控的所有主机添加超链接图标
[root@nagios-server objects]# sed -n '23,34p' hosts.cfg
# Define a host for the local machine

define host{
        use                     linux-server            ; Name of host template to use
                                                        ; This host definition will inherit all variables that are defined
                                                        ; in (or inherited by) the linux-server host template definition.
        host_name               web001
        alias                   web001
        address                 192.168.2.152
        process_perf_data       1
        action_url              /nagios/pnp/index.php?host=$HOSTNAME$ #<== 添加超链接图标
        }
- 检查语法,使配置生效
[root@nagios-server etc]# /etc/init.d/nagios checkconfig
[root@nagios-server etc]# /etc/init.d/nagios reload
- 此时在浏览器输入 http://192.168.2.151/nagios/pnp/index.php ,打开页面,如下图所示
(2)给被监控主机指定的服务添加超链接图标
[root@nagios-server objects]# head -8 services.cfg
define service {
        use                     generic-service
        host_name               web001,web002
        service_description     Disk Partition
        check_command                   check_nrpe!check_disk
        process_perf_data       1
        action_url              /nagios/pnp/index.php?host=$HOSTNAME$&srv=$SERVICEDESC$ #<== 给具体服务添加超链接图标
}
- 也可快速配置让全部的服务出图
[root@nagios-server objects]# sed -n '177p' templates.cfg |sed -r 's#(.*);.*$#\1#g'
        action_url              /nagios/pnp/index.php?host=$HOSTNAME$&srv=$SERVICEDESC$
- 检查语法,使配置生效
[root@nagios-server etc]# /etc/init.d/nagios checkconfig
[root@nagios-server etc]# /etc/init.d/nagios reload
- 此时在浏览器输入 http://192.168.2.151/nagios/pnp/index.php ,打开页面,如下图所示