vsftpd安装手册
1、安装vsftpd组件
安装完后,有/etc/vsftpd/vsftpd.conf 文件,是vsftp的配置文件。
[root@bogon ~]# yum -y install vsftpd
2、添加一个ftp用户
此用户就是用来登录ftp服务器用的。
[root@bogon ~]# useradd ftpuser
这样一个用户建完,可以用这个登录,记得用普通登录不要用匿名了。登录后默认的路径为 /home/ftpuser.
3、给ftp用户添加密码。
[root@bogon ~]# passwd ftpuser
输入两次密码后修改密码。
4、防火墙开启21端口
因为ftp默认的端口为21,而centos默认是没有开启的,所以要修改iptables文件
[root@bogon ~]# vim /etc/sysconfig/iptables
在行上面有22 -j ACCEPT 下面另起一行输入跟那行差不多的,只是把22换成21,然后:wq保存。
还要运行下,重启iptables
[root@bogon ~]# service iptables restart
5、修改selinux
外网是可以访问上去了,可是发现没法返回目录(使用ftp的主动模式,被动模式还是无法访问),也上传不了,因为selinux作怪了。
修改selinux:
执行以下命令查看状态:
[root@bogon ~]# getsebool -a | grep ftp
allow_ftpd_anon_write --> off
allow_ftpd_full_access --> off
allow_ftpd_use_cifs --> off
allow_ftpd_use_nfs --> off
ftp_home_dir --> off
ftpd_connect_db --> off
ftpd_use_passive_mode --> off
httpd_enable_ftp_server --> off
tftp_anon_write --> off
[root@bogon ~]#
执行上面命令,再返回的结果看到两行都是off,代表,没有开启外网的访问
[root@bogon ~]# setsebool -P allow_ftpd_full_access on
[root@bogon ~]# setsebool -P ftp_home_dir on
这样应该没问题了(如果,还是不行,看看是不是用了ftp客户端工具用了passive模式访问了,如提示Entering Passive mode,就代表是passive模式,默认是不行的,因为ftp passive模式被iptables挡住了,下面会讲怎么开启,如果懒得开的话,就看看你客户端ftp是否有port模式的选项,或者把passive模式的选项去掉。如果客户端还是不行,看看客户端上的主机的电脑是否开了防火墙,关吧)
FileZilla的主动、被动模式修改:
菜单:编辑→设置
6、关闭匿名访问
修改/etc/vsftpd/vsftpd.conf文件:
重启ftp服务:
[root@bogon ~]# service vsftpd restart
7、开启被动模式
默认是开启的,但是要指定一个端口范围,打开vsftpd.conf文件,在后面加上
pasv_min_port=30000
pasv_max_port=30999
表示端口范围为30000~30999,这个可以随意改。改完重启一下vsftpd
由于指定这段端口范围,iptables也要相应的开启这个范围,所以像上面那样打开iptables文件。
也是在21上下面另起一行,更那行差不多,只是把21 改为30000:30999,然后:wq保存,重启下iptables。这样就搞定了。
8、设置开机启动vsftpd ftp服务
[root@bogon ~]# chkconfig vsftpd on
9、设置关闭防火墙
| 1 2 |
[root@localhost ~]#service iptables stop --临时关闭防火墙 [root@localhost ~]#chkconfig iptables off --永久关闭防火墙 |
10、配置ftp图片服务器
①需要在nginx/html下创建一个images文件夹(实际访问的不是这个路径)
mkdir /usr/local/nginx/html/images
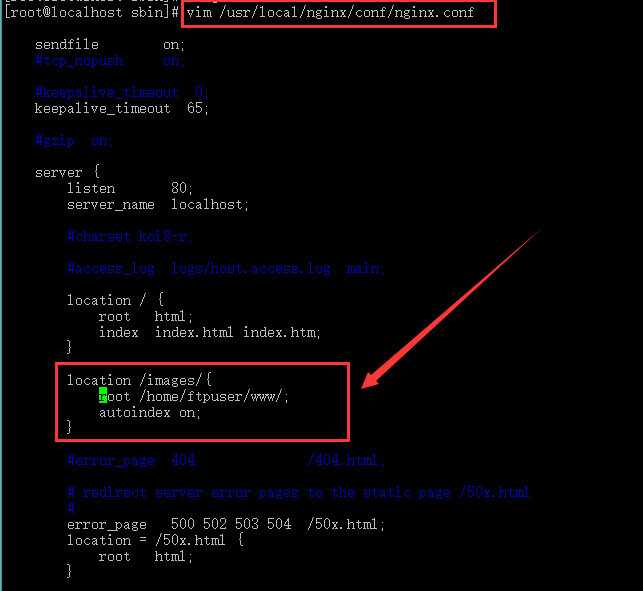
②修改、/usr/local/nginx/conf/nginx.conf在默认的server里再添加一个location并指定实际路径:
location /images/ {
root /home/ftpuser/www/;
autoindex on;
}
修改完后需要重新启动nginx
./nginx -s reload
说明
1)root则是将images映射到/home/ftpuser/www/images/
2)autoindex on便是打开浏览功能。
注意
1)ftpuser这个用户需要自己创建,在Linux安装ftp组件(8步完成)已经创建过,所以在这里不再创建,若没有,则需要自己创建,名字任意。
2)root /home/ftpuser/www/这后面是不带images的且root后面要有空格。www目录下有images目录,用于存放图片!!
③修改用户访问权限
chown ftpuser /home/ftpuser
chmod 777 -R /home/ftpuser
11、使用FileZilla上传图片,并在浏览器中访问
java代码上传图片
    /**

     * Description: 向FTP服务器上传文件

     *

     * @param host

     *            FTP服务器hostname

     * @param port

     *            FTP服务器端口

     * @param username

     *            FTP登录账号

     * @param password

     *            FTP登录密码

     * @param basePath

     *            FTP服务器基础目录

     * @param filePath

     *            FTP服务器文件存放路径。例如分日期存放:/2015/01/01。文件的路径为basePath+filePath

     * @param filename

     *            上传到FTP服务器上的文件名

     * @param input

     *            输入流

     * @return 成功返回true,否则返回false

     */

    public static boolean uploadFile(String host, int port, String username,

             String password, String basePath, String filePath, String filename,

             InputStream input) {

         boolean result = false;

         FTPClient ftp = new FTPClient();

         try {

             int reply;

             ftp.connect(host, port);// 连接FTP服务器

             // 如果采用默认端口,可以使用ftp.connect(host)的方式直接连接FTP服务器

             ftp.login(username, password);// 登录

             reply = ftp.getReplyCode();

             if (!FTPReply.isPositiveCompletion(reply)) {

                 ftp.disconnect();

                 return result;

             }

             // 切换到上传目录

             if (!ftp.changeWorkingDirectory(basePath + filePath)) {

                 // 如果目录不存在创建目录

                 String[] dirs = filePath.split("/");

                 String tempPath = basePath;

                 for (String dir : dirs) {

                     if (null == dir || "".equals(dir))

                          continue;

                     tempPath += "/" + dir;

                     if (!ftp.changeWorkingDirectory(tempPath)) {

                          if (!ftp.makeDirectory(tempPath)) {

                              return result;

                          } else {

                              ftp.changeWorkingDirectory(tempPath);

                          }

                     }

                 }

             }

             // 设置上传文件的类型为二进制类型

             ftp.setFileType(FTP.BINARY_FILE_TYPE);

             // 上传文件

             if (!ftp.storeFile(filename, input)) {

                 return result;

             }

             input.close();

             ftp.logout();

             result = true;

         } catch (IOException e) {

             e.printStackTrace();

         } finally {

             if (ftp.isConnected()) {

                 try {

                     ftp.disconnect();

                 } catch (IOException ioe) {

                 }

             }

         }

         return result;

    }