微信公众号支付开发
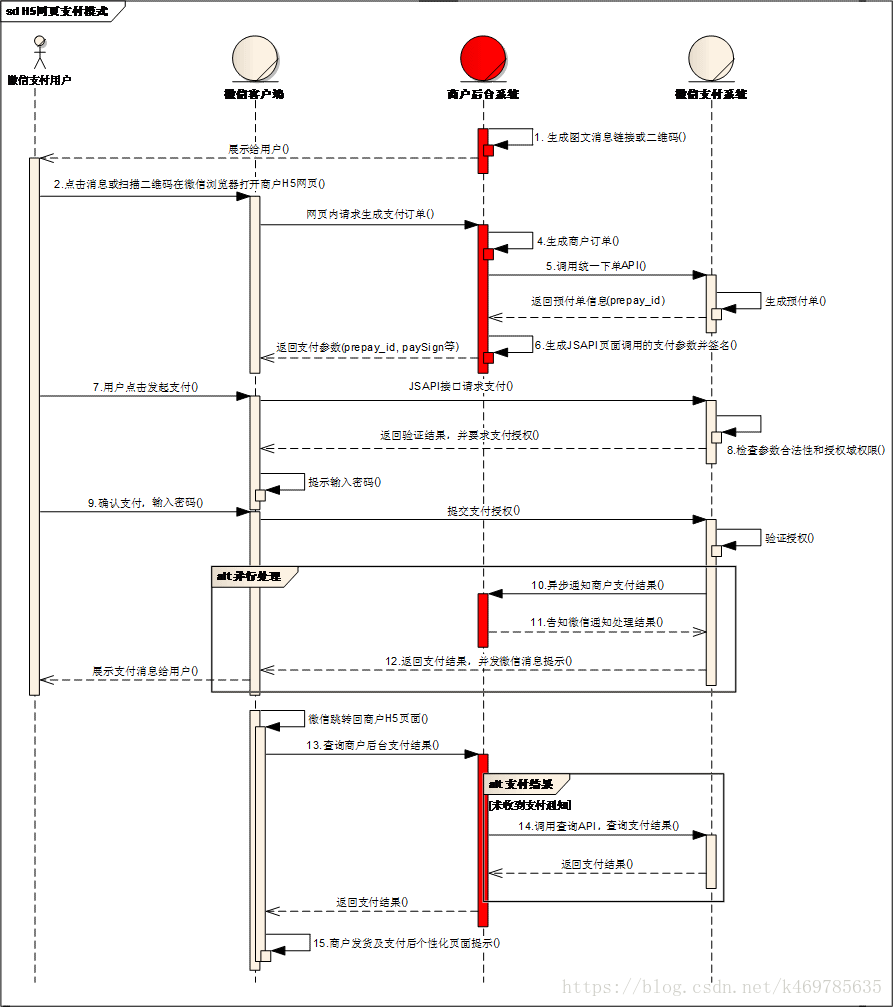
微信公众号支付业务流程如下:
设置授权域名
统一下单
授权登录,获取openid
下单之前,前端要先判断是否有openid,如果没有,需要首先调用后台授权接口得到openid。我们可以使用第三方SDK来做授权操作,这样比较简单。参考:微信公众号支付授权登录。
首先,项目中引入第三方SDK的依赖:
<dependency>
<groupId>com.github.binarywang</groupId>
<artifactId>weixin-java-mp</artifactId>
<version>3.0.0</version>
</dependency>
授权登录需要商户的AppId和AppSecret,可以通过配置文件注入。首先在application.yml中配置这两个属性:
wechat:
  myAppId: wx47a9d71b80dd945f
  myAppSecret: 075419ce8d3f95a3b49304d84d98cee5
然后创建一个类用来存放这些属性的值:
@Component
@ConfigurationProperties(prefix = "wechat")
@Data
public class WeChatAccountConfig {
    /**
     * 开发者ID(AppID)
     */
    private String myAppId;

    /**
     * 开发者密码(AppSecret)
     */
    private String myAppSecret;

    /**
     * 商户号
     */
    private String mchId;

    /**
     * 商户秘钥
     */
    private String mchKey;

    /**
     * 商户证书路径
     */
    private String keyPath;

    /**
     * 微信支付异步通知地址
     */
    private String notifyUrl;
}
然后将AppId和AppSecret设置到WxMpService中:
@Component
public class WeChatMpConfig {
    @Autowired
    private WeChatAccountConfig weChatAccountConfig;

    @Bean
    public WxMpService wxMpService() {
        WxMpService wxMpService = new WxMpServiceImpl();
        wxMpService.setWxMpConfigStorage(wxMpConfigStorage());
        return wxMpService;
    }

    @Bean
    public WxMpConfigStorage wxMpConfigStorage() {
        WxMpInMemoryConfigStorage wxMpConfigStorage = new WxMpInMemoryConfigStorage();
        wxMpConfigStorage.setAppId(weChatAccountConfig.getMyAppId());
        wxMpConfigStorage.setSecret(weChatAccountConfig.getMyAppSecret());
        return wxMpConfigStorage;
    }
}
最后调用SDK的接口进行授权:
@Controller
@RequestMapping("/wechat")
@Slf4j
public class WeChatController {
    @Autowired
    private WxMpService wxMpService;

    @GetMapping("/authorize")
    public String authorize(@RequestParam("returnUrl") String returnUrl) {
        String url = "http://rc6wah.natappfree.cc/sell/wechat/userInfo";
        String redirectUrl = wxMpService.oauth2buildAuthorizationUrl(url,    WxConsts.OAuth2Scope.SNSAPI_USERINFO, URLEncoder.encode(returnUrl));
        log.info("【微信网页授权】 获取code, result={}", redirectUrl);
        return "redirect:" + redirectUrl;
    }
    @GetMapping("/userInfo")
    public String userInfo(@RequestParam("code") String code, @RequestParam("state") String returnUrl) {
        WxMpOAuth2AccessToken wxMpOAuth2AccessToken = new WxMpOAuth2AccessToken();
        try {
            wxMpOAuth2AccessToken = wxMpService.oauth2getAccessToken(code);
        } catch (WxErrorException e) {
            log.error("【微信网页授权】 {}", e);
            throw new SellException(ResultEnum.WECHAT_MP_ERROR.getCode(), e.getError().getErrorMsg());
        }
        String openId = wxMpOAuth2AccessToken.getOpenId();
        return "redirect:" + returnUrl + "?openid=" + openId;
    }
}
上面,returnUrl是前端传进来的,表示授权登陆后要跳转的页面。此时,就已经获得openid,返回给前台。
支付
支付这块为了方便使用,一样引用第三方SDK:
<dependency>
    <groupId>cn.springboot</groupId>
    <artifactId>best-pay-sdk</artifactId>
    <version>1.2.0</version>
</dependency>
支付完成之后微信会有一个异步通知,我将这两个接口写在同一个controller中了。代码如下:
@Controller
@RequestMapping("/pay")
public class PayController {
    @Autowired
    private OrderMasterService orderMasterService;
    @Autowired
    private PayService payService;

    /**
     * 微信支付
     * @param orderId
     * @param returnUrl
     * @param map
     * @return
     */
    @GetMapping("/create")
    public ModelAndView create(@RequestParam("orderId") String orderId,
                               @RequestParam("returnUrl") String returnUrl,
                               Map<String, Object> map) {
        //查询订单
        OrderMasterDto orderMasterDto = orderMasterService.findOne(orderId);
        if (orderMasterDto == null) {
            throw new SellException(ResultEnum.ORDER_NOT_EXIST);
        }
        //发起支付
        PayResponse payResponse = payService.create(orderMasterDto);
        map.put("payResponse", payResponse);
        map.put("returnUrl", returnUrl);
        return new ModelAndView("pay/create", map);
    }

    /**
     * 微信异步通知
     * @param notifyData
     */
    @PostMapping("/notify")
    public ModelAndView notify(@RequestBody String notifyData) {
        payService.notify(notifyData);
        //返回给微信处理结果
        return new ModelAndView("pay/success");
    }
}
先说支付,两个入参:orderId表示要支付订单的订单号,returnUrl表示异步通知地址,可以在配置文件中配置,即下面的notifyUrl:
wechat:
  myAppId: wx47a9d71b80dd945f
  myAppSecret: 075419ce8d3f95a3b49304d84d98cee5
  mchId:
  mchKey:
  keyPath: /var/weixin_cert/h5.p12
  notifyUrl: http://rc6wah.natappfree.cc/sell/pay/notify
支付接口中,payService的create方法为:
public PayResponse create(OrderMasterDto orderMasterDto) {
    PayRequest payRequest = new PayRequest();
    payRequest.setOpenid(orderMasterDto.getOrderId());
    payRequest.setOrderAmount(orderMasterDto.getOrderAmount().doubleValue());
    payRequest.setOrderId(orderMasterDto.getOrderId());
    payRequest.setOrderName(ORDER_NAME);
    payRequest.setPayTypeEnum(BestPayTypeEnum.WXPAY_H5);
    log.info("【微信支付】 发起支付,request={}", JsonUtil.toJson(payRequest));
    PayResponse payResponse = bestPayService.pay(payRequest);
    log.info("【微信支付】 发起支付,response={}", JsonUtil.toJson(payResponse));
    return payResponse;
}
最后返回一个payResponse,这个对象为:
/**
 * 支付时的同步返回参数
 */
@Data
public class PayResponse {

    private String prePayParams;

    private URI payUri;

    /** 以下字段仅在微信h5支付返回. */
    private String appId;

    private String timeStamp;

    private String nonceStr;

    @JsonProperty("package")
    private String packAge;

    private String signType;

    private String paySign;

    /** 以下字段在微信异步通知下返回. */
    private Double orderAmount;

    private String orderId;

    //第三方支付的流水号
    private String outTradeNo;

    /** 以下支付是h5支付返回*/
    private String mwebUrl;
}
最后把这个对象和异步通知地址通过重定向返回给create页面。create页面路径:
create.ftl内容如下:
<script>
    function onBridgeReady(){
        WeixinJSBridge.invoke(
                'getBrandWCPayRequest', {
                    "appId":${payResponse.appId},     //公众号名称,由商户传入
                    "timeStamp":${payResponse.timeStamp},         //时间戳,自1970年以来的秒数
                    "nonceStr":${payResponse.nonceStr}, //随机串
                    "package":${payResponse.packAge},
                    "signType":"MD5",         //微信签名方式:
                    "paySign":${payResponse.paySign} //微信签名
                },
                function(res){
                    if(res.err_msg == "get_brand_wcpay_request:ok" ) {}     // 使用以上方式判断前端返回,微信团队郑重提示:res.err_msg将在用户支付成功后返回    ok,但并不保证它绝对可靠。
                    location.href = "${returnUrl}"
                }
        );
    }
    if (typeof WeixinJSBridge == "undefined"){
        if( document.addEventListener ){
            document.addEventListener('WeixinJSBridgeReady', onBridgeReady, false);
        }else if (document.attachEvent){
            document.attachEvent('WeixinJSBridgeReady', onBridgeReady);
            document.attachEvent('onWeixinJSBridgeReady', onBridgeReady);
        }
    }else{
        onBridgeReady();
    }
</script>
成功之后就会调用returnUrl,即配置文件中配置的notifyUrl地址,此处就是上面controller中的notify接口。
异步通知
Notify接口中,notify方法如下:
/**
 * 微信异步通知
 * @param notifyData
 * @return
 */
@Override
public PayResponse notify(String notifyData) {
    //1.验证签名
    //2.支付的状态
    //3.支付金额
    //4.支付人(下单人 == 支付人)
    PayResponse payResponse = bestPayService.asyncNotify(notifyData);
    log.info("【微信支付】 异步通知, payResponse={}", payResponse);
    //查询订单
    String orderId = payResponse.getOrderId();
    OrderMasterDto orderMasterDto = orderMasterService.findOne(orderId);
    if (orderMasterDto == null) {
        log.error("【微信支付】 异步通知,订单不存在,orderId={}", orderId);
        throw new SellException(ResultEnum.ORDER_NOT_EXIST);
    }
    //判断金额是否一致
    if (!MathUtil.equals(orderMasterDto.getOrderAmount().doubleValue(), payResponse.getOrderAmount())) {
        log.error("【微信支付】 异步通知,订单金额不一致, orderId={}, 微信通知金额={}, 系统金额={}", orderId, payResponse.getOrderAmount(), orderMasterDto.getOrderAmount());
        throw new SellException(ResultEnum.WXPAY_NOTIFY_MONNEY_VERIFY);
    }
    //修改订单支付状态
    orderMasterService.paid(orderMasterDto);
    return payResponse;
}
主要是修改订单支付状态,成功之后,返回success界面,通知微信已经成功,不需再调用异步通知接口了。success路径:
内容:
<xml>
    <return_code><![CDATA[SUCCESS]]></return_code>
    <return_msg><![CDATA[OK]]></return_msg>
</xml>