1.预处理
首先在网上找一份常用汉字大全,我这里找了一份2994字的常用汉字作为训练,712字的次常用汉字作为测试。
操作系统内就自带字体文件,后缀为ttc和ttf,Mac的路径为 /System/Library/Fonts,选取若干个作为分类的对象。
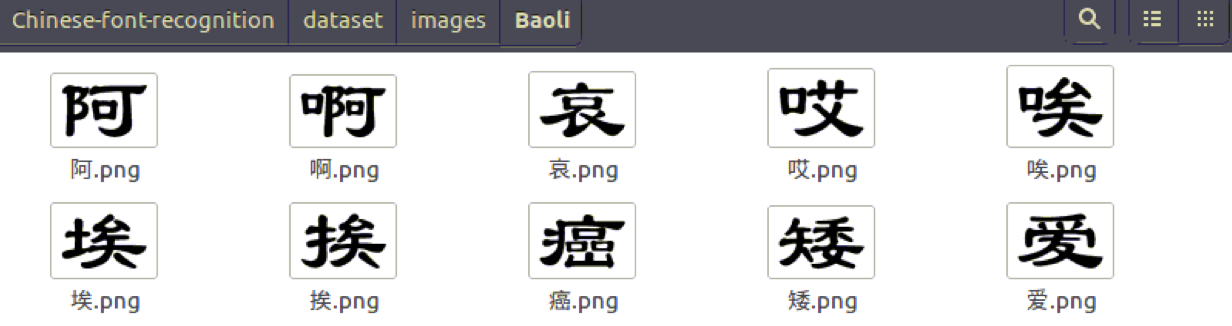
接着用PIL库来生成字体图片,生成的时候本想每个字居中显示。但是当一个字体中的字居中了,另外字体的字就会跑偏,因此这里用numpy来框出字体位置,然后再在四个方向加边框,代码如下:
#!/usr/bin/env python
# -*- coding: utf-8 -*-
import os
import sys
reload(sys)
sys.setdefaultencoding('utf8')
import Queue
import threading
from PIL import Image, ImageFont, ImageDraw
import numpy as np
from tqdm import tqdm


def draw_font(text, font, save_path=None, mode='train'):

    image_name = '{}{}.png'.format(save_path, text)

    if mode == 'train' and os.path.isfile(image_name):
        return

    im = Image.new("RGB", (256, 256), (255, 255, 255))
    dr = ImageDraw.Draw(im)
    font = ImageFont.truetype(font, 128)

    dr.text((64, 64), text.decode('utf8'), font=font, fill="#000000")
    im_slice = np.asarray(im)[:,:,0]
    y, x = np.where(im_slice != 255)
    x_max, x_min, y_max, y_min = np.max(x), np.min(x), np.max(y), np.min(y)

    frame = 10
    box = (x_min - frame, y_min - frame, x_max + frame, y_max + frame)
    im = im.crop(box)
    return im, image_name
在外层使用多线程来生成图片:
def generator(fonts, texts, consumer_num):

    with tqdm(total=len(fonts)*len(texts)) as counter:
        for font in fonts:
            save_path = 'images/{}/'.format(font.split('.')[0])
            if not os.path.isdir(save_path):
                os.mkdir(save_path)
            for text in texts:
                font = os.path.join(os.getcwd(), 'fonts', font)
                result = draw_font(text, font, save_path)
                if result:
                    message.put(result)
                counter.update(1)
    for _ in xrange(consumer_num):
        message.put(None)

def writer():

    while True:
        msg = message.get()
        if msg:
            im, image_name = msg
            im.save(image_name)
        else:
            break

def read_text(file_name):

    with open(file_name, 'r') as f:
        texts = f.read().split(' ')
    return texts

def run():

    file_name = u'中国汉字大全.txt'
    texts = read_text(file_name)
    fonts = os.listdir('fonts')

    consumer_1 = threading.Thread(target=writer)
    consumer_2 = threading.Thread(target=writer)
    consumer_num = 2
    producer = threading.Thread(target=generator, args=(fonts, texts, consumer_num,))


    producer.start()
    consumer_1.start()
    consumer_2.start()
    message.join()

if __name__ == '__main__':

    message = Queue.Queue(1000)
    run()
最后生成的图片内容如下:
2.数据流
读入数据使用TensorFlow最近发布的1.4版本的Dataset API。
先根据目录树结构,来读取图片与标签


#!/usr/bin/env python
# -*- coding: utf-8 -*-
import sys
import os
import random
import tensorflow as tf
from tensorflow.python.framework import ops
from tensorflow.python.framework import dtypes


dir_path, _ = os.path.split(os.path.realpath(__file__))
class_num = 2
def read_labeled_image_list(images_dir):

    folders = [folder for _, folder, _ in os.walk(images_dir) if folder][0]

    filenames = []
    labels = []
    for index, folder in enumerate(folders):
        image_dir = os.path.join(images_dir, folder)
        filename = [os.path.join(image_dir, f) for f in os.listdir(image_dir) if f[0] != '.']
        filenames += filename
        label = index
        labels += [label] * len(filename)

    return filenames, labels, folders
这里返回的folders是标签的顺序
接着就是读取功能
def read_data(batch_size):

    with tf.name_scope('input_pipeline'):
        filenames, labels, annotation = read_labeled_image_list(os.path.join(dir_path, 'images'))

        instances = zip(filenames, labels)
        random.shuffle(instances)
        filenames, labels = zip(*instances)
        filenames, labels = list(filenames), list(labels)

        dataset = tf.data.Dataset.from_tensor_slices((filenames, labels))
        dataset = dataset.map(parse_function)

        dataset = dataset.shuffle(100).batch(batch_size).repeat()

        return dataset, annotation
dataset.map()类似map()的用法,接收一个函数,作用于每个元素。这里parse_function的作用是读取图片,调整尺寸并标准化(非归一化),对标签进行one-hot编码,代码如下:
def parse_function(filenames, label):
 label = tf.one_hot(label, class_num)
    file_contents = tf.read_file(filenames)
    example = tf.image.decode_png(file_contents, channels=3)
    example = tf.cast(tf.image.resize_images(example, [224, 224]), tf.uint8)
    example = tf.image.per_image_standardization(example)
    return example, label
参考资料:
3.模型-vgg16
这里的分类模型选择VGG16,fc层调整为[2048, 2048, 类别数],代码如下:
#!/usr/bin/env python
# -*- coding: utf-8 -*-
import tensorflow as tf

def conv_op(input_op, name, n_out, kh=3, kw=3, dh=1, dw=1):

    n_in = input_op.get_shape()[-1].value

    with tf.name_scope(name) as scope:
        kernel = tf.get_variable(scope + 'w', shape=[kh, kw, n_in, n_out], dtype=tf.float32, initializer=tf.contrib.layers.xavier_initializer_conv2d())
        conv = tf.nn.conv2d(input_op, kernel, (1, dh, dw, 1), padding='SAME')
        bias_init_val = tf.constant(.0, shape=[n_out], dtype=tf.float32)
        bias = tf.Variable(bias_init_val, trainable=True, name='b')
        z = tf.nn.bias_add(conv, bias)
        activation = tf.nn.relu(z, name=scope)
        tf.summary.histogram('histogram', activation)
        return activation

def fc_op(input_op, name, n_out):

    n_in = input_op.get_shape()[-1].value

    with tf.name_scope(name) as scope:
        kernel = tf.get_variable(scope+'w', shape=[n_in, n_out], dtype=tf.float32, initializer=tf.contrib.layers.xavier_initializer())
        biases = tf.Variable(tf.constant(.1, shape=[n_out], dtype=tf.float32), name='b')
        activation = tf.nn.relu_layer(input_op, kernel, biases, name=scope)
        tf.summary.histogram('histogram', activation)
        return activation

def mpool_op(input_op, name, kh=2, kw=2, dh=2, dw=2):

    return tf.nn.max_pool(input_op, ksize=[1, kh, kw, 1], strides=[1, dh, dw, 1], padding='SAME', name=name)

def vgg(input_op, class_num, keep_prob):

    with tf.name_scope('vgg'):

        conv1_1 = conv_op(input_op, name='conv1_1', n_out=64)
        conv1_2 = conv_op(conv1_1, name='conv1_2',  n_out=64)
        pool1 = mpool_op(conv1_2, name='pool1')

        conv2_1 = conv_op(pool1, name='conv2_1', n_out=128)
        conv2_2 = conv_op(conv2_1, name='conv2_2', n_out=128)
        pool2 = mpool_op(conv2_2, name='pool2')

        conv3_1 = conv_op(pool2, name='conv3_1', n_out=256)
        conv3_2 = conv_op(conv3_1, name='conv3_2', n_out=256)
        conv3_3 = conv_op(conv3_2, name='conv3_3', n_out=256)
        pool3 = mpool_op(conv3_3, name='pool3')

        conv4_1 = conv_op(pool3, name='conv4_1', n_out=512)
        conv4_2 = conv_op(conv4_1, name='conv4_2', n_out=512)
        conv4_3 = conv_op(conv4_2, name='conv4_3', n_out=512)
        pool4 = mpool_op(conv4_3, name='pool4')

        conv5_1 = conv_op(pool4, name='conv5_1', n_out=512)
        conv5_2 = conv_op(conv5_1, name='conv5_2', n_out=512)
        conv5_3 = conv_op(conv5_2, name='conv5_3', n_out=512)
        pool5 = mpool_op(conv5_3, name='pool5')

        shp = pool5.get_shape()
        flattened_shape = shp[1].value * shp[2].value * shp[3].value
        resh1 = tf.reshape(pool5, [-1, flattened_shape], name='resh1')

        fc6 = fc_op(resh1, name='fc6', n_out=2048)
        fc6_drop = tf.nn.dropout(fc6, keep_prob, name='fc6_drop')

        fc7 = fc_op(fc6_drop, name='fc7', n_out=2048)
        fc7_drop = tf.nn.dropout(fc7, keep_prob, name='fc6_drop')

        fc8 = fc_op(fc7_drop, name='fc8', n_out=class_num)
        softmax = tf.nn.softmax(fc8)

        return softmax
4.训练
在训练时用softmax计算交叉熵,容易出现浮点下溢,导致log(0)的计算,这就造成了从此次以后的loss都是Nan,解决方法是限制网络输出范围:tf.log(tf.clip_by_value(pred, 1e-5, 1.0))。学习率过大也会造成Nan,一般出现这种情况的话每次学习率除以10地进行调试。
TensorFlow实现训练大致分两种方法。
最低效的是将data pipeline与训练的graph分割成两部分,然后在session中分次执行。代码示意如左,另一种是将data pipeline写进训练的graph中,让TensorFlow自动多线程处理,代码示意如右。
|
|
然而TensorFlow自动多线程的实现并不是很好,设置batch size 128,iter 1000次测试两种方法,分别耗时665.52s, 654.39s, 基本差别不大。GPU使用率曲线分别如下:

理论上来说,如果把训练数据全部读取到内存,那么只需要在内存与GPU直接通信就行了,但实际上训练集都会非常大,因此最耗时的是在硬盘读取上。所以要获得高效的训练,最好自己实现多线程。在这里我使用Python自带的Queue库和threading库,用4个producer产生数据,一个consumer训练网络,代码如下:
#!/usr/bin/env python
# -*- coding: utf-8 -*-
import os
import time
import Queue
import threading
import tensorflow as tf
from dataset.read_data import read_data
from nnets.vgg import vgg

os.environ['CUDA_VISIBLE_DEVICES'] = '1'

class_num = 2

def data_pipline(batch_size):


    data_batch, annotation = read_data(batch_size)
    iterator = data_batch.make_initializable_iterator()
    inputs, outputs = iterator.get_next()
    with tf.Session() as sess:
        sess.run(iterator.initializer)
        for _ in xrange(250):
            data = sess.run([inputs, outputs])
            message.put(data)
    message.put(None)

def train():


    inputs = tf.placeholder(tf.float32, shape=[None, 128, 128, 3])
    outputs = tf.placeholder(tf.float32, shape=[None, class_num])
    tf.summary.image('inputs', inputs, 16)

    lr = tf.placeholder(tf.float32)
    keep_prob = tf.placeholder(tf.float32)

    pred = vgg(inputs, class_num, keep_prob)

    with tf.name_scope('cross_entropy'):
        cross_entropy = tf.reduce_mean(-tf.reduce_sum(outputs * tf.log(tf.clip_by_value(pred, 1e-5, 1.0)), reduction_indices=[1]))
        tf.summary.scalar('cross_entropy', cross_entropy)

    with tf.name_scope('accuracy'):
        correct = tf.equal(tf.argmax(pred, 1), tf.argmax(outputs, 1))
        accuracy = tf.reduce_mean(tf.cast(correct, tf.float32))
        tf.summary.scalar('accuracy', accuracy)

    with tf.name_scope('optimizer'):
        optimizer = tf.train.AdamOptimizer(lr).minimize(cross_entropy)

    merged = tf.summary.merge_all()

    saver = tf.train.Saver()
    with tf.Session() as sess:

        writer = tf.summary.FileWriter('./log/', sess.graph)
        sess.run(tf.global_variables_initializer())

        i, stop_count = 0, 0
        st = time.time()
        while True:
            i += 1

            if stop_count == producer_num:
                break

            msg = message.get()
            if msg is None:
                stop_count += 1
                continue

            image, label = msg
            learning_rate = 1e-5 if i < 500 else 1e-6
            sess.run(optimizer, feed_dict={inputs:image, outputs:label, lr:learning_rate, keep_prob:0.5})
            # if i % 50 == 0:
            #     summary, acc, l = sess.run([merged, accuracy, cross_entropy], feed_dict={inputs:image, outputs:label ,keep_prob:1.0})
            #     print 'iter:{}, acc:{}, loss:{}'.format(i, acc, l)

            #     writer.add_summary(summary, i)
        print 'run time: ', time.time() - st
        saver.save(sess, './models/vgg.ckpt')


    return

if __name__ == '__main__':

    BATCH_SIZE = 128
    producer_num = 4
    message = Queue.Queue(200)

    for i in xrange(producer_num):
        producer_name = 'p{}'.format(i)
        locals()[producer_name] = threading.Thread(target=data_pipline, args=(BATCH_SIZE,))
        locals()[producer_name].start()

    c = threading.Thread(target=train)1
    c.start()
    message.join()
耗时527.11s,下图为GPU使用率,可以看到基本上是100%。取消76-80行的注释会把中间结果写进tensorboard,但会多耗时一些,在执行这个步骤时GPU使用率也会降到0。

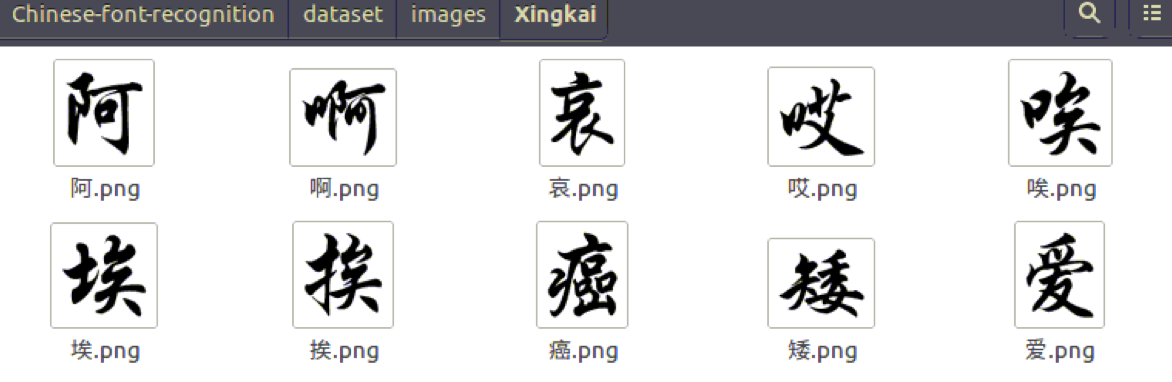
在这里只使用Baoli和Xingkai两种字体来做二分类,下图分别是训练时的accuracy和loss


5.评估
这里使用712字的次常用汉字来作为测试。测试是要注意的是,在训练时使用tf.image.per_image_standardization来将数据集进行标准化,若测试集用归一化,或者不做处理输出网络,那么所有的预测结果都会偏向于同一类。
如下是测试代码,在测试的时候偷了个懒,网络每次只接收一张图片,若要提升代码速度的话可以批量读取图片到内存,然后一起送进网络。
#!/usr/bin/env python
# -*- coding: utf-8 -*-
import os
import random
import numpy as np
from scipy.misc import imresize, imrotate
import matplotlib.pyplot as plt
import tensorflow as tf
from dataset.generator import read_text, draw_font
from nnets.vgg import vgg


def generator_images(texts, fonts):

    for text in texts:
        for font in fonts:
            image, _ = draw_font(text, font, mode='test')
            image = np.asarray(image)
            yield image, text


def run():

    file_name = u'test.txt'
    # file_name = u'dataset/中国汉字大全.txt'
    texts = read_text(file_name)

    fonts_dir = os.path.join('dataset', 'fonts')
    fonts = [os.path.join(os.getcwd(), fonts_dir, path) for path in os.listdir(fonts_dir)]

    images_gen = generator_images(texts, fonts)

    inputs = tf.placeholder(tf.float32, shape = [None, None, 3])
    example = tf.cast(tf.image.resize_images(inputs, [128, 128]), tf.uint8)
    example = tf.image.per_image_standardization(example)
    example = tf.expand_dims(example, 0)
    outputs = vgg(example, 2, 1.0)

    sess = tf.Session()
    restorer = tf.train.Saver()
    restorer.restore(sess, 'models/vgg.ckpt')

    error = 0
    error_texts = []
    for index, info in enumerate(images_gen):

        image, text = info
        pred = sess.run(outputs, feed_dict={inputs:image})
        pred = np.squeeze(pred)
        label = np.squeeze(np.where(pred==np.max(pred)))
        if index % 2 != label:
            error_texts.append((text, pred.tolist()))
            error += 1


    print 'test num: {}, error num: {}, acc: {}'.format(index + 1, error, 1 - float(error) / index)
输出结果如下:
test num: 1424, error num: 6, acc:0.9957865168539326
因为类别为2,所以测试集大小为712×2=1424
接着将错误的类别可视化:
def show_errors(error_infos, fonts):


    length = len(error_infos)
    labels = len(fonts)
    for i in xrange(length):
        text, pred = error_infos[i]
        index = pred.index(max(pred))
        for j in xrange(labels):
            axis = plt.subplot(length, labels, i * labels + j + 1)
            axis.axis('off')
            font = fonts[j]
            image, _ = draw_font(text, font, mode='test')
            if index == j:
                plt.title(str(pred))
            plt.imshow(image)
    plt.show()

可以看到被误分类的字分别是皿、吆、蚣、豺、鹦、豁。具体的误分类情况为:
- Baoli的皿以0.978的概率被判断为Xingkai
- Xingkai的吆以0.783的概率被判断为Baoli
- Baoli的蚣以0.801的概率被判断为Xingkai
- Xingkai的豺以0.591的概率被判断为Baoli
- Baoli的鹦以0.827的概率被判断为Xingkai
- Baoli的豁以0.578的概率被判断为Xingkai
test num: 5988, error num: 0, acc:1.0
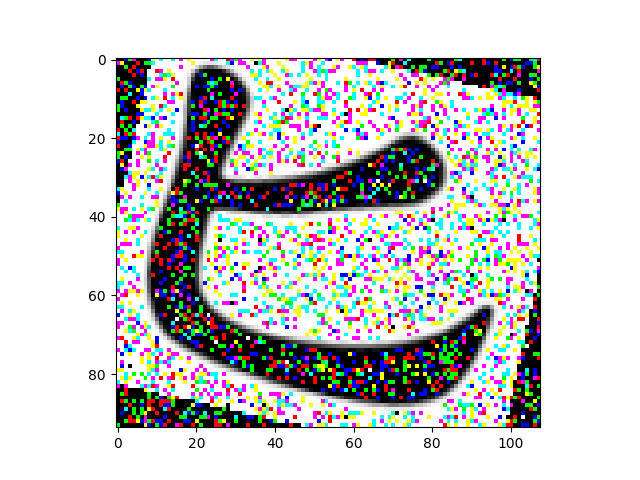
def generator_images(texts, fonts):

    mean, sigma = 0, 1
    random_rotate = 30
    random_scale = 0.2

    for text in texts:
        for font in fonts:
            image, _ = draw_font(text, font, mode='test')
            image = np.asarray(image)
            image = imresize(image, random.uniform(1-random_scale, 1+random_scale))
            image = imrotate(image, random.uniform(-random_rotate, random_rotate))
            image = image + np.random.normal(mean, sigma, size = image.shape)

            yield image, text