0. Graph构建
Graph对象是用户的操作入口,主要包含edge和vertex两部分。边是由点组成,所以边中所有的点就是点的全集,但这个全集包含了重复的点,去重后就是VertexRDD。
1. 构建图的方法
从边的集合构建图(
Graph.fromEdges)def fromEdges[VD: ClassTag, ED: ClassTag]( edges: RDD[Edge[ED]], defaultValue: VD, edgeStorageLevel: StorageLevel = StorageLevel.MEMORY_ONLY, vertexStorageLevel: StorageLevel = StorageLevel.MEMORY_ONLY): Graph[VD, ED]从源点和目的点的元组构建(
Graph.fromEdgeTuples)def fromEdgeTuples[VD: ClassTag]( rawEdges: RDD[(VertexId, VertexId)], defaultValue: VD, uniqueEdges: Option[PartitionStrategy] = None, edgeStorageLevel: StorageLevel = StorageLevel.MEMORY_ONLY, vertexStorageLevel: StorageLevel = StorageLevel.MEMORY_ONLY): Graph[VD, Int]从具有属性的顶点和边的RDD构建(
Graph())def apply[VD: ClassTag, ED: ClassTag]( vertices: RDD[(VertexId, VD)], edges: RDD[Edge[ED]], defaultVertexAttr: VD = null.asInstanceOf[VD], edgeStorageLevel: StorageLevel = StorageLevel.MEMORY_ONLY, vertexStorageLevel: StorageLevel = StorageLevel.MEMORY_ONLY): Graph[VD, ED]
三种方法最后都是调用了伴生对象GraphImpl的apply()方法,主要包括edgeRDD和vertexRDD 的构建,vertexRDD是从edgeRDD基础上构建起来的。
  def apply[VD: ClassTag, ED: ClassTag](
      vertices: RDD[(VertexId, VD)],
      edges: RDD[Edge[ED]],
      defaultVertexAttr: VD,
      edgeStorageLevel: StorageLevel,
      vertexStorageLevel: StorageLevel): GraphImpl[VD, ED] = {
    val edgeRDD = EdgeRDD.fromEdges(edges)(classTag[ED], classTag[VD])
      .withTargetStorageLevel(edgeStorageLevel)
    val vertexRDD = VertexRDD(vertices, edgeRDD, defaultVertexAttr)
      .withTargetStorageLevel(vertexStorageLevel)
    GraphImpl(vertexRDD, edgeRDD)
  }
2. 构建EdgeRDD
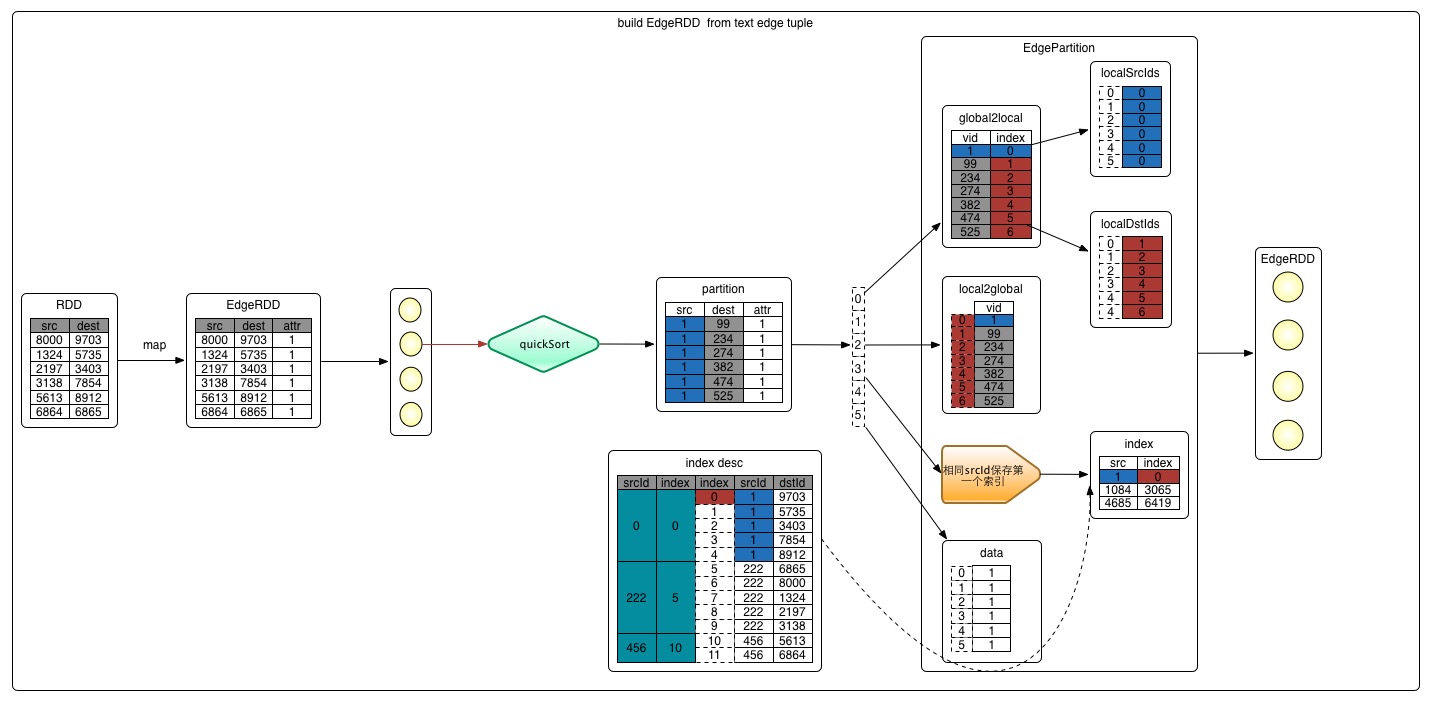
2.1 从HDFS加载文本文件
从分布式文件系统(HDFS)中加载文本,按行处理成元组形式,即(srcId, dstId)。
    val rawEdgesRdd: RDD[(Long, Long)] = sc.textFile(input, partNum).repartition(partNum).map {
      case line =>
        val sd = line.split(",")
        val src = sd(0).toLong
        val dst = sd(1).toLong
    }.distinct()
数据格式如下:
0,1
2,3
4,1
5,1
8,2
3,5
...
2.2 详细构建过程
第一步:
Graph.fromEdge(edges)首先从已经构建好的
RDD[Edge[ED]]来开始整个EdgeRDD的构建。Edge在文件Edge.scala中定义,主要存储了边的三种类型数据:srcId,dstId,attr。case class Edge[@specialized(Char, Int, Boolean, Byte, Long, Float, Double) ED] ( var srcId: VertexId = 0, var dstId: VertexId = 0, var attr: ED = null.asInstanceOf[ED]) extends Serializable第二步:
EdgeRDD.fromEdges(edges)遍历
RDD[Edge[ED]]的所有分区,开始重新构建边的存储方式。第三步:
EdgePartitionBuilder[ED, VD]EdgePartitionBuilder是边的物理存储结构,具体存储结构的关系图如下:
(勘误:localDstIds表中最后一行数据的local值为4,应该修改为5)源码如下:
private[graphx]
class EdgePartitionBuilder[@specialized(Long, Int, Double) ED: ClassTag, VD: ClassTag](
    size: Int = 64) {
  private[this] val edges = new PrimitiveVector[Edge[ED]](size)

  /* 将一条边加入进去*/
  def add(src: VertexId, dst: VertexId, d: ED) {
    edges += Edge(src, dst, d)
  }

  // 上述add执行完成后,会调用下面的toEdgePartition方法形成EdgePartition
  // 下面就是GraphX中图数据在分区内部的存储结构
  def toEdgePartition: EdgePartition[ED, VD] = {
    val edgeArray = edges.trim().array
    new Sorter(Edge.edgeArraySortDataFormat[ED])
      .sort(edgeArray, 0, edgeArray.length, Edge.lexicographicOrdering) // 将图进行快速排序,先按源点排,再按照目的点排
    val localSrcIds = new Array[Int](edgeArray.size)
    val localDstIds = new Array[Int](edgeArray.size)
    val data = new Array[ED](edgeArray.size)  // 存储权值
    val index = new GraphXPrimitiveKeyOpenHashMap[VertexId, Int]  // 保存相同srcId的第一个索引值
    val global2local = new GraphXPrimitiveKeyOpenHashMap[VertexId, Int]
    val local2global = new PrimitiveVector[VertexId] // 记录源点和所有目的点
    var vertexAttrs = Array.empty[VD]  // 顶点属性

    // Copy edges into columnar structures, tracking the beginnings of source vertex id clusters and
    // adding them to the index. Also populate a map from vertex id to a sequential local offset.

    // 构建边结构
    if (edgeArray.length > 0) {
      index.update(edgeArray(0).srcId, 0)
      var currSrcId: VertexId = edgeArray(0).srcId
      var currLocalId = -1
      var i = 0
      while (i < edgeArray.size) {
        val srcId = edgeArray(i).srcId  // 获取第i个点的src
        val dstId = edgeArray(i).dstId  // 获取第i个点的dst

        // 序号是递增
        // chageValue方法:若srcId不存在,则执行大括号中的内容,并将currLocalId作为global2local的value
        // local2global 只会记录一次源点
        // loaclSrcIds 中记录是源点在global2local中存的索引值,即currLocalId的结果
        localSrcIds(i) = global2local.changeValue(srcId,
          { currLocalId += 1; local2global += srcId; currLocalId }, identity) // identity相同

        // 序号是递增
        // 将目的点ID和currLocalId的值存储到global2local中
        // 并同时更新localDstIds对应的存储结果
        localDstIds(i) = global2local.changeValue(dstId,
          { currLocalId += 1; local2global += dstId; currLocalId }, identity)


        // 序号是递增
        data(i) = edgeArray(i).attr  // 存储第i个点的属性值

        // index中记录某个源点ID第一次出现的下标
        if (srcId != currSrcId) {
          currSrcId = srcId
          index.update(currSrcId, i)
        }

        i += 1
      }
      vertexAttrs = new Array[VD](currLocalId + 1)
    }

    new EdgePartition(
      localSrcIds, localDstIds, data, index, global2local, local2global.trim().array, vertexAttrs,
      None)
  }
}
第四步:
toEdgePartition分区内将图进行快速排序,先按源点排序,再按照目的点排序,
new Sorter(Edge.edgeArraySortDataFormat[ED]).sort(edgeArray, 0, edgeArray.length, Edge.lexicographicOrdering)。关于为什么要排序的原因,因为顶点的存储使用数组,数据是连续的内存空间,顺序访问时,访问速度更快。内部存储主要有如下7个数据结构,下面由简到难依次介绍。
(1)data:存储当前分区所有边的attr的属性数组。(2)
vertexAttrs:用来存储顶点的数组,toEdgePartition后为空。(3)
index:相同srcId的第一次出现的srcId和其下标。(4、5)
localSrcIds/loacalDstIds:是glocal2local.changeValue()返回的一个本地索引,这里实际的顶点的ID称为global,对应的索引称为local。(6)
global2local:是spark私有的Map数据结构GraphXPrimitiveKeyOpenHashMap,保存vertextId和本地索引的映射关系。其中包含当前partition中所有srcId、dstId与本地索引的映射关系。(7)
localg2lobal:记录的是所有的VertexId的数组。其中会包含相同的ID。即:当前分区所有vertextId的顺序实际值。用途:
根据本地下标取VertexId
localSrcIds/localDstIds -> index -> local2global -> VertexId根据VertexId取本地下标,取属性
VertexId -> global2local -> index -> data -> attr object
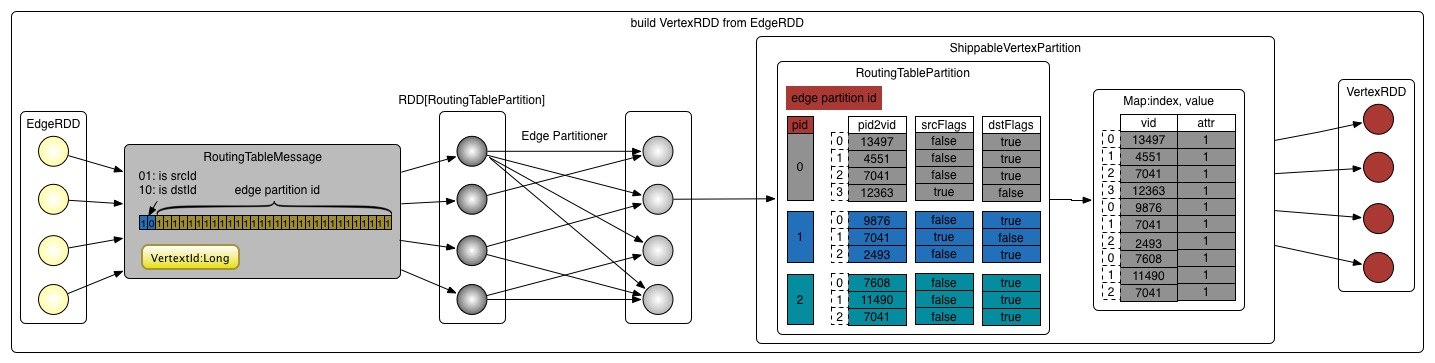
3. 构建VertexRDD
第一步:
VertexRDD.fromEdges()构建VertexRDD入口是:
val vertices = VertexRDD.fromEdges(edgesCached, edgesCached.partitions.size,defaultVertexAttr).withTargetStorageLevel(vertexStorageLevel),点是以EdgeRDD[ED, VD]为基础来构建的。为了能通过点找到边,每个点都需要保存点所在边的信息即分区ID(pid),这些信息保存在路由表RoutingTablePartition中。物理存储结构如下所示:
第二步:
RoutingTablePartition.edgePartitionToMsgs该方法返回
RoutingTableMessage类型的迭代器,对应的数据类型是包含vid和int的tuple类型:(VertexId, Int),为了节省内存,把edgePartitionId和一个标志位通过一个32位的int表示。int的32~31位表示一个标志位,01: isSrcId,10: isDstId。30~0位表示边分区ID。val vid2pid = edges.partitionsRDD.mapPartitions(_.flatMap(Function.tupled(RoutingTablePartition.edgePartitionToMsgs))).setName("VertexRDD.createRoutingTables - vid2pid (aggregation)")第三步:
RoutingTablePartition.fromMsgs(1)将上面生成的消息路由表信息进行重新分区,分区数保持和edge的分区数一致。
val numEdgePartitions = edges.partitions.size
vid2pid.partitionBy(vertexPartitioner).mapPartitions(iter => Iterator(RoutingTablePartition.fromMsgs(numEdgePartitions, iter)), preservesPartitioning = true)
(2)在新分区中,mapPartition的数据,从
RoutingTableMessage解出数据:vid,edge pid,isSrcId/isDstId。这个三个数据项重新封装到三个数据结构中:pid2vid,srcFlags,dstFlags。(3)
ShippableVertexPartition根据上面
routingTables,重新封装路由表里的数据结构为:ShippableVertexPartition。ShippableVertexPartition会合并相同重复点的属性attr对象,补全缺失的attr对象。得到的对象是ShippableVertexPartition(map.keySet, map._values, map.keySet.getBitSet, routingTable),包括keyset,values和routingTable。(4)
new VertexRDDImpl()
创建完对象后会生成VertexRDD。
4. 生成Graph对象
把上述edgeRDD和vertexRDD拿过来组成Graph
new GraphImpl(vertices, new ReplicatedVertexView(edges.asInstanceOf[EdgeRDDImpl[ED, VD]]))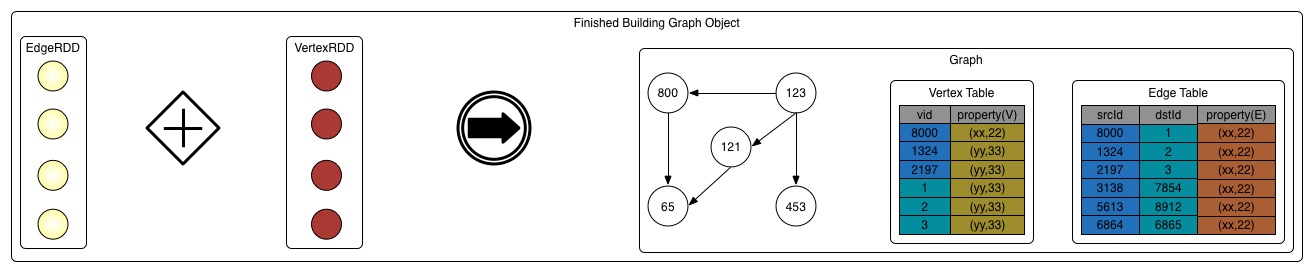
【完】