转载请注明出处: http://blog.csdn.net/like_program/article/details/53576927
微信想必大家都很熟悉了,它的底部菜单栏和显示未读消息数量功能,被很多 app 模仿,这篇博客就来带领大家,一步一步实现底部菜单栏,并且在底部菜单栏显示未读消息数量。
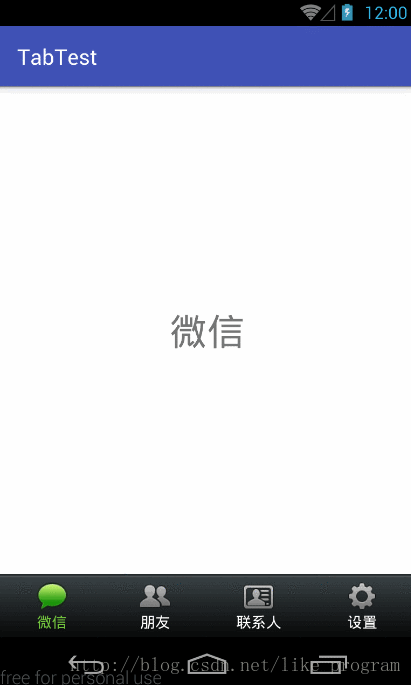
我们先来看下最终效果图。
最终效果图
1.底部菜单栏
2.显示未读消息数量
1.实现底部菜单栏
我们先来实现底部菜单栏。
打开 Android Studio,新建 TabTest 项目。
底部菜单栏是由 4 个 tab 组成,我们先来实现 tab 的布局,在 layout 目录下新建 view_tab.xml ,代码如下:
<?xml version="1.0" encoding="utf-8"?>
<RelativeLayout xmlns:android="http://schemas.android.com/apk/res/android"
                android:layout_width="match_parent"
                android:layout_height="wrap_content"
                android:gravity="center">

    <LinearLayout
        android:layout_width="match_parent"
        android:layout_height="wrap_content"
        android:gravity="center"
        android:orientation="vertical"
        android:padding="5dp">

        <ImageView
            android:id="@+id/iv_tab"
            android:layout_width="wrap_content"
            android:layout_height="wrap_content"
            android:src="@drawable/tab_wechat_normal"/>

        <TextView
            android:id="@+id/tv_tab"
            android:layout_width="wrap_content"
            android:layout_height="wrap_content"
            android:text="微信"/>
    </LinearLayout>

</RelativeLayout>
嗯,布局看上去有些繁琐。。。不过为了后面布局修改方便,暂时先无视这些。。。
tab 布局完成后,我们接着实现底部菜单栏,底部菜单栏,我们使用 FragmentTabHost 来实现。
修改 activity_main.xml 文件,代码如下:
<?xml version="1.0" encoding="utf-8"?>
<android.support.v4.app.FragmentTabHost
    xmlns:android="http://schemas.android.com/apk/res/android"
    xmlns:tools="http://schemas.android.com/tools"
    android:id="@android:id/tabhost"
    android:layout_width="match_parent"
    android:layout_height="match_parent"
    android:background="@android:color/white"
    tools:context="com.example.tabnews.MainActivity">

    <LinearLayout
        android:layout_width="match_parent"
        android:layout_height="match_parent"
        android:orientation="vertical">

        <!-- Fragment 容器 -->
        <FrameLayout
            android:id="@android:id/tabcontent"
            android:layout_width="match_parent"
            android:layout_height="0dp"
            android:layout_weight="1"/>

        <!-- 底部菜单栏 -->
        <TabWidget
            android:id="@android:id/tabs"
            android:layout_width="match_parent"
            android:layout_height="wrap_content"
            android:background="@android:color/darker_gray"/>
    </LinearLayout>
</android.support.v4.app.FragmentTabHost>
没有使用过 FragmentTabHost 的同学看布局文件可能会有些晕。为了便于大家理解,我简单的画张图。
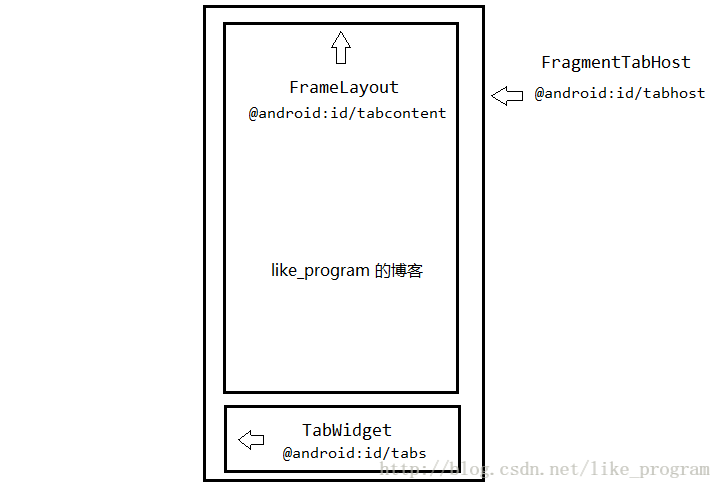
我们可以看到,最外层的控件就是 FragmentTabHost,在 FragmentTabHost 里面从上至下,依次是
tabcontent 和 tabs。这里要注意下,控件的 id 必须是 Android 提供的标准 id , 即 @android:id。
- FragmentTabHost 用来托管 Fragment 和 TabWidget(底部菜单栏),所以我们把它的 id 指定为
@android:id/tabhost - FrameLayout 用来放置 Fragment,也就是具体展示的内容,所以我们把它的 id 指定为
@android:id/tabcontent - TabWidget 用来放置底部菜单栏,底部菜单栏有很多 tab。所以我们把它的 id 指定为
@android:id/tabs
当点击不同的 tab 时,对应的 Fragment 就会被切换到 FrameLayout 中。
布局文件完成后,我们修改 MainActivity.java,代码如下:
package com.example.tabtest;

import android.graphics.Color;
import android.os.Bundle;
import android.support.v4.app.Fragment;
import android.support.v4.app.FragmentTabHost;
import android.support.v7.app.AppCompatActivity;
import android.view.View;
import android.widget.ImageView;
import android.widget.TabHost;
import android.widget.TextView;

import java.util.ArrayList;
import java.util.List;

public class MainActivity extends AppCompatActivity {

    private List<TabItem> mFragmentList;

    private FragmentTabHost mFragmentTabHost;

    @Override
    protected void onCreate(Bundle savedInstanceState) {
        super.onCreate(savedInstanceState);
        setContentView(R.layout.activity_main);
        initTabItemData();
    }

    /**
     * 初始化 Tab 数据
     */
    private void initTabItemData() {
        mFragmentList = new ArrayList<>();
        mFragmentList.add(new TabItem(
                R.drawable.tab_wechat_normal,
                R.drawable.tab_wechat_selected,
                "微信",
                WeChatFragment.class
        ));

        mFragmentList.add(new TabItem(
                R.drawable.tab_friend_normal,
                R.drawable.tab_friend_selected,
                "朋友",
                FriendFragment.class
        ));

        mFragmentList.add(new TabItem(
                R.drawable.tab_contacts_normal,
                R.drawable.tab_contacts_selected,
                "联系人",
                ContactsFragment.class
        ));

        mFragmentList.add(new TabItem(
                R.drawable.tab_settings_normal,
                R.drawable.tab_settings_selected,
                "设置",
                SettingFragment.class
        ));

        mFragmentTabHost = (FragmentTabHost) findViewById(android.R.id.tabhost);
        // 绑定 FragmentManager
        mFragmentTabHost.setup(this, getSupportFragmentManager(), android.R.id.tabcontent);
        // 删除分割线
        mFragmentTabHost.getTabWidget().setDividerDrawable(null);

        for (int i = 0; i < mFragmentList.size(); i++) {
            TabItem tabItem = mFragmentList.get(i);
            // 创建 tab
            TabHost.TabSpec tabSpec = mFragmentTabHost.newTabSpec(
                    tabItem.getTabText()).
                    setIndicator(tabItem.getTabView());
            // 将创建的 tab 添加到底部 tab 栏中( @android:id/tabs )
            // 将 Fragment 添加到页面中( @android:id/tabcontent )
            mFragmentTabHost.addTab(tabSpec, tabItem.getFragmentClass(), null);
            // 底部 tab 栏设置背景图片
            mFragmentTabHost.getTabWidget().setBackgroundResource(R.drawable.bottom_bar);

            // 默认选中第一个 tab
            if (i == 0) {
                tabItem.setChecked(true);
            } else {
                tabItem.setChecked(false);
            }
        }

        // 切换 tab 时,回调此方法
        mFragmentTabHost.setOnTabChangedListener(new TabHost.OnTabChangeListener() {
            @Override
            public void onTabChanged(String tabId) {
                for (int i = 0; i < mFragmentList.size(); i++) {
                    TabItem tabItem = mFragmentList.get(i);
                    // 通过 tag 检查用户点击的是哪个 tab
                    if (tabId.equals(tabItem.getTabText())) {
                        tabItem.setChecked(true);
                    } else {
                        tabItem.setChecked(false);
                    }
                }
            }
        });
    }

    class TabItem {

        private ImageView mIvTab;

        /**
         * 正常状态的图片
         */
        private int imageNormal;

        /**
         * 选中状态的图片
         */
        private int imageSelected;

        private TextView mTvTab;

        /**
         * 文字
         */
        private String tabText;

        /**
         * Fragment
         */
        private Class<? extends Fragment> fragmentClass;

        private View mTabView;

        public TabItem(int imageNormal,
                       int imageSelected,
                       String text,
                       Class<? extends Fragment>
                fragmentClass) {
            this.imageNormal = imageNormal;
            this.imageSelected = imageSelected;
            this.tabText = text;
            this.fragmentClass = fragmentClass;
        }

        public Class<? extends Fragment> getFragmentClass() {
            return fragmentClass;
        }

        /**
         * 获取 tab 上的文字
         *
         * @return tab 上的文字
         */
        public String getTabText() {
            return tabText;
        }

        /**
         * 设置选中
         *
         * @param checked 是否选中
         */
        public void setChecked(boolean checked) {
            if (checked) {
                mTvTab.setTextColor(getResources().getColor(R.color.colorTabText));
                mIvTab.setImageResource(imageSelected);
            } else {
                mTvTab.setTextColor(Color.WHITE);
                mIvTab.setImageResource(imageNormal);
            }
        }

        public View getTabView() {
            mTabView = View.inflate(MainActivity.this, R.layout.view_tab, null);
            mIvTab = (ImageView) mTabView.findViewById(R.id.iv_tab);
            mTvTab = (TextView) mTabView.findViewById(R.id.tv_tab);
            mIvTab.setImageResource(imageNormal);
            mTvTab.setText(tabText);
            return mTabView;
        }
    }
}
使用 FragmentTabHost ,Activity 需要继承自 FragmentActivity。但是 Android Studio 创建的 Activity 默认继承自 AppCompatActivity,而 AppCompatActivity 又继承自 FragmentActivity,所以我们不需要修改 Activity 的继承关系。
为了更加方便的使用 FragmentTabHost,我们把很多数据都封装在 TabItem 中,比如每个 Tab 的 ImageView,TextView,还有对应的文字,图片,设置选中状态,等等。
我们首先实例化了 FragmentTabHost:
mFragmentTabHost = (FragmentTabHost) findViewById(android.R.id.tabhost);然后将 FragmentManager 和 android.R.id.tabcontent(Fragment 容器 id)绑定了起来,这样,FragmentManager 等会才能管理Fragment,将不同的 Fragment 切换到容器里。
mFragmentTabHost.setup(this, getSupportFragmentManager(), android.R.id.tabcontent);接下来,我们遍历 mFragmentList,依次取出每一个 tabItem。
接着,我们使用 mFragmentTabHost.newTabSpec() 方法创建 tab,并设置了指示器。newTabSpec() 方法中接收一个 tag 作为参数,我们为了方便起见,直接传入每个 tab 的文字作为 tag。指示器我们传入的是每个 tab 的 View。
TabHost.TabSpec tabSpec = mFragmentTabHost.newTabSpec(
        tabItem.getTabText()).
        setIndicator(tabItem.getTabView());
这样,tab 就创建好了。创建好之后,我们就要把 tab 和对应的 Fragment 添加到 FragmentTabHost 中。Fragment 代码就不贴了,就是一个 TextView。相信大家都能写的出来。
// 将创建的 tab 添加到底部 tab 栏中( @android:id/tabs )
// 将 Fragment 添加到页面中( @android:id/tabcontent )
mFragmentTabHost.addTab(tabSpec, tabItem.getFragmentClass(), null);
为了让底部菜单栏看着更美观,我们给底部菜单栏设置了背景。这里要注意下,给底部菜单栏设置背景,不能直接调用 mFragmentTabHost 的 setBackgroundResource() 方法,而是要先获取到底部菜单栏,再设置背景:
mFragmentTabHost.getTabWidget().setBackgroundResource(R.drawable.bottom_bar);然后,我们给 mFragmentTabHost 设置了 tab 切换的监听器,当我们点击 tab 时,就会回调此方法:
mFragmentTabHost.setOnTabChangedListener(new TabHost.OnTabChangeListener() {
    @Override
    public void onTabChanged(String tabId) {
        for (int i = 0; i < mFragmentList.size(); i++) {
            TabItem tabItem = mFragmentList.get(i);
            // 通过 tag 检查用户点击的是哪个 tab
            if (tabId.equals(tabItem.getTabText())) {
                tabItem.setChecked(true);
            } else {
                tabItem.setChecked(false);
            }
        }
    }
});
我们可以看到,onTabChanged 方法中有一个参数,tabId,这个 tabId 就是我们使用 mFragmentTabHost.newTabSpec() 方法创建 tab 时,传入的 tag。因为我们传入的 tag 就是每个 tab 的文字。所以我们要用 tag 和每一个 tabItem 的文字作比较,如果一样,就切换图标和文字颜色。
最后我们默认选中第一个 tab:
if (i == 0) {
    tabItem.setChecked(true);
} else {
    tabItem.setChecked(false);
}
好了,运行一下程序:
底部菜单栏已经成功的实现了。
2.实现显示未读消息数量
我们先思考一下,显示未读消息数量这个功能,该怎么实现?
其实这个功能的实现很简单,就是在每个 tab 的布局右上角,放一个 TextView,当有未读消息时,就让 TextView 显示未读消息的数量。
那我们先来修改下 tab 的布局文件,修改 view_tab.xml ,代码如下:
<?xml version="1.0" encoding="utf-8"?>
<RelativeLayout xmlns:android="http://schemas.android.com/apk/res/android"
                android:layout_width="match_parent"
                android:layout_height="wrap_content"
                android:gravity="center">

    <LinearLayout
        android:layout_width="match_parent"
        android:layout_height="wrap_content"
        android:gravity="center"
        android:orientation="vertical"
        android:padding="5dp">

        ......
    </LinearLayout>

    <!-- 消息数量小圆点 -->
    <TextView
        android:id="@+id/tv_new_msg"
        android:layout_width="wrap_content"
        android:layout_height="wrap_content"
        android:layout_alignParentRight="true"
        android:layout_marginRight="10dp"
        android:gravity="center"
        android:textColor="#fcff00"
        android:textSize="12sp"/>

</RelativeLayout>
可以看到,我们在 LinearLayout 的下面放置了一个 TextView。
接下来,我们修改 Activity 的代码,实现显示未读消息的功能。
package com.example.tabtest;

import android.graphics.Color;
import android.os.Bundle;
import android.support.v4.app.Fragment;
import android.support.v4.app.FragmentTabHost;
import android.support.v7.app.AppCompatActivity;
import android.view.View;
import android.widget.ImageView;
import android.widget.TabHost;
import android.widget.TextView;

import java.util.ArrayList;
import java.util.List;

public class MainActivity extends AppCompatActivity {

    public static final int TAB_WECHAT      = 0;
    public static final int TAB_FRIEND      = 1;
    public static final int TAB_CONTACTS    = 2;
    public static final int TAB_SETTING     = 3;

    @Override
    protected void onCreate(Bundle savedInstanceState) {
        super.onCreate(savedInstanceState);
        setContentView(R.layout.activity_main);
        initTabItemData();
    }

    /**
     * 更新新消息数量
     *
     * @param tabIndex tab 的索引
     * @param msgCount 消息数量
     */
    public void updateMsgCount(int tabIndex, int msgCount) {
        mFragmentList.get(tabIndex).setNewMsgCount(msgCount);
    }

    class TabItem {

        ......

        /**
         * 新消息
         */
        private TextView mTvNewMsg;

        public View getTabView() {
            mTabView = View.inflate(MainActivity.this, R.layout.view_tab, null);
            ......
            mTvNewMsg = (TextView) mTabView.findViewById(R.id.tv_new_msg);
            return mTabView;
        }

        /**
         * 设置新消息数量
         */
        public void setNewMsgCount(int count) {
            if (count > 0) {
                mTvNewMsg.setText(String.valueOf(count));
            }
            mTvNewMsg.setBackgroundResource(R.drawable.ic_new_msg);
        }
    }
}
我们给 TabItem 加上了 设置新消息数量 的功能:让 TextView 显示新消息数量,并显示背景。
然后又创建一个了 updateMsgCount() 方法,用来更新某一个 tab 的新消息数量。
接下来,我们要在 WeChatFragment 中设置新消息数量。
我们先修改 WeChatFragment 的布局文件,修改 fragment_wechat.xml,代码如下:
<?xml version="1.0" encoding="utf-8"?>
<LinearLayout xmlns:android="http://schemas.android.com/apk/res/android"
android:layout_width="match_parent"
android:layout_height="match_parent"
android:orientation="vertical">
<!-- 微信 -->
<LinearLayout
android:layout_width="match_parent"
android:layout_height="wrap_content"
android:orientation="horizontal">
<EditText
android:id="@+id/et_wechat"
android:layout_width="0dp"
android:layout_height="wrap_content"
android:layout_weight="1"
android:hint="微信 未读消息数量"
android:inputType="number"/>
<Button
android:id="@+id/btn_wechat"
android:layout_width="wrap_content"
android:layout_height="wrap_content"
android:text="确定"/>
</LinearLayout>
<!-- 朋友 -->
<LinearLayout
android:layout_width="match_parent"
android:layout_height="wrap_content"
android:orientation="horizontal">
<EditText
android:id="@+id/et_friend"
android:layout_width="0dp"
android:layout_height="wrap_content"
android:layout_weight="1"
android:hint="朋友 未读消息数量"
android:inputType="number"/>
<Button
android:id="@+id/btn_friend"
android:layout_width="wrap_content"
android:layout_height="wrap_content"
android:text="确定"/>
</LinearLayout>
<!-- 联系人 -->
<LinearLayout
android:layout_width="match_parent"
android:layout_height="wrap_content"
android:orientation="horizontal">
<EditText
android:id="@+id/et_contacts"
android:layout_width="0dp"
android:layout_height="wrap_content"
android:layout_weight="1"
android:hint="联系人 未读消息数量"
android:inputType="number"/>
<Button
android:id="@+id/btn_contacts"
android:layout_width="wrap_content"
android:layout_height="wrap_content"
android:text="确定"/>
</LinearLayout>
<!-- 设置 -->
<LinearLayout
android:layout_width="match_parent"
android:layout_height="wrap_content"
android:orientation="horizontal">
<EditText
android:id="@+id/et_setting"
android:layout_width="0dp"
android:layout_height="wrap_content"
android:layout_weight="1"
android:hint="设置 未读消息数量"
android:inputType="number"/>
<Button
android:id="@+id/btn_setting"
android:layout_width="wrap_content"
android:layout_height="wrap_content"
android:text="确定"/>
</LinearLayout>
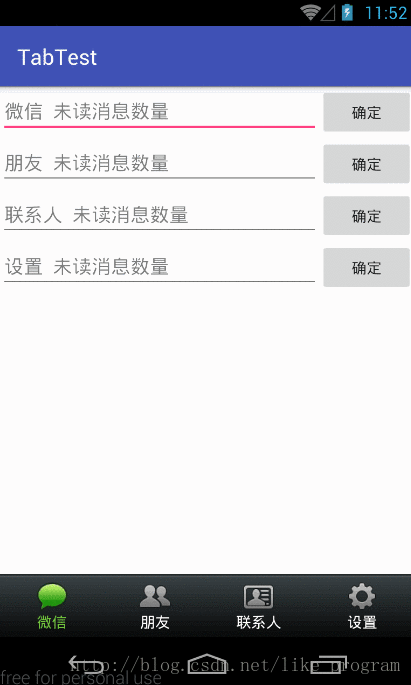
</LinearLayout>代码看着有些长,但是很简单,就是 4 个 EditText + 4 个 Button。没什么难度,就不多说了。
修改 WeChatFragment.java ,代码如下:
package com.example.tabtest;

import android.os.Bundle;
import android.support.v4.app.Fragment;
import android.text.TextUtils;
import android.view.LayoutInflater;
import android.view.View;
import android.view.ViewGroup;
import android.widget.Button;
import android.widget.EditText;

/**
 * 微信 Fragment
 */
public class WeChatFragment extends Fragment implements View.OnClickListener {

    private EditText mEdWeChat;
    private EditText mEdFriend;
    private EditText mEdContacts;
    private EditText mEdSetting;

    public WeChatFragment() {
        // Required empty public constructor
    }

    @Override
    public View onCreateView(LayoutInflater inflater, ViewGroup container,
                             Bundle savedInstanceState) {
        View view = inflater.inflate(R.layout.fragment_wechat, container, false);

        mEdWeChat = (EditText) view.findViewById(R.id.et_wechat);
        mEdFriend = (EditText) view.findViewById(R.id.et_friend);
        mEdContacts = (EditText) view.findViewById(R.id.et_contacts);
        mEdSetting = (EditText) view.findViewById(R.id.et_setting);

        Button btnWeChat = (Button) view.findViewById(R.id.btn_wechat);
        Button btnFrrend = (Button) view.findViewById(R.id.btn_friend);
        Button btnContacts = (Button) view.findViewById(R.id.btn_contacts);
        Button btnSetting = (Button) view.findViewById(R.id.btn_setting);

        btnWeChat.setOnClickListener(this);
        btnFrrend.setOnClickListener(this);
        btnContacts.setOnClickListener(this);
        btnSetting.setOnClickListener(this);
        return view;
    }

    @Override
    public void onClick(View v) {
        // 新消息数量
        String number;
        // 获取 Fragment 的托管 Activity
        MainActivity mainActivity = (MainActivity) getActivity();

        switch (v.getId()) {
            case R.id.btn_wechat:
                number = mEdWeChat.getText().toString().trim();
                if (!TextUtils.isEmpty(number)) {
                    mainActivity.updateMsgCount(MainActivity.TAB_WECHAT, Integer.valueOf(number));
                }
                break;
            case R.id.btn_friend:
                number = mEdFriend.getText().toString().trim();
                if (!TextUtils.isEmpty(number)) {
                    mainActivity.updateMsgCount(MainActivity.TAB_FRIEND, Integer.valueOf(number));
                }
                break;
            case R.id.btn_contacts:
                number = mEdContacts.getText().toString().trim();
                if (!TextUtils.isEmpty(number)) {
                    mainActivity.updateMsgCount(MainActivity.TAB_CONTACTS, Integer.valueOf(number));
                }
                break;
            case R.id.btn_setting:
                number = mEdSetting.getText().toString().trim();
                if (!TextUtils.isEmpty(number)) {
                    mainActivity.updateMsgCount(MainActivity.TAB_SETTING, Integer.valueOf(number));
                }
                break;
        }
    }
}
代码同样很简单,先实例化布局文件中的 4 个 EditText 和 4 个 Button,然后给 Button 设置了点击监听。当点击 Button 时,就获取对应的 EditText 中输入的新消息数量,然后调用 MainActivity 的 updateMsgCount() 方法设置新消息数量。
这里有一点要注意下:因为 WeChatFragment 的托管 Activity 是 MainActivity,所以在 WeChatFragment 中调用 getActivity() 后,可以向下转型为 MainActivity。
MainActivity mainActivity = (MainActivity) getActivity();好了,运行一下程序:
可以看到,已经可以成功显示未读消息数量了。