Unity3d官方案例之Flappy Bird(下篇)
在上篇中我们完成了背景布置以及小鸟的操控,本篇我们先完善一下UI再进行滚动背景和障碍添加的讲解。
游戏UI 制作
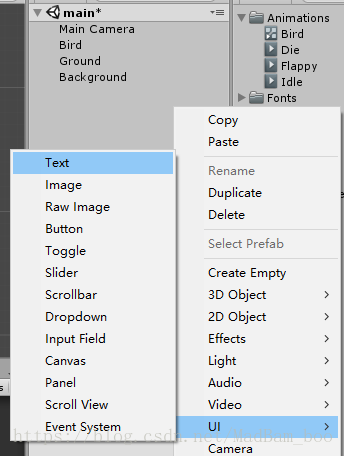
1、在Hierarchy中右键创建Text,重命名为ScoreText。
2、选中ScoreText,更改Text Component中的属性:
· 将Text修改为Score: 0(非必要,因为在后面我们会在脚本中修改,这里修改只是为了更直观地调整UI位置和观察效果);
· 点击Font更改字体为LuckiestGuy;
· Alignment设置为Center和Middle;
· Color设置为白色(255,255,255,255);
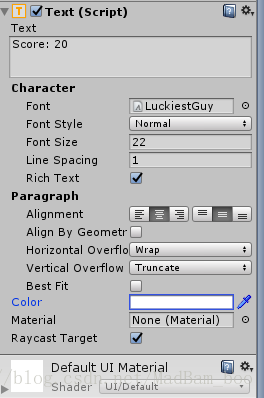
有可能会出现Text内容没有显示出来的情况,这时候你可以调整Font Size属性或者调整Rect Transform Component中的Height属性或者将Text Component下的Horizontal Overflow和Vertical Overflow设置为Overflow即可。
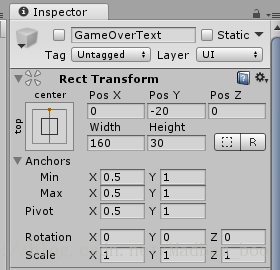
3、选中ScoreText,调整Rect Transform Component中的Anchor
` 按着Shift和Alt,选择Center Bottom;
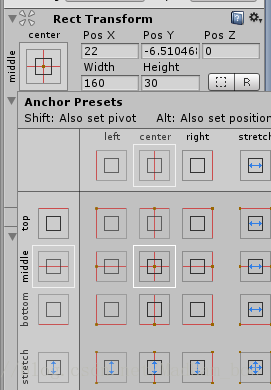
· 调整一下Font Size和Pos Y,自己觉得差不多即可。
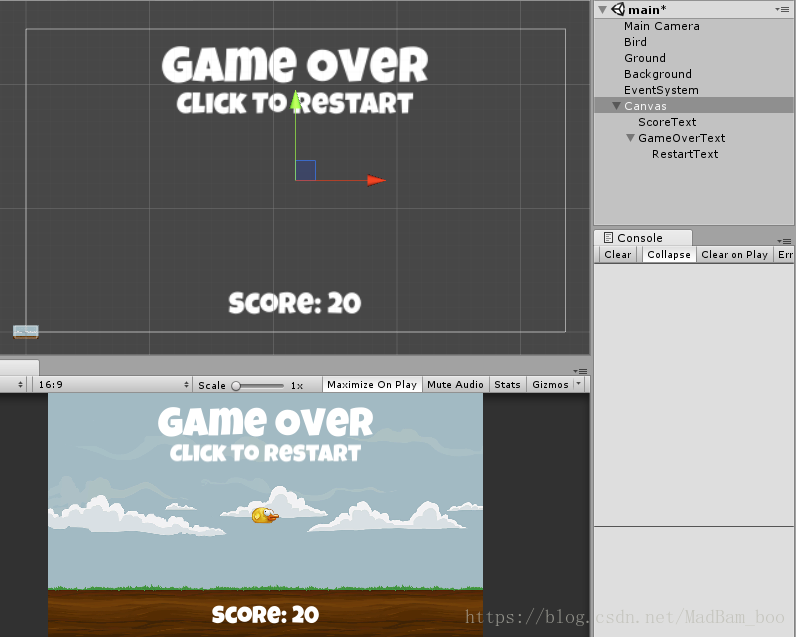
4、选中ScoreText,右键Duplicate拷贝两份,分别重命名为GameOverText和RestartText,
5、同时选中GameOverText和RestartText,修改他们的RectTransform为Center Top(跟上面的一样,同时按着Shift和Alt),然后将RestartText拖拽到GameOverText上,让RestartText成为GameOverText的子物体。调整两个Text的Font size和Pos Y以及Text内容,完成后如图所示:
6、在Hierarchy中右键创建新的空物体命名为GameManager,并添加新C# Script,命名为GameManager,双击Script编辑:
这里我们要实现的功能室:
· 更新得分
· Bird Die后弹出GameOver UI,玩家点击画面后重新加载场景。
using System.Collections;
using System.Collections.Generic;
using UnityEngine;
using UnityEngine.UI;
using UnityEngine.SceneManagement;

public class GameManager : MonoBehaviour {

    public static GameManager instance;             // single instance

    public GameObject gameOverText;                 // game over UI
    public Text scoreText;                          // score text

    private bool gameOver = false;                  // mark current game status
    private int score = 0;                          // store score.


    void Awake()
    {
        if (instance == null) {                     // set single instance
            instance = this;
        } else if (instance != null) {
            Destroy (gameObject);
        }
    }

    void Update()
    {
        if (gameOver == true && Input.GetMouseButtonDown (0)) {         // if gameover and click the picture, restart the game.
            SceneManager.LoadScene (SceneManager.GetActiveScene ().buildIndex);
        }
    }

    public void AddScore()                          // when the bird cross a obstacle, add score.
    {
        if (gameOver)
            return;

        score += 1;
        scoreText.text = "Score: " + score.ToString ();
    }

    public void GameOver()                          // game over function.
    {
        gameOverText.SetActive (true);
        gameOver = true;
    }
}
在Awake中,我们实现了单例模式,因为在同一Scene中我们只需要1个GameMnager。
在Update中,我们通过检测game的状态以及判断鼠标输入,实现游戏的重新开始。
另外,我们定义了两个public方法,分别实现加分和游戏结束。
注意,记得using UnityEngine.UI和SceneManagement。
7、打开Bird Script,在OnCollisionEnter2D中添加GameOver方法。
...
public class Bird : MonoBehaviour {

    ...
    void OnCollisionEnter2D()
    {
        rb2d.velocity = Vector2.zero;
        isDead = true;
        animator.SetTrigger ("Die");                        // change current animation clip to Die

    +   GameManager.instance.GameOver ();
    }

}
在Bird碰到Ground或者障碍后该方法将会被调用,同时我们调用GameMnager中的GameOver方法弹出GameOver UI。
这里的+号只是为了提醒你添加了什么内容,实际代码中不需要添加+号。
8、Ctrl + S保存两个Script,回到Scene中,选中GameManager物体,将ScoreText和GameOverText分别拖拽到GameManager脚本对应的槽中:
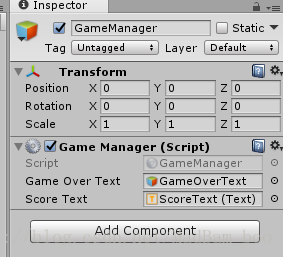
选中GameOverText,取消Active的勾选:
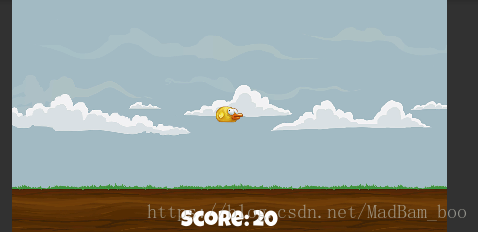
9、运行游戏测试一下吧!记得Ctrl + S保存。
“无限”滚动背景的实现;
滚动背景的实现原理很简单,就是通过两张图片不断地交替。
1、创建ScrollingObject脚本实现对一个物体的移动。
using System.Collections;
using System.Collections.Generic;
using UnityEngine;

public class ScrollingObject : MonoBehaviour {

    public float scrollSpeed = -2f;         // object scroll speed.

    private Rigidbody2D rb2d;

    void Start()
    {
        rb2d = GetComponent<Rigidbody2D> ();
        rb2d.velocity = new Vector2 (scrollSpeed, 0);
    }

    void Update()
    {
        if (GameManager.instance.gameOver == true) {
            rb2d.velocity = Vector2.zero;
        }
    }

}2、选中Ground物体,给它添加一个Rigidbody2D Component,并将Body Type设置为Kinematic(因为我们会通过脚本来移动它而不是使用物理系统),然后将ScrollingObject脚本添加到Ground物体上。
3、新建一个C# Script,命名为RepeatingBackGround,双击编辑:
改脚本实现两个Ground之间的切换,当Ground移动其本身宽度距离后,重置他的位置。
using System.Collections;
using System.Collections.Generic;
using UnityEngine;

public class RepeatingBackground : MonoBehaviour {

    private BoxCollider2D groundCollider;
    private float groundHorizontalLength;               // store background's width.

    void Start()
    {
        groundCollider = GetComponent<BoxCollider2D> ();
        groundHorizontalLength = groundCollider.size.x;             // get background's width;
    }

    void Update()
    {
        if (transform.position.x < -groundHorizontalLength) {       // when it move out of screen, reset it's position.
            RepositionBackground ();
        }
    }

    void RepositionBackground()
    {
        Vector2 groundOffset = new Vector2 (groundHorizontalLength * 2f, 0);
        transform.position = (Vector2)transform.position + groundOffset;        // reset position
    }

}
保存脚本,返回Scene。
将该脚本拖拽到Ground物体上,运行查看效果。
4、将Background拖拽到Ground上,让他成为Ground的一个子物体。DuplicateGround物体,生成第二份Ground。创建空物体重命名为Scenery,Reset它的position为(0,0,0),将两个Ground物体拖拽到Scenery下,让Scenery成为他们的父物体,调整两个Ground物体的位置,然后运行游戏进行测试,如图:

5、至此便完成了滚动背景的实现了~ Ctrl + S 庆祝一下
“无限“生成障碍
1、首先,制作障碍Prefab。
· 从Project > Sprites > ColumnSprite 拖拽到Hierarchy中,修改ColumnSprite物体的Sprite Renderer的Sorting Layer为Middle,然后给他添加上一个Box Collider 2D Component,调整Collider的大小,如图。这样当Bird碰到它时便会触发Bird脚本的碰撞方法,然后GameOver。
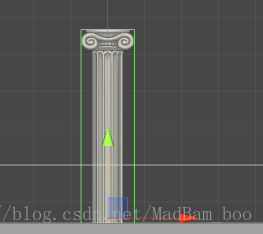
· Copy一份ColumnSprite,旋转,调整一下两个ColumnSprite的位置,如图:
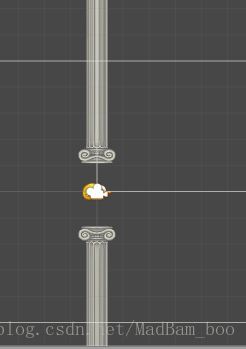
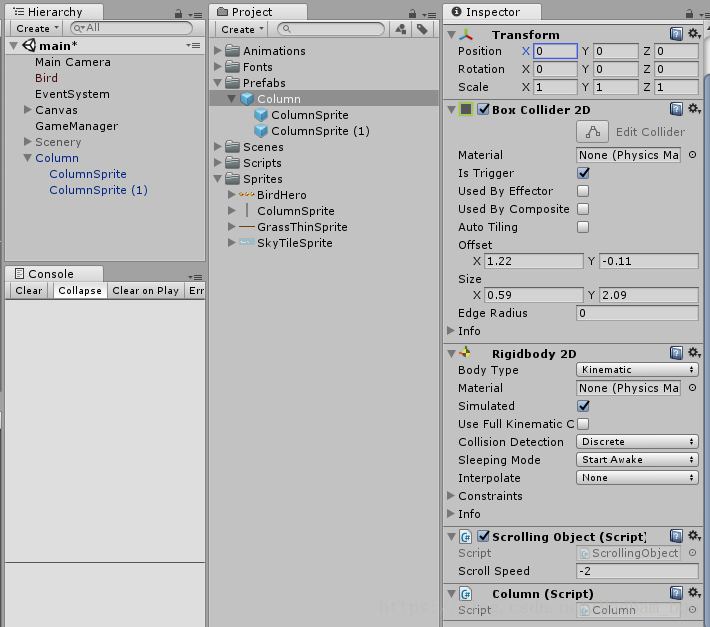
· 创建空物体命名为Column,初始化Transform信息(点击Transform组件右上方小齿轮 > Reset)
将两个ColumnSprite拖拽到Column下使其成为父物体。给Column添加Rigidbody2D,设置Type为Kinematic,添加BoxCollider2D,调整BoxCollider2D的大小和位置,将其置于出口处,并勾选Is Trigger,如图:

· 给Column添加Scrolling Object Script,以及添加一个新的C# Script。命名为Column。
在Colujn Script中我们要实现的功能是检测碰撞物体是否为Bird,是则加分。
using System.Collections;
using System.Collections.Generic;
using UnityEngine;

public class Column : MonoBehaviour {

    void OnTriggerEnter2D(Collider2D other)
    {
        if (other.GetComponent<Bird> () != null) {
            GameManager.instance.AddScore ();
        }
    }
}
· 在Project中新建Prefabs文件夹,将Column物体拖拽到Prefabs文件夹中使其成为预制体。
完成后Hierarchy中的Column物体名称会变成蓝色:
· 至此,我们完成了Column障碍物的Prefab。
2、新建一个C# Script,命名为ColumnsPool用于管理Column。
· 由于每生成一个Column物体都会占用资源,因此我们制作一个Column数组(Columns pool)来存储Column,然后重复利用,节约资源
· 每次Column出现的位置在Y轴上随机,增加游戏趣味性。
· 按一定的时间间隔更新Column的位置,当然,你也可以让这个更新间隔随着游戏时长或者玩家得分的增加而减少,提高游戏难度。
using System.Collections;
using System.Collections.Generic;
using UnityEngine;

public class ColumnsPool : MonoBehaviour {

    public GameObject columnPrefab;         // column prefab
    public int poolSize = 5;                // max size of pool
    public float spawnRate = 4.5f;          // spawn rate
    public float columnYMin = -1.45f;       // column's min y
    public float columnYMax = 2.8f;         // column's max y

    private GameObject[] columns;           // column pool
    private Vector2 startSpawnPos = new Vector2 (13f, 0f);  // origin start spawn position.
    private float spawnXPosition = 10f;     // column's x not change.
    private float lastSpawnTime = 0;        // record the last spawn time.
    private int currentIndex = 0;           // current column's index in pool

    void Start()
    {
        columns = new GameObject[poolSize];     // init columns pool
        for (int i = 0; i < poolSize; i++) {
            columns [i] = (GameObject)Instantiate (columnPrefab, startSpawnPos, Quaternion.identity);
            columns [i].SetActive (false);
        }
    }

    void Update()
    {
        if (Time.time - spawnRate > lastSpawnTime) {        // after spawnRate time, reset a column's position
            lastSpawnTime = Time.time;
            float columnY = Random.Range (columnYMin, columnYMax);  // get a random y.
            columns [currentIndex].transform.position = new Vector2 (spawnXPosition, columnY);  // reset position
            columns [currentIndex].SetActive (true);        // active column
            currentIndex++;                                 // turn to next column.

            if (currentIndex >= poolSize) {                 // check overflow
                currentIndex = 0;
            }
        }
    }

}3、将ColumnsPool脚本拖拽到GameManager物体上。并从Prefabs文件夹中将Column Prefab拖拽到对应的槽上。删除Hierarchy中的Column,运行游戏测试一下~
至此,整个游戏就完成了~ 当然这只是基础版本的Flappy Bird,如果你想让他更有趣,可以发挥一下你的想象力,如果说闪现Column、添加道具、联网功能等等~
· Enjoy yourself~ 下一个案例再见~