相关连接: Android 消息处理机制之一: Handler 与 Message
Android 消息处理机制之二: Message 中 obtain()源代码剖析
Android 消息处理机制之三: Handler 中 sendMessage() 源代码剖析
上一讲我们学习Handler和Message的一些使用方式,我们知道Handler它会发送消息和处理消息,并且关联一个子线程,如何发送消息入队和出队处理消息等这些都是交给Looper去管理分发的,也就是它是负责整个消息队列运转的一个类,这一讲我们就来学习一下Android中的Looper的操作。
一、Looper类介绍
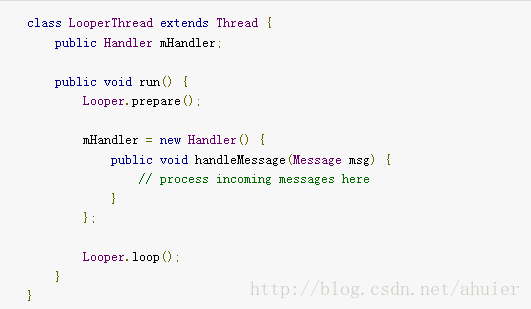
这个类是用来在一个线程中运行一个消息循环(Message),默认情况下线程是没有一个消息循环来关联它们的,在这个线程中调用prepare()方法来启动一个循环,然后调用loop()就可以处理消息至到循环停止。下面就是一个典型的例子实现一个Looper线程,使用 prepare()方法 和 loop()来创建一个初始的Handler并且能够与消息循环(Looper)进行沟通关联
【注意】:默认情况下的android新诞生的一个线程是没有开启一个消息循环(Looper)的,但是主线程除外,主线程系统会自动为其创建Looper对象,开启消息循环。
二、程序Demo
1. 布局文件定义一个Button和TextView,这里不贴出来,读者可以阅读附件源码
2. MainActivity.java
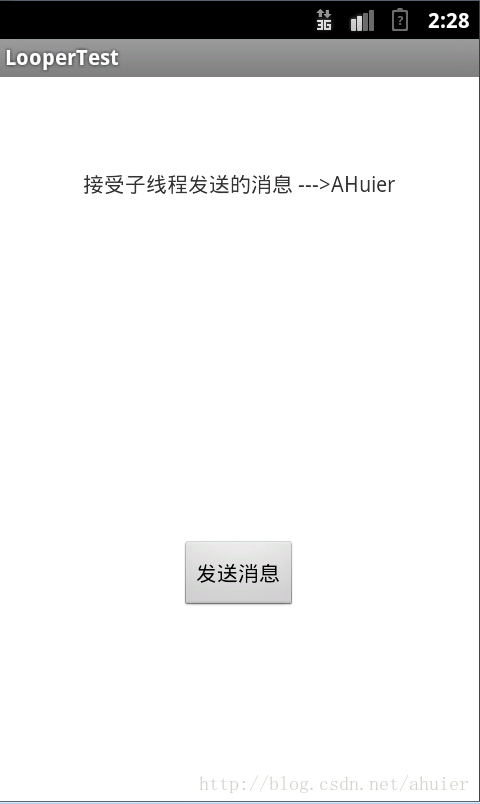
...
public class MainActivity extends Activity {

    private Button btn;
    private TextView txt;
    private MyHandler mHandler;

    @Override
    protected void onCreate(Bundle savedInstanceState) {
        super.onCreate(savedInstanceState);
        setContentView(R.layout.activity_main);
       ...
        mHandler = new MyHandler();
        btn.setOnClickListener(new View.OnClickListener() {

            @Override
            public void onClick(View v) {
                // TODO Auto-generated method stub
                // 启动线程
                new Thread(new MyThread()).start();
            }
        });
    }

    public class MyThread implements Runnable {

        @Override
        public void run() {
            // TODO Auto-generated method stub
            Message msg = Message.obtain();
            msg.obj = "AHuier";
            mHandler.sendMessage(msg);
        }

    }

    public class MyHandler extends Handler {

        public MyHandler() {
            super();
            // TODO Auto-generated constructor stub
        }

        // Handler中有个传递Looper对象的构造方法,这个构造方法比较少用
        public MyHandler(Looper looper) {
            super(looper);
            // TODO Auto-generated constructor stub
        }

        @Override
        public void handleMessage(Message msg) {
            // TODO Auto-generated method stub
            super.handleMessage(msg);
            txt.setText("接受子线程发送的消息 --->" + msg.obj);
        }
    }
...
 }
3. 程序执行结果
4. 【说明】: 在上面的代码中我们并没有去手动生成Looper对象,主线程依然可以完成接受子线程消息并显示的操作,在这里我们需要明白为什么我们之前的例子中虽然没有创建一个Looper去管理消息,但是子线程中发送消息依然能够被主线程接受到,原因是因为我们主线程中已经存在了默认的一个Looper对象。
这里我们在做一个小测试,我们给其生成一个Looper对象,在onCreate()方法中添加代码如下:
程序执行依然会接受到子线程发送的消息。为什么会是这样的呢?我们来查看一下它们的源码@Override protected void onCreate(Bundle savedInstanceState) { super.onCreate(savedInstanceState); setContentView(R.layout.activity_main); initComponent(); // 在Activity中有一个默认的Looper对象,来处理子线程发送的消息 // 这里我们尝试的给其生成一个Looper对象,也是可以的 Looper looper = Looper.myLooper(); //获得与子线程关联的Looper对象 mHandler = new MyHandler(looper); btn.setOnClickListener(new View.OnClickListener() { @Override public void onClick(View v) { // TODO Auto-generated method stub // 启动线程 new Thread(new MyThread()).start(); } }); }1) 查看Handler源码中的构造方法
可以发现在其构造方法中就已经默认为帮其生成一个Looper对象了: mLooper = Looper.myLooper();/** * Default constructor associates this handler with the queue for the * current thread. * * If there isn't one, this handler won't be able to receive messages. */ public Handler() { if (FIND_POTENTIAL_LEAKS) { final Class<? extends Handler> klass = getClass(); if ((klass.isAnonymousClass() || klass.isMemberClass() || klass.isLocalClass()) && (klass.getModifiers() & Modifier.STATIC) == 0) { Log.w(TAG, "The following Handler class should be static or leaks might occur: " + klass.getCanonicalName()); } } mLooper = Looper.myLooper(); if (mLooper == null) { throw new RuntimeException( "Can't create handler inside thread that has not called Looper.prepare()"); } mQueue = mLooper.mQueue; mCallback = null; }
同时从Looper中获取到一个消息队列,并且赋值给Handler的本地的mQueque,我们在看一下Handler(Looper looper)这个构造方法如下:同样也是接受用户生成的一个Looper对象。所以是底层实现方式都是一模一样了,从这里我们也知道了为什么默认情况下主线程都会默认的Looper对象去维护了。/** * Use the provided queue instead of the default one. */ public Handler(Looper looper) { mLooper = looper; mQueue = looper.mQueue; mCallback = null; }2) 这里我们需要在看一下为什么会调用 Looper.myLooper();会获取到一个Looper对象,跟踪其源码如下:
继续跟踪是谁给其sThreadLocal实例化/** * Return the Looper object associated with the current thread. Returns * null if the calling thread is not associated with a Looper. */ public static Looper myLooper() { return sThreadLocal.get(); }sThreadLocal 是从一个本地线程中获取Looper类型的本地线程ThreadLocal对象,这里只需要明白ThreadLocal是一个Android提供管理线程的一个东西。// sThreadLocal.get() will return null unless you've called prepare(). static final ThreadLocal<Looper> sThreadLocal = new ThreadLocal<Looper>();在prepare()方法中,会从sThreadLocal通过get获取一个本地线程的对象, 如果是空的话,这个东西中将new出来的Looper对象set到本地线程中。查看ThreadLocal的get和set方法/** Initialize the current thread as a looper. * This gives you a chance to create handlers that then reference * this looper, before actually starting the loop. Be sure to call * {@link #loop()} after calling this method, and end it by calling * {@link #quit()}. */ public static void prepare() { if (sThreadLocal.get() != null) { throw new RuntimeException("Only one Looper may be created per thread"); } sThreadLocal.set(new Looper()); }public T get() { // Optimized for the fast path. Thread currentThread = Thread.currentThread(); Values values = values(currentThread); if (values != null) { Object[] table = values.table; int index = hash & values.mask; if (this.reference == table[index]) { return (T) table[index + 1]; } } else { values = initializeValues(currentThread); } return (T) values.getAfterMiss(this); }public void set(T value) { Thread currentThread = Thread.currentThread(); Values values = values(currentThread); if (values == null) { values = initializeValues(currentThread); } values.put(this, value); }也就是说它终究是通过set的方式讲new出来的Looper对象扔到ThreadLocal中,由它来完成初始化和关联一个线程,如果要得到一个Looper对象就从ThreadLocal中get出来。通过这种方式来关联和初始化指定线程的Looper对象。
5. 在上面的一个Demo中,我们是实现了子线程发送消息给主线程来更新UI的操作和Looper的关系,子线程默认情况下是没有Looper的对象的,下面我就来测试一下主线程向子线程发送消息,由于子线程默认没有Looper,我们就来测试一下这样实现会发生什么情况?[注意,这种方式我们一般在实际开发中是很少见的],Demo2如下所示:
1) MainActivity.java 中贴出onCreate()和 MyThread 类里面的代码段,读者可以阅读附件中的源代码
编译执行发出异常:@Override protected void onCreate(Bundle savedInstanceState) { super.onCreate(savedInstanceState); setContentView(R.layout.activity_main); initComponent(); new Thread(new MyThread()).start(); btn.setOnClickListener(new View.OnClickListener() { @Override public void onClick(View v) { // TODO Auto-generated method stub // 点击按钮的时候在UI主线程中向子线程发送消息 Message message = Message.obtain(); message.obj = "AHuier"; mHandler.sendMessage(message); } }); } public class MyThread implements Runnable { @Override public void run() { mHandler = new Handler(){ @Override public void handleMessage(Message msg) { // TODO Auto-generated method stub super.handleMessage(msg); // 由于不能在子线程中更新UI,所以我们输出到控制台. System.out.println("接受主线程中发出来的消息" + msg.obj); } }; } }
从这里我们可以得出结论在子线程中,默认情况下是没有Looper对象的,所以我们需要根据博文上面的Looper类的说明添加prepare()方法 和 loop()方法来启动Looper消息循环。修改程序如下2)
2) 在MyThread子线程中添加prepare()方法 和 loop()方法完成Looper消息循环的启动
程序执行结果:public class MyThread implements Runnable { @Override public void run() { Looper.prepare(); mHandler = new Handler(){ @Override public void handleMessage(Message msg) { // TODO Auto-generated method stub super.handleMessage(msg); // 由于不能在子线程中更新UI,所以我们输出到控制台. System.out.println("接受主线程中发出来的消息" + msg.obj); } }; Looper.loop(); } }
6. 在这里为什么添加完这两个方法之后就会有Looper消息循环了?我们来查看一下Looper的相关源代码
1) prepare() 方法我们在上面已经知道,它会初始化当前的线程关联一个Looper.
2) loop()源码如下
它首先获取Looper对象,然后将消息从Looper中取出,然后赋值给MessageQueue,让MessageQueue去管理,接着在While(true)这个死循环里面一直在轮转的取消息和分发消息(从Message msg = queue.next();和msg.target.dispatchMessage(msg);)这两句代码读出。/** * Run the message queue in this thread. Be sure to call * {@link #quit()} to end the loop. */ public static void loop() { Looper me = myLooper(); if (me == null) { throw new RuntimeException("No Looper; Looper.prepare() wasn't called on this thread."); } MessageQueue queue = me.mQueue; // Make sure the identity of this thread is that of the local process, // and keep track of what that identity token actually is. Binder.clearCallingIdentity(); final long ident = Binder.clearCallingIdentity(); while (true) { Message msg = queue.next(); // might block if (msg != null) { if (msg.target == null) { // No target is a magic identifier for the quit message. return; } long wallStart = 0; long threadStart = 0; // This must be in a local variable, in case a UI event sets the logger Printer logging = me.mLogging; if (logging != null) { logging.println(">>>>> Dispatching to " + msg.target + " " + msg.callback + ": " + msg.what); wallStart = SystemClock.currentTimeMicro(); threadStart = SystemClock.currentThreadTimeMicro(); } msg.target.dispatchMessage(msg); if (logging != null) { long wallTime = SystemClock.currentTimeMicro() - wallStart; long threadTime = SystemClock.currentThreadTimeMicro() - threadStart; logging.println("<<<<< Finished to " + msg.target + " " + msg.callback); if (logging instanceof Profiler) { ((Profiler) logging).profile(msg, wallStart, wallTime, threadStart, threadTime); } } // Make sure that during the course of dispatching the // identity of the thread wasn't corrupted. final long newIdent = Binder.clearCallingIdentity(); if (ident != newIdent) { Log.wtf(TAG, "Thread identity changed from 0x" + Long.toHexString(ident) + " to 0x" + Long.toHexString(newIdent) + " while dispatching to " + msg.target.getClass().getName() + " " + msg.callback + " what=" + msg.what); } msg.recycle(); } } }


三、总结与相关源码
通过上述两个Demo和Looper相关源码的分析,我们可以知道Looper作为一个循环机制它的作用就是初始化线程和将Handler与该线程关联的工作,以及管理,维护整个消息循环的机制。但是具体的发送消息还有处理消息都是靠Handler和Message来完成的。所以在一个新诞生的线程中,Looper都会关联到这个Thread,以及它的MessageQueue和Handler.
源码下载:
http://download.csdn.net/detail/xukunhui2/6656293