通过前两篇对Okhttp使用的介绍,我们大致对Okhttp有了初步了解。这篇文章我们就深入地分析一下Okhttp的原理,看一下源码是如何实现的。
1.从请求处理开始分析
当我们要请求网络的时候我们需要用OkHttpClient.newCall(request)进行execute或者enqueue操作,当我们调用newCall时:
 /**
   * Prepares the {@code request} to be executed at some point in the future.
   */
  @Override public Call newCall(Request request) {
    return new RealCall(this, request);
  }
实际返回的是一个RealCall类,我们调用enqueue异步请求网络实际上是调用了RealCall的enqueue方法:
 void enqueue(Callback responseCallback, boolean forWebSocket) {
    synchronized (this) {
      if (executed) throw new IllegalStateException("Already Executed");
      executed = true;
    }
    client.dispatcher().enqueue(new AsyncCall(responseCallback, forWebSocket));
  }
可以看到最终的请求是dispatcher来完成的。dispatcher就是任务调度器。
2.Dispatcher任务调度
主要的变量
Dispatcher主要用于控制并发的请求,它主要维护了以下变量:
/** 最大并发请求数*/
private int maxRequests = 64;
/** 每个主机最大请求数*/
private int maxRequestsPerHost = 5;
/** 消费者线程池 */
private ExecutorService executorService;
/** 将要运行的异步请求队列 */
private final Deque<AsyncCall> readyAsyncCalls = new ArrayDeque<>();
/**正在运行的异步请求队列 */
private final Deque<AsyncCall> runningAsyncCalls = new ArrayDeque<>();
/** 正在运行的同步请求队列 */
private final Deque<RealCall> runningSyncCalls = new ArrayDeque<>();
构造函数
public Dispatcher(ExecutorService executorService) {
   this.executorService = executorService;
 }
 public Dispatcher() {
 }
 public synchronized ExecutorService executorService() {
   if (executorService == null) {
     executorService = new ThreadPoolExecutor(0, Integer.MAX_VALUE, 60, TimeUnit.SECONDS,
         new SynchronousQueue<Runnable>(), Util.threadFactory("OkHttp Dispatcher", false));
   }
   return executorService;
}Dispatcher有两个构造函数,可以使用自己设定线程池,如果没有设定线程池则会在请求网络前自己创建线程池,这个线程池类似于CachedThreadPool比较适合执行大量的耗时比较少的任务。关于线程池相关的知识可以查看:文章Android多线程(一)线程池(http://blog.csdn.net/itachi85/article/details/44874511),其中用到了SynchronousQueue,不了解它的同学可以查看Java并发编程(六)阻塞队列这篇文章(http://blog.csdn.net/itachi85/article/details/52036684)。
异步请求
 synchronized void enqueue(AsyncCall call) {
    if (runningAsyncCalls.size() < maxRequests && runningCallsForHost(call) < maxRequestsPerHost) {
      runningAsyncCalls.add(call);
      executorService().execute(call);
    } else {
      readyAsyncCalls.add(call);
    }
  }
很明显,这段代码说了当正在运行的异步请求队列中的数量小于64并且正在运行的请求主机数小于5时则把请求加载到runningAsyncCalls中并在线程池中执行,否则就再入到readyAsyncCalls中进行缓存等待。
AsyncCall
线程池中传进来的参数就是AsyncCall它是RealCall的内部类,内部也实现了execute方法:
@Override protected void execute() {
  boolean signalledCallback = false;
  try {
    Response response = getResponseWithInterceptorChain(forWebSocket);
    if (canceled) {
      signalledCallback = true;
      responseCallback.onFailure(RealCall.this, new IOException("Canceled"));
    } else {
      signalledCallback = true;
      responseCallback.onResponse(RealCall.this, response);
    }
  } catch (IOException e) {
    if (signalledCallback) {
      // Do not signal the callback twice!
      logger.log(Level.INFO, "Callback failure for " + toLoggableString(), e);
    } else {
      responseCallback.onFailure(RealCall.this, e);
    }
  } finally {
    client.dispatcher().finished(this);
  }
}
首先我们来看看最后一行, 无论这个请求的结果如何都会执行client.dispatcher().finished(this);
synchronized void finished(AsyncCall call) {
   if (!runningAsyncCalls.remove(call)) throw new AssertionError("AsyncCall wasn't running!");
   promoteCalls();
 }
finished方法将此次请求从runningAsyncCalls移除后还执行了promoteCalls方法:
private void promoteCalls() {
  if (runningAsyncCalls.size() >= maxRequests) return; // Already running max capacity.
  if (readyAsyncCalls.isEmpty()) return; // No ready calls to promote.
  for (Iterator<AsyncCall> i = readyAsyncCalls.iterator(); i.hasNext(); ) {
    AsyncCall call = i.next();
    if (runningCallsForHost(call) < maxRequestsPerHost) {
      i.remove();
      runningAsyncCalls.add(call);
      executorService().execute(call);
    }
    if (runningAsyncCalls.size() >= maxRequests) return; // Reached max capacity.
  }
}
可以看到最关键的点就是会从readyAsyncCalls取出下一个请求,并加入runningAsyncCalls中并交由线程池处理。好了让我们再回到上面的AsyncCall的execute方法,我们会发getResponseWithInterceptorChain方法返回了Response,很明显这是在请求网络。
3.Interceptor拦截器
private Response getResponseWithInterceptorChain(boolean forWebSocket) throws IOException {
  Interceptor.Chain chain = new ApplicationInterceptorChain(0, originalRequest, forWebSocket);
  return chain.proceed(originalRequest);
}
getResponseWithInterceptorChain方法,创建了ApplicationInterceptorChain,它是一个拦截器链,这个类也是RealCall的内部类,接下来执行了它的proceed方法:
@Override public Response proceed(Request request) throws IOException {
// If there's another interceptor in the chain, call that.
if (index < client.interceptors().size()) {
Interceptor.Chain chain = new ApplicationInterceptorChain(index + 1, request, forWebSocket);
//从拦截器列表取出拦截器
Interceptor interceptor = client.interceptors().get(index);
Response interceptedResponse = interceptor.intercept(chain);
if (interceptedResponse == null) {
throw new NullPointerException("application interceptor " + interceptor
+ " returned null");
}
return interceptedResponse;
}
// No more interceptors. Do HTTP.
return getResponse(request, forWebSocket);
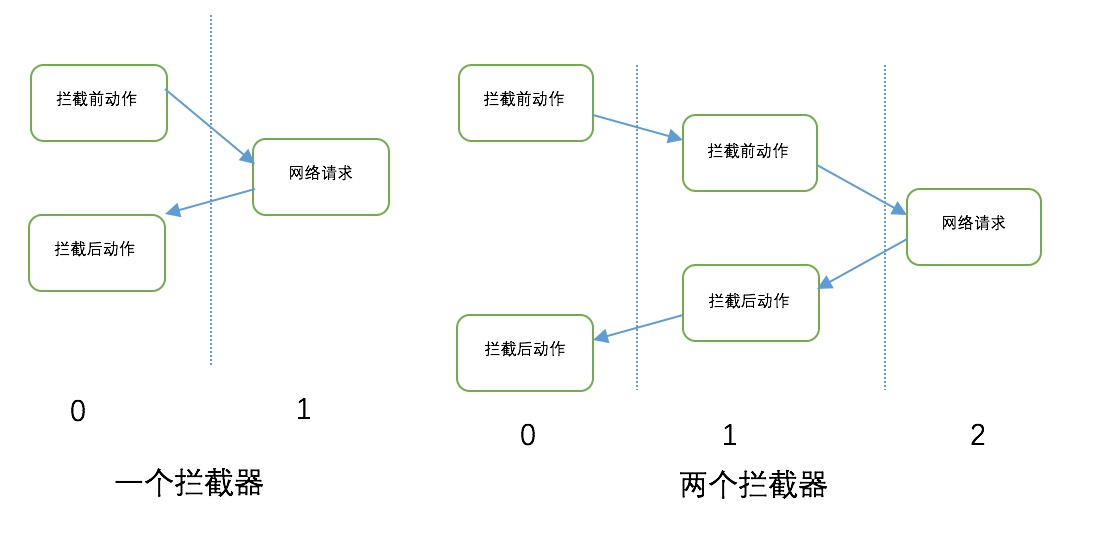
}proceed方法每次从拦截器列表中取出拦截器,当存在多个拦截器时都会在第七行阻塞,并等待下一个拦截器的调用返回。下面分别以 拦截器链中有1个、2个拦截器的场景加以模拟:
拦截器主要用来观察,修改以及可能短路的请求输出和响应的回来。通常情况下拦截器用来添加,移除或者转换请求或者响应的头部信息。比如将域名替换为ip地址,将请求头中添加host属性,也可以添加我们应用中的一些公共参数,比如设备id、版本号等等。 不了解拦截器的可以查看Okhttp-wiki 之 Interceptors 拦截器这篇文章。
回到代码上来,我们看最后一行 return getResponse(request, forWebSocket),如果没有更多的拦截器的话,就会执行网络请求,来看看getResponse方法做了些什么(RealCall.java):
Response getResponse(Request request, boolean forWebSocket) throws IOException {
 ...省略
    // Create the initial HTTP engine. Retries and redirects need new engine for each attempt.
    engine = new HttpEngine(client, request, false, false, forWebSocket, null, null, null);
    int followUpCount = 0;
    while (true) {
      if (canceled) {
        engine.releaseStreamAllocation();
        throw new IOException("Canceled");
      }
      boolean releaseConnection = true;
      try {
        engine.sendRequest();
        engine.readResponse();
        releaseConnection = false;
      } catch (RequestException e) {
        // The attempt to interpret the request failed. Give up.
        throw e.getCause();
      } catch (RouteException e) {
        // The attempt to connect via a route failed. The request will not have been sent.
  ...省略
    }
  }
getResponse方法比较长我省略了一些代码,可以看到创建了HttpEngine类并且调用HttpEngine的sendRequest方法和readResponse方法。
4.缓存策略
我们先来看看sendRequest方法:
public void sendRequest() throws RequestException, RouteException, IOException {
   if (cacheStrategy != null) return; // Already sent.
   if (httpStream != null) throw new IllegalStateException();
   //请求头部添加
   Request request = networkRequest(userRequest);
   //获取client中的Cache,同时Cache在初始化的时候会去读取缓存目录中关于曾经请求过的所有信息。
   InternalCache responseCache = Internal.instance.internalCache(client);
   //cacheCandidate为上次与服务器交互缓存的Response
   Response cacheCandidate = responseCache != null
       ? responseCache.get(request)
       : null;
   long now = System.currentTimeMillis();
   //创建CacheStrategy.Factory对象,进行缓存配置
   cacheStrategy = new CacheStrategy.Factory(now, request, cacheCandidate).get();
   //网络请求
   networkRequest = cacheStrategy.networkRequest;
   //缓存的响应
   cacheResponse = cacheStrategy.cacheResponse;
   if (responseCache != null) {
    //记录当前请求是网络发起还是缓存发起
     responseCache.trackResponse(cacheStrategy);
   }
   if (cacheCandidate != null && cacheResponse == null) {
     closeQuietly(cacheCandidate.body()); // The cache candidate wasn't applicable. Close it.
   }
   //不进行网络请求并且缓存不存在或者过期则返回504错误
   if (networkRequest == null && cacheResponse == null) {
     userResponse = new Response.Builder()
         .request(userRequest)
         .priorResponse(stripBody(priorResponse))
         .protocol(Protocol.HTTP_1_1)
         .code(504)
         .message("Unsatisfiable Request (only-if-cached)")
         .body(EMPTY_BODY)
         .build();
     return;
   }
   // 不进行网络请求,而且缓存可以使用,直接返回缓存
   if (networkRequest == null) {
     userResponse = cacheResponse.newBuilder()
         .request(userRequest)
         .priorResponse(stripBody(priorResponse))
         .cacheResponse(stripBody(cacheResponse))
         .build();
     userResponse = unzip(userResponse);
     return;
   }
   //需要访问网络时
   boolean success = false;
   try {
     httpStream = connect();
     httpStream.setHttpEngine(this);
     if (writeRequestHeadersEagerly()) {
       long contentLength = OkHeaders.contentLength(request);
       if (bufferRequestBody) {
         if (contentLength > Integer.MAX_VALUE) {
           throw new IllegalStateException("Use setFixedLengthStreamingMode() or "
               + "setChunkedStreamingMode() for requests larger than 2 GiB.");
         }
         if (contentLength != -1) {
           // Buffer a request body of a known length.
           httpStream.writeRequestHeaders(networkRequest);
           requestBodyOut = new RetryableSink((int) contentLength);
         } else {
           // Buffer a request body of an unknown length. Don't write request headers until the
           // entire body is ready; otherwise we can't set the Content-Length header correctly.
           requestBodyOut = new RetryableSink();
         }
       } else {
         httpStream.writeRequestHeaders(networkRequest);
         requestBodyOut = httpStream.createRequestBody(networkRequest, contentLength);
       }
     }
     success = true;
   } finally {
     // If we're crashing on I/O or otherwise, don't leak the cache body.
     if (!success && cacheCandidate != null) {
       closeQuietly(cacheCandidate.body());
     }
   }
 }
上面的代码显然是在发送请求,但是最主要的是做了缓存的策略。cacheCandidate是上次与服务器交互缓存的Response,这里的缓存都是基于Map,key是请求中url的md5,value是在文件中查询到的缓存,页面置换基于LRU算法,我们现在只需要知道它是一个可以读取缓存Header的Response即可。根据cacheStrategy的处理得到了networkRequest和cacheResponse这两个值,根据这两个值的数据是否为null来进行进一步的处理,当networkRequest和cacheResponse都为null的情况也就是不进行网络请求并且缓存不存在或者过期,这时候则返回504错误;当networkRequest 为null时也就是不进行网络请求,而且缓存可以使用时则直接返回缓存;其他的情况则请求网络。
接下来我们查看readResponse方法:
public void readResponse() throws IOException {
  ...省略
  else{
    //读取网络响应
    networkResponse = readNetworkResponse();
  }
  //将响应头部存入Cookie中
  receiveHeaders(networkResponse.headers());
  // If we have a cache response too, then we're doing a conditional get.
  if (cacheResponse != null) {
  //检查缓存是否可用,如果可用。那么就用当前缓存的Response,关闭网络连接,释放连接。
    if (validate(cacheResponse, networkResponse)) {
      userResponse = cacheResponse.newBuilder()
          .request(userRequest)
          .priorResponse(stripBody(priorResponse))
          .headers(combine(cacheResponse.headers(), networkResponse.headers()))
          .cacheResponse(stripBody(cacheResponse))
          .networkResponse(stripBody(networkResponse))
          .build();
      networkResponse.body().close();
      releaseStreamAllocation();
      // Update the cache after combining headers but before stripping the
      // Content-Encoding header (as performed by initContentStream()).
      InternalCache responseCache = Internal.instance.internalCache(client);
      responseCache.trackConditionalCacheHit();
      // 更新缓存
      responseCache.update(cacheResponse, stripBody(userResponse));
      userResponse = unzip(userResponse);
      return;
    } else {
      closeQuietly(cacheResponse.body());
    }
  }
  userResponse = networkResponse.newBuilder()
      .request(userRequest)
      .priorResponse(stripBody(priorResponse))
      .cacheResponse(stripBody(cacheResponse))
      .networkResponse(stripBody(networkResponse))
      .build();
  if (hasBody(userResponse)) {
    maybeCache();
    userResponse = unzip(cacheWritingResponse(storeRequest, userResponse));
  }
}
这个方法发起刷新请求头部和请求体,解析HTTP响应头部。如果有缓存并且可用则用缓存的数据并更新缓存,否则就用网络请求返回的数据。同时我们也看到了unzip的身影:
private Response unzip(final Response response) throws IOException {
    if (!transparentGzip || !"gzip".equalsIgnoreCase(userResponse.header("Content-Encoding"))) {
      return response;
    }

    if (response.body() == null) {
      return response;
    }

    GzipSource responseBody = new GzipSource(response.body().source());
    Headers strippedHeaders = response.headers().newBuilder()
        .removeAll("Content-Encoding")
        .removeAll("Content-Length")
        .build();
    return response.newBuilder()
        .headers(strippedHeaders)
        .body(new RealResponseBody(strippedHeaders, Okio.buffer(responseBody)))
        .build();
  }
我们看到了里面的方法是通过解压数据源,然后通过Okio操作数据流,最后重新构建Response对象。这点喝之前httpclick、httpurlconnection和Volley是最大的不同!
我们再来看看validate(cacheResponse, networkResponse)方法是如何判断缓存是否可用的:
/**
   * Returns true if {@code cached} should be used; false if {@code network} response should be
   * used.
   */
  private static boolean validate(Response cached, Response network) {
    if (network.code() == HTTP_NOT_MODIFIED) {
      return true;
    }

    // The HTTP spec says that if the network's response is older than our
    // cached response, we may return the cache's response. Like Chrome (but
    // unlike Firefox), this client prefers to return the newer response.
    Date lastModified = cached.headers().getDate("Last-Modified");
    if (lastModified != null) {
      Date networkLastModified = network.headers().getDate("Last-Modified");
      if (networkLastModified != null
          && networkLastModified.getTime() < lastModified.getTime()) {
        return true;
      }
    }

    return false;
}如缓存过期或者强制放弃缓存,在此情况下,缓存策略全部交给服务器判断,客户端只用发送条件get请求即可,如果缓存是有效的,则返回304 Not Modifiled,否则直接返回body。条件get请求有两种方式一种是Last-Modified-Date,一种是 ETag。这里采用了Last-Modified-Date,通过缓存和网络请求响应中的Last-Modified来计算是否是最新数据,如果是则缓存有效。5.失败重连
最后我们再回到RealCall的getResponse方法:
Response getResponse(Request request, boolean forWebSocket) throws IOException {
...省略
    boolean releaseConnection = true;
    try {
      engine.sendRequest();
      engine.readResponse();
      releaseConnection = false;
    } catch (RequestException e) {
      // The attempt to interpret the request failed. Give up.
      throw e.getCause();
    } catch (RouteException e) {
      // The attempt to connect via a route failed. The request will not have been sent.
      HttpEngine retryEngine = engine.recover(e.getLastConnectException(), null);
      if (retryEngine != null) {
        releaseConnection = false;
        engine = retryEngine;
        continue;
      }
      // Give up; recovery is not possible.
      throw e.getLastConnectException();
    } catch (IOException e) {
      // An attempt to communicate with a server failed. The request may have been sent.
      HttpEngine retryEngine = engine.recover(e, null);
      if (retryEngine != null) {
        releaseConnection = false;
        engine = retryEngine;
        continue;
      }
      // Give up; recovery is not possible.
      throw e;
    } finally {
      // We're throwing an unchecked exception. Release any resources.
      if (releaseConnection) {
        StreamAllocation streamAllocation = engine.close();
        streamAllocation.release();
      }
    }
   ...省略
    engine = new HttpEngine(client, request, false, false, forWebSocket, streamAllocation, null,
        response);
  }
}
查看代码第11行和21行当发生IOException或者RouteException时会执行HttpEngine的recover方法:
 /**
   * Report and attempt to recover from a failure to communicate with a server. Returns a new HTTP
   * engine that should be used for the retry if {@code e} is recoverable, or null if the failure is
   * permanent. Requests with a body can only be recovered if the body is buffered.
   */
  public HttpEngine recover(IOException e, Sink requestBodyOut) {
    if (!streamAllocation.recover(e, requestBodyOut)) {
      return null;
    }

    if (!client.retryOnConnectionFailure()) {
      return null;
    }

    StreamAllocation streamAllocation = close();

    // For failure recovery, use the same route selector with a new connection.
    return new HttpEngine(client, userRequest, bufferRequestBody, callerWritesRequestBody,
        forWebSocket, streamAllocation, (RetryableSink) requestBodyOut, priorResponse);
  }
最后一行可以看到就是重新创建了HttpEngine并返回,用来完成重连。
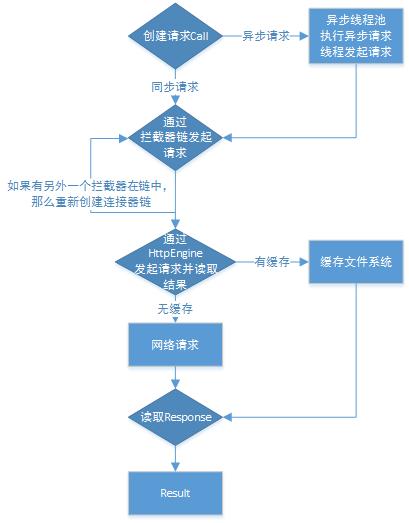
到这里OkHttp请求网络的流程基本上讲完了,下面是关于OKHttp的请求流程图:
文章参考:
http://liuwangshu.cn/application/network/7-okhttp3-sourcecode.html
http://www.jianshu.com/p/aad5aacd79bf
http://www.jianshu.com/p/64e256c1dbbf
http://www.cnblogs.com/LuLei1990/p/5534791.html
http://frodoking.github.io/2015/03/12/android-okhttp/