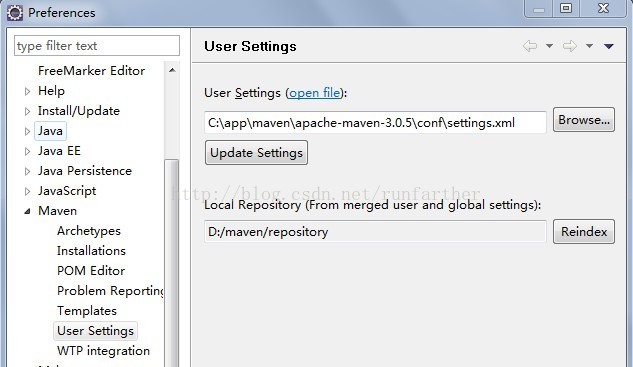
一、在eclipse中设置maven的setting文件位置,指向你下载的maven目录中,仓库会自动生成。
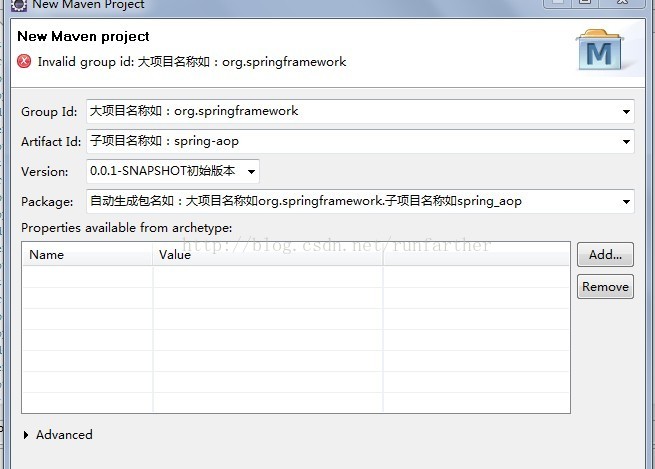
一、在eclipse中创建maven工程,注意几项:
选择Artifact ID为maven-archetype-webapp的一项

二、创建目录结构:工程右键:new-Source Folder,创建如下几个目录
1、src/main/java
2、src/test/java
3、src/test/resources
三、依次设置java,resources目录的class输出目录,工程右键:build path-Source,双击Source Folder,在弹出框中选择输出的目录。
同时要选上Allow output folders for source folders.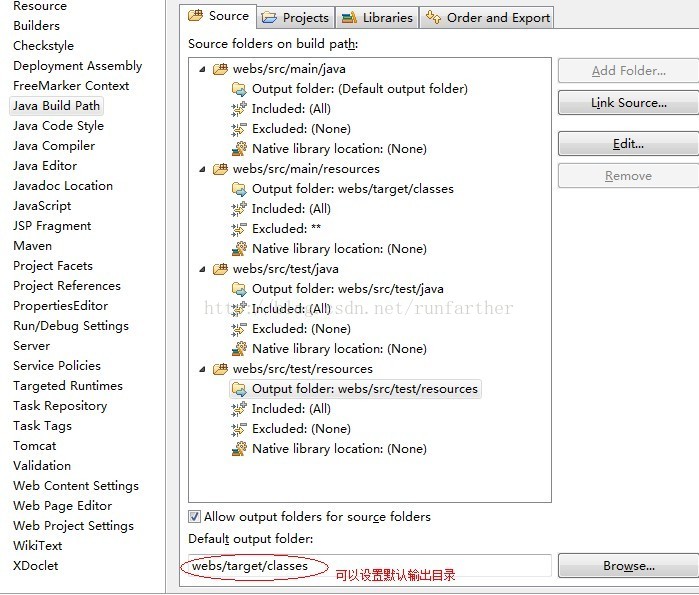
四、 把项目转成Dynamic Web项目
右键项目,选择Project Facets,点击Convert to faceted from
配置Project Facets
选择java且版本1.6,勾选Dynamic Web Module的Version为2.5。(3.0为Java7的)。
如果提示错误,可能需要在Java Compiler设置Compiler compliance level 为1.6。或者需要在此窗口的Java的Version改成1.6。
另:如果报错 cannot ….. Dynamic Web Module to 2.5打开项目根目录下的.setting文件夹下的org.eclipse.wst.common.project.facet.core.xml文件手动修改版本
<faceted-project>
<fixed facet="wst.jsdt.web"/>
<installed facet="java" version="1.6"/><编译器1.6版,运行的JDK版本不能低于编译的版本>
<installed facet="jst.web" version="2.5"/><servlet2.5版>
<installed facet="wst.jsdt.web" version="1.0"/>
</faceted-project>
------------------------------------------------以下4行可忽略
配置 Modify Faceted Project
点击Further configuration available…,弹出Modify Faceted Project窗口
此处是设置web.xml文件的路径,我们输入src/main/webapp。
Generate web.xml deployment descriptor自动生成web.xml文件,可选可不选。
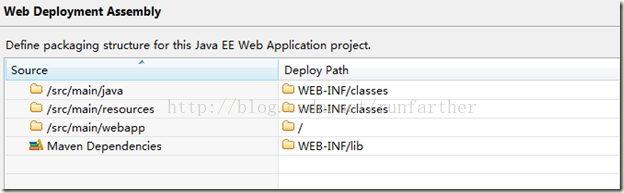
--------------------------------------------------------------五、设置项目部署时文件发布的目录位置
在右键项目打开此窗口。在左侧列表中会出现一个Deployment Assembly,点击进去后,如下图:

1,需要删除test的两项,因为test是测试使用,并不需要部署。
2,设置将Maven的jar包发布到lib下。
Add -> Java Build Path Entries -> Maven Dependencies -> Finish
设置完成后的效果图
六、向maven项目添加jar包
6.1 在pom.xml中添加所需要的jar包
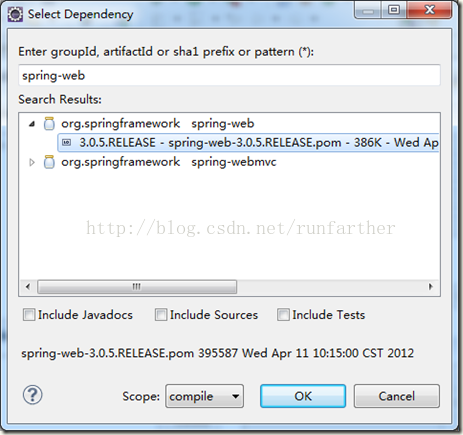
使用Maven POM editor打开项目中的pom.xml文件,选择Dependencies,在Dependencies栏目点击Add进行,首先弹出一个搜索按钮,例如输入spring-web,就会自动搜索关于spring-web相关的jar包,我们选择3.0.5版本的spring。将spring包全部添加进来。需要添加的其他jar包有:junit、jstl。或者点击pom.xml直接编辑pom.xml文件。这样可以直接copy过来dependencies内容。
6.2设置jar包的scope

当添加进入一个jar包后,有一些属性需要设置,最重要的就是scope,它有以下几种取值:
1. compile,缺省值,适用于所有阶段,会随着项目一起发布。
2. provided,类似compile,期望JDK、容器或使用者会提供这个依赖。如servlet.jar。
3. runtime,只在运行时使用,如JDBC驱动,适用运行和测试阶段。
4. test,只在测试时使用,用于编译和运行测试代码。不会随项目发布。
5. system,类似provided,需要显式提供包含依赖的jar,Maven不会在 Repository中查找它。
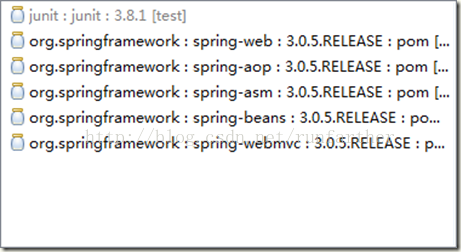
通常SpringMVC项目所需要配置scope的jar包如下图:
有的时候发现servlet-api还是被打包到lib下面了,此时肯定会报错。就需要把maven插件中的WTP也安装一下。
Eclipse在线安装路径:http://m2eclipse.sonatype.org/sites/m2e-extras。选择for Eclipse WTP。
-------------------------------------------------------------------------------------------------以下搭建spring框架部分可忽略
七、 构建SpringMVC框架7.1 编辑web.xml文件
需要添加log4j,字符过滤,Spring 的dispatcher等。
webx.xml代码如下:
Xml代码
<?xml version=<span class="str" style="color:#06080;margin:0px; padding:0px; line-height:1.5;">"1.0"</span> encoding=<span class="str" style="color:#06080;margin:0px; padding:0px; line-height:1.5;">"UTF-8"</span>?>
<web-app xmlns=<span class="str" style="color:#06080;margin:0px; padding:0px; line-height:1.5;">"http://java.sun.com/xml/ns/javaee"</span>
         xmlns:xsi=<span class="str" style="color:#06080;margin:0px; padding:0px; line-height:1.5;">"http://www.w3.org/2001/XMLSchema-instance"</span>
         xsi:schemaLocation=<span class="str" style="color:#06080;margin:0px; padding:0px; line-height:1.5;">"http://java.sun.com/xml/ns/javaee
                             http://java.sun.com/xml/ns/javaee/web-app_2_5.xsd"</span>
         version=<span class="str" style="color:#06080;margin:0px; padding:0px; line-height:1.5;">"2.5"</span> >

    <context-param>
        <param-name></param-name>
        <param-<span class="kwrd" style="color:#00ff;margin:0px; padding:0px; line-height:1.5;">value</span>></param-<span class="kwrd" style="color:#00ff;margin:0px; padding:0px; line-height:1.5;">value</span>>
    </context-param>

    <!-- Spring的log4j监听器 -->
    <listener>
        <listener-<span class="kwrd" style="color:#00ff;margin:0px; padding:0px; line-height:1.5;">class</span>>org.springframework.web.util.Log4jConfigListener</listener-<span class="kwrd" style="color:#00ff;margin:0px; padding:0px; line-height:1.5;">class</span>>
    </listener>

    <!-- 字符集 过滤器  -->
    <filter>
        <filter-name>CharacterEncodingFilter</filter-name>
        <filter-<span class="kwrd" style="color:#00ff;margin:0px; padding:0px; line-height:1.5;">class</span>>org.springframework.web.filter.CharacterEncodingFilter</filter-<span class="kwrd" style="color:#00ff;margin:0px; padding:0px; line-height:1.5;">class</span>>
        <init-param>
            <param-name>encoding</param-name>
            <param-<span class="kwrd" style="color:#00ff;margin:0px; padding:0px; line-height:1.5;">value</span>>UTF-8</param-<span class="kwrd" style="color:#00ff;margin:0px; padding:0px; line-height:1.5;">value</span>>
        </init-param>
        <init-param>
            <param-name>forceEncoding</param-name>
            <param-<span class="kwrd" style="color:#00ff;margin:0px; padding:0px; line-height:1.5;">value</span>><span class="kwrd" style="color:#00ff;margin:0px; padding:0px; line-height:1.5;">true</span></param-<span class="kwrd" style="color:#00ff;margin:0px; padding:0px; line-height:1.5;">value</span>>
        </init-param>
    </filter>
    <filter-mapping>
        <filter-name>CharacterEncodingFilter</filter-name>
        <url-pattern>/*</url-pattern>
    </filter-mapping>

    <!-- Spring view分发器 -->
    <servlet>
        <servlet-name>dispatcher</servlet-name>
        <servlet-<span class="kwrd" style="color:#00ff;margin:0px; padding:0px; line-height:1.5;">class</span>>org.springframework.web.servlet.DispatcherServlet</servlet-<span class="kwrd" style="color:#00ff;margin:0px; padding:0px; line-height:1.5;">class</span>>
        <init-param>
            <param-name>contextConfigLocation</param-name>
            <param-<span class="kwrd" style="color:#00ff;margin:0px; padding:0px; line-height:1.5;">value</span>>/WEB-INF/dispatcher-servlet.xml</param-<span class="kwrd" style="color:#00ff;margin:0px; padding:0px; line-height:1.5;">value</span>>
        </init-param>
        <load-on-startup>1</load-on-startup>
    </servlet>
    <servlet-mapping>
        <servlet-name>dispatcher</servlet-name>
        <url-pattern>*.<span class="kwrd" style="color:#00ff;margin:0px; padding:0px; line-height:1.5;">do</span></url-pattern>
    </servlet-mapping>

</web-app>
<span style="font-family:Verdana,Arial,Helvetica,sans-serif;color:#333333;background-color:rgb(245,250,254); font-size:13px">
</span><span style="font-family:Verdana,Arial,Helvetica,sans-serif;color:#333333;background-color:rgb(245,250,254); font-size:13px">7.2 编写Spring配置文件dispatcher-servlet.xml</span>如要添加MVC驱动、注解检测、视图解析等。dispatcher-servlet.xml代码如下:
Xml代码
<?xml version=<span class="str" style="color:#06080;margin:0px; padding:0px; line-height:1.5;">"1.0"</span> encoding=<span class="str" style="color:#06080;margin:0px; padding:0px; line-height:1.5;">"UTF-8"</span>?>
<beans xmlns=<span class="str" style="color:#06080;margin:0px; padding:0px; line-height:1.5;">"http://www.springframework.org/schema/beans"</span>
       xmlns:aop=<span class="str" style="color:#06080;margin:0px; padding:0px; line-height:1.5;">"http://www.springframework.org/schema/aop"</span>
       xmlns:context=<span class="str" style="color:#06080;margin:0px; padding:0px; line-height:1.5;">"http://www.springframework.org/schema/context"</span>
       xmlns:mvc=<span class="str" style="color:#06080;margin:0px; padding:0px; line-height:1.5;">"http://www.springframework.org/schema/mvc"</span>
       xmlns:tx=<span class="str" style="color:#06080;margin:0px; padding:0px; line-height:1.5;">"http://www.springframework.org/schema/tx"</span>
       xmlns:xsi=<span class="str" style="color:#06080;margin:0px; padding:0px; line-height:1.5;">"http://www.w3.org/2001/XMLSchema-instance"</span>
       xsi:schemaLocation=<span class="str" style="color:#06080;margin:0px; padding:0px; line-height:1.5;">"http://www.springframework.org/schema/aop
        http://www.springframework.org/schema/aop/spring-aop-3.0.xsd
        http://www.springframework.org/schema/beans
        http://www.springframework.org/schema/beans/spring-beans-3.0.xsd
        http://www.springframework.org/schema/context
        http://www.springframework.org/schema/context/spring-context-3.0.xsd
        http://www.springframework.org/schema/mvc
        http://www.springframework.org/schema/mvc/spring-mvc-3.0.xsd
        http://www.springframework.org/schema/tx
        http://www.springframework.org/schema/tx/spring-tx-3.0.xsd"</span>>

    <mvc:annotation-driven />
    <context:component-scan <span class="kwrd" style="color:#00ff;margin:0px; padding:0px; line-height:1.5;">base</span>-package=<span class="str" style="color:#06080;margin:0px; padding:0px; line-height:1.5;">"com.xujj"</span> />

    <bean <span class="kwrd" style="color:#00ff;margin:0px; padding:0px; line-height:1.5;">class</span>=<span class="str" style="color:#06080;margin:0px; padding:0px; line-height:1.5;">"org.springframework.web.servlet.view.InternalResourceViewResolver"</span>>
        <property name=<span class="str" style="color:#06080;margin:0px; padding:0px; line-height:1.5;">"prefix"</span> <span class="kwrd" style="color:#00ff;margin:0px; padding:0px; line-height:1.5;">value</span>=<span class="str" style="color:#06080;margin:0px; padding:0px; line-height:1.5;">"/WEB-INF/views/"</span> />
        <property name=<span class="str" style="color:#06080;margin:0px; padding:0px; line-height:1.5;">"suffix"</span> <span class="kwrd" style="color:#00ff;margin:0px; padding:0px; line-height:1.5;">value</span>=<span class="str" style="color:#06080;margin:0px; padding:0px; line-height:1.5;">".jsp"</span> />
    </bean>

</beans>
-------------------------------------------------------------------------------------------------以上为可忽略部分
1、在tomcat中的conf的tomcat_users.xml中创建管理用户和密码,一般选manager-script,在pom.xml中的tomcat插件中用text,否则可能出现403错误
<role rolename="manager-script"/>
<user username="admin" password="password" roles="manager-script"/>
</tomcat-users>
【
tomcat role changed:
Note that for Tomcat 7 onwards, the roles required to use the manager application were changed from the single manager role to the following four roles. You will need to assign the role(s) required for the functionality you wish to access.
manager-gui - allows access to the HTML GUI and the status pages
manager-script - allows access to the text interface and the status pages
manager-jmx - allows access to the JMX proxy and the status pages
manager-status - allows access to the status pages only
只用manager-gui role即可。
】
2、启动tomcat,然后访问 http://localhost:8080/manager/html,输入admin/password,如果tomcat默认界面,表示tomcat一切OK,然后才可以继续后面操作。
3、在项目根据目录中的pom.xml文件中的build中配置tomcat插件
<plugins>
<plugin>
<groupId>org.codehaus.mojo</groupId>
<artifactId>tomcat-maven-plugin</artifactId>
<version>1.1</version>
<configuration>
<url>http://localhost:8080/manager/text</url>
<!--
2、deploy:eg http://localhost:8080/manager/deploy?path=/phoenix&war=&update=true
but the deploy url does not find.
the warning is as follows:
The page you tried to access (/manager/deploy) does not exist.
The Manager application has been re-structured for Tomcat 7 onwards and some of URLs have changed. All URLs used to access the Manager application should now start with one of the following options:
/manager/html for the HTML GUI
/manager/text for the text interface
/manager/jmxproxy for the JMX proxy
/manager/status for the status pages
-->
<username>admin</username>
<password>admin</password>
<path>/baseinfo</path>
</configuration>
</plugin>
【
1、执行tomcat:deploy时出现以下错误,是由于tomcat-users中配置的用户名或者密码与pom.xml中的不一致
Failed to execute goal org.codehaus.mojo:tomcat-maven-plugin:1.1:deploy (default-cli) on project webs: Cannot invoke Tomcat manager: Server returned HTTP response code: 401 for URL: http://localhost:8080/manager/text/deploy?path=%2Fwebs&war= -> [Help 1]
重启tomcat,再次执行命令
2、必须启动tomcat后再执行tomcat:deploy或者tomcat:redeploy,否则报连接被拒绝的错误信息
Cannot invoke Tomcat manager: Connection refused: connect
3、403错误是因为tomcat的角色设置问题,修改角色名即可
】
再打开tomcat的webapps目录,已经将项目部署到该文件夹中,浏览器打开页面测试成功。
记录配置中涉及到的相关插件和知识:
1、有提到使用maven-war-plugin插件来生成war,但不使用该插件在tomcat中同样生成了项目的war包,
<plugin>
<groupId>org.apache.maven.plugins</groupId>
<artifactId>maven-war-plugin</artifactId>
<version>2.1.1</version>
<configuration>
<packagingExcludes>WEB-INF/web.xml</packagingExcludes>
</configuration>
</plugin>
2、第一个项目在pom.xml中配置了以下节点,不知是否可省略
<repositories><repository>
<id>people.apache.snapshots</id>
<url>http://repository.apache.org/content/groups/snapshots-group/</url>
<releases>
<enabled>false</enabled>
</releases>
<snapshots>
<enabled>true</enabled>
</snapshots>
</repository>
</repositories>
<pluginRepositories>
<pluginRepository>
<id>apache.snapshots</id>
<name>Apache Snapshots</name>
<url>
http://repository.apache.org/content/groups/snapshots-group/
</url>
<releases>
<enabled>false</enabled>
</releases>
<snapshots>
<enabled>true</enabled>
</snapshots>
</pluginRepository>
</pluginRepositories>