版权声明:本文为博主原创文章,未经博主允许不得转载。 https://blog.csdn.net/YhL_Leo/article/details/50593825
本系列文章由 @yhl_leo 出品,转载请注明出处。
文章链接: http://blog.csdn.net/yhl_leo/article/details/50593825
首先看一下Rect对象的定义:
typedef Rect_<int> Rect;再看Rect_的定义:
/*!
  The 2D up-right rectangle class

  The class represents a 2D rectangle with coordinates of the specified data type.
  Normally, cv::Rect ~ cv::Rect_<int> is used.
*/
template<typename _Tp> class Rect_
{
public:
    typedef _Tp value_type;

    //! various constructors
    Rect_();
    Rect_(_Tp _x, _Tp _y, _Tp _width, _Tp _height);
    Rect_(const Rect_& r);
    Rect_(const CvRect& r);
    Rect_(const Point_<_Tp>& org, const Size_<_Tp>& sz);
    Rect_(const Point_<_Tp>& pt1, const Point_<_Tp>& pt2);

    Rect_& operator = ( const Rect_& r );
    //! the top-left corner
    Point_<_Tp> tl() const;
    //! the bottom-right corner
    Point_<_Tp> br() const;

    //! size (width, height) of the rectangle
    Size_<_Tp> size() const;
    //! area (width*height) of the rectangle
    _Tp area() const;

    //! conversion to another data type
    template<typename _Tp2> operator Rect_<_Tp2>() const;
    //! conversion to the old-style CvRect
    operator CvRect() const;

    //! checks whether the rectangle contains the point
    bool contains(const Point_<_Tp>& pt) const;

    _Tp x, y, width, height; //< the top-left corner, as well as width and height of the rectangle
};从上面的定义至少可以发现两点:一,类Rect_的类模板中的数据类型_Tp在Rect_<int>中被指定为整型;二,从Rect_的构造函数可以看出,其形参列表一共有6种形式:
Rect_(),形参列表为空,即定义一个空窗口(默认值为:x=y=width=height=0);Rect_(_Tp _x, _Tp _y, _Tp _width, _Tp _height),定义一个左上角点坐标为(_x, _y)的_width*_height矩形窗口;Rect_(const Rect_& r),使用其他的Rect_对象初始化;Rect_(const CvRect& r),使用CvRect对象初始化;Rect_(const Point_<_Tp>& org, const Size_<_Tp>& sz),分别将位置坐标(_x, _y)和窗口大小(_width, _height)用Point_和Size_对象初始化;Rect_(const Point_<_Tp>& pt1, const Point_<_Tp>& pt2),分别将坐标位置(_x, _y)和窗口大小(_width, _height)用Point_和Point_对象初始化。
在OpenCV库中,图像像素坐标与所在行列数的对应关系为:
x -> col, y -> row, width -> cols, height -> rows
下面给出一段代码,基本可以把Rect的常见用法涵盖:
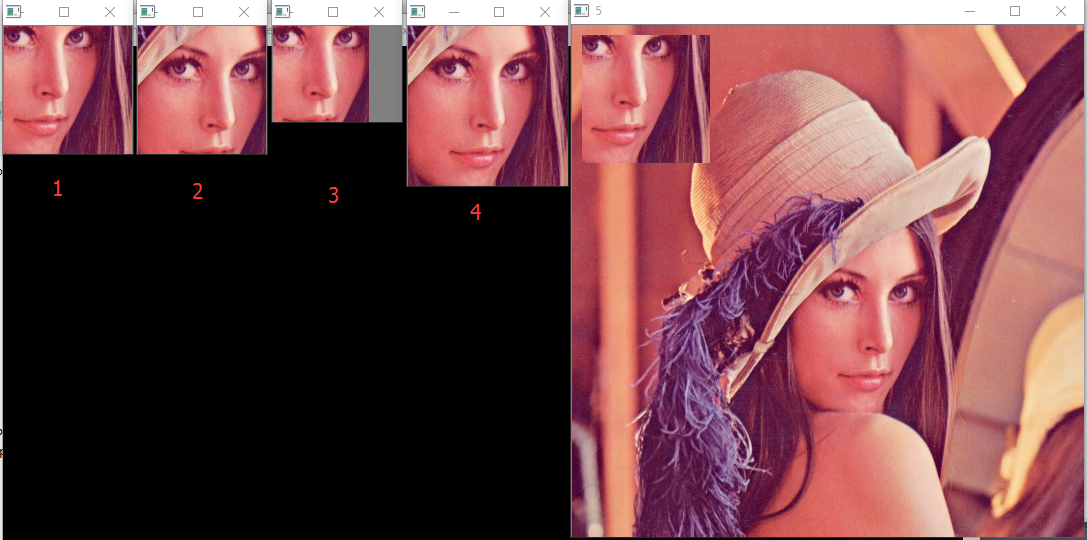
Mat image = imread("C:\\Users\\Leo\\Desktop\\lena.jpg");
Rect rect1(256, 256, 128, 128);
Rect rect2(224, 224, 128, 128);

Mat roi1;
image(rect1).copyTo(roi1); // copy the region rect1 from the image to roi1
imshow("1", roi1);
waitKey(0);

Mat roi2;
image(rect2).copyTo(roi2); // copy the region rect2 from the image to roi2
imshow("2", roi2);
waitKey(0);

cv::Rect rect3 = rect1&rect2; // intersection of the two sets
Mat roi3;
image(rect3).copyTo(roi3);
imshow("3", roi3);
waitKey(0);

Rect rect4 = rect1|rect2; // union of the two sets (the minimum bounding rectangle)
Mat roi4;
image(rect4).copyTo(roi4);
imshow("4", roi4);
waitKey(0);

Rect rect5(10, 10, 128, 128);
roi1.copyTo(image(rect5)); // copy the region rect1 to the designated region in the image
imshow("5", image);
waitKey(0);
结果为:
相应代码,可以在Github账户中下载:yhlleo。