分别在Linux和windows上安装mysql8.*
环境
- CentOS7 安装mysql8 步骤;
- window下的Navicat 连接MySql8;
第一部分 CentOS7安装mysql8
1.1 安装前清理工作;
1.1.1 清理原有的mysql数据库;
使用以下命令查找出安装的mysql软件包和依赖包:
rpm -pa | grep mysql
显示结果如下:
    mysql80-community-release-el7-1.noarch
    mysql-community-server-8.0.11-1.el7.x86_64
    mysql-community-common-8.0.11-1.el7.x86_64
    mysql-community-libs-8.0.11-1.el7.x86_64
    mysql-community-client-8.0.11-1.el7.x86_64
使用以下命令依次删除上面的程序
yum remove mysql-xxx-xxx-
删除mysql的配置文件,卸载不会自动删除配置文件,首先使用如下命令查找出所用的配置文件;
find / -name mysql
或
 whereis mysql
可能的显示结果如下:
/etc/logrotate.d/mysql
/etc/selinux/targeted/active/modules/100/mysql
/etc/selinux/targeted/tmp/modules/100/mysql
/var/lib/mysql
/var/lib/mysql/mysql
/usr/bin/mysql
/usr/lib64/mysql
/usr/local/mysql
根据需求使用以下命令 依次 对配置文件进行删除
rm -rf /var/lib/mysql
注意:卸载后/etc/my.cnf不会删除,需要进行手工删除
rm -rf /etc/my.cnf
1.1.2 删除MariaDB的文件,
由于MySQL在CentOS7中收费了,所以已经不支持MySQL了,取而代之在CentOS7内部集成了mariadb,而安装MySQL的话会和MariaDB的文件冲突,所以需要先卸载掉MariaDB.
使用rpm 命令查找出要删除的mariadb文件;
rpm -pa | grep mariadb
可能的显示结果如下:
mariadb-libs-5.5.56-2.el7.x86_64
删除上面的程序
rpm -e mariadb-libs-5.5.56-2.el7.x86_64
可能出现错误提示如下:
依赖检测失败:
libmysqlclient.so.18()(64bit) 被 (已安裝) postfix-2:2.10.1-6.el7.x86_64 需要
libmysqlclient.so.18(libmysqlclient_18)(64bit) 被 (已安裝) postfix-2:2.10.1-6.el7.x86_64 需要
libmysqlclient.so.18(libmysqlclient_18)(64bit) 被 (已安裝) postfix-2:2.10.1-6.el7.x86_64 需要
使用强制删除:
rpm -e --nodeps mariadb-libs-5.5.56-2.el7.x86_64
至此就将原来有的mysql 和mariadb数据库删除了;
1.2 安装mysql
1.2.1 下面mysql官网提供的mysql repo源
centos的yum 源中默认是没有mysql的,所以我们需要先去官网下载mysql的repo源并安装;
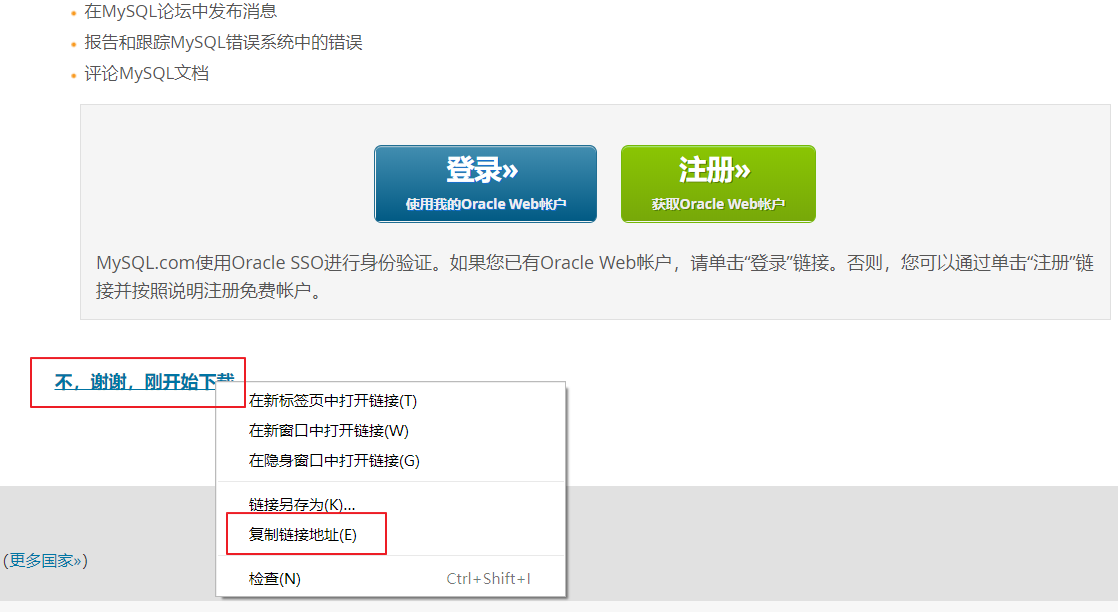
mysql官网下载链接:mysql repo下载地址 如下:

1.22右键复制链接,通过wget下载
wget https://dev.mysql.com/get/mysql80-community-release-el7-1.noarch.rpm

1.2.3 安装 yum repo文件并更新 yum 缓存;
rpm -ivh mysql57-community-release-el7-11.noarch.rpm
执行结果:
会在/etc/yum.repos.d/目录下生成两个repo文件mysql-community.repo mysql-community-source.repo

更新 yum 命令
yum clean all
yum makecache
1.2.4 使用 yum安装mysql
当我们在使用yum安装mysql时,yum默认会从yum仓库中安装mysql最新的GA版本;如何选择自己的版本;
第一步: 查看mysql yum仓库中mysql版本,使用如下命令
yum repolist all | grep mysql
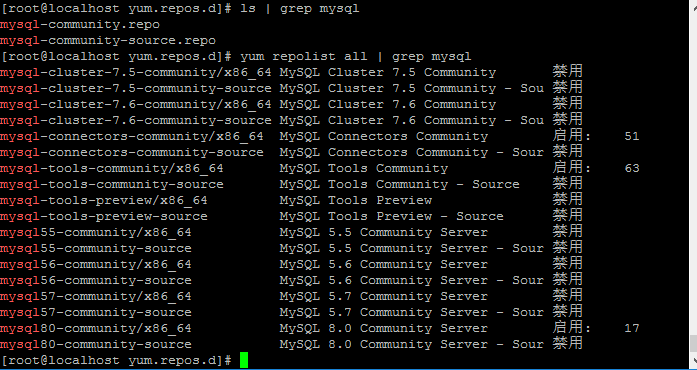
可以看到 MySQL 5.5 5.6 5.7为禁用状态 而MySQL 8.0为启用状态;
第二步 使用 yum-config-manager 命令修改相应的版本为启用状态,其他版本为禁用状态,以mysql8为例
yum-config-manager --enable mysql80-community
或者可以编辑 mysql repo文件,
cat /etc/yum.repos.d/mysql-community.repo
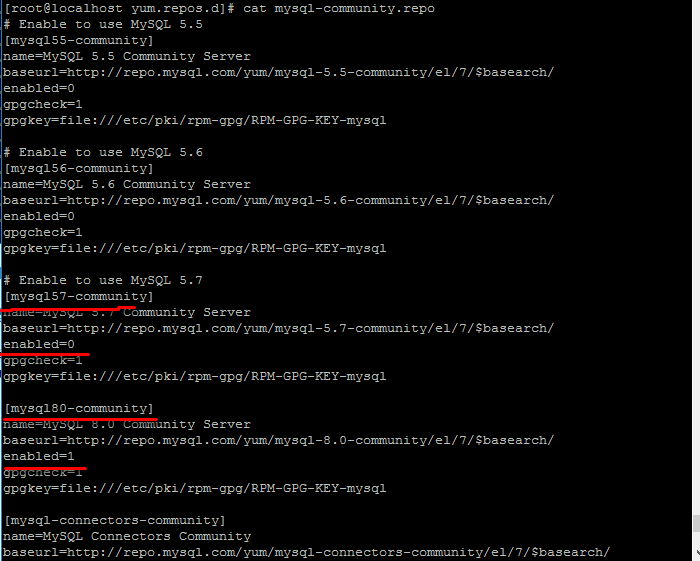
将相应版本下的enabled改成 1 ,其他版本改成 0 即可;
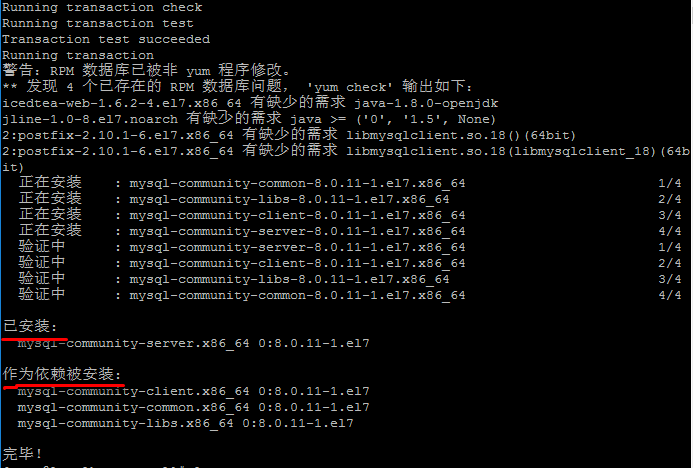
1.2.5 安装mysql 命令如下:
yum install mysql-community-server
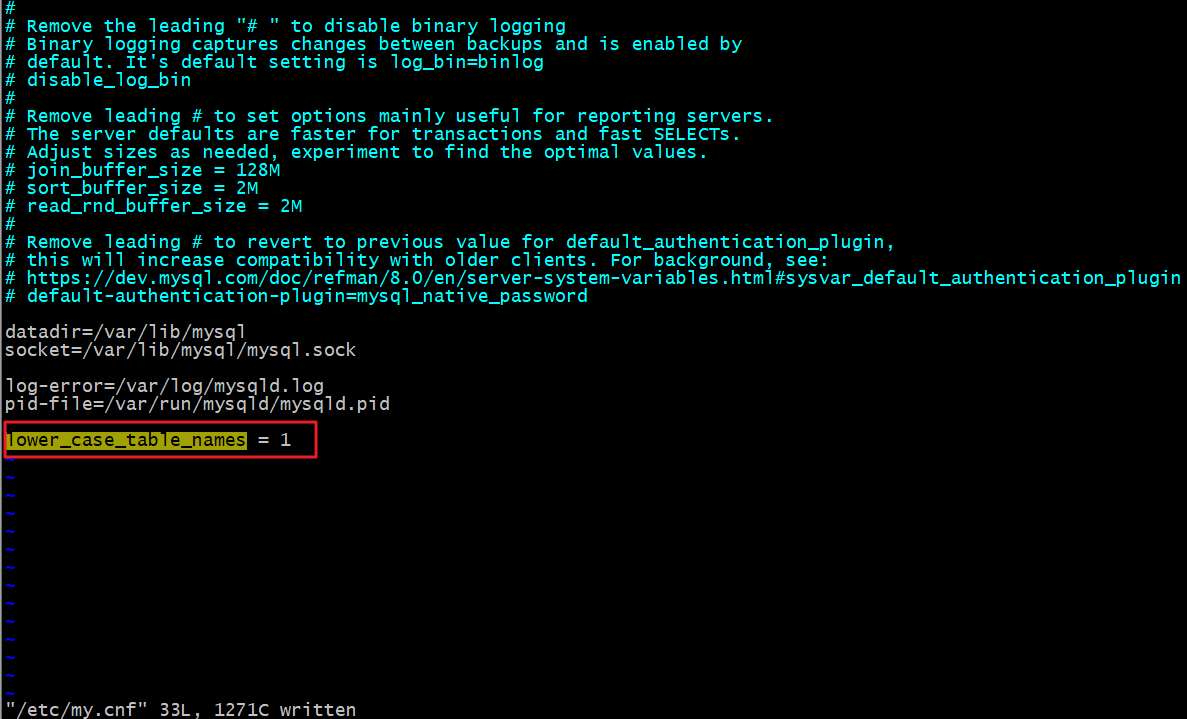
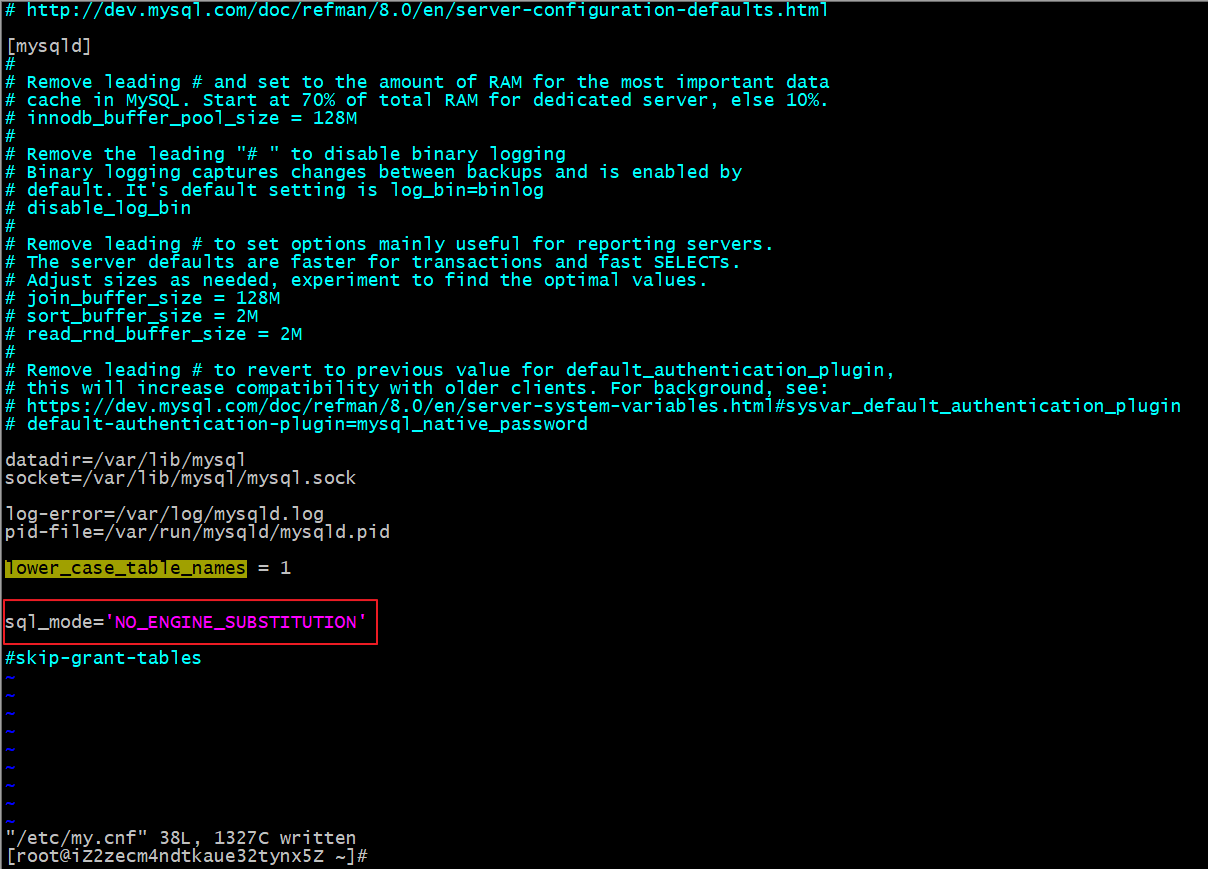
设置mysql不区分大小写
修改配置文件:vim /etc/my.cnf
#添加如下配置:
#只有在安装完成之后,初始化数据库之前,修改my.cnf,然后再初始化数据库才有效
#如果你不在意数据的话直接删除数据
#1 停止MySQL
#2 删除 MySQL的数据  /var/lib/mysql
#3 修改该   lower_case_table_names = 1
#4 启动 mysql
lower_case_table_names = 1
1.2.6 开启mysql 服务
systemctl start mysqld.service
1.2.7 获取初始密码登录mysql
mysql在安装后会创建一个root@locahost账户,并且把初始的密码放到了/var/log/mysqld.log文件中;
cat /var/log/mysqld.log | grep password
或grep 'temporary password' /var/log/mysqld.log
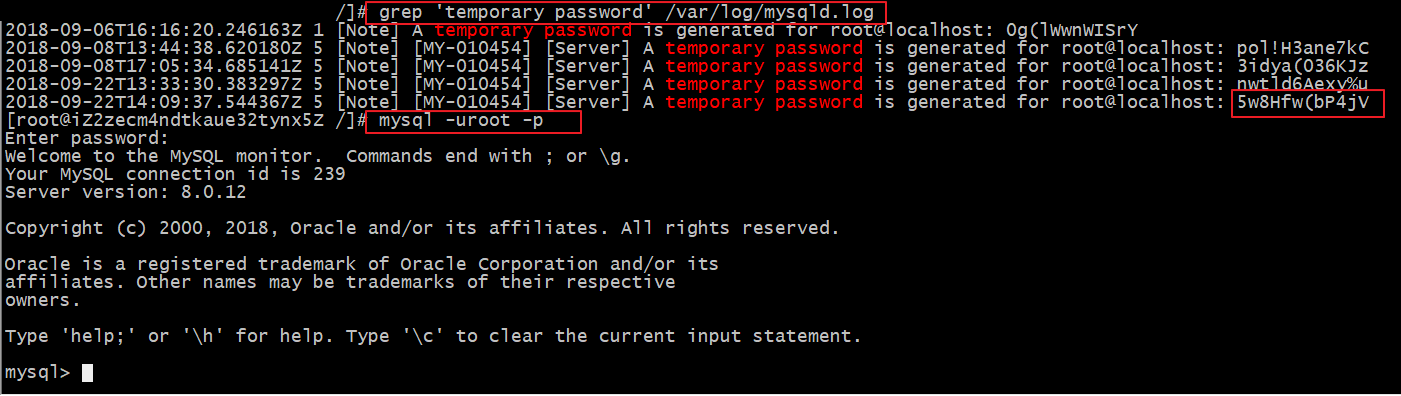
使用初始密码登录mysql ,四个密码最后一个是登陆密码
mysql -u root -p
修改初始密码:
ALTER USER 'root'@'localhost' IDENTIFIED BY 'MyNewPass4!';
mysql新的安全机制要求,mysql的密码必须包含英文大小写、数字以及特殊字符
查看密码策略的相关信息
show variables like ‘%password%’;
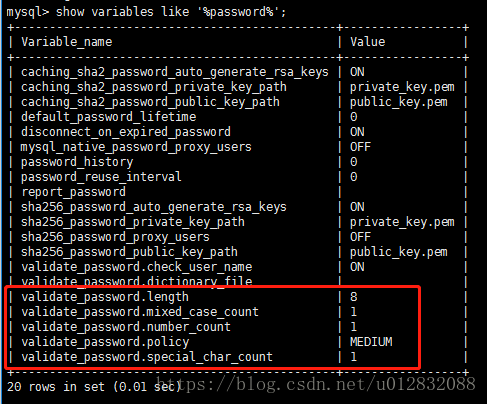
validate_password_policy:密码策略,默认为MEDIUM策略
validate_password_dictionary_file:密码策略文件,策略为STRONG才需要
validate_password_length:密码最少长度
validate_password_mixed_case_count:大小写字符长度,至少1个
validate_password_number_count :数字至少1个
validate_password_special_char_count:特殊字符至少1个
上述参数是默认策略MEDIUM的密码检查规则。
mysql主要有三种密码策略

1.2.8 在防火墙中开启3306端口
CentOS7默认使用的是firewall作为防火墙,我这里改为习惯常用的iptables防火墙
第一步: 关闭firewall防火墙
    systemctl stop firewalld.service
    systemctl disable firewalld.service
    systemctl mask firewalld.service
第二步: 安装iptables防火墙
yum install iptables-services -y
第三步: 启动iptable防火墙
systemctl enable iptables
systemctl start iptables
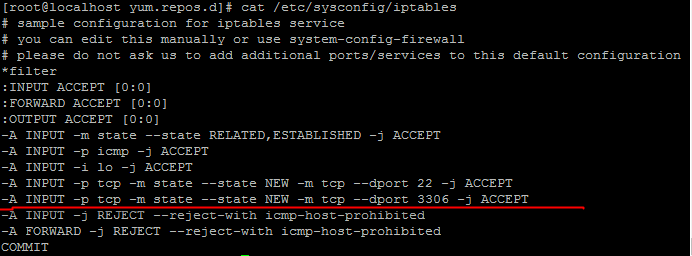
第四步: 编辑防火墙增加端口 防火墙文件位置为: /etc/sysconfig/iptables
vim /etc/sysconfig/iptables
在倒数第三行上增加
-A INPUT -p tcp -m state --state NEW -m tcp --dport 3306 -j ACCEPT
第五步: 重启防火墙
    systemctl enable iptables.service
    systemctl start iptables.service
1.2.9 将mysql 服务加入开机启动项,并启动mysql进程
systemctl enable mysqld.service
systemctl start mysqld.service
常用mysql服务命令:
    登录mysql
    mysql -u username -p

    退出mysql
    quit

    启动mysql
    systemctl start mysqld.service

    结束
    systemctl stop mysqld.service

    重启
    systemctl restart mysqld.service

    开机自启
    systemctl enable mysqld.service

    查看mysql版本
    select version();
删除mysql服务
  chkconfig --list | grep -i mysql
   chkconfig --del mysql
第二部分 Navicat 连接 Mysql8
2.1 开启mysql远程服务:
2.1.1 修改mysql数据库下的user表中host的值
可能是你的帐号不允许从远程登陆,只能在localhost。这个时候只要在localhost的那台电脑,登入mysql后,更改 "mysql" 数据库里的 "user" 表里的 "host" 项,从"localhost"改称"%"登录mysql数据库 执行如下命令:
    mysql -u root -p
    use mysql;
    update user set host='%' where user='root';
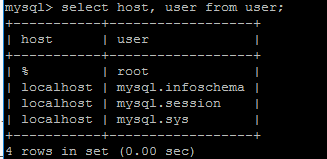
select host, user, authentication_string, plugin from user;
2.1.2 使用授权的方式
赋予任何主机访问数据的权限
mysql> GRANT ALL PRIVILEGES ON *.* TO 'root'@'%' WITH GRANT OPTION;
mysql> FLUSH PRIVILEGES;
如果想myuser用户使用mypassword密码从任何主机连接到mysql服务器的话。
GRANT ALL PRIVILEGES ON *.* TO 'myuser'@'%'IDENTIFIED BY 'mypassword' WITH GRANT OPTION;
如果你想允许用户myuser从ip为192.168.1.6的主机连接到mysql服务器,并使用mypassword作为密码
GRANT ALL PRIVILEGES ON *.* TO 'myuser'@'192.168.1.3'IDENTIFIED BY 'mypassword' WITH GRANT OPTION;
2.2 在使用 Navicat for Mysql连接mysql 8.0时会报如下错误:
Authentication plugin 'caching_sha2_password' cannot be loaded:
mysql8.0 引入了新特性 caching_sha2_password;这种密码加密方式客户端不支持;客户端支持的是mysql_native_password 这种加密方式;
我们可可以查看mysql 数据库中user表的 plugin字段;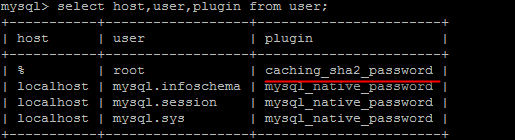
可以使用命令将他修改成mysql_native_password加密模式:
update user set plugin='mysql_native_password' where user='root';
再用Navicat链接 就可以链接成功;
windows安装mysql8
1、官网下载软件MySQL8
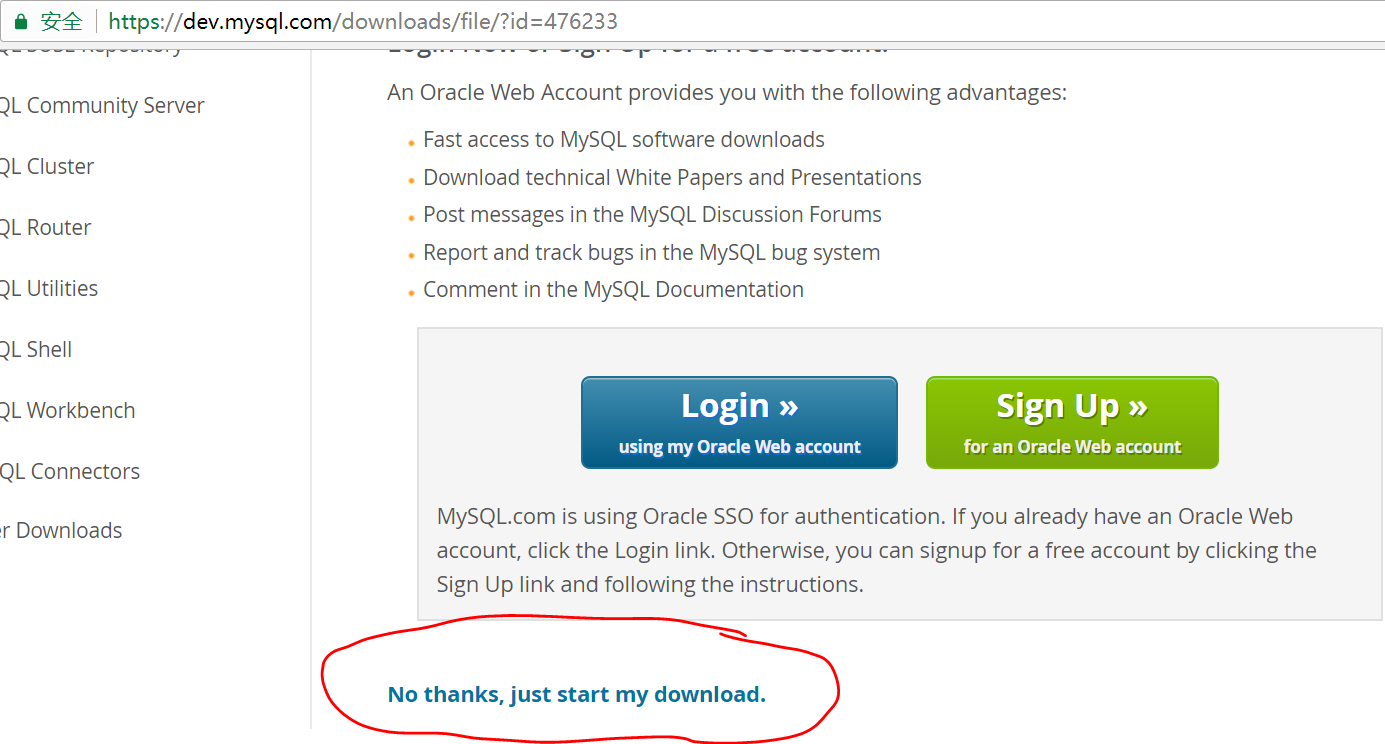
直接点击我红色记号笔圈出的超链接,这句话的中文意思是:不用了,直接开始下载
2. 设置系统环境变量
这个不多说了百度上一堆,配置这个只是为了命令行方便...
3. 编写配置文件
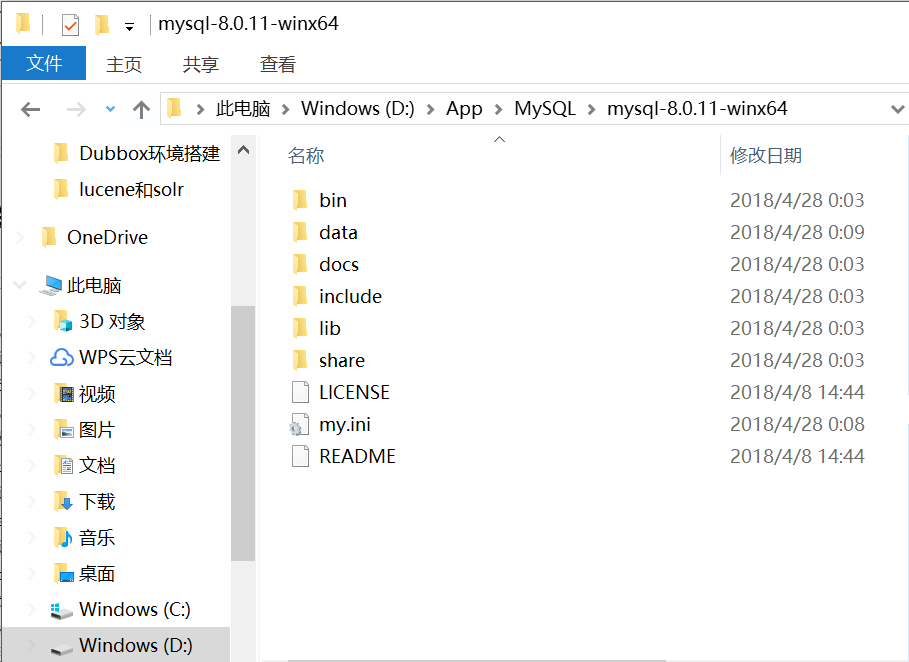
如解压位置为D:\App\MySQL\mysql-8.0.11-winx64
就在此处手动创建my.ini文件,文件内容如下:
[mysql]
#设置mysql客户端默认字符集
default-character-set=utf8
[mysqld]
#设置3306端口
port = 3306 #设置mysql的安装目录 basedir=D:\App\MySQL\mysql-8.0.11-winx64 #设置mysql数据库的数据的存放目录 datadir=D:\App\MySQL\mysql-8.0.11-winx64\data #允许最大连接数 max_connections=200 #服务端使用的字符集默认为8比特编码的latin1字符集 character-set-server=utf8 #创建新表时将使用的默认存储引擎 default-storage-engine=INNODB
注意修改安装目录与数据存放目录
4. 数据库初始化
用管理员身份运行命令行,进入安装MySQL下的bin目录输入如下命令:
自动生成root用户,可以不带密码:
mysqld --initialize-insecure
或者带随机密码:
mysqld --initialize
随机密码被保存在错误日志里,位于(前面配置好的datadir)数据文件夹下,文件名为:主机名.err
注意:如果要重新初始化,必须先清空data文件夹。(包括停止下一步的服务)
我看的教程就是没有这一步,导致:
服务无法启动。
服务器没有报告任何错误。
请键入 NET HELPMSG 3534 以获得更多的帮助。
mysqld --initialize --console
注意!执行输出结果里面有一段:
[Note] [MY-010454] [Server] A temporary password is generated for root@localhost: rI5rvf5x5G,E 其中root@localhost:后面的“rI5rvf5x5G,E”就是初始密码(不含首位空格)。在没有更改密码前,需要记住这个密码,后续登录需要用到。
5. 安装并启动服务
在命令行下执行。
安装服务:
mysqld -install
启动服务:
net start mysql
回退的时候反过来
停止、卸载服务:
net stop mysql
mysqld -remove
6. 进入MySQL
无密码进入:
mysql -u root有密码的进入方式:
mysql -u root -p有密码的话进去就要求输入,随机密码的话位置上面提到过了。
感动,终于看到了:
mysql>
最后说下如果客户端连接如果出现caching-sha2-password问题
解决方案如下:
首先:ALTER USER 'root'@'localhost' IDENTIFIED BY 'password' PASSWORD EXPIRE NEVER; #修改加密规则 接着:ALTER USER 'root'@'localhost' IDENTIFIED WITH mysql_native_password BY 'password'; #更新一下用户的密码 最后:FLUSH PRIVILEGES; #刷新权限
2、客户端连接时,提示客户端版本过低(即:mysql 1521错误)
网上大部分的解决办法是使用:set password for '用户名' @ '主机名' = old_password('密码');
执行时发现old_password函数已经不支持了。。。
有效的解决办法是:https://blog.csdn.net/fanxiangru999/article/details/80726413
3、Java连接Mysql8时要注意一下几点:
1)驱动不再是com.mysql.jdbc.Driver,正确可用的应该是:com.mysql.cj.jdbc.Driver
2)注意项目引入的Mysql版本,应该是:
    <dependency>
    <groupId>mysql</groupId>
    <artifactId>mysql-connector-java</artifactId>
    <version>8.0.11</version>
    </dependency>
3)如果连接仍然提示连接失败(Communications link failure),注意修改my.ini两项配置为如下:
    interactive_timeout=604800
    wait_timeout=604800
正文完毕~~~~~下面是我的application.properties:
    spring.datasource.url=jdbc:mysql://localhost:3306/wechat?serverTimezone=UTC&characterEncoding=utf8&useUnicode=true&useSSL=false
    spring.datasource.username=root
    spring.datasource.password=*****
    spring.datasource.driver-class-name=com.mysql.cj.jdbc.Driver
    spring.datasource.max-idle=10
    spring.datasource.max-wait=10000
    spring.datasource.min-idle=5
    spring.datasource.initial-size=5

    server.port = 80
    server.session.timeout=10
    #防止乱码
    spring.http.encoding.force=true
    spring.http.encoding.charset=UTF-8
    spring.http.encoding.enabled=true
    server.tomcat.uri-encoding=UTF-8

    # 配置jsp文件的位置,默认位置为:src/main/webapp
    spring.mvc.view.prefix=/pages/
    # 配置jsp文件的后缀
    spring.mvc.view.suffix=.jsp

    #Mybaties
    mybatis.type-aliases-package=wechatService.myb.entity
    mybatis.mapper-locations=classpath:mybatis/mapper/*.xml
    mybatis.config-location=classpath:mybatis/mybatis-config.xml

    #cache 多个用逗号分开
    spring.cache.cache-names=userCache
    spring.cache.jcache.config=classpath:ehcache.xml

    #LOG日志
    logging.level.wechatService=WARN
    logging.level.wechatService.myb.mapper=DEBUG
    logging.file=logs/WeChatServer.log
Centos7重置Mysql 8的 root 密码
问题产生背景:
安装完 最新版的 mysql8后忘记了密码,想重置root密码;找了网上好多资料都不尽相同,根据自己的问题总结如下:
第一步:修改配置文件免密码登录mysql
vim /etc/my.cnf
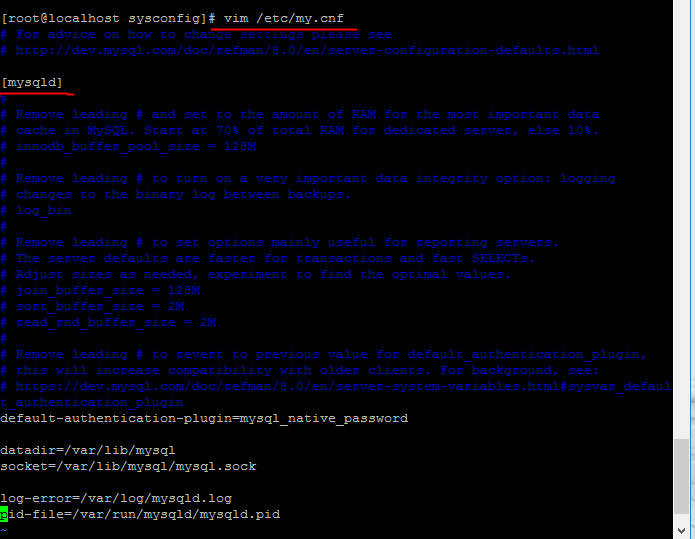
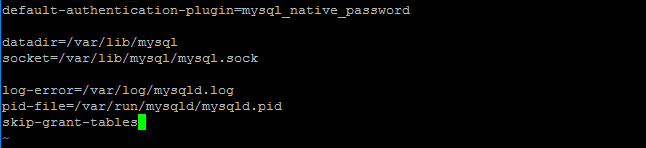
在 [mysqld]最后加上如下语句 并保持退出文件;
skip-grant-tables
重启mysql服务:
service mysqld restart
第二步免密码登录到mysql上;直接在命令行上输入:
    mysql
    //或者
    mysql -u root -p
    //password直接回车
第三步: 给root用户重置密码;
首先查看当前root用户相关信息,在mysql数据库的user表中;
select host, user, authentication_string, plugin from user;

修改root密码规则和外部访问:
#不支持下面的密码格式
mysql> ALTER USER 'root'@'localhost' IDENTIFIED WITH mysql_native_password BY 'root';
ERROR 1819 (HY000): Your password does not satisfy the current policy requirements

#mysql8的密码格式必须是大小写+数字+特殊字符
mysql> ALTER USER 'root'@'localhost' IDENTIFIED WITH mysql_native_password BY 'myPwd@123';
Query OK, 0 rows affected (0.08 sec)

mysql>
需要创建用户和配置远程访问权限
创建用户:
创建用户(myuser:用户名;%:任意ip,也可以指定,root默认就是localhost;123456:登录密码)
mysql> CREATE USER 'myuser'@'%' IDENTIFIED BY 'myPwd@123';
配置权限:
GRANT ALL PRIVILEGES ON *.* TO 'root'@'%' IDENTIFIED BY 'myPwd@123' WITH GRANT OPTION;
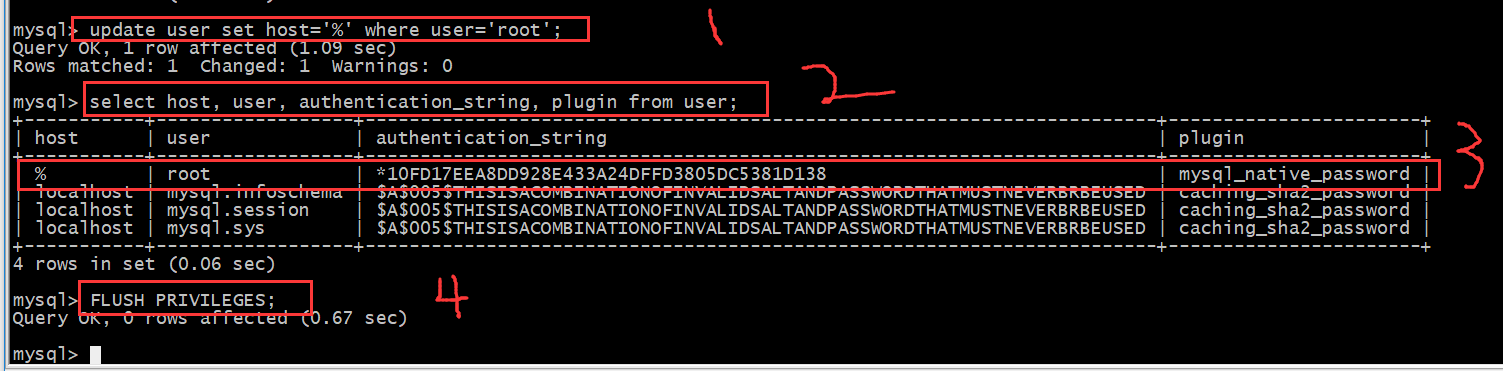
修改root密码规则和允许访问的 IP 主机:
mysql> update user set host='%',plugin='mysql_native_password' where user='root';
Query OK, 0 rows affected (0.32 sec)
Rows matched: 1  Changed: 0  Warnings: 0
mysql> select host, user, authentication_string, plugin from user;
+-----------+------------------+------------------------------------------------------------------------+-----------------------+
| host      | user             | authentication_string                                                  | plugin                |
+-----------+------------------+------------------------------------------------------------------------+-----------------------+
| %         | root             | *10FD17EEA8DD928E433A24DFFD3805DC5381D138                              | mysql_native_password |
| %         | zs               | *10FD17EEA8DD928E433A24DFFD3805DC5381D138                              | mysql_native_password |
| localhost | mysql.infoschema | $A$005$THISISACOMBINATIONOFINVALIDSALTANDPASSWORDTHATMUSTNEVERBRBEUSED | caching_sha2_password |
| localhost | mysql.session    | $A$005$THISISACOMBINATIONOFINVALIDSALTANDPASSWORDTHATMUSTNEVERBRBEUSED | caching_sha2_password |
| localhost | mysql.sys        | $A$005$THISISACOMBINATIONOFINVALIDSALTANDPASSWORDTHATMUSTNEVERBRBEUSED | caching_sha2_password |
+-----------+------------------+------------------------------------------------------------------------+-----------------------+
5 rows in set (0.03 sec)
mysql> FLUSH PRIVILEGES;
Query OK, 0 rows affected (0.04 sec)
安装mysql8.0.11版本,并使用mybatis进行连接mysql遇到的问题

    mysql -uroot -p #进入服务器中,执行这条命令,再输入密码,即可进入mysql数据库
    mysql>use mysql;
    mysql>ALTER USER 'root'@'%' IDENTIFIED BY 'password' PASSWORD EXPIRE NEVER; #修改加密规则
    mysql>ALTER USER 'root'@'%' IDENTIFIED WITH mysql_native_password BY 'password'; #更新一下用户的密码
    mysql>FLUSH PRIVILEGES; #刷新权限
2、第二个错误:使用mybatis连接mysql,抛出异常错误。
(1)异常错误:Loading class `com.mysql.jdbc.Driver'. This is deprecated. The new driver class is `com.mysql.cj.jdbc.Driver'. The driver is automatically registered via the SPI and manual loading of the driver class is generally unnecessary.(2)错误原因:数据库连接驱动的方式不适用。(3)解决方法:使用最新的mysql连接驱动,即将`com.mysql.jdbc.Driver'改为`com.mysql.cj.jdbc.Driver'以前版本使用的连接驱动:
    jdbc.driver=com.mysql.jdbc.Driver
    jdbc.url=jdbc:mysql://xxx.xx.xx.xxx:3306/db?characterEncoding=utf-8
    jdbc.username=root
    jdbc.password=admin
解决后的数据库连接驱动:
    jdbc.driver=com.mysql.cj.jdbc.Driver
    jdbc.url=jdbc:mysql://xxx.xx.xx.xxx:3306/db?characterEncoding=utf-8
    jdbc.username=root
    jdbc.password=admin
3、第三个警告:Establishing SSL connection without server's identity verification is not recommended
(1)警告信息:Establishing SSL connection without server's identity verification is not recommended. According to MySQL 5.5.45+, 5.6.26+ and 5.7.6+ requirements SSL connection must be established by default if explicit option isn't set. For compliance with existing applications not using SSL the verifyServerCertificate property is set to 'false'. You need either to explicitly disable SSL by setting useSSL=false, or set useSSL=true and provide truststore for server certificate verification.
(2)警告原因:这是因为Mysql在高版本需要指明是否进行SSL连接
(3)解决方法:虽然不修改也不影响使用,但是如果想要不出现警告,可以在mysql连接字符串url中加入useSSL=false或者useSSL=true即可。如下
jdbc.url=jdbc:mysql://xxx.xxx.xx.xxx:3306/db?characterEncoding=utf-8&useSSL=false
SpringBoot+MyBatis基于mysql-8(最新版)的连接测试
项目依赖:
<!-- 数据源 -->
  <dependency>
   <groupId>com.alibaba</groupId>
   <artifactId>druid</artifactId>
   <version>1.1.0</version>
  </dependency>
  <!-- mysql -->
  <dependency>
   <groupId>mysql</groupId>
   <artifactId>mysql-connector-java</artifactId>
   <version>8.0.11</version>
  </dependency>

  <!--mybatis-->
  <dependency>
      <groupId>org.mybatis.spring.boot</groupId>
      <artifactId>mybatis-spring-boot-starter</artifactId>
      <version>1.3.1</version>
  </dependency>
2.配置数据源相关,使用阿里巴巴Druid数据源
### MySQL Connector/J 5.x   (旧版连接)
#spring.datasource.url=jdbc:mysql://127.0.0.1:3306/rwa?useUnicode=true&characterEncoding=utf8
### MySQL Connector/J 6.x之后   (新版连接)
spring.datasource.url=jdbc:mysql:///rwa?serverTimezone=UTC&characterEncoding=utf8&useUnicode=true&useSSL=false
#说明: 新版驱动url默认地址为127.0.0.1:3306,所以访问本机mysql数据库地址可以用 /// 表示
#spring.datasource.url=jdbc:mysql://localhost:3306/rwa?serverTimezone=UTC&characterEncoding=utf8&useUnicode=true&useSSL=false
spring.datasource.username=root
spring.datasource.password=myPwd@123
#spring.datasource.driver-class-name=com.mysql.jdbc.Driver
spring.datasource.driver-class-name=com.mysql.cj.jdbc.Driver
spring.datasource.druid.initial-size=1
spring.datasource.druid.min-idle=1
spring.datasource.druid.max-active=20
spring.datasource.druid.test-on-borrow=true
spring.datasource.druid.stat-view-servlet.allow=true
注意:新版mysql驱动的url必须设置时区,即serverTimezone=UTC,否则会报如下错误:

java.sql.SQLException: The server time zone value 'Öйú±ê׼ʱ¼ä' is unrecognized or represents more than one time zone. You must configure either the server or JDBC driver (via the serverTimezone configuration property) to use a more specifc time zone value if you want to utilize time zone support.
 at com.mysql.cj.jdbc.exceptions.SQLError.createSQLException(SQLError.java:127) ~[mysql-connector-java-8.0.11.jar:8.0.11]
 at com.mysql.cj.jdbc.exceptions.SQLError.createSQLException(SQLError.java:95) ~[mysql-connector-java-8.0.11.jar:8.0.11]
 at com.mysql.cj.jdbc.exceptions.SQLError.createSQLException(SQLError.java:87) ~[mysql-connector-java-8.0.11.jar:8.0.11]
 at com.mysql.cj.jdbc.exceptions.SQLError.createSQLException(SQLError.java:61) ~[mysql-connector-java-8.0.11.jar:8.0.11]
 at com.mysql.cj.jdbc.exceptions.SQLError.createSQLException(SQLError.java:71) ~[mysql-connector-java-8.0.11.jar:8.0.11]
 at com.mysql.cj.jdbc.exceptions.SQLExceptionsMapping.translateException(SQLExceptionsMapping.java:76) ~[mysql-connector-java-8.0.11.jar:8.0.11]
 at com.mysql.cj.jdbc.ConnectionImpl.createNewIO(ConnectionImpl.java:862) ~[mysql-connector-java-8.0.11.jar:8.0.11]
 at com.mysql.cj.jdbc.ConnectionImpl.<init>(ConnectionImpl.java:444) ~[mysql-connector-java-8.0.11.jar:8.0.11]
 at com.mysql.cj.jdbc.ConnectionImpl.getInstance(ConnectionImpl.java:230) ~[mysql-connector-java-8.0.11.jar:8.0.11]
 at com.mysql.cj.jdbc.NonRegisteringDriver.connect(NonRegisteringDriver.java:226) ~[mysql-connector-java-8.0.11.jar:8.0.11]
 at com.alibaba.druid.filter.FilterChainImpl.connection_connect(FilterChainImpl.java:148) ~[druid-1.1.0.jar:1.1.0]
 at com.alibaba.druid.filter.stat.StatFilter.connection_connect(StatFilter.java:217) ~[druid-1.1.0.jar:1.1.0]
 at com.alibaba.druid.filter.FilterChainImpl.connection_connect(FilterChainImpl.java:142) ~[druid-1.1.0.jar:1.1.0]
 at com.alibaba.druid.pool.DruidAbstractDataSource.createPhysicalConnection(DruidAbstractDataSource.java:1466) ~[druid-1.1.0.jar:1.1.0]
 at com.alibaba.druid.pool.DruidAbstractDataSource.createPhysicalConnection(DruidAbstractDataSource.java:1529) ~[druid-1.1.0.jar:1.1.0]
 at com.alibaba.druid.pool.DruidDataSource$CreateConnectionThread.run(DruidDataSource.java:2178) ~[druid-1.1.0.jar:1.1.0]
Caused by: com.mysql.cj.exceptions.InvalidConnectionAttributeException: The server time zone value 'Öйú±ê׼ʱ¼ä' is unrecognized or represents more than one time zone. You must configure either the server or JDBC driver (via the serverTimezone configuration property) to use a more specifc time zone value if you want to utilize time zone support.
 at sun.reflect.GeneratedConstructorAccessor85.newInstance(Unknown Source) ~[na:na]
 at sun.reflect.DelegatingConstructorAccessorImpl.newInstance(DelegatingConstructorAccessorImpl.java:45) ~[na:1.8.0_91]
 at java.lang.reflect.Constructor.newInstance(Constructor.java:423) ~[na:1.8.0_91]
 at com.mysql.cj.exceptions.ExceptionFactory.createException(ExceptionFactory.java:59) ~[mysql-connector-java-8.0.11.jar:8.0.11]
 at com.mysql.cj.exceptions.ExceptionFactory.createException(ExceptionFactory.java:83) ~[mysql-connector-java-8.0.11.jar:8.0.11]
 at com.mysql.cj.util.TimeUtil.getCanonicalTimezone(TimeUtil.java:128) ~[mysql-connector-java-8.0.11.jar:8.0.11]
 at com.mysql.cj.protocol.a.NativeProtocol.configureTimezone(NativeProtocol.java:2201) ~[mysql-connector-java-8.0.11.jar:8.0.11]
 at com.mysql.cj.protocol.a.NativeProtocol.initServerSession(NativeProtocol.java:2225) ~[mysql-connector-java-8.0.11.jar:8.0.11]
 at com.mysql.cj.jdbc.ConnectionImpl.initializePropsFromServer(ConnectionImpl.java:1391) ~[mysql-connector-java-8.0.11.jar:8.0.11]
 at com.mysql.cj.jdbc.ConnectionImpl.connectOneTryOnly(ConnectionImpl.java:993) ~[mysql-connector-java-8.0.11.jar:8.0.11]
 at com.mysql.cj.jdbc.ConnectionImpl.createNewIO(ConnectionImpl.java:852) ~[mysql-connector-java-8.0.11.jar:8.0.11]
 ... 9 common frames omitted
加上时区参数serverTimezone=UTC

项目正常启动!
mybatis代码生成器逆向工程生成代码
D:\Java\jdk1.8.0_151\bin\java.exe -Dmaven.multiModuleProjectDirectory=D:\IdeaProjects\tdtk-cloud\tdtk-cloud-eureka-client-provider-8001 -Dmaven.home=D:\IDEA\plugins\maven\lib\maven3 -Dclassworlds.conf=D:\IDEA\plugins\maven\lib\maven3\bin\m2.conf -javaagent:D:\IDEA\lib\idea_rt.jar=61840:D:\IDEA\bin -Dfile.encoding=UTF-8 -classpath D:\IDEA\plugins\maven\lib\maven3\boot\plexus-classworlds-2.5.2.jar org.codehaus.classworlds.Launcher -Didea.version=2018.1.6 org.mybatis.generator:mybatis-generator-maven-plugin:1.3.2:generate -f pom.xml
[INFO] Scanning for projects...
[WARNING]
[WARNING] Some problems were encountered while building the effective model for com.tdtk:tdtk-cloud-eureka-client-provider-8001:jar:0.0.1-SNAPSHOT
[WARNING] 'build.plugins.plugin.version' for org.springframework.boot:spring-boot-maven-plugin is missing. @ com.tdtk:tdtk-cloud-eureka-client-provider-8001:[unknown-version], D:\IdeaProjects\tdtk-cloud\tdtk-cloud-eureka-client-provider-8001\pom.xml, line 91, column 12
[WARNING]
[WARNING] It is highly recommended to fix these problems because they threaten the stability of your build.
[WARNING]
[WARNING] For this reason, future Maven versions might no longer support building such malformed projects.
[WARNING]
[INFO]
[INFO] ------------------------------------------------------------------------
[INFO] Building tdtk-cloud-eureka-client-provider-8001 0.0.1-SNAPSHOT
[INFO] ------------------------------------------------------------------------
[INFO]
[INFO] --- mybatis-generator-maven-plugin:1.3.2:generate (default-cli) @ tdtk-cloud-eureka-client-provider-8001 ---
[INFO] Connecting to the Database
Sun Sep 09 09:48:03 CST 2018 WARN: Establishing SSL connection without server's identity verification is not recommended. According to MySQL 5.5.45+, 5.6.26+ and 5.7.6+ requirements SSL connection must be established by default if explicit option isn't set. For compliance with existing applications not using SSL the verifyServerCertificate property is set to 'false'. You need either to explicitly disable SSL by setting useSSL=false, or set useSSL=true and provide truststore for server certificate verification.
[INFO] Introspecting table t_user
log4j:WARN No appenders could be found for logger (org.mybatis.generator.internal.db.DatabaseIntrospector).
log4j:WARN Please initialize the log4j system properly.
log4j:WARN See http://logging.apache.org/log4j/1.2/faq.html#noconfig for more info.
[INFO] Generating Record class for table t_user
[INFO] Generating Mapper Interface for table t_user
[INFO] Generating SQL Map for table t_user
[INFO] Saving file UserMapper.xml
[INFO] Saving file User.java
[INFO] Saving file UserMapper.java
[INFO] ------------------------------------------------------------------------
[INFO] BUILD SUCCESS
[INFO] ------------------------------------------------------------------------
[INFO] Total time: 2.818 s
[INFO] Finished at: 2018-09-09T09:48:04+08:00
[INFO] Final Memory: 15M/190M
[INFO] ------------------------------------------------------------------------

Process finished with exit code 0
再来说说 遇到的一些问题吧!

报
错的代码

    [INFO] ------------------------------------------------------------------------
    [INFO] BUILD FAILURE
    [INFO] ------------------------------------------------------------------------
    [INFO] Total time: 2.581 s
    [INFO] Finished at: 2018-08-05T11:51:49+08:00
    [INFO] ------------------------------------------------------------------------
    [ERROR] Failed to execute goal org.mybatis.generator:mybatis-generator-maven-plugin:1.3.5:generate (default-cli) on project smart-campus: The server time zone value 'Öйú±ê׼ʱ¼ä' is unrecognized or represents more than one time zone. You must configure either the server or JDBC driver (via the serverTimezone configuration property) to use a more specifc time zone value if you want to utilize time zone support. -> [Help 1]
    [ERROR]
    [ERROR] To see the full stack trace of the errors, re-run Maven with the -e switch.
    [ERROR] Re-run Maven using the -X switch to enable full debug logging.
    [ERROR]
    [ERROR] For more information about the errors and possible solutions, please read the following articles:
    [ERROR] [Help 1] http://cwiki.apache.org/confluence/display/MAVEN/MojoExecutionException

    Process finished with exit code 1
拉到后面看报 to use a more specifc time zone value if you want to utilize time zone support. ->
说没有给他使用时区 请给他设置一个具体的时区值
我们就得在connectionURL的配置上加
?serverTimezone=UTC
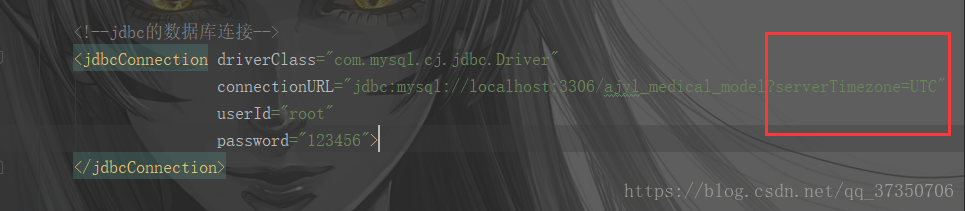
加上就可以解决了
MySQL表名不区分大小写的设置方法
Linux下的MySQL默认是区分表名大小写的,设置方法:
1、用root登录,修改 /etc/my.cnf
2、在[mysqld]节点下,加入一行:lower_case_table_names=1
3、重启MySQL即可; 其中 lower_case_table_names=1,这个参数在 Windows 中默认为 1 ,在 Unix 中默认为 0,
因此在window中不会遇到的问题,但是到linux就会出问题(尤其在mysql对表起名时是无法用大写字母的,而查询用了大写字母却经常会出现查不到的错误)
遇到的问题:
2018-09-23 01:23:38.015 ERROR 15384 --- [nio-8003-exec-8] o.a.c.c.C.[.[.[/].[dispatcherServlet]: Servlet.service() for servlet [dispatcherServlet] in context with path [] threw exception [Request processing failed; nested exception is feign.FeignException: status 500 reading PromoteServiceFeign#queryInfoForMain(String); content:
{"timestamp":"2018-09-22T17:23:38.000+0000","status":500,"error":"Internal Server Error","message":"\r\n### Error querying database.
Cause: java.sql.SQLSyntaxErrorException: In aggregated query without GROUP BY, expression #1 of SELECT list contains nonaggregated column 'yjgss.t.TS_UNITCODE';
this is incompatible with sql_mode=only_full_group_by\r\n### The error may exist in file [D:\\IdeaProjects\\yjzhly\\gss\\target\\classes\\config\\yjtssMapper\\popularize\\SpreadBoMapper.xml]\r\n###
The error may involve com.tdtk.yjtss.gss.popularize.extension.mapper.SpreadBoMapper.querySpreadList-Inline\r\n### The error occurred while setting parameters\r\n###
SQL: SELECT m.unitCode TS_UNITCODE,m.wechat TS_WECHAT_FOCUSNUM,m.web TS_WEB_FOCUSNUM from (SELECT t.TS_UNITCODE unitCode,SUM(t.TS_WECHAT_FOCUSNUM) wechat,SUM(t.TS_WEB_FOCUSNUM) web FROM  t_tou_spread t WHERE  t.TS_ISDEL = '0' AND LEFT (t.TS_START_TIME, 4) = SUBSTR(CURRENT_TIMESTAMP FROM 1 FOR 4) UNION SELECT t.TS_UNITCODE unitCode,SUM(t.TS_WECHAT_FOCUSNUM) wechat,SUM(t.TS_WEB_FOCUSNUM) web FROM t_tou_spread t WHERE t.TS_ISDEL = '0' AND LEFT (t.TS_START_TIME, 7) = SUBSTR(CURRENT_TIMESTAMP FROM 1 FOR 7) GROUP BY t.TS_UNITCODE,  LEFT (t.TS_START_TIME, 7)) m WHERE m.unitCode = 'JQBM1536217831128' ORDER BY m.wechat DESC\r\n###
Cause: java.sql.SQLSyntaxErrorException: In aggregated query without GROUP BY, expression #1 of SELECT list contains nonaggregated column 'yjgss.t.TS_UNITCODE'; this is incompatible with sql_mode=only_full_group_by\n;
bad SQL grammar []; nested exception is java.sql.SQLSyntaxErrorException: In aggregated query without GROUP BY, expression #1 of SELECT list contains nonaggregated column 'yjgss.t.TS_UNITCODE';
this is incompatible with sql_mode=only_full_group_by","path":"/spread/queryInfoForMain"}] with root cause
解决方法:
修改MySQL的配置文件
vim /etc/my.cnf
#添加语句
sql_mode='NO_ENGINE_SUBSTITUTION'
重启mysql服务:
service mysqld restart
mode解释:
#SELECT @@GLOBAL.sql_mode; #SELECT @@SESSION.sql_mode;
1、STRICT_TRANS_TABLES: 在该模式下,如果一个值不能插入到一个事务表中,则中断当前的操作,对非事务表不做限制
2、NO_ZERO_IN_DATE: 在严格模式下,不允许日期和月份为零
3、NO_ZERO_DATE: 设置该值,mysql数据库不允许插入零日期,插入零日期会抛出错误而不是警告。
4、ERROR_FOR_DIVISION_BY_ZERO:在INSERT或UPDATE过程中,如果数据被零除,则产生错误而非警告。如 果未给出该模式,那么数据被零除时MySQL返回NULL
5、NO_AUTO_CREATE_USER: 禁止GRANT创建密码为空的用户
6、NO_ENGINE_SUBSTITUTION: 如果需要的存储引擎被禁用或未编译,那么抛出错误。不设置此值时,用默认的存储引擎替代,并抛出一个异常
7、PIPES_AS_CONCAT: 将"||"视为字符串的连接操作符而非或运算符,这和Oracle数据库是一样的,也和字符串的拼接函数Concat相类似
8、ANSI_QUOTES: 启用ANSI_QUOTES后,不能用双引号来引用字符串,因为它被解释为识别符
9、NO_AUTO_VALUE_ON_ZERO: 该值影响自增长列的插入。默认设置下,插入0或NULL代表生成下一个自增长值。如果用户 希望插入的值为0,而该列又是自增长的,那么这个选项就有用了。
#sql_mode=STRICT_TRANS_TABLES,NO_ZERO_IN_DATE,NO_ZERO_DATE,ERROR_FOR_DIVISION_BY_ZERO,NO_AUTO_CREATE_USER,NO_ENGINE_SUBSTITUTION,PIPES_AS_CONCAT,ANSI_QUOTES,NO_AUTO_VALUE_ON_ZERO
#sql_mode=ONLY_FULL_GROUP_BY,STRICT_TRANS_TABLES,NO_ZERO_IN_DATE,NO_ZERO_DATE,ERROR_FOR_DIVISION_BY_ZERO,NO_ENGINE_SUBSTITUTION
附:
教程
https://www.e-learn.cn/content/mysql/814162
mysql配置文件 /etc/my.cnf 详细解释
https://www.cnblogs.com/wajika/p/6323026.html