Spring 概述
Spring是一个容器,它包含并且管理系统对象的生命周期和配置。
在项目中管理事务以及对象的注入。
Spring 是非侵入式的:基于Spring开发的系统中对象一般不依赖Spring的类。
轻量级框架
一站式框架:
Web层:springMVC
(springMVC是通过spring在单独简化出来的一个框架)
service: IOC (本身自带)
DAO层:jdbcTemplate (本身自带)
Spring整体介绍
组成Spring框架的每个模块(或者组件)都可以单独存在,或者与其他一个或多个模块联合实现。
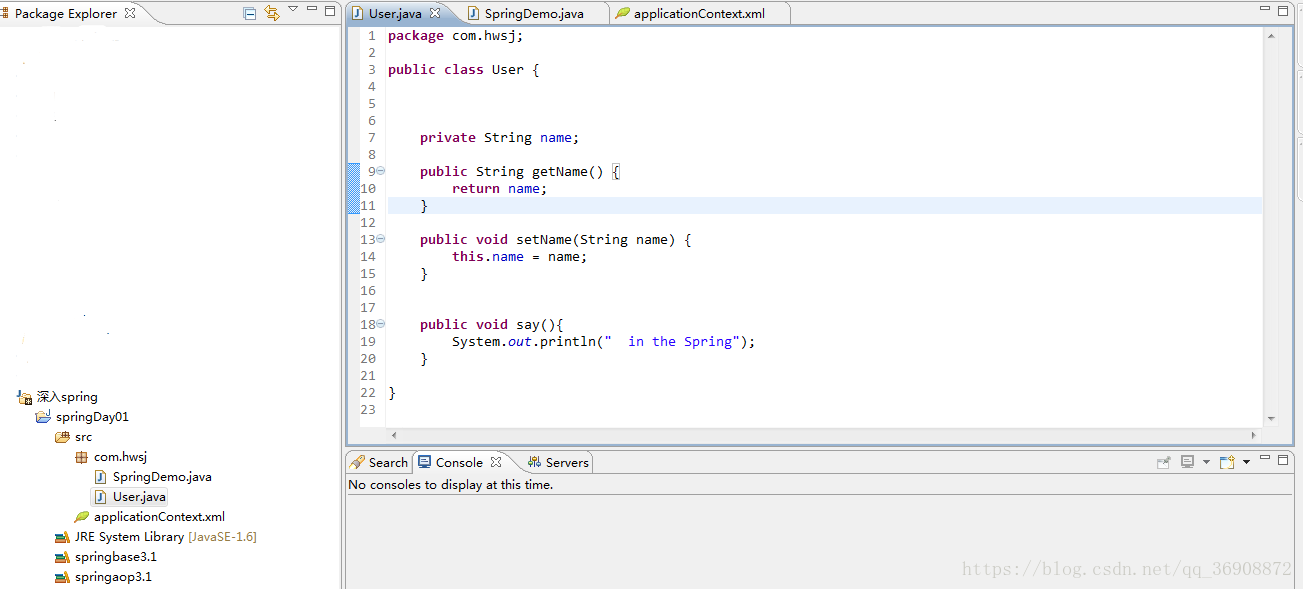
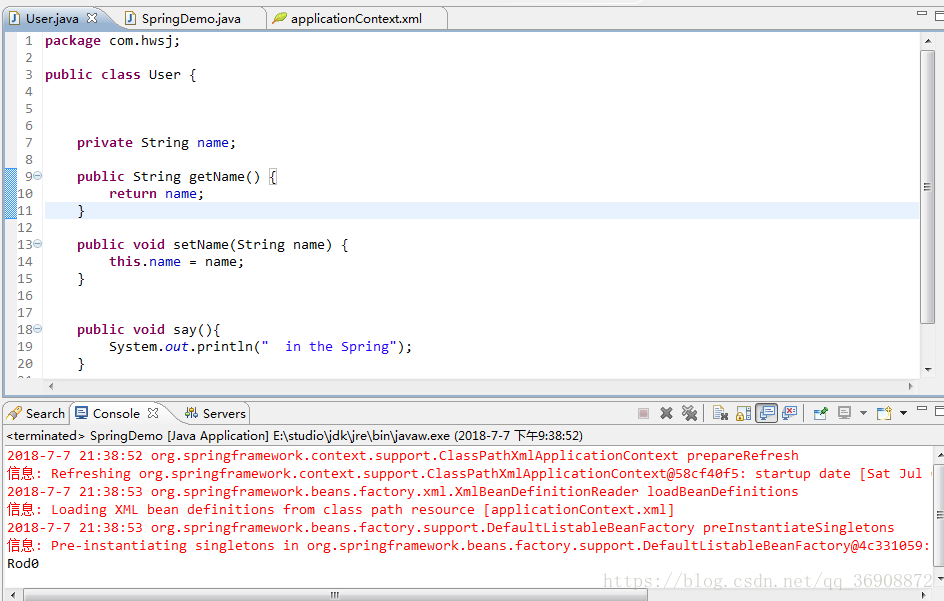
把对象存入IOC容器中并通过spring获取到对象的一个小例子


接着在深入了解spring的优点
→ 不需要实现框架指定的接口,因此可以轻松的将组件从Spring中脱离,甚至不需要任何修复。
→ 组件间 的依赖关系减少,极大改善了代码的可重用性。
→ Spring的依赖注入机制,可以在运行期为组件配置所需资源,而无需在编写组件代码时就加以指定,从而在相当程度上降低了组件之间的耦合。
Spring 基本概念
→ IOC = Inverse of Contrl (控制反转)
→ DI = Dependence Injection (依赖注入)
→ AOP
面向接口
面向抽象
IOC详情:IOC就是 Inverse of Contrl 控制反转,在java开发中IOC意味着将你设计好的类交给系统去控制,而不是在你的类内部控制,在称为控制反转。
把对象创建给Spring容器管理
△ 工厂模式
△ 反射
IOC在Spring中的应用
△ 解析XML文件
△ 反射机制生产XML解析出来的对象
△ 工厂模式调用反射机制生成对象
IOC 与 DI (依赖注入) 的关系 是等价的
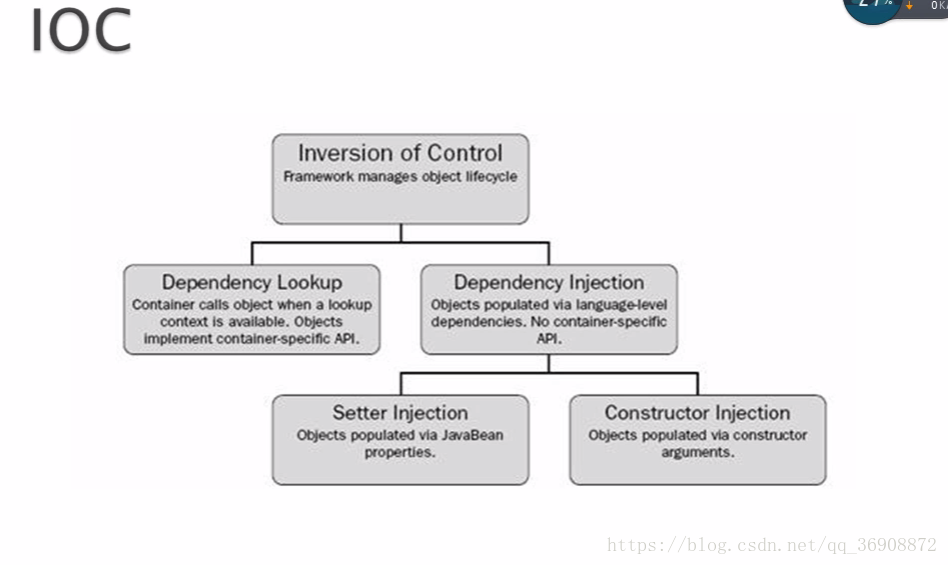
DI详情:
△ 所谓依赖注入,即在运行期由容器将依赖关系注入到组件之中。
△ 是在运行期,由Spring根据配置文件,将其他对象的引用通过组件的提供setter方法进行设定。
△ Type1 设值注入(常用)
△ Type2 构造子注入
△ Type3 接口注入
Spring框架只支持前两种
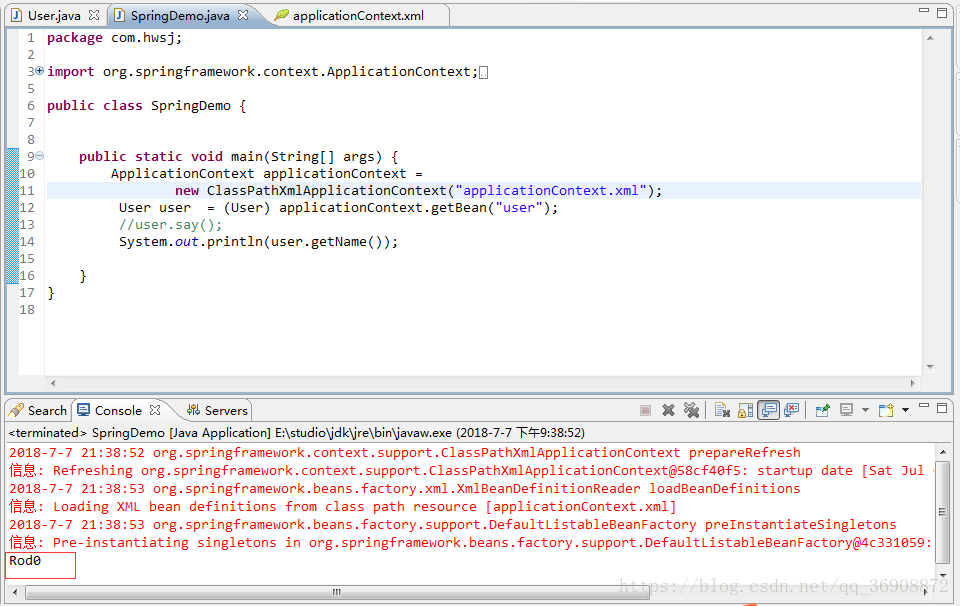
一个注入的简单例子
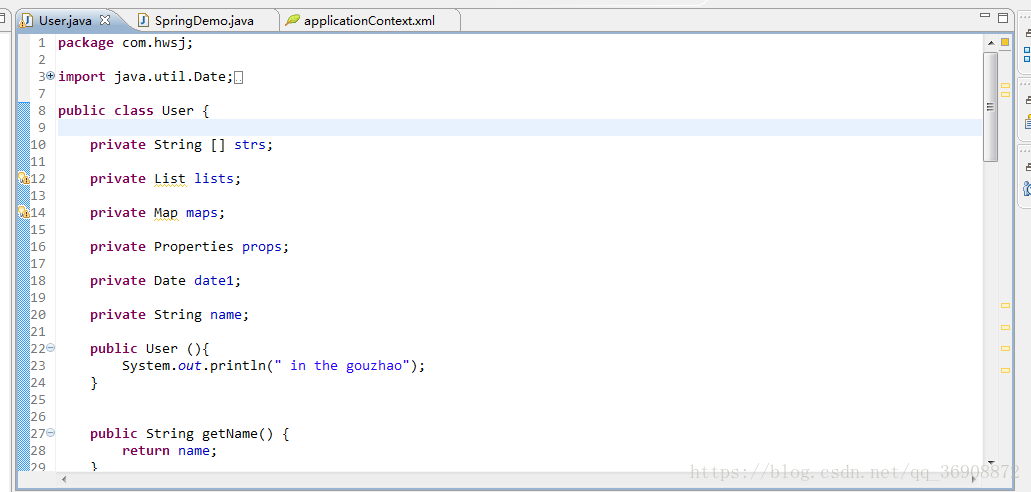
User类中声明一遍变量 生产set和get方法
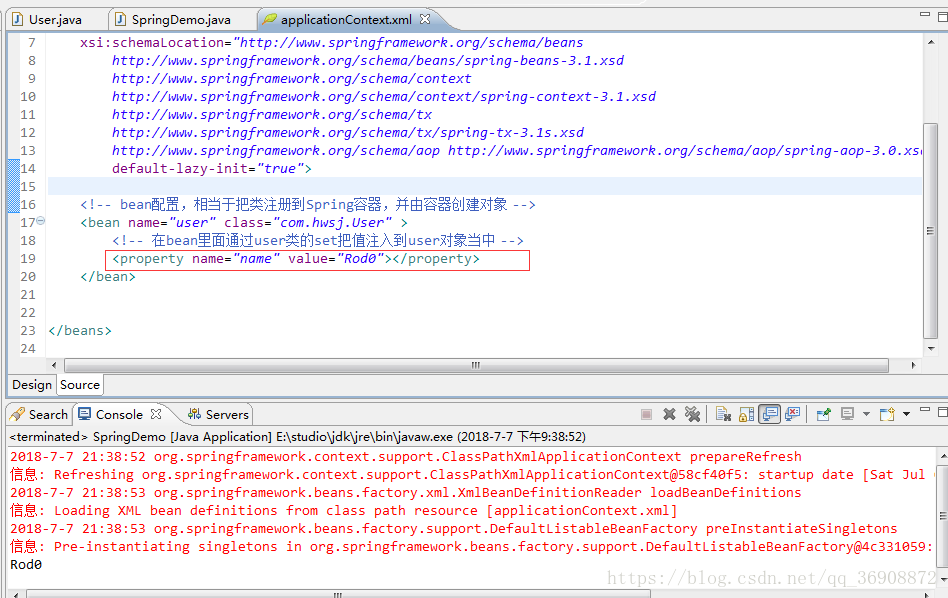
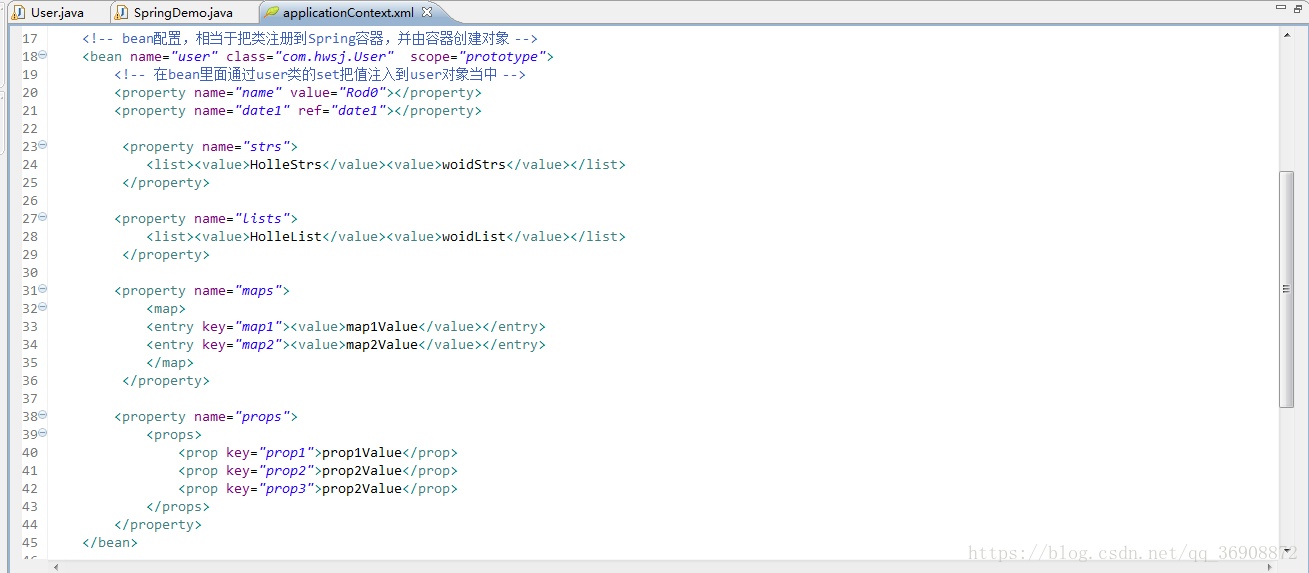
在spring配置文件中把值通注入 也是通过set方法生产对象时注入
获取得到注入的值
Scope
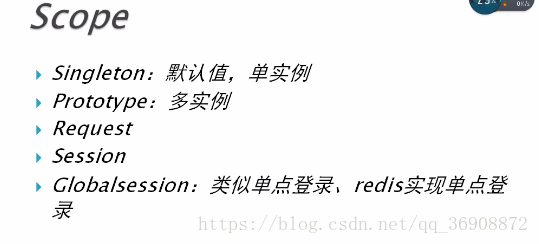
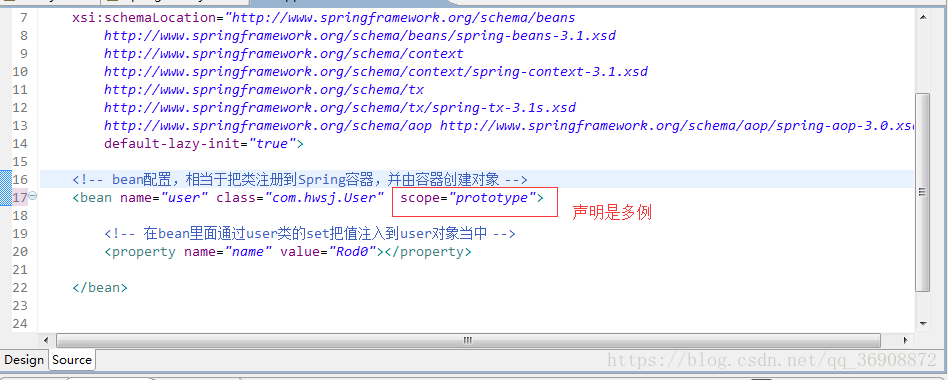
在spring 配置文件文件中声明是单例还是多例 ( 默认是单例)
单例情况的时候


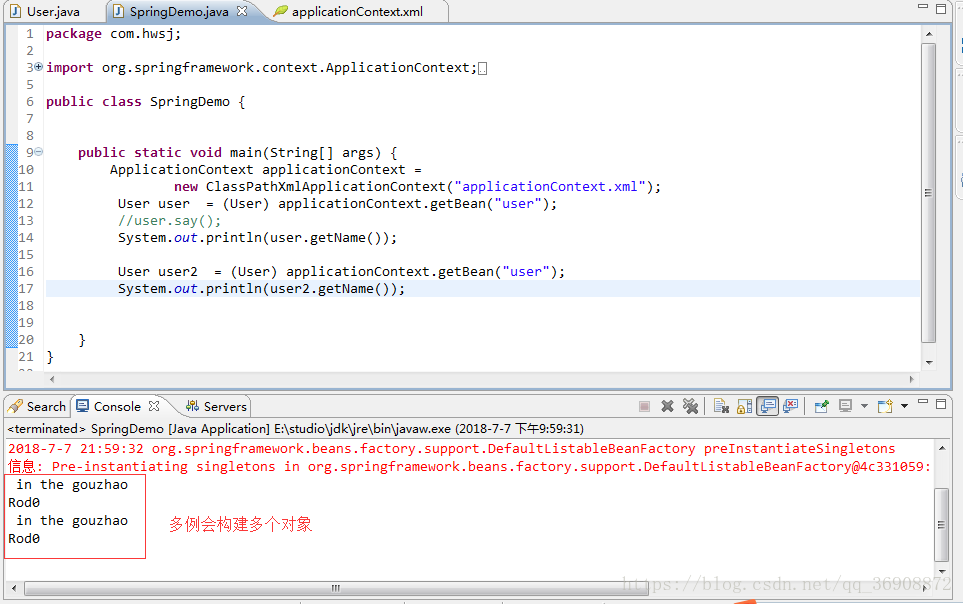
多例情况的时候
集合的注入 ,加入集合属性并生产set和get方法
spring配置文件中注入相对应的值
测试并输出结果

properties文件调用
先创建一个properties文件

这个是例子连接数据库时使用的一个连接文件,properties文件是以Key与Value 的形式保存的

spring文件获取到properties文件内容 (Spring 文件开头的为 约束,每个约束都有不同的作用,要明白每个约束才能够引用尽梁,不可胡乱引入)

--Resource 获取到properties 文件
spring小结
开发当中常用的 spring的Bean, AOP, jdbcTemplate,事务
△ Bean管理
△ AOP: 静态代理,动态代理,Aspect,Pointcut,Advisor,Interceptor
△ jdbcTemplate
△ 事务
Bean管理 注解
△ 一种特殊标记
△ @注解名称(属性名称=属性值)
△ 可以用在类,方法,属性
创建对象有4个注解 (功能一样都是创建对象)
△ component
△ controller (控制层)
△ Service (业务层)
△ Repository (持久层)
注解和配置文件的关系
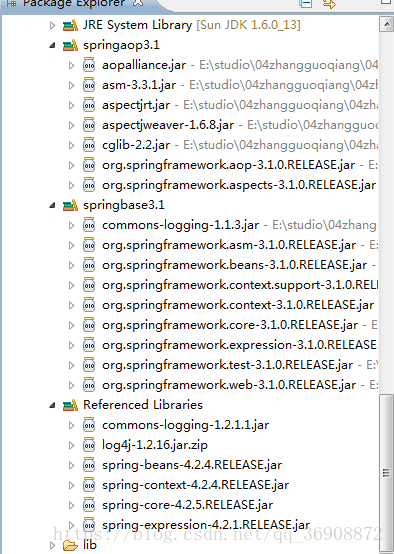
要用Bean时第一步是导入相对应的jar包,跟着在spring配置文件中配置上相对想的约束条件

例子
applicationContext.xml文件
<?xml version="1.0" encoding="UTF-8"?>
<beans xmlns="http://www.springframework.org/schema/beans"
    xmlns:xsi="http://www.w3.org/2001/XMLSchema-instance"
    xmlns:context="http://www.springframework.org/schema/context"
    xmlns:tx="http://www.springframework.org/schema/tx"
    xsi:schemaLocation="http://www.springframework.org/schema/beans
        http://www.springframework.org/schema/beans/spring-beans-3.1.xsd
        http://www.springframework.org/schema/context
        http://www.springframework.org/schema/context/spring-context-3.1.xsd
        http://www.springframework.org/schema/tx
        http://www.springframework.org/schema/tx/spring-tx-3.1.xsd"
        default-lazy-init="true" >
        <!-- 表明我将要用注解方式 -->
        <context:annotation-config/>
        <context:component-scan base-package="com.zhang.server" />


</beans>
UserServer类 和 UserDao类 在同一个包下
package com.zhang.server;

import org.springframework.beans.factory.annotation.Autowired;
import org.springframework.stereotype.Component;


@Service(value="userServer")//等价于 <bean name="userServer" class="UserServer">

@Scope(value="prototype")   //等价于<bean  name="" scope="prototype" > 是多例的  默认是单例的
public class UserServer {

    @Autowired //自适应注入 (自动匹配)
    public UserDao  userDao;

    public UserDao getUserDao() {
        return userDao;
    }

    public void setUserDao(UserDao userDao) {
        this.userDao = userDao;
    }

    public void addUser (){
        userDao.insertUser();
    }


}
package com.zhang.server;
import org.springframework.stereotype.Component;
@Repository(value="userDao")
public class UserDao {
public void insertUser (){
System.out.println(" in the addUser!!! " );
}
}
测试类 springDemo
package com.zhang.action;


import java.io.IOException;
import java.net.URISyntaxException;
import java.util.List;
import java.util.Map;
import java.util.Properties;

import javax.annotation.Resource;

import org.springframework.context.ApplicationContext;
import org.springframework.context.support.ClassPathXmlApplicationContext;

import com.zhang.server.UserServer;

public class SpringDemo {


    public static void main(String[] args) throws IOException, URISyntaxException{
        ApplicationContext ctx =  new ClassPathXmlApplicationContext("applicationContext.xml");
        UserServer userServer= (UserServer) ctx.getBean("userServer");
        userServer.addUser();

    }
}
运行结果

证明多例的代码 (UserServer类中新写一个构造函数方法)
package com.zhang.server;

import org.springframework.beans.factory.annotation.Autowired;
import org.springframework.context.annotation.Scope;
import org.springframework.stereotype.Component;
import org.springframework.stereotype.Service;


@Service(value="userServer")//等价于 <bean name="userServer" class="UserServer">
@Scope(value="prototype")   //等价于<bean  name="" scope="prototype" > 是多例的  默认是单例的
public class UserServer {


    public UserServer(){
        System.out.println("in the UserServer!");
    }

    @Autowired //自适应注入 (自动匹配)
    public UserDao  userDao;

    public UserDao getUserDao() {
        return userDao;
    }

    public void setUserDao(UserDao userDao) {
        this.userDao = userDao;
    }

    public void addUser (){
        userDao.insertUser();
    }


}
测试类 springDemo
package com.zhang.action;
import java.io.IOException;
import java.net.URISyntaxException;
import java.util.List;
import java.util.Map;
import java.util.Properties;
import javax.annotation.Resource;
import org.springframework.context.ApplicationContext;
import org.springframework.context.support.ClassPathXmlApplicationContext;
import com.zhang.server.UserServer;
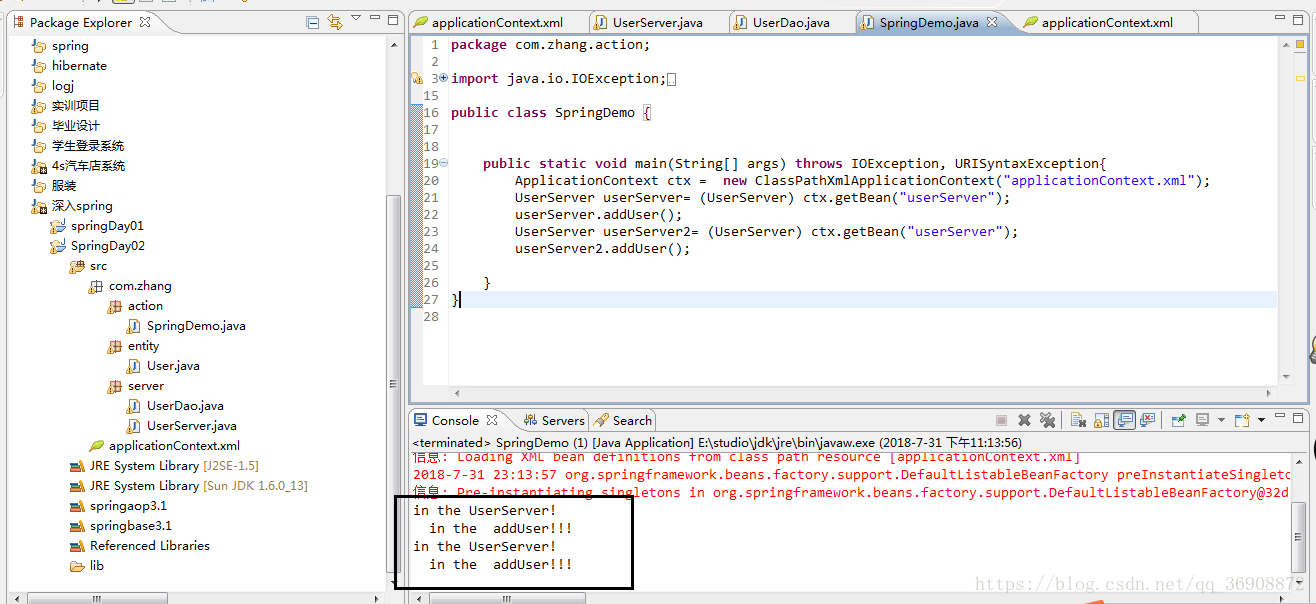
public class SpringDemo {
public static void main(String[] args) throws IOException, URISyntaxException{
ApplicationContext ctx = new ClassPathXmlApplicationContext("applicationContext.xml");
UserServer userServer= (UserServer) ctx.getBean("userServer");
userServer.addUser();
UserServer userServer2= (UserServer) ctx.getBean("userServer");
userServer2.addUser();
}
}
运行结果,调用了两次构造函数,说明创建了两个对象属于多例
注解 @Resource 与 @Autowired 一样,但是@Autowired //自适应注入 (自动匹配), @Resource则是要指定类名
用法
package com.zhang.server;

import javax.annotation.Resource;

import org.springframework.beans.factory.annotation.Autowired;
import org.springframework.context.annotation.Scope;
import org.springframework.stereotype.Component;
import org.springframework.stereotype.Service;


@Service(value="userServer")//等价于 <bean name="userServer" class="UserServer">
@Scope(value="prototype")   //等价于<bean  name="" scope="prototype" > 是多例的  默认是单例的
public class UserServer {


	public UserServer(){
		System.out.println("in the UserServer!");
	}

	@Resource(name="userDao")
	public UserDao  userDao;

	public UserDao getUserDao() {
		return userDao;
	}

	public void setUserDao(UserDao userDao) {
		this.userDao = userDao;
	}

	public void addUser (){
		userDao.insertUser();
	}


}
AOP (表现方式就是代理)
实现有两个实现方式:
Proxy : static Proxy (静态代理) 与 DynamicProxy (动态代理)
CGLIB : if has interface use Dynamic Proxy, otherwise CLIB (不常用)
面向切面编程
△ Aspect Oriented Programming
跨模块的代码共享
关注点
Aop的应用
△ 动态代理和装饰
△ 事务管理
△ 安全
△ 日志
静态代理视图

静态代理例子代码
HelloWorld 接口
package com.zhang.proxy;

public interface HelloWorld {


	public void print();

}
HelloWorldIplm 实现类
package com.zhang.proxy;

public class HelloWorldIplm  implements HelloWorld{

	public void print() {
		System.out.println( " ===print.....=== ");

	}


}
静态代理类(HelloWorldProxy),它对于接口来说是中介代理,对于实现类来说也是中介代理接口,静态代理类中可以通过在代理过程时来完成自己想要做的事情,再实现接口真正要做的事情。
package com.zhang.proxy;

public class HelloWorldProxy implements HelloWorld {

	public HelloWorld  wd;

	public HelloWorldProxy(HelloWorld  wd){
		this.wd = wd;
	}

	public void print() {
		//代理自己要做的事情
		System.out.println(" I am proxy.....");
		//接口要做的事情
		wd.print();
	}

	public HelloWorld getWd() {
		return wd;
	}

	public void setWd(HelloWorld wd) {
		this.wd = wd;
	}


}
Demo测试类
package com.zhang.proxy;

public class Demo {

	public static void main(String[] args) {

		HelloWorld hw = new HelloWorldIplm();
		HelloWorld proxy = new HelloWorldProxy(hw);
		proxy.print();
	}

}
最后运行结果

Static Proxy
静态代理的弱点
如果接口加一个方法,所有的现实类和代理类里都需要做个实现,这就增加了代码的复杂度。
动态代理就可以避免这个缺点。
Dynamic Proxy
动态代理与普通的代理想相比较,最大的好处是接口中声明的所以方法都被转移到一个集中的方法中处理(invoke),
这样在接口方法数量比较多的时候,我们可以进行灵活处理,而不需要像静态代理那样每一个方法进行中转。
动态代理类zhin只能代理接口,代理类都需要实现InvocationHandler类,实现invoke方法。
该invoke方法就是调用被代理接口的所有方法时需要调用的,该invoke方法返回的值是被代理接口的一个实现类
动态代理例子代码
DynamicProxydon动态代理类
package com.zhang.proxy1;

import java.lang.reflect.InvocationHandler;
import java.lang.reflect.Method;
import java.lang.reflect.Proxy;

public class DynamicProxy implements InvocationHandler {
	private Object object;

	public Object bindRelation(Object object){
		this.object = object;
		return Proxy.newProxyInstance(object.getClass().getClassLoader(),
				object.getClass().getInterfaces(), this);
	}


	public Object invoke(Object proxy, Method method, Object[] args)
			throws Throwable {
		System.out.println("welcome");
		Object result = method.invoke(object, args);
		return result;
	}

}
DemoDynamicProxy测试类
package com.zhang.proxy1;

import com.zhang.proxy.HelloWorld;
import com.zhang.proxy.HelloWorldIplm;

public class DemoDynamicProxy {

	public static void main(String[] args) {

		HelloWorld helloWorld = new HelloWorldIplm();

		DynamicProxy dp = new DynamicProxy();

		HelloWorld hw = (HelloWorld) dp.bindRelation(helloWorld);

		hw.print();
	}
}
运行结果

AOP的基本概念
△ 切面(Aspect)
权限检查
日志记录
△ 连接点 (JoinPoint)
程序运行过程中的某个阶段点,如某个方法调用,或者某个异常被抛出
△ 处理逻辑 (Advice)
在某个连接点所采用的处理逻辑
是你想向程序内部不同的地方注入的代码被翻译为 “通知”
MethodBeforeAdvice (方法运行前执行)
ThrowsAdvice (抛出异常执行)
AfterReturningAdvice (方法运行后执行)
MethodInterceptor (round Advice 方法运行前后都执行)
△ 切点 (PointCut)
一系列连接点的集合,它指明处理方式(Advice)将在何时被触发
定义了需要注入advice的位置,通常是某个特定的类的一个public方法
△ Advisor
是pointcut和advice的装配器,是讲advice注入主程序预定义位置的代码
△ weaving
AOP实例 (例子)
IBusinessLogic 接口
package com.zhang.proxy2;

public interface IBusinessLogic {
	public void foo();

}
BusinessLogic 实现类
package com.zhang.proxy2;

public class BusinessLogic implements IBusinessLogic {

	public void foo() {
		System.out.println("Inside usinessLogic.foo()");

	}

}
TracingBeforeAdvice 拦截器类
package com.zhang.proxy2;

import java.lang.reflect.Method;

import org.springframework.aop.MethodBeforeAdvice;

public class TracingBeforeAdvice implements MethodBeforeAdvice {

	public void before(Method arg0, Object[] arg1, Object arg2)
			throws Throwable {
		System.out.println(" Hello world! ");

	}


}
MainApplication 测试类
package com.zhang.proxy2;

import org.springframework.context.ApplicationContext;
import org.springframework.context.support.ClassPathXmlApplicationContext;

public class MainApplication {


	public static void main(String[] args) {
		ApplicationContext ctx =  new ClassPathXmlApplicationContext("applicationContext.xml");
		IBusinessLogic  testObject = (IBusinessLogic) ctx.getBean("businesslogicbean");
		testObject.foo();

	}

}
applicationContext.xml 配置文件
<?xml version="1.0" encoding="UTF-8"?>
<beans xmlns="http://www.springframework.org/schema/beans"
	xmlns:xsi="http://www.w3.org/2001/XMLSchema-instance"
	xmlns:context="http://www.springframework.org/schema/context"
	xmlns:tx="http://www.springframework.org/schema/tx"
    xsi:schemaLocation="http://www.springframework.org/schema/beans
		http://www.springframework.org/schema/beans/spring-beans-3.1.xsd
		http://www.springframework.org/schema/context
		http://www.springframework.org/schema/context/spring-context-3.1.xsd
		http://www.springframework.org/schema/tx
		http://www.springframework.org/schema/tx/spring-tx-3.1.xsd"
		default-lazy-init="true" >

	<bean id="businesslogicbean" class="org.springframework.aop.framework.ProxyFactoryBean">
		<property name="proxyInterfaces">
			<value>com.zhang.proxy2.IBusinessLogic</value>
		</property>
		<property name="target" ref="beanTarget">

		</property>
		<property name="interceptorNames">
			<list>
				<value>theTracingBeforeAdvisor</value>
			</list>
		</property>
	</bean>
	<bean id="beanTarget" class="com.zhang.proxy2.BusinessLogic"/>

	<bean id="theTracingBeforeAdvisor"
		class="org.springframework.aop.support.RegexpMethodPointcutAdvisor">

		<property name="advice">
			<bean class="com.zhang.proxy2.TracingBeforeAdvice" />
		</property>
		<property name="pattern">
			<value>.*</value>
		</property>
	</bean>

</beans>
测试结果

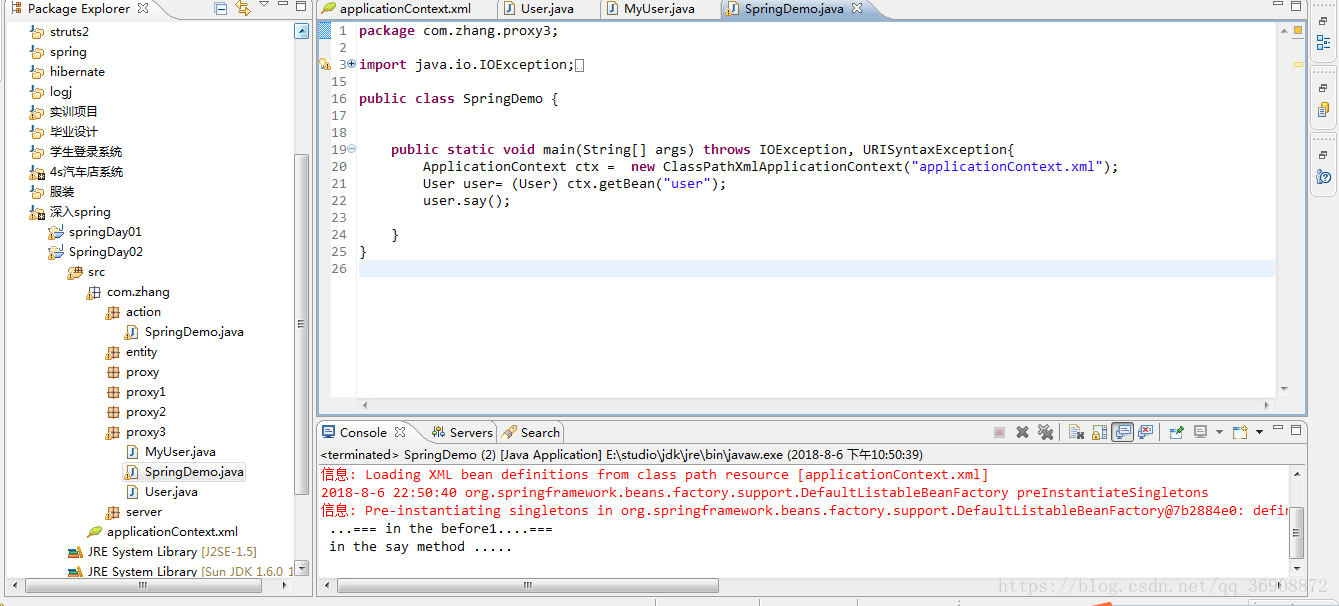
AOP Aspect 切面
通过切入点的配置来实现 myuser拦截user

user 类
package com.zhang.proxy3;

public class User {

	public void say(){
		System.out.println(" in the say method .....  ");
	}
}
MyUser 类
package com.zhang.proxy3;

public class MyUser {

		public void before1(){
			System.out.println(" ...=== in the before1....=== ");
		}
}
applicationContext.xml 配置文件
<?xml version="1.0" encoding="UTF-8"?>
<beans xmlns="http://www.springframework.org/schema/beans"
	xmlns:xsi="http://www.w3.org/2001/XMLSchema-instance"
	xmlns:aop="http://www.springframework.org/schema/aop"
    xsi:schemaLocation="http://www.springframework.org/schema/beans
		http://www.springframework.org/schema/beans/spring-beans-3.1.xsd
		http://www.springframework.org/schema/aop
		http://www.springframework.org/schema/aop/spring-aop.xsd ">


<bean id="user"  class="com.zhang.proxy3.User"></bean>
<bean id="myUser"  class="com.zhang.proxy3.MyUser"></bean>
<aop:config>
	<aop:pointcut expression="execution(* com.zhang.proxy3.User.*(..))" id="pointcut1"/>
	<aop:aspect ref="myUser">
		<aop:before method="before1" pointcut-ref="pointcut1"/>

	</aop:aspect>
</aop:config>


</beans>
测试类
package com.zhang.proxy3;

import java.io.IOException;
import java.net.URISyntaxException;
import java.util.List;
import java.util.Map;
import java.util.Properties;

import javax.annotation.Resource;

import org.springframework.context.ApplicationContext;
import org.springframework.context.support.ClassPathXmlApplicationContext;

import com.zhang.server.UserServer;

public class SpringDemo {


	public static void main(String[] args) throws IOException, URISyntaxException{
		ApplicationContext ctx =  new ClassPathXmlApplicationContext("applicationContext.xml");
		User user= (User) ctx.getBean("user");
		user.say();

	}
}
运行结果是先执行了myuser的方法在执行user 的方法,从而看出拦截的操作
数据访问
在spring的DAO框架里,Connection对象是通过DataSource获得的
Spring提供的几种获得DataSource的方式:1.从JNDI得到DataSource 2.创建一个DataSource连接池
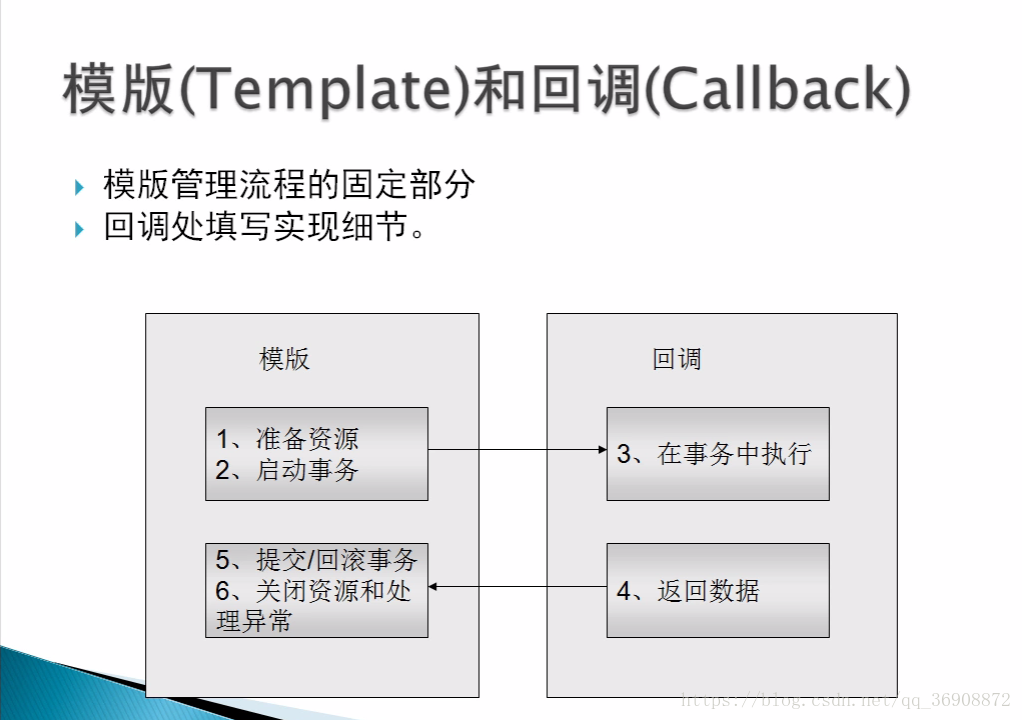
样板代码的重要性:
释放资源和处理错误让数据访问更为可靠
如果没有这些,错误没有发现,资源继续占用,将导致不可预测的代码和资源泄露
Template和Callback
使用jdbcTemplate
Spring的JDBC框架承担了资源管理和错误处理的重担,可使JDBC代码非常干净
从书写statement和查询语句来读写数据库解放出来
所有的Spring DAO模板类都是线程安全的
例子
使用的jar包

mysql 驱动jar包
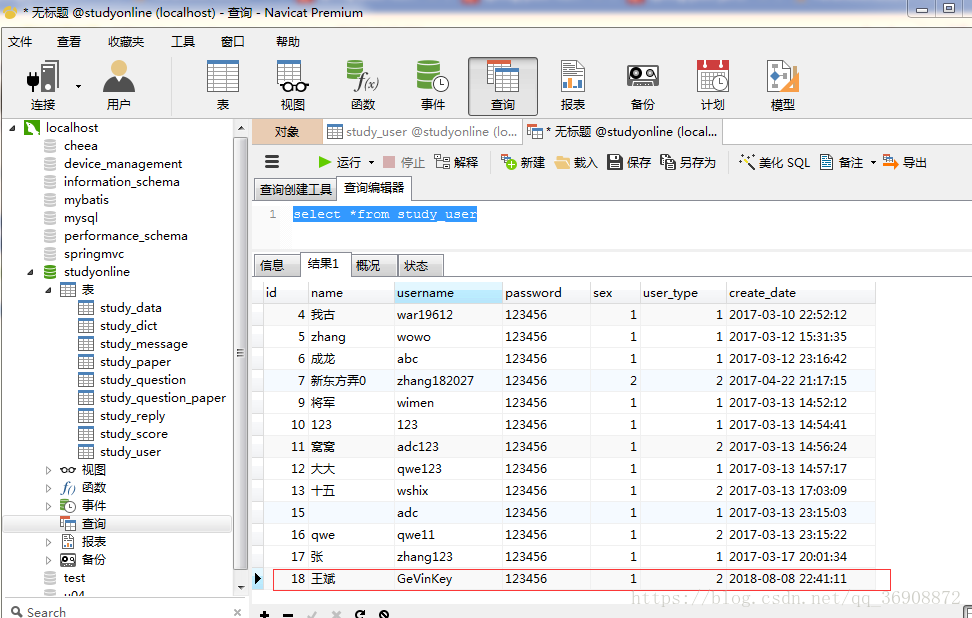
jdbcTempleatDemp 代码
package com.zhang.jdbc;

import org.springframework.jdbc.core.JdbcTemplate;
import org.springframework.jdbc.datasource.DriverManagerDataSource;

public class JdbcTemplateDemo {


	public static void main(String[] args) {
		DriverManagerDataSource dmd = new  DriverManagerDataSource();
		dmd.setDriverClassName("com.mysql.jdbc.Driver");
		dmd.setUrl("jdbc:mysql://127.0.0.1:3306/studyonline");
		dmd.setUsername("root");
		dmd.setPassword("u04");

		JdbcTemplate jdbctp = new JdbcTemplate(dmd);
		jdbctp.update("update study_user set username=? where id=18","GeVinKey");

	}
}
修改前

修改后
查询的代码

在开发当中最常用的就是声明一个连接数据库的properties文件 以Key - value 形式存储 , 然后在spring配置文件中读取properties文件中的数据
properties文件代码 (以oracle数据库为例子)
#驱动类
driver=oracle.jdbc.driver.OracleDriver
url=jdbc:oracle:thin:@127.0.0.1:1521:XE
#加1是为了避免命名冲突
username1=u04
password1=u04
#连接池启动时初始连接数
initialSize=1
#最大活动连接数
maxActive=3
# 最大空闲值.当经过一个高峰后, 可以将已经用不到的连接慢慢释放一部分,减少到maxIdle为止
maxIdle=2
#最小空闲值.当空闲的连接数少于阀值时,连接池就会预申请一些连接,以免洪峰来时来不及申请
minIdle=1
applicationContext.xml 文件
<?xml version="1.0" encoding="UTF-8"?>
<beans xmlns="http://www.springframework.org/schema/beans"
	xmlns:xsi="http://www.w3.org/2001/XMLSchema-instance"
	xmlns:context="http://www.springframework.org/schema/context"
	xmlns:aop="http://www.springframework.org/schema/aop"
	xmlns:tx="http://www.springframework.org/schema/tx"
    xsi:schemaLocation="http://www.springframework.org/schema/beans
		http://www.springframework.org/schema/beans/spring-beans-3.1.xsd
		http://www.springframework.org/schema/context
		http://www.springframework.org/schema/context/spring-context-3.1.xsd
		http://www.springframework.org/schema/tx
		http://www.springframework.org/schema/tx/spring-tx-3.1.xsd
		http://www.springframework.org/schema/aop
		http://www.springframework.org/schema/aop/spring-aop-3.1.xsd"
		default-lazy-init="true" >
		<!-- 表明我将要用注解方式 -->
		<context:annotation-config/>
		<!-- 自动扫描(包和子包,把待注解的类纳入到spring容器来管理) -->
		<context:component-scan base-package="com.entor" />
		<!-- 加载jdb.properties配置文件-->
		<context:property-placeholder location="classpath:db.properties"/>
		 <!-- 配置数据源(数据库连接池)需要commons-dbcp.jar和commons-pool.jar- -->
 		<bean id="dataSource" class="org.apache.commons.dbcp.BasicDataSource" destroy-method="close">
   			 <property name="driverClassName" value="${driver}"/>
  			 <property name="url" value="${url}"/>
    		 <property name="username" value="${username1}"/>
     		 <property name="password" value="${password1}"/>
			 <!-- 连接池启动时的初始值 -->
 			 <property name="initialSize" value="${initialSize}"/>
 			 <!-- 连接池的最大值 -->
			 <property name="maxActive" value="${maxActive}"/>
			 <!-- 最大空闲值.当经过一个高峰时间后,连接池可以慢慢将已经用不到的连接慢慢释放一部分,一直减少到maxIdle为止 -->
			 <property name="maxIdle" value="${maxIdle}"/>
			 <!-- 最小空闲值.当空闲的连接数少于阀值时,连接池就会预申请去一些连接,以免洪峰来时来不及申请 -->
			 <property name="minIdle" value="${minIdle}"/>
 		 </bean>

</beans>