首先我们要新建一个项目,然后按照 《Android平台下的FFmpeg的学习之路------(二)环境搭建》,这篇文章的知识搭建好环境。
大概流程是:获取音频文件路径 -> 把音频文件路径传递到NDK层 -> NDK层通过FFmpeg打开音频文件 -> FFmpeg获取音频文件的信息 -> FFmpeg通过音频文件信息获得音频流 -> FFmpeg通过音频流获取所需要的解码器的信息 -> FFmpeg通过解码器的信息在FFmpeg中获取解码器 -> 打开解码器 -> Java层创建AudioTrack -> AudioTrack调用Play-> 解码音频获得原生数据(PCM) -> 原生数据(PCM)重采样 -> 将重采样后的数据转换为Java的byte[](Java的byte[]对应JNI的jbyteArray) -> AudioTrack调用Write写入byte[]
这样就完成了解码和AudioTrack播放的流程,下面开始写代码。
PS:音频解码流程和视频解码流程类似
因为我们要从SD卡获取视频或音频,然后解码播放,所以,我们要在项目的AndroidManifest.xml文件中添加权限:
<uses-permission android:name="android.permission.READ_EXTERNAL_STORAGE" />
<uses-permission android:name="android.permission.WRITE_EXTERNAL_STORAGE" />
然后编写XML代码,需要的控件是一个Button:用于点击开始,代码如下:
<?xml version="1.0" encoding="utf-8"?>
<android.support.constraint.ConstraintLayout xmlns:android="http://schemas.android.com/apk/res/android"
    xmlns:app="http://schemas.android.com/apk/res-auto"
    xmlns:tools="http://schemas.android.com/tools"
    android:layout_width="match_parent"
    android:layout_height="match_parent"
    tools:context="com.jamingx.ffmpegtest.MainActivity">

    <Button
        android:id="@+id/btn_play"
        android:layout_width="wrap_content"
        android:layout_height="wrap_content"
        android:text="开始" />

</android.support.constraint.ConstraintLayout>
接着编辑Java代码,首先编写native方法:
public native static void deCodeAudio(String input);
其中input是用于传入的音频路径(注意,这里的音频路径也可以是视频,因为大部分视频都有声音)
接着编写上面流程中的 Java层创建AudioTrack 的代码:
public static AudioTrack createAudioTrack(int sampleRateInHz, int nb_channals) {
int channaleConfig;
if (nb_channals == 1) {
channaleConfig = AudioFormat.CHANNEL_OUT_MONO;
} else if (nb_channals == 2) {
channaleConfig = AudioFormat.CHANNEL_OUT_STEREO;
}else {
channaleConfig = AudioFormat.CHANNEL_OUT_MONO;
}
int buffersize=AudioTrack.getMinBufferSize(sampleRateInHz,
channaleConfig, AudioFormat.ENCODING_PCM_16BIT);
AudioTrack audioTrack = new AudioTrack(AudioManager.STREAM_MUSIC,sampleRateInHz,channaleConfig,
AudioFormat.ENCODING_PCM_16BIT,buffersize,AudioTrack.MODE_STREAM);
audioTrack.stop();
return audioTrack;
}
这个方法是提供给JNI层调用的(C调用Java),其中sampleRateInHz是采样率,nb_channals是声道个数。
最后的代码如下:

package com.jamingx.ffmpegtest;

import android.media.AudioFormat;
import android.media.AudioManager;
import android.media.AudioTrack;

/**
 * Created by Administrator on jamingx 2018/1/18 16:13
 */

public class FFmpegTest {
//    public native static String getFFmpegCodecInfo();
//    public native static void deCodeVideo(String input,Surface surface);
    public native static void deCodeAudio(String input);

    /**
     * 创建AudioTrack
     * @param sampleRateInHz 采样率,单位Hz
     * @param nb_channals 声道个数
     * @return AudioTrack
     */
    public static AudioTrack createAudioTrack(int sampleRateInHz, int nb_channals) {
        int channaleConfig;
        if (nb_channals == 1) {
            channaleConfig = AudioFormat.CHANNEL_OUT_MONO;
        } else if (nb_channals == 2) {
            channaleConfig = AudioFormat.CHANNEL_OUT_STEREO;
        }else {
            channaleConfig = AudioFormat.CHANNEL_OUT_MONO;
        }
        int buffersize=AudioTrack.getMinBufferSize(sampleRateInHz,
                channaleConfig, AudioFormat.ENCODING_PCM_16BIT);
        AudioTrack audioTrack = new AudioTrack(AudioManager.STREAM_MUSIC,sampleRateInHz,channaleConfig,
                AudioFormat.ENCODING_PCM_16BIT,buffersize,AudioTrack.MODE_STREAM);
        return audioTrack;
    }

    static {
        System.loadLibrary("ffmpeg");
        System.loadLibrary("ffmpeg_test");
    }
}
接着生成头文件:
/* DO NOT EDIT THIS FILE - it is machine generated */
#include <jni.h>
/* Header for class com_jamingx_ffmpegtest_FFmpegTest */

#ifndef _Included_com_jamingx_ffmpegtest_FFmpegTest
#define _Included_com_jamingx_ffmpegtest_FFmpegTest
#ifdef __cplusplus
extern "C" {
#endif
/*
 * Class:     com_jamingx_ffmpegtest_FFmpegTest
 * Method:    getFFmpegCodecInfo
 * Signature: ()Ljava/lang/String;
 */
//JNIEXPORT void JNICALL Java_com_jamingx_ffmpegtest_FFmpegTest_deCodeVideo
//  (JNIEnv *, jclass,jstring,jobject);

JNIEXPORT void JNICALL Java_com_jamingx_ffmpegtest_FFmpegTest_deCodeAudio
        (JNIEnv *, jclass,jstring);

#ifdef __cplusplus
}
#endif
#endif
接下来编写MainActivity代码:
package com.jamingx.ffmpegtest;

import android.os.Bundle;
import android.os.Environment;
import android.support.v7.app.AppCompatActivity;
import android.util.Log;
import android.view.View;

public class MainActivity extends AppCompatActivity {
    private Thread playThread;

    @Override
    protected void onCreate(Bundle savedInstanceState) {
        super.onCreate(savedInstanceState);
        setContentView(R.layout.activity_main);
        findViewById(R.id.btn_play).setOnClickListener(new View.OnClickListener() {
            @Override
            public void onClick(View v) {
                if (playThread != null){
                    playThread.interrupt();
                    playThread = null;
                }
                playThread = new Thread(){
                    @Override
                    public void run() {
                        String input2 = Environment.getExternalStorageDirectory().getAbsolutePath() + "/input2.mkv";
                        Log.e("TAG",input2);
                        FFmpegTest.deCodeAudio(input2);
                    }
                };
                playThread.start();
            }
        });
    }
}
这个代码就只是点击按钮开启新线程进行解码播放
接下来我们编写C++代码:
#include "com_jamingx_ffmpegtest_FFmpegTest.h"
#include <android/log.h>
#define LOGE(FORMAT,...) __android_log_print(ANDROID_LOG_ERROR,"TAG",FORMAT,##__VA_ARGS__);
#define MAX_AUDIO_FRME_SIZE 48000*4

extern "C" {
#include "libavcodec/avcodec.h"
#include "libavformat/avformat.h"
#include "libswresample/swresample.h"
}

jobject audioTrack = NULL;//对应Java的audioTrack
jmethodID audioTrack_play_mid;//对应audioTrack.play()的methodID
jmethodID audioTrack_stop_mid;//对应audioTrack.stop()的methodID
jmethodID audioTrack_write_mid;//对应audioTrack.write()的methodID
void createAudioTrackForJava(JNIEnv *, jclass,int32_t,int32_t);//在Java层创建AudioTrack
void audioTrackPlayForJava(JNIEnv *);//调用Java层的audioTrack.play()
void audioTrackStopForJava(JNIEnv *);//调用Java层的audioTrack.stop()
void audioTrackWriteForJava(JNIEnv *,uint8_t*,int32_t);//调用Java层的audioTrack.write()


JNIEXPORT void JNICALL Java_com_jamingx_ffmpegtest_FFmpegTest_deCodeAudio
        (JNIEnv *env, jclass jcls,jstring input_jstr){
    const char* input_path = env->GetStringUTFChars(input_jstr,NULL);// java String -> C char*

    //一.注册所有组件
    //void av_register_all(void);
    av_register_all();

    //二.打开输入文件
    //int avformat_open_input(AVFormatContext **ps, const char *url, AVInputFormat *fmt, AVDictionary **options);
    //1. 初始化 AVFormatContext *pFormatCtx
    AVFormatContext *pFormatCtx = avformat_alloc_context();
    //2. 打开输入文件
    if (avformat_open_input(&pFormatCtx,input_path,NULL,NULL) != 0){
        LOGE("打开输入文件失败");
        return;
    }


    //三.获取音频文件信息
    //int avformat_find_stream_info(AVFormatContext *ic, AVDictionary **options);
    if (avformat_find_stream_info(pFormatCtx,NULL) < 0){
        LOGE("获取音频文件信息失败");
        return;
    }

    //四.查找编解码器
    //AVCodec *avcodec_find_decoder(enum AVCodecID id);
    //1.获取音频流的索引(下标)位置
    int audio_stream_index = -1;//存放音频流的索引(下标)位置
    for (int i = 0; i < pFormatCtx->nb_streams; ++i) {
        if (pFormatCtx->streams[i]->codec->codec_type == AVMEDIA_TYPE_AUDIO){
            audio_stream_index = i;
            break;
        }
    }
    if (audio_stream_index == -1){
        LOGE("没有找到音频流");
        return;
    }
    //2.获取音频流的编解码器上下文(保存了视频或音频编解码器的信息)
    AVCodecContext * pCodecCtx = pFormatCtx->streams[audio_stream_index]->codec;
    //3.通过编解码器上下文(存放的编解码器信息)存放的编解码器ID获取编解码器
    AVCodec * pCodec = avcodec_find_decoder(pCodecCtx->codec_id);

    //五.打开编码器
    //int avcodec_open2(AVCodecContext *avctx, const AVCodec *codec, AVDictionary **options);
    if(avcodec_open2(pCodecCtx,pCodec,NULL) < 0){
        LOGE("打开编码器失败");
        return;
    }

    //六.从输入文件读取数据(循环读取),av_read_frame只能读取1帧
    //int av_read_frame(AVFormatContext *s, AVPacket *pkt);
    //1.初始化 AVPacket *pPacket -> 存放解码前数据
    AVPacket *pPacket = av_packet_alloc();
    //2.初始化 AVFrame *pFrame -> 存放解码后的数据
    AVFrame *pFrame = av_frame_alloc();
    //3.初始化用于重采样的SwrContext
    //分配重采样SwrContext
    SwrContext *swrCtx = swr_alloc();
    //输入的采样格式
    enum AVSampleFormat in_sample_fmt = pCodecCtx->sample_fmt;
    //输出采样格式16bit PCM
    enum AVSampleFormat out_sample_fmt = AV_SAMPLE_FMT_S16;
    //输入采样率
    int in_sample_rate = pCodecCtx->sample_rate;
    //输出采样率
    int out_sample_rate = 44100;
    //获取输入的声道布局
    uint64_t in_ch_layout = pCodecCtx->channel_layout;
    //输出的声道布局(立体声)
    uint64_t out_ch_layout = AV_CH_LAYOUT_STEREO;
    //设置参数到SwrContext
    swr_alloc_set_opts(swrCtx,
                       out_ch_layout, out_sample_fmt, out_sample_rate,
                       in_ch_layout, in_sample_fmt, in_sample_rate,
                       0, NULL);
    //初始化SwrContext
    swr_init(swrCtx);
    //输出的声道个数
    //int av_get_channel_layout_nb_channels(uint64_t channel_layout);
    int out_channel_nb = av_get_channel_layout_nb_channels(out_ch_layout);
    //分配存放 16bit 44100 PCM 数据 的内存
    uint8_t *out_buffer = (uint8_t *) av_malloc(MAX_AUDIO_FRME_SIZE);
    //4.Java层创建AudioTrack
    createAudioTrackForJava(env,jcls,out_sample_rate,out_channel_nb);
    //5.调用Java层的AudioTrack.play()
    audioTrackPlayForJava(env);

    int got_frame = 0;
    int countFrame = 0;
    while (av_read_frame(pFormatCtx,pPacket) == 0){
        if(pPacket->stream_index == audio_stream_index){
            //七.解码一帧数据
            avcodec_decode_audio4(pCodecCtx, pFrame, &got_frame, pPacket);
            if (got_frame > 0) {
                LOGE("解码:%d", ++countFrame);
                //重采样
                //int swr_convert(struct SwrContext *s, uint8_t **out, int out_count,
                //                const uint8_t **in , int in_count);
                swr_convert(swrCtx, &out_buffer, MAX_AUDIO_FRME_SIZE,(const uint8_t **) pFrame->data , pFrame->nb_samples);
                //获取samples(样本,类似于视频的一帧)的大小
                //int av_samples_get_buffer_size(int *linesize, int nb_channels, int nb_samples,
                //                               enum AVSampleFormat sample_fmt, int align);
                int out_buffer_size = av_samples_get_buffer_size(NULL, out_channel_nb,
                                                                 pFrame->nb_samples, out_sample_fmt, 1);
                //调用Java层的audioTrack.write()
                audioTrackWriteForJava(env,out_buffer,out_buffer_size);
            }
        }
        av_packet_unref(pPacket);
    }
    //调用Java层的audioTrack.stop()
    audioTrackStopForJava(env);
    av_free(pPacket);
    av_free(pFrame);
    av_free(out_buffer);
    swr_free(&swrCtx);
    //八.关闭解编码器
    avcodec_close(pCodecCtx);

    //九.关闭输入文件
    avformat_close_input(&pFormatCtx);

    env->ReleaseStringUTFChars(input_jstr,input_path);//释放
}

/**
 * 在Java层创建AudioTrack
 * @param env
 * @param playerUtil
 * @param out_sample_rate
 * @param out_channel_nb
 */
void createAudioTrackForJava(JNIEnv *env,jclass ffmpegTest_clas,int32_t out_sample_rate,int32_t out_channel_nb){
    //AudioTrack对象
    jmethodID createAudioTrack_mid = env->GetStaticMethodID(ffmpegTest_clas, "createAudioTrack",
                                                        "(II)Landroid/media/AudioTrack;");
    //调用Java层的createAudioTrack
    audioTrack = env->CallStaticObjectMethod(ffmpegTest_clas,createAudioTrack_mid,out_sample_rate, out_channel_nb);
    //获得AudioTrack的class
    jclass audio_track_class = env->GetObjectClass(audioTrack);
    //AudioTrack.play
    audioTrack_play_mid = env->GetMethodID( audio_track_class, "play", "()V");
    //AudioTrack.stop
    audioTrack_stop_mid = env->GetMethodID(audio_track_class, "stop", "()V");
    //AudioTrack.write
    audioTrack_write_mid = env->GetMethodID( audio_track_class, "write","([BII)I");
}


/**
 * 调用Java层的audioTrack.play()
 * @param env
 */
void audioTrackPlayForJava(JNIEnv *env){
    if (audioTrack != NULL){
        //调用audioTrack.play()
        env->CallVoidMethod(audioTrack, audioTrack_play_mid);
    }
}

/**
 * 调用Java层的audioTrack.stop()
 * @param env
 */
void audioTrackStopForJava(JNIEnv *env){
    if (audioTrack != NULL){
        //调用audioTrack.stop()
        env->CallVoidMethod(audioTrack, audioTrack_stop_mid);
    }
}

/**
 * 调用Java层的audioTrack.write()
 * @param env
 * @param out_buffer
 * @param out_buffer_size
 */
void audioTrackWriteForJava(JNIEnv *env,uint8_t* out_buffer,int32_t out_buffer_size){
    if (audioTrack != NULL){
        //out_buffer缓冲区数据 -> Java的byte[]
        jbyteArray audio_sample_array = env->NewByteArray(out_buffer_size);
        jbyte *sample_bytep = env->GetByteArrayElements(audio_sample_array, NULL);
        //out_buffer的数据复制到sampe_bytep
        memcpy(sample_bytep, out_buffer, out_buffer_size);
        env->ReleaseByteArrayElements(audio_sample_array, sample_bytep, 0);
        //调用audioTrack.write()
        env->CallIntMethod(audioTrack, audioTrack_write_mid,
                           audio_sample_array, 0, out_buffer_size);
        //释放局部引用
        env->DeleteLocalRef(audio_sample_array);
    }
}
其中,jobject audioTrack 存放调用Java层创建A udioTrack返回的AudioTrack对象。
jmethodID audioTrack_play_mid 存放audioTrack.play() 的 methodID,用于C调用Java
jmethodID audioTrack_stop_mid 存放audioTrack.stop() 的 methodID,用于C调用Java
jmethodID audioTrack_write_mid 存放audioTrack.write() 的 methodID,用于C调用Java
void createAudioTrackForJava(JNIEnv *, jclass,int32_t,int32_t) 调用Java层的创建AudioTrack方法(public static AudioTrack createAudioTrack(int sampleRateInHz, int nb_channals) )
void audioTrackPlayForJava(JNIEnv *) 调用AudioTrack对象的play()方法(C调用Java)
void audioTrackStopForJava(JNIEnv *) 调用AudioTrack对象的stop()方法(C调用Java)
void audioTrackWriteForJava(JNIEnv *,uint8_t*,int32_t) 调用AudioTrack对象的write()方法(C调用Java)
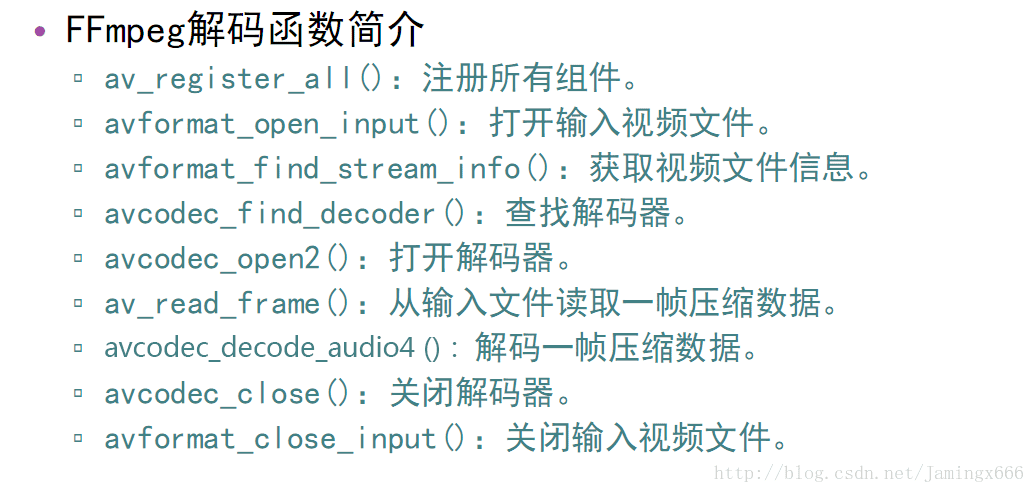
解码流程如下(以下3张图片来源于 雷霄骅 ):

音视频的基础知识请看雷霄骅的博客:[总结]FFMPEG视音频编解码零基础学习方法
一.注册所有组件
void av_register_all(void);
二.打开输入文件
int avformat_open_input(AVFormatContext **ps, const char *url, AVInputFormat *fmt, AVDictionary **options);

根据注释说的,可以通过AVFormatContext **ps可以通过avformat_alloc_context()分配,使用完以后通过avformat_close_input()释放,const char *url 是 文件路径,而剩余的2个参数我们给它NULL就可以了。然后0表示成功,非0表示打开失败。
三.获取音频文件信息
int avformat_find_stream_info(AVFormatContext *ic, AVDictionary **options);
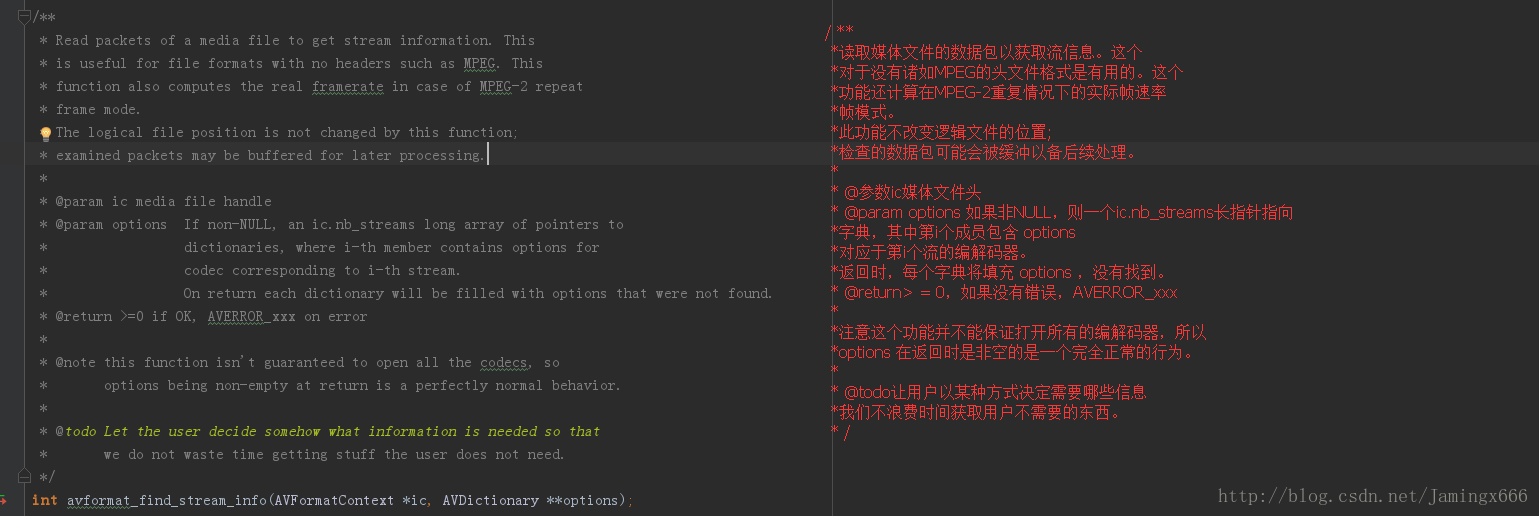
这个函数需要一个AVFormatContext *ic,所以我们把刚刚分配的AVFormatContext *传进来,另外一个也给它一个NULL,返回值>=0表示没有错误,否则就有错误。
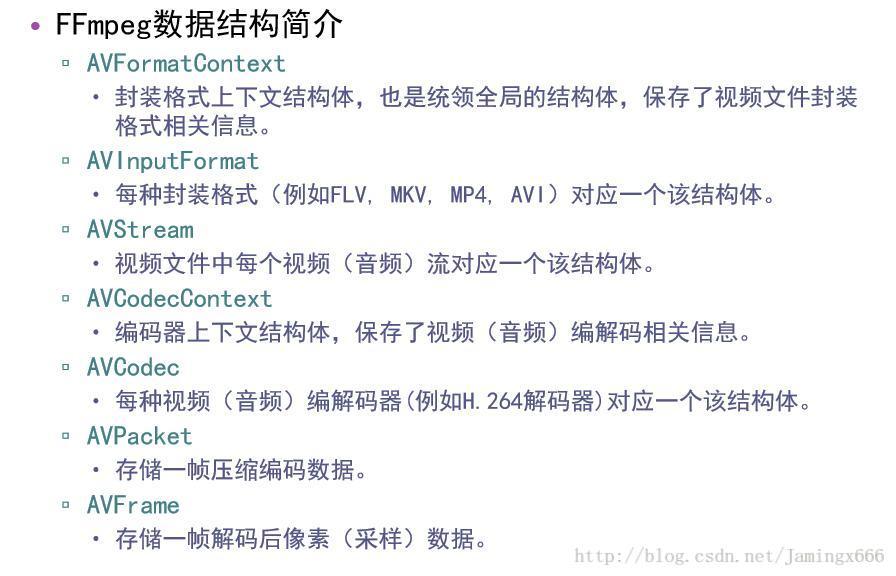
例如一个MP4文件就包含很多流,有视频流,音频流...

通过这一步就能把这些流以数组的形式储存到AVFormatContext *中。
四.查找编解码器
AVCodec *avcodec_find_decoder(enum AVCodecID id);

这个函数需要一个AVCodecID id,才能获得一个解码器。
我们先遍历AVFormatContext *存储的流数组,得到视频流(AVStream),每个AVStream都会存储一个编解码器上下文(AVCodecContext *),这个编解码器上下文(AVCodecContext *)保存了视频或音频编解码器的信息,其中就有AVCodecID。
这样,我们就得到AVCodecID,通过avcodec_find_decoder(),就能从FFmpeg中得到所需要的解码器了AVCodec
五.打开解码器
int avcodec_open2(AVCodecContext *avctx, const AVCodec *codec, AVDictionary **options);
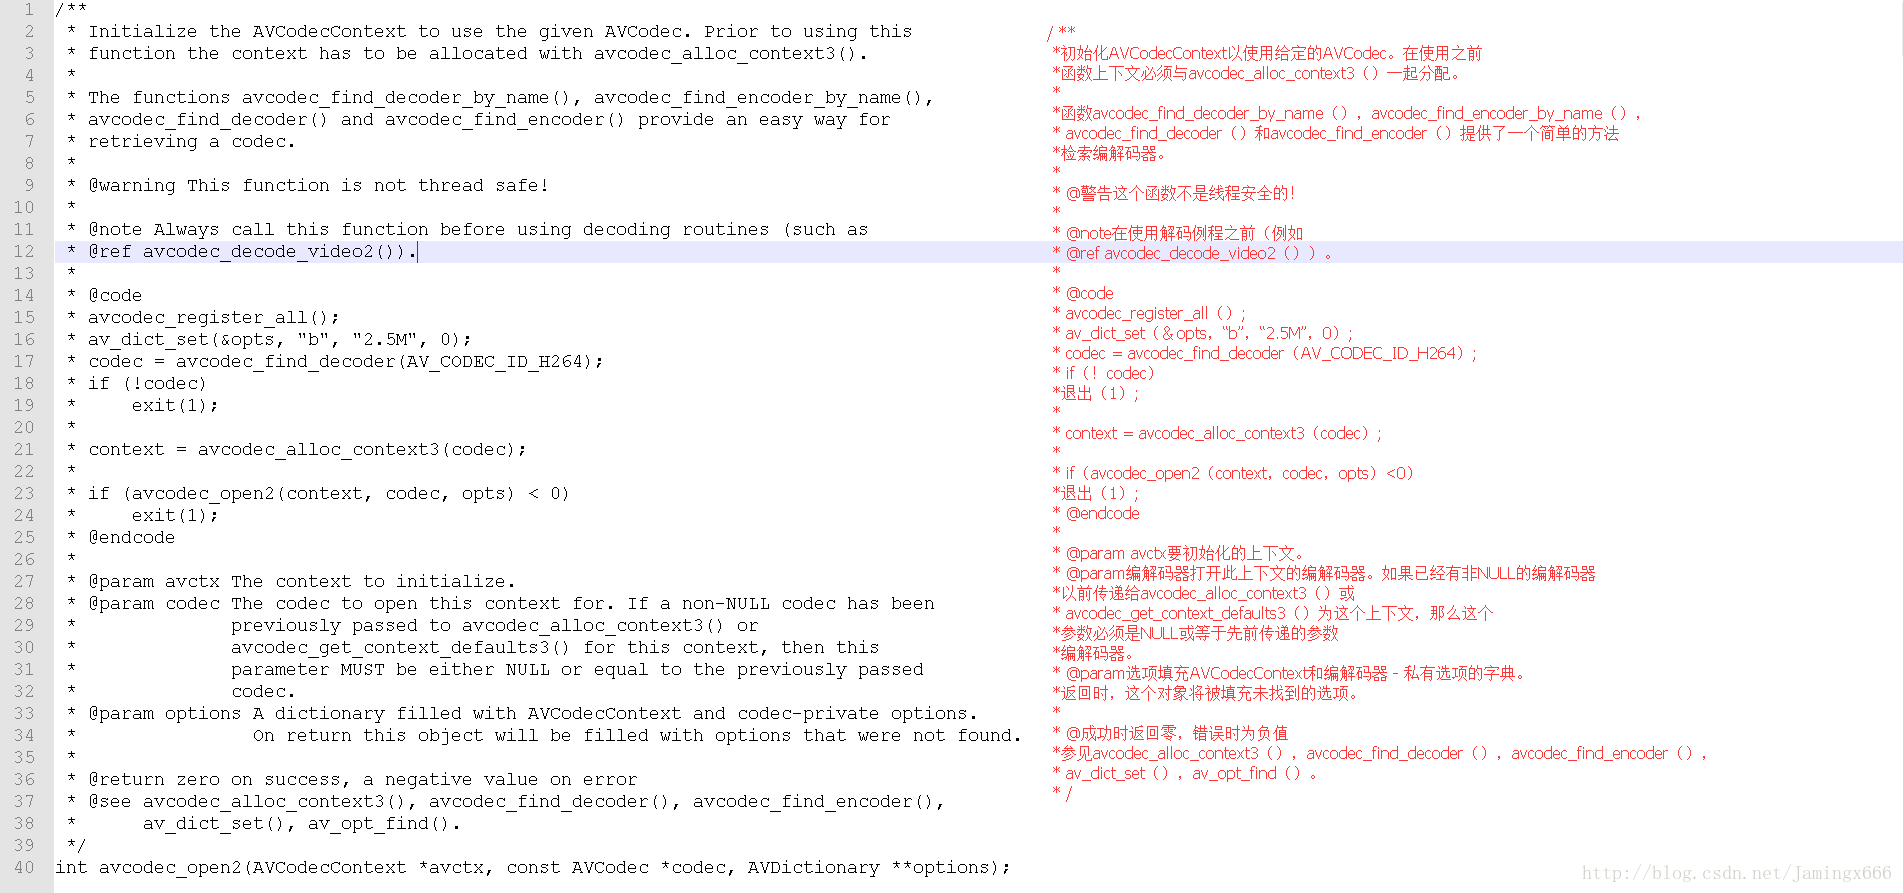
注释说了AVCodecContext *avctx 可以通过avcodec_alloc_context3()创建。
但是我们这里可以通过AVStream得到AVCodecContext *,所以我们就直接把得到的这个传进去,
第二个参数就把刚刚得到的AVCodec* 传进去,第三个参数直接传NULL就可以了。
六.从输入文件读取数据(循环读取)
因为av_read_frame()只能读取1帧,所以需要循环读取

读取前,我们先做一些初始化工作:
1.初始化 AVPacket *pPacket -> 存放解码前数据
AVPacket *pPacket = av_packet_alloc();
2.初始化 AVFrame *pFrame -> 存放解码后的数据
AVFrame *pFrame = av_frame_alloc();
分配重采样SwrContext
SwrContext *swrCtx = swr_alloc();
设置参数到SwrContext
struct SwrContext *swr_alloc_set_opts(struct SwrContext *s,
int64_t out_ch_layout, enum AVSampleFormat out_sample_fmt, int out_sample_rate,
int64_t in_ch_layout, enum AVSampleFormat in_sample_fmt, int in_sample_rate,
int log_offset, void *log_ctx);
初始化SwrContext
swr_init(swrCtx);
分配存放 16bit 44100 PCM 数据 的内存
uint8_t *out_buffer = (uint8_t *) av_malloc(MAX_AUDIO_FRME_SIZE)
4.Java层创建AudioTrack
createAudioTrackForJava(env,jcls,out_sample_rate,out_channel_nb)
5.调用Java层的AudioTrack.play()
audioTrackPlayForJava(env)


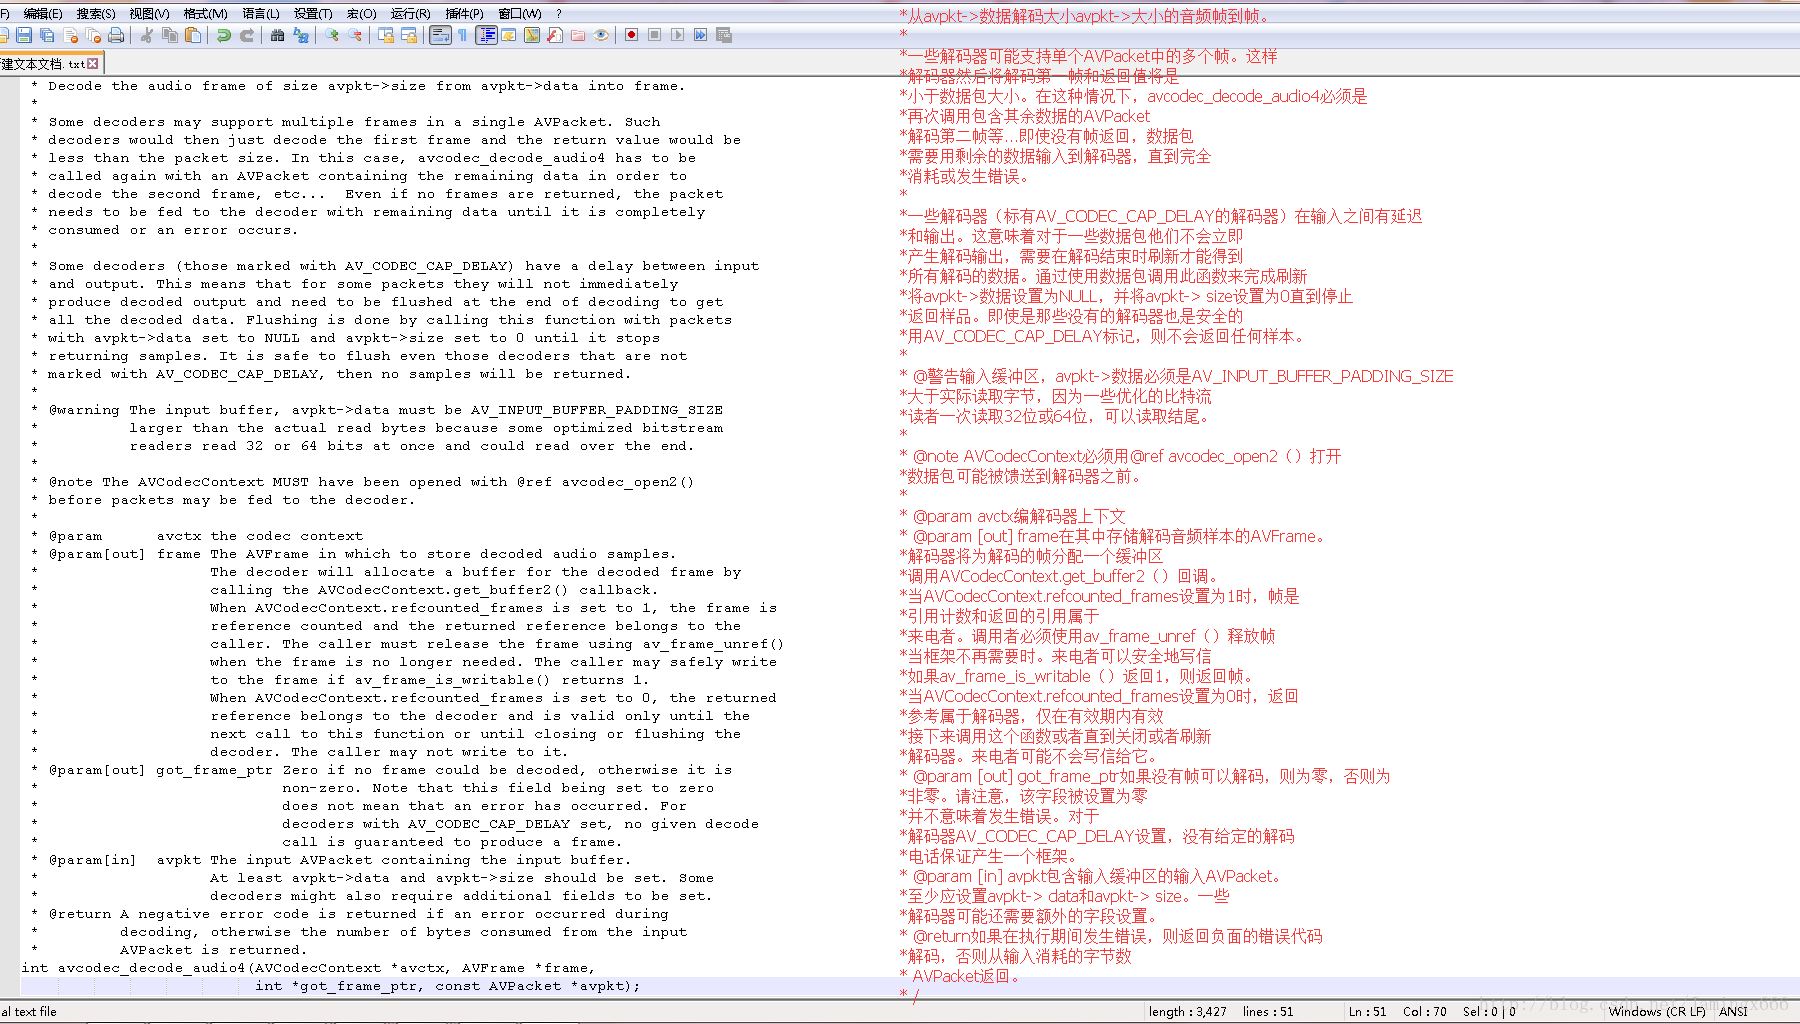
七.解码一帧数据
int avcodec_decode_audio4(AVCodecContext *avctx, AVFrame *frame,
int *got_frame_ptr, const AVPacket *avpkt);
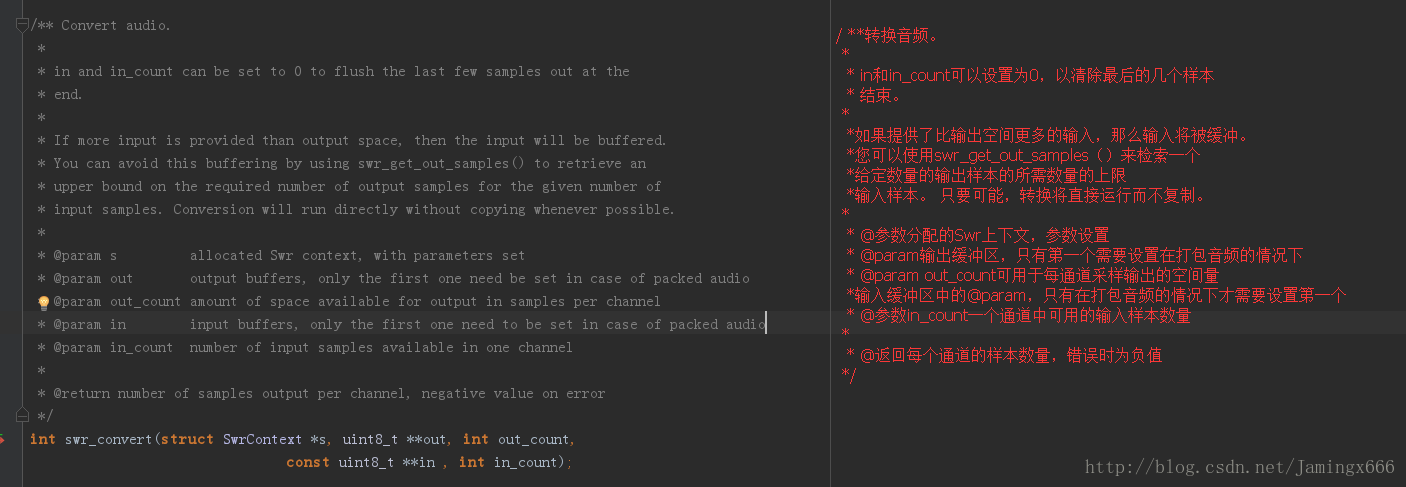
重采样。因为音频的声道,采样率,采样格式等,如果和AudioTrack设置的不一样,会播放出错,而且有些设备只能播放16Bit PCM的采样格式,所以这一步做一个统一格式的操作。
int swr_convert(struct SwrContext *s, uint8_t **out, int out_count,
const uint8_t **in , int in_count);
获取samples(样本,类似于视频的一帧)的大小
int av_samples_get_buffer_size(int *linesize, int nb_channels, int nb_samples,
enum AVSampleFormat sample_fmt, int align);
调用Java层的audioTrack.write()
audioTrackWriteForJava(env,out_buffer,out_buffer_size);

这样,解码播放就完成了,剩下的是一些收尾工作。
内存回收free。
调用Java层的audioTrack.stop()
audioTrackStopForJava(env);
八.关闭解编码器
int avcodec_close(AVCodecContext *avctx);
九.关闭输入文件
void avformat_free_context(AVFormatContext *s);
以上函数翻译来自谷歌/滑稽
最后运行结果如下,成功运行,并且可以听到声音
