十.测试及发布
10.1 测试类型
- 单元测试:在模拟环境中测试一个独立方法来保证其有效性。
- 功能测试:在真是环境中测试一个方法来确保其准确性。
- 性能测试:测试一个方法,模块或完整应用的性能。
10.2 定义
- 测试用例:需要进行测试的一个场景。它包含一个方法,功能或程序执行所需的条件;测试场景需要的一系列输入变量;以及一个期望行为,其中包括系统的输出或改变。
- 测试夹具:表示进行一个或多个测试用例前所需的准备和清理阶段。其中包括对象创建,依赖项设置,数据库设置,等等。
- 测试套件:包含一系列测试夹具的测试用例,可以嵌套其他的测试套件,它用于聚合应当一起执行的测试用例。
- 测试运行器:执行测试并提供结果的系统。Xcode是一个图形化的测试运行器。命令行工具同样可以启动一个测试自动化常用的客户端。
- 测试报告:测试成功或失败的内容摘要,如有必要,还会附上错误信息。
- 测试覆盖率:衡量测试套件进行的测试数量,并可以发现应用未被测试的部分。
- 测试驱动开发:测试驱动开发是一种反复迭代且开发周期很短的软件开发流程。其过程包含编写自动化测试用例,编写通过测试的最小代码集,重构代码以符合准入标准。
10.3 单元测试
10.3.1 设置
添加测试目标: 
product scheme测试设置: 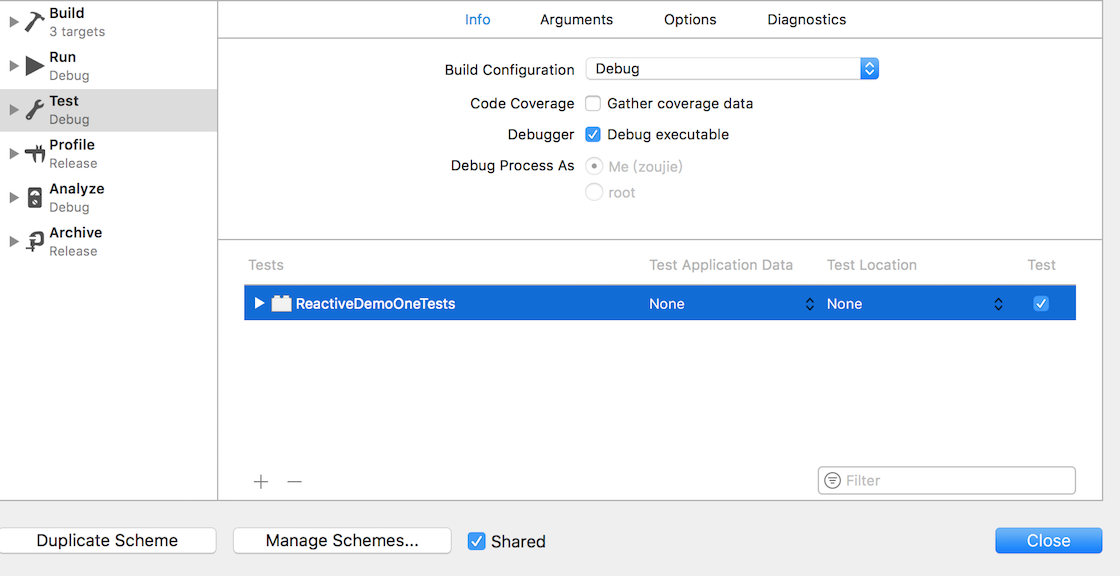
10.3.2 编写单元测试
继承XCTestCase,默认的方法有4个:
- setUp(每个测试方法调用前执行, 在执行完父类方法后添加自定义配置);
- tearDown(每个测试方法调用后执行,在执行父类方法前添加自定义配置);
- textExample(一个示例);
- testPerformanceExample(在measureBlock中放入需要测试性能的代码)方法;
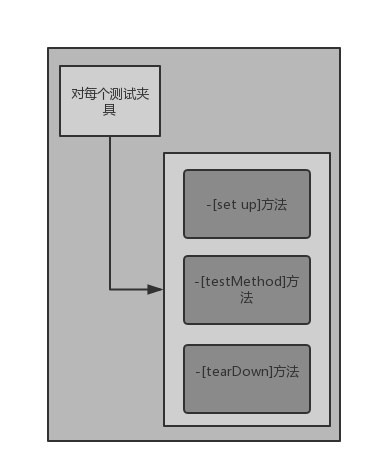
测试用例命名必须以test开头,不可有参数且返回为void,不然无法识别为测试方法。测试用例类型有3种:普通测试,性能测试与异步测试。
运行单元测试: CMD + U测试整个文件的测试用例. 也可通过每个单元测试用例左边的按钮执行单元测试,执行后绿色勾选按钮代表测试成功,红色叉号按钮代表测试失败。
#import <XCTest/XCTest.h>
#import "HPUser.h"
[@interface](https://my.oschina.net/u/996807) ReactiveDemoOneTests : XCTestCase  //1.测试类名

[@end](https://my.oschina.net/u/567204)

@implementation ReactiveDemoOneTests

- (void)setUp {
    [super setUp];
    // Put setup code here. This method is called before the invocation of each test method in the class.
}

- (void)tearDown {
    // Put teardown code here. This method is called after the invocation of each test method in the class.
    [super tearDown];
}

- (void)testExample {
    // This is an example of a functional test case.
    // Use XCTAssert and related functions to verify your tests produce the correct results.
}

- (void)testPerformanceExample {
    // This is an example of a performance test case.
    [self measureBlock:^{
        // Put the code you want to measure the time of here.
    }];
}
-(void)testInitializer{//2.测试实例方法前缀必须是test
	HPUser *user = [[HPUser alloc]init];
	XCTAssert(user,@"user alloc-init fail");//3.XCTAssert方法用于断言对象不是nil
}

-(void)testPropertyGetter{//4.测试属性的获取
	HPUser *user = [[HPUser alloc]init];
	user.name = @"ZJ";
	user.LoginTime = [NSDate date];

	ZJEntry *zj = [[ZJEntry alloc]init];
	zj.vipLever = @"10";
	zj.sexy = @"man";
	user.zoujie = zj;//5.测试状态前的对象设置和需要提前执行的代码

	XCTAssertEqualObjects(@"man", zj.sexy);
	XCTAssertEqualObjects(@"10", zj.vipLever);
	XCTAssertEqualObjects(@"ZJ", user.name);
	XCTAssertEqualObjects(user.zoujie, zj);//6.测试对象等价性的断言
}
-(void) testOne{
	NSLog(@"1111111111111111");
	NSInteger wordA = 1;
	XCTAssertTrue(wordA == 1,@"断言wordA等于0,不等于则测试没通过");
}
-(void) testTwo{
	NSLog(@"22222222222222222");
}

-(void) fourMethod{
	NSLog(@"wrong method444444");
}

@end
参考文章:http://blog.csdn.net/Jolie_Yang/article/details/54891250
10.3.3 代码覆盖率
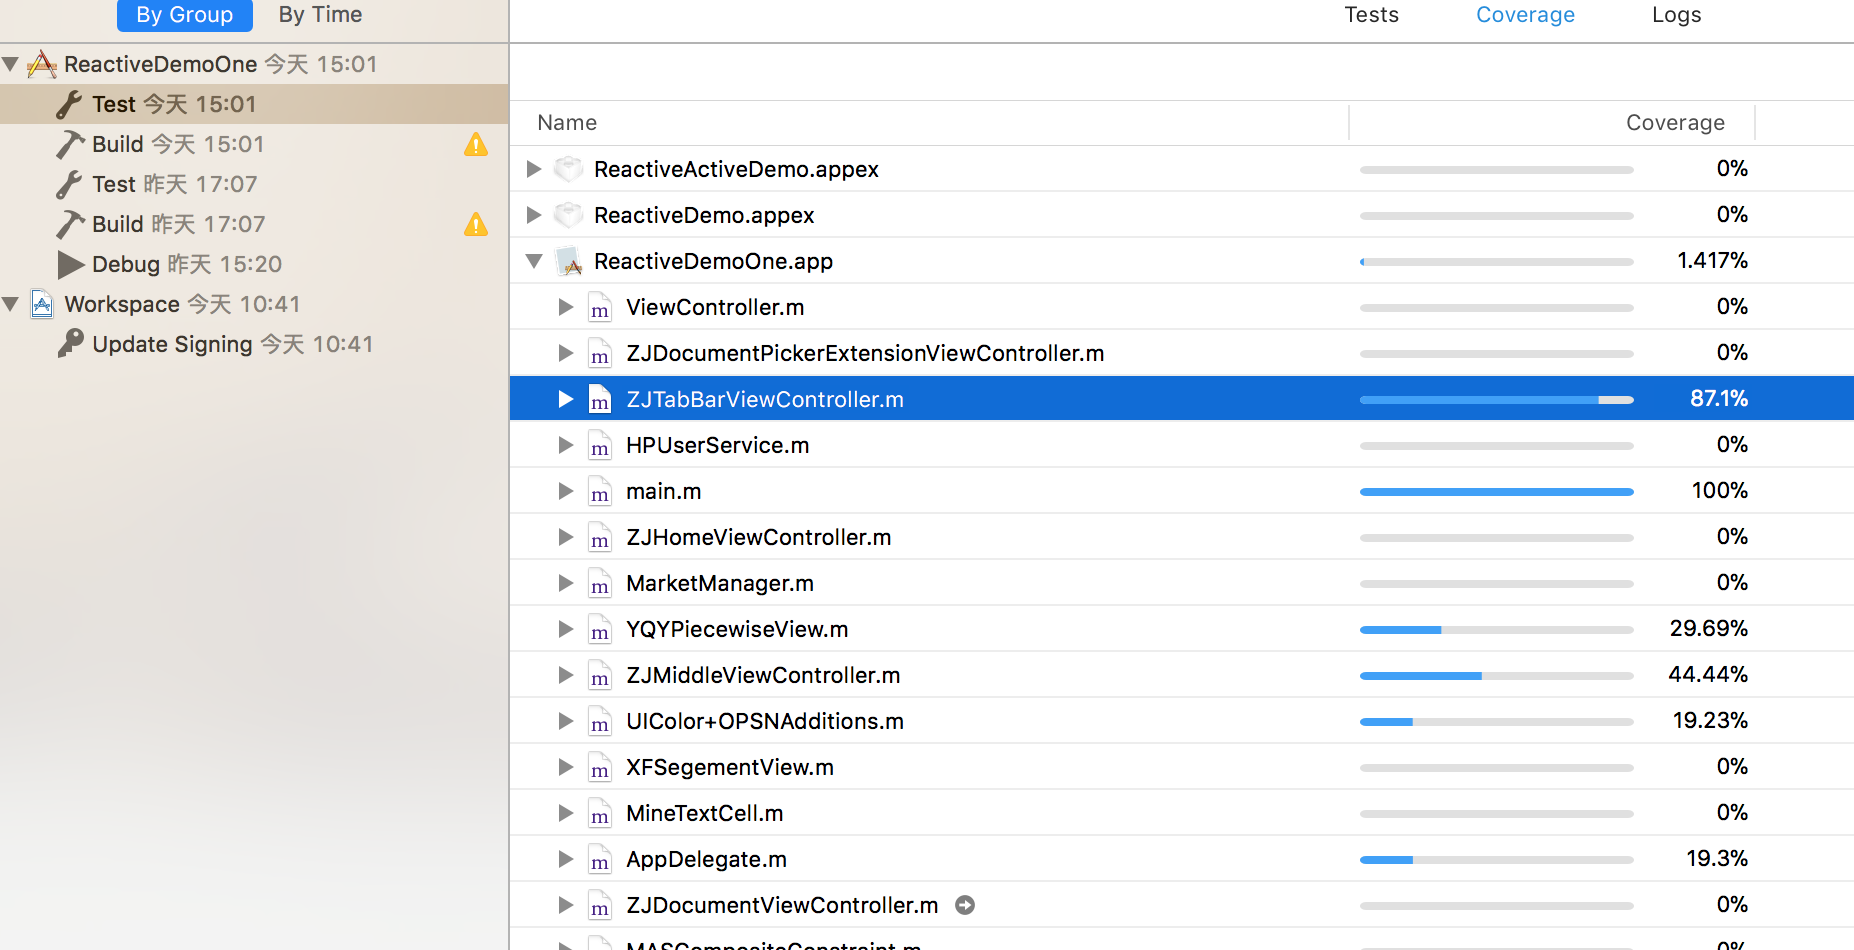
在自动化单元测试或功能测试中,使用代码覆盖率来表示经过测试的代码的百分比。 1.集成覆盖率报告 开启测试覆盖率数据: 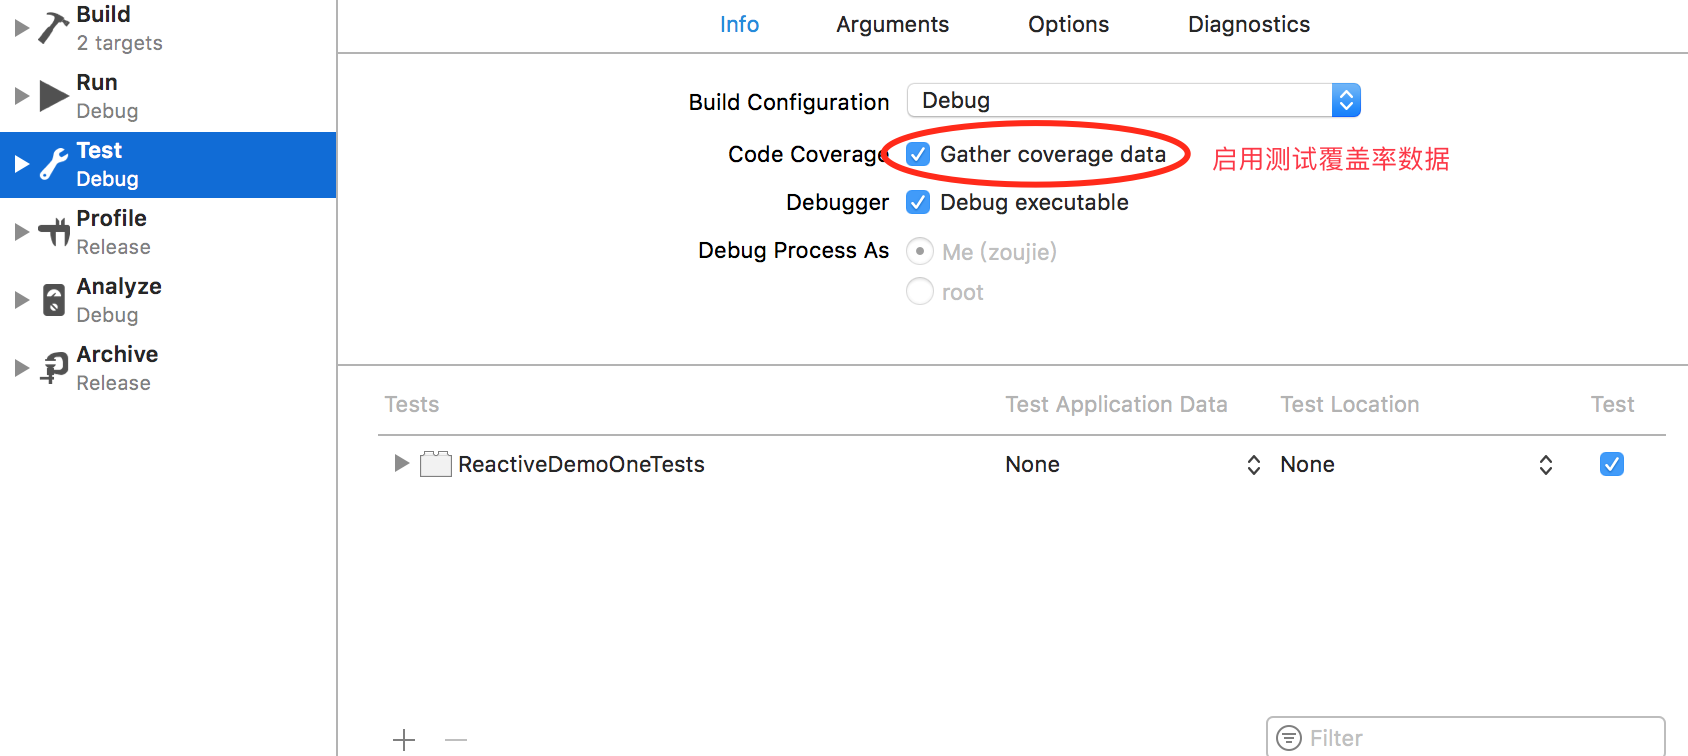
测试覆盖率报告:
2.外置测试率报告 还可以生成XML或HTML格式的报告。 生成包含覆盖率数据的报告,需要启用一下标记:
- Generate Debug Symbols :在编译生成的库中引入调试符号
- Generate Test Coverage Files :生成包含覆盖率数据的二进制文件
- Instrument Program Flow :在测试用例运行时检测应用


这些设置会在工程的衍生数据文件夹中生成.gcno和.gcda文件。.gcno包含重建基本代码块和块对应源码的详细信息,.gcda包含代码分支转换的计数。
使用这些文件生成可以导为XML或HTML格式的报告:
- lcov :从多个文件收集覆盖率数据到一个统一的INFOFILE文件
- genhtml :用lcov工具生成INFOFILE文件来生成HTML报告
使用Macposts或HomeBrew来安装lcov软件包 在Xcode的Build Phases中添加一个New Run Script Phase,从而生成报告。
lcov --directory "${OBJECT_FILE_DIR_normal}/${CURRENT_ARCH}"
    --capture
    --output-file "${PROJECT_DIR}\${PROJECT_NAME}.info"

genhtml --output-directory "${PROJECT_DIR}/${PROJECT_NAME}-covergae"
    "${PROJECT_DIR}/${PROJECT_NAME}.name"
10.3.4 异步操作
测试异步方法的步骤: (1)使用expectationWithDescription:方法来获取XCTestExpectation实例。 (2)waitForExpectationsWithTimeout: handler:方法来等待操作完成。如果测试用例没有完成,那么将会调用回调处理的闭包块。 (3)使用XCTestExpectation对象的fulfill方法来表示操作已经完成,等待结束。
-(void)testsignalForUserUpdates{
	HPUserService *userSever = [[HPUserService alloc]init];

	XCTestExpectation *expectation = [self expectationWithDescription:@"Test Fetch Type"];//1.创建XCTestExpectation 对象。可以等待多个expectation。

	[userSever catchType:@"user" WithId:@"1" block:^(NSDictionary *responseDict) {//2.执行要被测试的方法
	NSString *key1Value =	[responseDict objectForKey:@"key1"];
		XCTAssertEqualObjects(@"uesrName", key1Value);
		//验证数据,使用断言 满足期望 这将导致后面的 -waitForExpectation 调用其completion handler然后返回。
		[expectation fulfill];
	}];

	// 测试会等在这里,运行着run loop,直到超时或者expectation被满足
	[self waitForExpectationsWithTimeout:1 handler:^(NSError * _Nullable error) {
		NSLog(@"如果期望对象没有满足,则进行清理操作");
	}];
}
10.3.5 Xcode福利:性能单元测试
XCTestCase提供了方法measureBlock来测量一个代码块的性能。  一旦设置好基线,输出结果将不仅显示平均值和标准差,还将显示低于基线的最差结果。
10.3.6 模拟依赖
添加一个系统来模拟依赖关系,带有模拟依赖的测试用例的工作方式如下: (1)配置依赖项以便依照提前定义好的方式运行,返回特定的值,或根据特定的输入改变至特定的状态。 (2)执行测试用例。 (3)重置依赖项使一切正常工作。
依赖项在-[set up]方法中配置,在测试夹具的-[tear down]中重置。
词汇
-
dummy/double(n.傀儡,adj.虚拟的) 用于描述模拟测试对象的通用词汇,double共有4种类型
- stub 在测试期间提供封装好的数据以便被调用
- spy 捕获并使参数和状态信息可用
- mock 在受控制的情况下模拟一个真实对象的行为
- fake 除了底层实现不同,它与原始对象的工作方式一模一样
-
BDD 行为驱动开发,是测试驱动开发的一种扩展。
-
mocking框架 允许创建dummy框架。
OCMock非常好的mocking框架:
- 创建mock对象 使用OCMClassMock宏来创建一个lei的mock实例
- 创建spy对象 OCMPartialMock宏来创建一个spy或一个对象的部分mock
- stub对象 OCMStub宏对函数进行stub操作,实现什么也不做就返回或返回一个值
- 验证操作 OCMVerify宏来验证一个底层子系统是否以特定方式进行交互
-(void)testUserWithId_Completion{
	id syncService = OCMClassMock([HPUserService class]);//模拟HPUserService类的一个对象
	[OCMStub([syncService new]) andReturn:syncService];//stub操作,返回之前得到的mock对象,在mock对象上调用某个方法的时候,这个方法一定返回一个anObject.(也就是说强制替换了某个方法的返回值为anObject)。
	//测试用例输入
	NSString *userId = @"user-id",
	 		*fname = @"fn-user-id",
			*lname = @"ln-user-id",
			*gender =@"gender-x";
	NSDate *dob = [NSDate date];

	NSDictionary *data = @{@"id":userId,
						   @"fname":fname,
						   @"lanme":lname,
						   @"gender":gender,
						   @"dateOfBirth":dob
						   };

	[OCMStub([syncService fetchType:OCMOCK_ANY WithId:OCMOCK_ANY completion:OCMOCK_ANY]) andDo:^(NSInvocation *invocation) {//andDo 在mock对象调用someMethod的时候,andDo后面的block会调用.block可以从NSInvocation中得到一些参数,然后使用这个NSInvocation对象来构造返回值等等.

		void (^callBack)(NSDictionary *);
		[invocation getArgument:&callBack atIndex:4];
		callBack(data);
	}];

	HPUserService *svc = [HPUserService new];
	[svc fetchType:userId WithId:userId completion:^(NSDictionary *dic) {//配置完成开始测试
		//进行验证
		XCTAssert(dic);
		XCTAssertEqualObjects(userId, dic[@"id"]);
		XCTAssertEqualObjects(fname, dic[@"fname"]);
		//......
	}];
	OCMVerify(syncService);//验证方法以特定参数值被调用
}
参考文章:http://blog.csdn.net/jymn_chen/article/details/21562869, http://www.cnblogs.com/xilifeng/p/4690273.html
10.3.7 其他框架
| 框架类型 | 名称 | 保持器 | GitHub URL |
|---|---|---|---|
| mock对象 | OCMock | https://github.com/erikdoe/ocmock | |
| OCMockito | https://github.com/jonreid/OCMockito | ||
| 匹配器 | Expecta | https://github.com/specta/expecta | |
| OCHamcrest | https://github.com/hamcrest/OCHamcrest | ||
| TDD/BDD框架 | Specta | https://github.com/specta/specta | |
| Kiwi | https://github.com/kiwi-bdd/Kiw | ||
| Cedar | https://github.com/pivotal/cedar | ||
| Calabash | https://calaba.sh |
10.4 功能测试
功能测试确保应用的功能与预期一致。 UITesting 参考文章:https://www.jianshu.com/p/31367c97c67d
10.5 持续集成与自动化
持续集成可以保持代码清晰并确保构建即时更新。 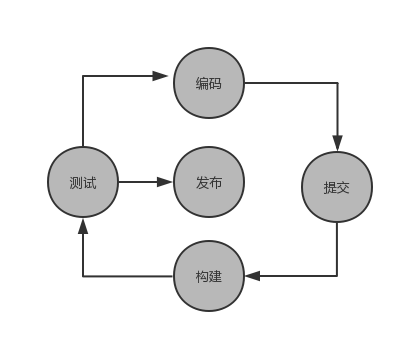
- Travis是一个商用解决方案,可以对Github上的开源项目免费试用。安装只需添加Travis配置文件,声明项目的文件引用,场景以及iOS版本。之后将Travis构建引擎指向仓库。https://objccn.io/issue-6-5/
- Jenjins是一个开源工具,一般用于任务执行管线管理,主要关注持续构建和测试软件项目,检测cron,procmail等外部任务的运行。构建iOS应用时需要Xcode插件。使用Jenjins的有点是,整个任务管线尽在你的掌握,你可以选择使用instruments命令行工具或更高级的xctool,也可以解除到运行Jenjins的物理设备并运行各种任务。https://www.jianshu.com/p/41ecb06ae95f,https://www.jianshu.com/p/faf879b3d182
- Xcode Server https://hjgitbook.gitbooks.io/ios/content/01-thinking/01-the-basic-knowledge-of-unit-test.html
10.6 最佳实践
- 测试所有的代码,包括所有的初始化方法。
- 测试参数值的所有组合。
- 不要测试私有方法。将被测方法视为黑盒。
- 建议消除任何的外部依赖,保证可以轻松驾驭各种场景。
- 在每个测试运行前设置状态,并在执行后清理。确保每次测试用例结果不受其他测试影响。
- 每个测试用例应当是可重复的,相同的输入产生相同的结果。
- 每个测试用例必须使用断言来验证测试的代码通过与否。
- 完整的运行应当用代码覆盖率报告。
性能测试: 为测试的内容编写特定的代码,例如计算运行速度,使用一个简化的计时器。 跟踪运行速度的计算器代码:
#import <Foundation/Foundation.h>
@interface HPTimer : NSObject//公共API
+(HPTimer *)startWithName:(NSString *)name;
@property (nonatomic , readonly , assign) uint64_t timeNanos;
@property (nonatomic , copy) NSString *name;
-(uint64_t)stop;
-(void)printTree;
@end


#import "HPTimer.h"
#include <mach/mach_time.h>
#import "CocoaLumberjack.h"
#ifdef DEBUG
static const DDLogLevel ddLogLevel = DDLogLevelDebug;
#else
static const DDLogLevel ddLogLevel = DDLogLevelError;
#endif
@interface HPTimer()
@property (nonatomic , strong) HPTimer *parent;
@property (nonatomic , strong) NSMutableArray *children;
@property (nonatomic , assign) uint64_t startTime;
@property (nonatomic , assign) uint64_t stopTime;
@property (nonatomic , assign) BOOL stopped;
@property (nonatomic , copy) NSString *threadName;
@end
@implementation HPTimer
+(HPTimer *)startWithName:(NSString *)name{//创建新的定时器,用于计时
	NSThread *thread = [NSThread new];
	NSMutableDictionary *tls = thread.threadDictionary;

	HPTimer *top = [tls objectForKey:@"hp-timer-top"];//计时器上下文是线程的局部对象。在示例的实现中,一旦创建计时器上下文,计时器可以在任意线程停止。这种实现可以变为让计时器对限制线程调用stop方法,只在创建计时器的线程中调用

	HPTimer *rv = [[HPTimer alloc]initWithParent:top name:name];
	[tls setObject:rv forKey:@"hp-timer-top"];

	rv.startTime = mach_absolute_time();//https://www.jianshu.com/p/82475b5a7e19
	return rv;
}

-(instancetype)initWithParent:(HPTimer *)parent name:(NSString *)name{
	if(self = [super init]){
		self.parent = parent;
		self.name = name;
		self.stopped = NO;
		self.children = [NSMutableArray array];
		self.threadName = [NSThread currentThread].name;
		if (parent){
			[parent.children addObject:self];
		}
	}
	return self;
}

-(uint64_t)stop{
	self.stopTime = mach_absolute_time();
	self.stopped = YES;
	//self.timeNanos =   获取以纳米为单位的时间间隔self.startTime && self.stopTime
	NSThread *thread = [NSThread new];
	NSMutableDictionary *tls = thread.threadDictionary;
	[tls setObject:self.parent forKey:@"hp-timer-top"];//从线程局部存储中后去当前线程的计时器
	return self.timeNanos;
}

-(void)printTree{
	[self printTreeWithNode:self indent:@" "];
}

-(void)printTreeWithNode:(HPTimer *)node indent:(NSString *)indent{//美化计时器树输出
	if (node){
		DDLogDebug(@"%@[%@][%@] -> %lld",indent,self.threadName,self.name,self.timeNanos);
		NSArray *childern = node.children;
		if (childern.count > 0){
			indent = [indent stringByAppendingString:@" "];
			for (NSUInteger i = 0;i<childern.count;i++){
				[self printTreeWithNode:[childern objectAtIndex:i] indent:@" "];
			}
		}
	}
}
@end


#pragma mark BEGIN  调用
-(void)methodA{
	HPTimer *timer = [HPTimer startWithName:@"method A"];//为计时器赋予一个有意义的名字
	[self methodB];
	[timer stop];//运行后调用stop
	[timer printTree];//输出运行耗时,包括任意嵌套的计时器
}
-(void)methodB{
	HPTimer *timer = [HPTimer startWithName:@"method B"];//在嵌套的方法调用中,创建其他计时器
	//do some thing
	[timer stop];
	[timer printTree];//可以输出嵌套的调用树
}
#pragma EDN