- 1、安装wget命令
如果需要通过使用wget命令,直接通过网络下载maven安装包时,需要在linux系统中安装wget命令。
yum -y install wget
- 2、下载maven安装包
wget http://mirror.bit.edu.cn/apache/maven/maven-3/3.5.2/binaries/apache-maven-3.5.2-bin.tar.gz
也可以直接把压缩包下载之后,上传到linux服务器
- 3、解压缩maven
tar -zxvf apache-maven-3.5.2-bin.tar.gz
我这里将maven解压缩之后的路径为:/opt/mavenDir
- 4、配置maven环境变量
vi /etc/profile
添加环境变量
export MAVEN_HOME=/var/local/apache-maven-3.5.2
export MAVEN_HOME
export PATH=$PATH:$MAVEN_HOME/bin
编辑之后记得使用source /etc/profile命令是改动生效。
- 5、验证结果
在任意路径下执行mvn -version验证命令是否有效。
正常结果如下,能够看到当前maven及jdk版本。

maven的原理图:

Maven 私有库和本地库的安装与配置:
前提:已安装 JDK 并配置好了环境变量
1、下载最新版 Nexus(本教程使用的是:nexus-2.11.2-03-bundle.tar.gz),下载地址: http://www.sonatype.org/nexus/go/
# wget https://sonatype-download.global.ssl.fastly.net/nexus/oss/nexus-2.11.203-bundle.tar.gz

# 如果wget下载不了,可以直接自己下载上传到服务器
2、解压
# mkdir nexus
# tar -zxvf nexus-2.11.2-03-bundle.tar.gz -C nexus
# cd nexus
# ls nexus-2.11.2-03  sonatype-work

(一个 nexus 服务,一个私有库目录)
3、编辑 Nexus 的 nexus.properties 文件,配置端口和 work 目录信息(保留默认)
[root@edu-procider-01 nexus]# ls
nexus-2.11.2-03  nexus-2.11.2-03-bundle.tar.gz  sonatype-work
[root@edu-procider-01 nexus]# cd nexus-2.11.2-03
[root@edu-procider-01 nexus-2.11.2-03]# ls
bin  conf  lib  LICENSE.txt  logs  nexus  NOTICE.txt  tmp
[root@edu-procider-01 nexus-2.11.2-03]# cd conf/

# 查看nexus配置文件,不修改采用默认配置,只是看一下
[root@edu-procider-01 conf]# vim nexus.properties

#
# Sonatype Nexus (TM) Open Source Version
# Copyright (c) 2008-2015 Sonatype, Inc.
# All rights reserved. Includes the third-party code listed at http://links.sonatype.com/products/nexus/oss/attributions.
#
# This program and the accompanying materials are made available under the terms of the Eclipse Public License Version 1.0,
# which accompanies this distribution and is available at http://www.eclipse.org/legal/epl-v10.html.
#
# Sonatype Nexus (TM) Professional Version is available from Sonatype, Inc. "Sonatype" and "Sonatype Nexus" are trademarks
# of Sonatype, Inc. Apache Maven is a trademark of the Apache Software Foundation. M2eclipse is a trademark of the
# Eclipse Foundation. All other trademarks are the property of their respective owners.
#

# Sonatype Nexus
# ==============
# This is the most basic configuration of Nexus.

# Jetty section
application-port=8081
application-host=0.0.0.0
nexus-webapp=${bundleBasedir}/nexus
nexus-webapp-context-path=/nexus

# Nexus section
nexus-work=${bundleBasedir}/../sonatype-work/nexus
runtime=${bundleBasedir}/nexus/WEB-INF
4、编辑 nexus 脚本, 配置 RUN_AS_USER 参数
[root@edu-procider-01 nexus-2.11.2-03]# ls
bin  conf  lib  LICENSE.txt  logs  nexus  NOTICE.txt  tmp
[root@edu-procider-01 nexus-2.11.2-03]# cd bin
[root@edu-procider-01 bin]# ls
jsw  nexus  nexus.bat
[root@edu-procider-01 bin]# vim nexus

#! /bin/sh

#
# Copyright (c) 1999, 2006 Tanuki Software Inc.
#
# Java Service Wrapper sh script.  Suitable for starting and stopping
#  wrapped Java applications on UNIX platforms.
#

#-----------------------------------------------------------------------------
# These settings can be modified to fit the needs of your application

# Set this to the root of the Nexus installation
NEXUS_HOME=".."

# If specified, the Wrapper will be run as the specified user.

# IMPORTANT - Make sure that the user has the required privileges to write into the Nexus installation directory.

# NOTE - This will set the user which is used to run the Wrapper as well as
#  the JVM and is not useful in situations where a privileged resource or
#  port needs to be allocated prior to the user being changed.
RUN_AS_USER=root

# Application
APP_NAME="nexus"
APP_LONG_NAME="Nexus OSS"

# Priority at which to run the wrapper.  See "man nice" for valid priorities.
#  nice is only used if a priority is specified.
PRIORITY=

# Location of the pid file.
#PIDDIR="."

# If uncommented, causes the Wrapper to be shutdown using an anchor file.
#  When launched with the 'start' command, it will also ignore all INT and
#  TERM signals.
#IGNORE_SIGNALS=true

# The following two lines are used by the chkconfig command. Change as is
#  appropriate for your application.  They should remain commented.
# chkconfig: 2345 20 80
# description: Test Wrapper Sample Application
#RUN_AS_USER= 改为: RUN_AS_USER=root
5、防火墙中打开 8081 端口
# vi /etc/sysconfig/iptables
添加: -A INPUT -m state --state NEW -m tcp -p tcp --dport 8081 -j ACCEPT
保存后重启防火墙 # service iptables restart
6、启动 nexus
[root@edu-procider-01 ~]# /opt/mavenDir/nexus/nexus-2.11.2-03/bin/nexus start
****************************************
WARNING - NOT RECOMMENDED TO RUN AS ROOT
****************************************
Starting Nexus OSS...
Started Nexus OSS.
7、浏览器中打开:http://192.168.126.129:8081/nexus/

8、登录,默认用户名 admin,默认密码 admin123:


到此,Nexus 已安装完成,接下来是 Nexus 的配置
Nexus 配置(登录后)
1、菜单 Administration/Server 配置邮箱服务地址(如果忘记密码,可以通过该邮箱找回密码)

给用户配置邮箱地址,方便忘记密码时找回:

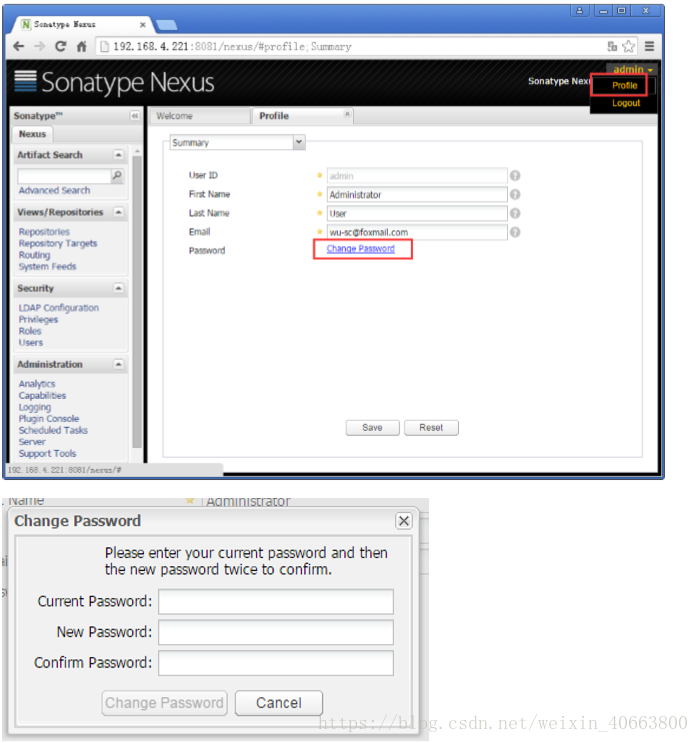
用户修改密码
2、仓库类型

group 仓库组:Nexus 通过仓库组的概念统一管理多个仓库,这样我们在项目中直接请求仓库组即可请求到仓库组管理的多个仓库;
hosted 宿主仓库:主要用于发布内部项目构件或第三方的项目构件(如购买商业的构件) 以及无法从公共仓库获取的构件(如 oracle 的 JDBC 驱动)
proxy 代理仓库:代理公共的远程仓库;
virtual 虚拟仓库:用于适配 Maven
1; 一般用到的仓库种类是 hosted、proxy
Hosted 仓库常用类型说明:
- releases 内部的模块中 release 模块的发布仓库
- snapshots 发布内部的 SNAPSHOT 模块的仓库
- 3rd party 第三方依赖的仓库,这个数据通常是由内部人员自行下载之后发布上去
如果构建的 Maven 项目本地仓库没有对应的依赖包,那么就会去 Nexus 私服去下载, 如果Nexus私服也没有此依赖包,就回去远程中央仓库下载依赖,这些中央仓库就是proxy。 Nexus 私服下载成功后再下载至本地 Maven 库供项目引用。
3、设置 proxy 代理仓库(Apache Snapshots/Central/Codehaus Snapshots)准许远程下载, 如:

4、Maven 本地库的安装与配置(请看参考视频的操作) 环境变量、setting.xml
conf/setting配置:
<?xml version="1.0" encoding="UTF-8"?>

<settings xmlns="http://maven.apache.org/SETTINGS/1.0.0"
          xmlns:xsi="http://www.w3.org/2001/XMLSchema-instance"
          xsi:schemaLocation="http://maven.apache.org/SETTINGS/1.0.0 http://maven.apache.org/xsd/settings-1.0.0.xsd">
	<!--本地仓库设置,也可以使用默认-->
	<localRepository>C:\Users\admin008\.m2\repository</localRepository>
	<interactiveMode>true</interactiveMode>
    <offline>false</offline>
    <pluginGroups>
        <pluginGroup>org.mortbay.jetty</pluginGroup>
        <pluginGroup>org.jenkins-ci.tools</pluginGroup>
    </pluginGroups>

	<!--nexus配置权限,使用默认用户-->
	<servers>
		<server>
			<id>nexus-releases</id>
			<username>deployment</username>
			<password>deployment123</password>
		</server>
		<server>
			<id>nexus-snapshots</id>
			<username>deployment</username>
			<password>deployment123</password>
		</server>
	</servers>

    <mirrors>

    </mirrors>

	<profiles>
		<profile>
		   <id>edu</id>
			    <activation>
                    <activeByDefault>false</activeByDefault>
                    <jdk>1.8</jdk>
                </activation>
			    <repositories>
					<!-- 私有库地址,pom文件中定义的依赖-->
				    <repository>
						<id>nexus</id>
						<url>http://192.168.126.129:8081/nexus/content/groups/public/</url>
						<releases>
							<enabled>true</enabled>
						</releases>
						<snapshots>
							<enabled>true</enabled>
						</snapshots>
					</repository>
				</repositories>
				<pluginRepositories>
					<!--插件库地址,pom文件中定义的插件-->
					<pluginRepository>
						<id>nexus</id>
						<url>http://192.168.126.129:8081/nexus/content/groups/public/</url>
						<releases>
							<enabled>true</enabled>
						</releases>
						<snapshots>
							<enabled>true</enabled>
					   </snapshots>
					</pluginRepository>
				</pluginRepositories>
			</profile>
	</profiles>

	<!--激活profile-->
	<activeProfiles>
		<activeProfile>edu</activeProfile>
	</activeProfiles>

</settings>
5、ide(eclipse、idea) 中的 Maven 配置
6、项目的构建与发布演示,修改 common-parent 中的 pom.xml 中的私有库地址(项目的pom文件配置私有库)
<distributionManagement>
		<repository>
			<id>nexus-releases</id>
			<name>Nexus Release Repository</name>
			<url>http://192.168.126.129:8081/nexus/content/repositories/releases/</url>
		</repository>
		<snapshotRepository>
			<id>nexus-snapshots</id>
			<name>Nexus Snapshot Repository</name>
			<url>http://192.168.126.129:8081/nexus/content/repositories/snapshots/</url>
		</snapshotRepository>
</distributionManagement>
至此,私有库配置完成。