1 设计要点解析
1.1 通信模型
SOFA Bolt当前支持四种通信模型:

● oneway:单向调用。单向调用不会阻塞请求线程,不关心响应。但是,使用时需要注意控制调用频率和节奏,防止压垮接收方;
● sync:同步调用。同步调用会阻塞请求线程,待响应返回后才能进行下一个请求。这是最常用的一种通信模型;
● future:future调用。Future调用在调用过程中不会阻塞线程,但在获取结果的过程中会阻塞线程;
● callback:回调。回调是真正的异步调用,永远不会阻塞线程,在异步线程里处理响应结果。
在SOFA Bolt中,实现上述四种通信模型的相关类的类图如下:
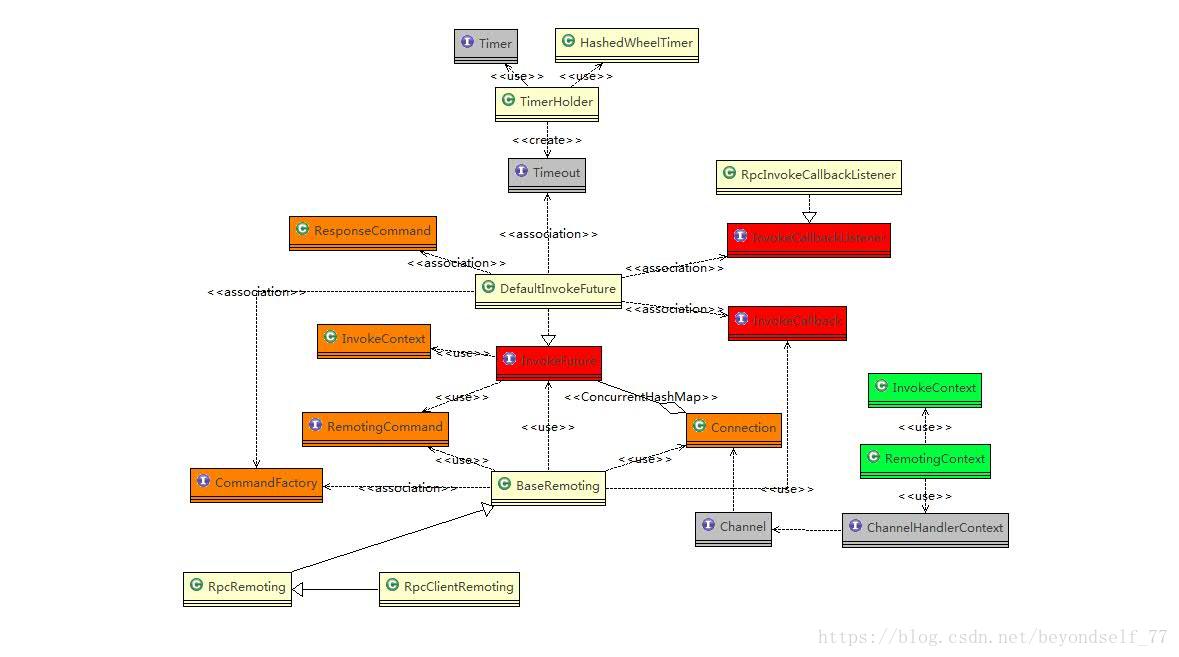
BaseRemoting基于Netty实现了上述四种通信模型,其源码如下:
1. public abstract class BaseRemoting {
2. ……略
3.
4. /**
5. * Synchronous invocation
6. ……略
7. */
8. protected RemotingCommand invokeSync(final Connection conn, finalRemotingCommand request, final int timeoutMillis) throwsRemotingException, InterruptedException {
9. ……略
10. }
11.
12. /**
13. * Invocation with callback.
14. ……略
15. */
16. protected void invokeWithCallback(final Connection conn, finalRemotingCommand request, final InvokeCallback invokeCallback, final inttimeoutMillis) {
17. ……略
18. }
19.
20. /**
21. * Invocation with futurereturned.
22. ……略
23. */
24. protected InvokeFuture invokeWithFuture(final Connection conn, finalRemotingCommand request, final inttimeoutMillis) {
25. ……略
26.
27. };
28.
29. /**
30. * Oneway invocation.
31. ……略
32. */
33. protected void oneway(final Connection conn, finalRemotingCommand request) {
34. ……略
35. };
36.……略
37.}
通过源码可以看出,有两个类在实现上述四种通信模型中发挥了非常重要的作用:
1. InvokeFuture接口

一提到Future,大家一定会想到java.util.concurrent.Future。
Future为我们提供了一个异步编程的方式。Future表现为一个异步计算的结果,可以通过Future查看计算是否完成、等待计算完成、获取计算结果。
InvokeFuture虽然未实现Future接口,但遵循了Future的设计原理,基于网络通信的特征,为网络通信框架定义了一套同Future接口一样的功能。
1. public interface InvokeFuture {
2. /**
3. * Wait response with timeout.
4. ……略
5. */
6. public RemotingCommand waitResponse(final long timeoutMillis) throws InterruptedException;
7.
8. /**
9. * Wait response with unlimit timeout
10. ……略
11. */
12. public RemotingCommand waitResponse() throws InterruptedException;
13.
14. ……略
15.
16. /**
17. * Put the response to the future.
18. ……略
19. */
20. public void putResponse(final RemotingCommand response);
21.
22. ……略
23.
24. /**
25. * Execute the callback.
26. */
27. public void executeInvokeCallback();
28.
29. /**
30. * Asynchronous execute the callbackabnormally.
31. */
32. public void tryAsyncExecuteInvokeCallbackAbnormally();
33.
34. ……略
35.
36. /**
37. * Get the application callback of thefuture.
38. *
39. * @return
40. */
41. public InvokeCallback getInvokeCallback();
42.
43. /**
44. * Add timeout for the future.
45. *
46. * @param timeout
47. */
48. public void addTimeout(Timeout timeout);
49.
50. /**
51. * Cancel the timeout.
52. */
53. public void cancelTimeout();
54.
55. /**
56. * Whether the future is done.
57. *
58. * @return
59. */
60. public boolean isDone();
61.
62. ……略
63.
64. /**
65. * set invoke context
66. * @param invokeContext
67. */
68. public void setInvokeContext(InvokeContext invokeContext);
69.
70. /**
71. * get invoke context
72. * @return
73. */
74. public InvokeContext getInvokeContext();
75. }
在InvokeFuture中,主要的方法如下:
● waitResponse():等待服务端响应,直到接收到响应,或执行线程被中断;
● waitResponse(final longtimeoutMillis):等待服务端响应。如果在超时时间内没有返回响应,则抛出异常;
● putResponse(final RemotingCommandresponse):设置服务端响应结果;
● isDone():检查此处调用是否完成;
● executeInvokeCallback():执行回调;
● tryAsyncExecuteInvokeCallbackAbnormally():异步执行非正常响应的回调,如调用失败、调用超时等;
● addTimeout(Timeout timeout):设置超时时间;
● cancelTimeout():取消超时设置;
DefaultInvokeFuture实现了InvokeFuture接口,其主要源码如下:
1. public class DefaultInvokeFutureimplements InvokeFuture {
2.
3. ……略
4.
5. private final CountDownLatch countDownLatch = new CountDownLatch(1);
6.
7. private final AtomicBoolean executeCallbackOnlyOnce = newAtomicBoolean(false);
8. ……略
9.
10. @Override
11. public ResponseCommand waitResponse(long timeoutMillis) throwsInterruptedException {
12. this.countDownLatch.await(timeoutMillis,TimeUnit.MILLISECONDS);
13. return this.responseCommand;
14. }
15.
16. @Override
17. public ResponseCommand waitResponse() throws InterruptedException {
18. this.countDownLatch.await();
19. return this.responseCommand;
20. }
21.
22. ……略
23. @Override
24. public void putResponse(RemotingCommand response) {
25. this.responseCommand =(ResponseCommand) response;
26. this.countDownLatch.countDown();
27. }
28.
29. @Override
30. public boolean isDone() {
31. return this.countDownLatch.getCount()<= 0;
32. }
33. ……略
34. @Override
35. public void executeInvokeCallback() {
36. if (callbackListener != null) {
37. if(this.executeCallbackOnlyOnce.compareAndSet(false, true)) {
38. callbackListener.onResponse(this);
39. }
40. }
41. }
42. ……略
43. @Override
44. public void addTimeout(Timeout timeout) {
45. this.timeout = timeout;
46. }
47.
48. @Override
49. public void cancelTimeout() {
50. if (this.timeout != null) {
51. this.timeout.cancel();
52. }
53. }
54. ……略
55. @Override
56. public void tryAsyncExecuteInvokeCallbackAbnormally() {
57. try {
58. Protocol protocol =ProtocolManager.getProtocol(ProtocolCode.fromBytes(this.protocol));
59. if (null != protocol) {
60. CommandHandler commandHandler =protocol.getCommandHandler();
61. if (null != commandHandler) {
62. ExecutorService executor =commandHandler.getDefaultExecutor();
63. if (null != executor)
64. executor.execute(newRunnable() {
65. @Override
66. public void run() {
67. ClassLoaderoldClassLoader = null;
68. try {
69. if(DefaultInvokeFuture.this.getAppClassLoader() != null) {
70. oldClassLoader= Thread.currentThread()
71. .getContextClassLoader();
72. Thread.currentThread().setContextClassLoader(
73. DefaultInvokeFuture.this.getAppClassLoader());
74. }
75. DefaultInvokeFuture.this.executeInvokeCallback();
76. } finally {
77. if (null !=oldClassLoader) {
78. Thread.currentThread()
79. .setContextClassLoader(oldClassLoader);
80. }
81. }
82. }
83. });
84. } else {
85. logger.error("Executornull in commandHandler of protocolCode [{}].",
86. this.protocol);
87. }
88. } else {
89. logger.error("protocolCode[{}] not registered!", this.protocol);
90. }
91. } catch (Exception e) {
92. logger.error("Exception caughtwhen executing invoke callback abnormally.", e);
93. }
94. }
95.
96. }
在DefaultInvokeFuture中,通过CountDownLatch实现了执行线程的挂起(阻塞)和恢复(解除阻塞)。CountDownLatch是基于AQS(AbstractQueuedSynchronizer)实现的同步器,它根据同步状态的值将对调用线程进行阻塞和解除阻塞的操作,是一种无锁实现。DefaultInvokeFuture主要实现逻辑如下:
● 创建初始值为1的CountDownLatch对象countDownLatch,作为一个简单的开关;
● 创建初始值为false的AtomicBoolean对象executeCallbackOnlyOnce,作为回调只执行一次的开关;
● 在waitResponse()方法中,调用CountDownLatch的await方法,阻塞当前线程,等待服务端响应,直到获取到服务端响应。如果在等待过程中线程被中断,则抛出InterruptedException异常;
● 在waitResponse(longtimeoutMillis)方法中,调用CountDownLatch的await(long timeout, TimeUnit unit)方法,阻塞当前线程,等待服务端响应。如果在超时时间内获取到服务端响应,则返回true;否则,当等待时间超过超时时间,则返回false。如果在等待过程中线程被中断,则抛出InterruptedException异常;
● 在putResponse(RemotingCommand response)方法中,首先设置服务端响应结果,然后调用CountDownLatch的countDown()方法,恢复等待响应结果的线程;
● 在executeInvokeCallback()方法中,通过原子变量executeCallbackOnlyOnce的CAS操作,保证只有一个线程可以执行回调操作,并且只执行一次。如果compareAndSet(false, true)操作成功,则表示当前线程获取到执行权,则调用InvokeCallbackListener的onResponse方法,执行设置好的回调方法。
● 在tryAsyncExecuteInvokeCallbackAbnormally()方法中,如果当前RpcCommandHandler设置了执行线程池defaultExecutor,则在defaultExecutor线程池的某个线程中执行DefaultInvokeF的executeInvokeCallback()方法。executeInvokeCallback()方法的执行过程参考上一步的说明。
● 对于其它方法,在此不详述了。
2. Timeout与HashedWheelTimer
SOFABolt采用 Netty 的超时机制:HashedWheelTimer。
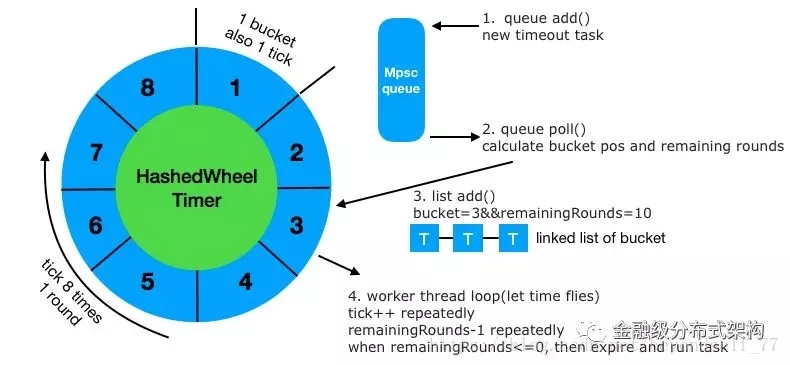
HashedWheelTimer基本原理如下所述:
● 首先,在发起调用前,新增一个超时任务timeoutTask到 MpscQueue(Netty 实现的一种高效的无锁队列);
● 然后,在循环里,不断的遍历MpscQueue队列里的超时任务(每次最多10万)。针对每个任务,根据其设置的超时时间,计算该任务所属于的 bucket 位置与剩余轮数 remainingRounds ,然后加入到对应bucket的链表结构里。随着tick++的进行,时间在不断的增长,每tick 8次,就是1个时间轮round;
● 最后,当对应超时任务的remainingRounds减到0时,就触发这个超时任务,执行其 run() 方法,做超时逻辑处理。
接下来,我们看看如何基于Netty实现四种通信模型:
1.1.1 单向调用-oneway
单向调用源码如下:
1. /**
2. * Oneway invocation.
3. ……略
4. */
5. protected void oneway(final Connection conn, finalRemotingCommand request) {
6. try {
7. conn.getChannel().writeAndFlush(request).addListener(new ChannelFutureListener(){
8.
9. @Override
10. public void operationComplete(ChannelFuture f) throws Exception {
11. if (!f.isSuccess()) {
12. logger.error("Invokesend failed. The address is {}",
13. RemotingUtil.parseRemoteAddress(conn.getChannel()),f.cause());
14. }
15. }
16.
17. });
18. } catch (Exception e) {
19. if (null == conn) {
20. logger.error("Conn isnull");
21. } else {
22. logger.error("Exceptioncaught when sending invocation. The address is {}",
23. RemotingUtil.parseRemoteAddress(conn.getChannel()),e);
24. }
25. }
26. };
对于单向调用,实现非常简单,主要实现逻辑如下:
1. 调用Netty的Channel接口的writeAndFlush方法,直接发送客户端请求对象request;
2. 增加ChannelFutureListener接口的匿名实现类,监听客户端请求发送操作。当发送操作完成以后,判断发送操作是否成功。如果未成功,则记录错误日志。如果成功,则忽略,表示调用完成。
1.1.2 同步调用-sync
同步调用源码如下:
1. /**
2. * Synchronous invocation
3. ……略
4. */
5. protected RemotingCommand invokeSync(final Connection conn, finalRemotingCommand request, final int timeoutMillis) throwsRemotingException, InterruptedException {
6. final InvokeFuture future = createInvokeFuture(request, request.getInvokeContext());
7. conn.addInvokeFuture(future);
8. try {
9. conn.getChannel().writeAndFlush(request).addListener(newChannelFutureListener() {
10.
11. @Override
12. public void operationComplete(ChannelFuture f) throws Exception {
13. if (!f.isSuccess()) {
14. conn.removeInvokeFuture(request.getId());
15. future.putResponse(commandFactory.createSendFailedResponse(
16. conn.getRemoteAddress(),f.cause()));
17. logger.error("Invokesend failed, id={}", request.getId(), f.cause());
18. }
19. }
20.
21. });
22. } catch (Exception e) {
23. conn.removeInvokeFuture(request.getId());
24. if (future != null) {
25. future.putResponse(commandFactory.createSendFailedResponse(conn.getRemoteAddress(),
26. e));
27. }
28. logger.error("Exception caughtwhen sending invocation, id={}", request.getId(), e);
29. }
30. RemotingCommand response = future.waitResponse(timeoutMillis);
31.
32. if (response == null) {
33. conn.removeInvokeFuture(request.getId());
34. response =this.commandFactory.createTimeoutResponse(conn.getRemoteAddress());
35. logger.warn("Wait response,request id={} timeout!", request.getId());
36. }
37.
38. return response;
39. }
对于同步调用,主要实现逻辑如下:
1. 根据请求对象request和请求调用上下文InvokeContext,创建DefaultInvokeFuture对象future,并设置到Connection的invokeFuture属性;
2. 调用Netty的Channel接口的writeAndFlush方法,直接发送客户端请求对象request;
3. 增加ChannelFutureListener接口的匿名实现类,监听客户端请求发送操作。当发送操作完成以后,判断发送操作是否成功。如果未成功,则首先从当前Connection的invokeFutureMap中,根据请求ID删除对应的future,此操作是线程安全的(基于ConcurrentHashmap实现),保证同一时间只有一个线程操作成功。如果删除成功,则调用future的putResponse方法,设置调用失败响应结果,唤醒等待调用结果的线程,即第4步中阻塞的线程;
4. 调用future的waitResponse方法,阻塞当前线程,在超时时间内等待服务端响应结果;
5. 如果在调用过程中发生异常,则首先从当前Connection中根据请求ID删除对应的future,然后调用future的putResponse方法,设置调用失败响应结果,唤醒等待调用结果的线程,即第4步中阻塞的线程;
6. 如果在超时时间内没有获得服务端响应结果,则调用future的putResponse方法,设置调用超时响应结果,唤醒等待调用结果的线程,即第4步中阻塞的线程;
7. 如果在超时时间内获得服务端响应结果,则直接返回。
1.1.3 Future调用-future
Future调用源码如下:
1. /**
2. * Invocation with future returned.
3. ……略
4. */
5. protected InvokeFuture invokeWithFuture(final Connection conn, finalRemotingCommand request,
6. final int timeoutMillis) {
7.
8. final InvokeFuture future = createInvokeFuture(request, request.getInvokeContext());
9. conn.addInvokeFuture(future);
10. try {
11. //add timeout
12. Timeout timeout =TimerHolder.getTimer().newTimeout(new TimerTask() {
13. @Override
14. public void run(Timeouttimeout) throws Exception {
15. InvokeFuture future =conn.removeInvokeFuture(request.getId());
16. if (future != null) {
17. future.putResponse(commandFactory.createTimeoutResponse(conn
18. .getRemoteAddress()));
19. }
20. }
21.
22. }, timeoutMillis,TimeUnit.MILLISECONDS);
23. future.addTimeout(timeout);
24.
25. conn.getChannel().writeAndFlush(request).addListener(newChannelFutureListener() {
26.
27. @Override
28. public voidoperationComplete(ChannelFuture cf) throws Exception {
29. if (!cf.isSuccess()) {
30. InvokeFuture f =conn.removeInvokeFuture(request.getId());
31. if (f != null) {
32. f.cancelTimeout();
33. f.putResponse(commandFactory.createSendFailedResponse(
34. conn.getRemoteAddress(),cf.cause()));
35. }
36. logger.error("Invokesend failed. The address is {}",
37. RemotingUtil.parseRemoteAddress(conn.getChannel()),cf.cause());
38. }
39. }
40.
41. });
42. } catch (Exception e) {
43. InvokeFuture f =conn.removeInvokeFuture(request.getId());
44. if (f != null) {
45. f.cancelTimeout();
46. f.putResponse(commandFactory.createSendFailedResponse(conn.getRemoteAddress(),e));
47. }
48. logger.error("Exception caughtwhen sending invocation. The address is {}",
49. RemotingUtil.parseRemoteAddress(conn.getChannel()),e);
50. }
51. return future;
52. };
对于Future调用,主要实现逻辑如下:
1. 根据请求对象request和请求调用上下文InvokeContext,创建DefaultInvokeFuture对象future,并设置到Connection的invokeFuture属性;
2. 根据超时时间,创建io.netty.util.HashedWheelTimer.HashedWheelTimer类型定时器,并设置定时任务。定时任务主要完成以下工作:首先从当前Connection中根据请求ID删除对应的future,然后调用future的putResponse方法,设置调用超时响应结果,唤醒等待调用结果的线程;
3. 设置future的timeout;
4. 调用Netty的Channel接口的writeAndFlush方法,直接发送客户端请求对象request;
5. 增加ChannelFutureListener接口的匿名实现类,监听客户端请求发送操作。当发送操作完成以后,判断发送操作是否成功。如果未成功,则首先从当前Connection中根据请求ID删除对应的future,然后调用future的putResponse方法,设置调用失败响应结果,唤醒等待调用结果的线程;
6. 如果在调用过程中发生异常,则首先从当前Connection中根据请求ID删除对应的future,然后调用future的putResponse方法,设置调用失败响应结果,唤醒等待调用结果的线程;
7. 如果在调用过程中没有发生异常,则直接返回future。
1.1.4 回调-callback
Callback调用源码如下:
1. /**
2. * Invocation with callback.
3. ……略
4. */
5. protected void invokeWithCallback(final Connection conn, finalRemotingCommand request,
6. finalInvokeCallback invokeCallback, final int timeoutMillis) {
7. final InvokeFuture future = createInvokeFuture(conn, request, request.getInvokeContext(),
8. invokeCallback);
9. conn.addInvokeFuture(future);
10.
11. try {
12. //add timeout
13. Timeout timeout =TimerHolder.getTimer().newTimeout(new TimerTask() {
14. @Override
15. public void run(Timeouttimeout) throws Exception {
16. InvokeFuture future =conn.removeInvokeFuture(request.getId());
17. if (future != null) {
18. future.putResponse(commandFactory.createTimeoutResponse(conn
19. .getRemoteAddress()));
20. future.tryAsyncExecuteInvokeCallbackAbnormally();
21. }
22. }
23.
24. }, timeoutMillis,TimeUnit.MILLISECONDS);
25. future.addTimeout(timeout);
26. conn.getChannel().writeAndFlush(request).addListener(new ChannelFutureListener() {
27.
28. @Override
29. public voidoperationComplete(ChannelFuture cf) throws Exception {
30. if (!cf.isSuccess()) {
31. InvokeFuture f =conn.removeInvokeFuture(request.getId());
32. if (f != null) {
33. f.cancelTimeout();
34. f.putResponse(commandFactory.createSendFailedResponse(
35. conn.getRemoteAddress(),cf.cause()));
36. f.tryAsyncExecuteInvokeCallbackAbnormally();
37. }
38. logger.error("Invokesend failed. The address is {}",
39. RemotingUtil.parseRemoteAddress(conn.getChannel()),cf.cause());
40. }
41. }
42.
43. });
44. } catch (Exception e) {
45. InvokeFuture f =conn.removeInvokeFuture(request.getId());
46. if (f != null) {
47. f.cancelTimeout();
48. f.putResponse(commandFactory.createSendFailedResponse(conn.getRemoteAddress(),e));
49. f.tryAsyncExecuteInvokeCallbackAbnormally();
50. }
51. logger.error("Exception caughtwhen sending invocation. The address is {}",
52. RemotingUtil.parseRemoteAddress(conn.getChannel()),e);
53. }
54. }
对于Callback回调,主要实现逻辑如下:
1. 根据请求对象request和请求调用上下文InvokeContext,创建DefaultInvokeFuture对象future,并设置到Connection的invokeFuture属性;
2. 根据超时时间,创建io.netty.util.HashedWheelTimer.HashedWheelTimer类型定时器,并设置定时任务。定时任务主要完成以下工作:首先,从当前Connection中根据请求ID删除对应的future;然后,调用future的putResponse方法,设置调用超时响应结果;最后,调用设置的回调方法,由回调方法处理响应结果;
3. 设置future的timeout;
4. 调用Netty的Channel接口的writeAndFlush方法,直接发送客户端请求对象request;
5. 增加ChannelFutureListener接口的匿名实现类,监听客户端请求发送操作。当发送操作完成以后,判断发送操作是否成功。如果未成功,则首先,从当前Connection中根据请求ID删除对应的future;然后,调用future的putResponse方法,设置调用失败响应结果;最后,调用设置的回调方法,由回调方法处理响应结果;
6. 如果在调用过程中发生异常,则首先从当前Connection中根据请求ID删除对应的future;然后,调用future的putResponse方法,设置调用失败响应结果;最后,调用设置的回调方法,由回调方法处理响应结果;
7. 如果在调用过程中没有发生异常,则直接返回。
在sync、futrue和callback三种通信模型的调用过程中,有两个操作包含一些隐含的意思,对于多线程同步和整个调用过程的处理非常关键:
● InvokeFuture future =conn.removeInvokeFuture(request.getId()),即从当前Connection的invokeFutureMap中,根据请求ID删除对应的future,此操作是线程安全的(基于ConcurrentHashmap实现),保证同一时间只有一个线程操作成功。如果删除成功,返回删除的InvokeFuture。否则,返回null。然后通过判断future是否为null,来决定当前线程是否具有设置响应结果或执行回调方法的权利;
● 在哪里设置正常的服务端响应结果。在SOFA Bolt中,是在com.alipay.remoting.rpc.protocol.RpcResponseProcessor的doProcess方法中设置。RpcResponseProcessor类主要用来处理服务端响应,通过Connection获取future,然后调用future的putResponse方法,设置正常服务端响应结果,唤醒等待调用结果的线程或调用设置好的回调方法,处理响应结果。
了解完BaseRemoting抽象类以后,我们在简要看看其子类:
● RpcRemoting抽象类,继承了BaseRemoting抽象类,该类根据RPC需求,增加了地址解析功能和连接管理功能。
● RpcClientRemoting类,继承了RpcRemoting抽象类,为客户端提供了四种通信模型的API,供客户端实际调用。
● RpcServerRemoting类,继承了RpcRemoting抽象类,为服务端提供了四种通信模型的API,供服务端实际调用。此API在全双工通信过程中才被服务端使用。
本系列文章目录: