一、前言
1、说明
HttpClient是一个目前最常用的用于模拟客户端发送http请求的工具,可用于接口自动化测试或者爬虫或者在项目中加入获取其他网站数据等;
支持目前所有的请求方式,如put,post,get,delete等;
2、maven依赖添加
maven依赖如下:
<dependency>
      <groupId>org.apache.httpcomponents</groupId>
      <artifactId>httpclient</artifactId>
      <version>4.5.6</version>
    </dependency>
    <dependency>
      <groupId>org.apache.httpcomponents</groupId>
      <artifactId>httpcore</artifactId>
      <version>4.4.10</version>
    </dependency>
    <dependency>
      <groupId>org.apache.httpcomponents</groupId>
      <artifactId>httpmime</artifactId>
      <version>4.5.6</version>
    </dependency>
3、简单的请求说明
如下为一个简单的请求代码:
import java.io.IOException;

import org.apache.http.client.ClientProtocolException;
import org.apache.http.client.methods.CloseableHttpResponse;
import org.apache.http.client.methods.HttpGet;
import org.apache.http.impl.client.CloseableHttpClient;
import org.apache.http.impl.client.HttpClients;

public class Entry {

	public static void main(String[] args) {
		CloseableHttpClient client = HttpClients.createDefault();//client实例初始化
		HttpGet get = new HttpGet("http://www.baidu.com");//请求初始化
		//请求执行,获取返回对象
		CloseableHttpResponse response = null;
		try {
			response = client.execute(get);
            System.out.println(response.getStatusLine().getStatusCode());
		} catch (ClientProtocolException e) {
			e.printStackTrace();
		} catch (IOException e) {
			e.printStackTrace();
		}finally
		{
			try {
				response.close();//关闭返回对象
				client.close();//关闭client
			} catch (IOException e) {
				e.printStackTrace();
			}
		}
	}

}
以上范例打印结果应为200;
二、httpClient设置
1、httpClient初始化
查看源码可以看到httpClient有如下几种方式:
简单点常用就是createDefault()方法和custom()方法;
下面分别对这几种方式做说明:

(1)、createDefault()
此方法返回一个默认的httpClient对象,源码如下:
/**
     * Creates {@link CloseableHttpClient} instance with default
     * configuration.
     */
    public static CloseableHttpClient createDefault() {
        return HttpClientBuilder.create().build();
    }
进一步查看HttpClientBuilder的源码发现此处使用的是HttpClient4.5已经设置好的一个HttpClient,包括资源池大小,ssl策略,链接管理,cookie等;
(2)、createSystem()
此方法返回一个系统的HttpClient对象,源码如下:
/**
     * Creates {@link CloseableHttpClient} instance with default
     * configuration based on system properties.
     */
    public static CloseableHttpClient createSystem() {
        return HttpClientBuilder.create().useSystemProperties().build();
    }
查看HttpClientBuilder的源码如下:
/**
     * Use system properties when creating and configuring default
     * implementations.
     */
    public final HttpClientBuilder useSystemProperties() {
        this.systemProperties = true;
        return this;
    }
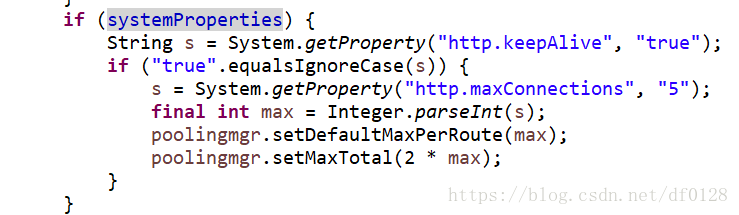
类的build()中多处根据systemProperties的值来进行判断,类似如下:
这些都是预设的一些策略。
(3)、createMinimal()
顾名思义,此为最小的HttpClient配置,源代码如下:
/**
     * Creates {@link CloseableHttpClient} instance that implements
     * the most basic HTTP protocol support.
     */
    public static CloseableHttpClient createMinimal() {
        return new MinimalHttpClient(new PoolingHttpClientConnectionManager());
    }
(4)、createMinimal(final HttpClientConnectionManager connManager)
此项和第三个类似,差别在于此方法的连接控制是自定义的,此处不再详述;
/**
     * Creates {@link CloseableHttpClient} instance that implements
     * the most basic HTTP protocol support.
     */
    public static CloseableHttpClient createMinimal(final HttpClientConnectionManager connManager) {
        return new MinimalHttpClient(connManager);
    }
(5)、custom()
此方法较为常用,为自定义的配置,可以附加各种配置,源代码如下:
/**
     * Creates builder object for construction of custom
     * {@link CloseableHttpClient} instances.
     */
    public static HttpClientBuilder custom() {
        return HttpClientBuilder.create();
    }
用法如下所示:
CloseableHttpClient client = HttpClients.custom().setConnectionManager(new PoolingHttpClientConnectionManager()).build();
custom()后面可以加多个配置,记住最后必须加上.build();
2、连接配置
自定义初始化HttpClient的时候需要设置连接管理,即上面代码的.setConnectionManager(new PoolingHttpClientConnectionManager())部分,此方法需要添加的实例为HttpClientConnectionManager,这个接口有两个实现类,为PoolingHttpClientConnectionManager和BasicHttpClientConnectionManager;
BasicHttpClientConnectionManager是一个简单连接管理器,一次只保持一条连接,即便这个类是线程安全的,它也只应该被一个执行线程使用,BasicHttpClientConnectionManager对相同路由的连续请求将重用连接,如果新的连接跟已经持久化保持的连接不同,那么它会关闭已有的连接,根据所给的路由重新开启一个新的连接来使用,如果连接已经被分配出去了,那么java.lang.IllegalStateException异常会被抛出。
该连接管理器的实现应该在EJB容器内使用。一个例子如下;
HttpClientContext context = HttpClientContext.create();
HttpClientConnectionManager connMrg = new BasicHttpClientConnectionManager();
HttpRoute route = new HttpRoute(new HttpHost("localhost", 80));
// Request new connection. This can be a long process
ConnectionRequest connRequest = connMrg.requestConnection(route, null);
// Wait for connection up to 10 sec
HttpClientConnection conn = connRequest.get(10, TimeUnit.SECONDS);
try {
    // If not open
    if (!conn.isOpen()) {
        // establish connection based on its route info
        connMrg.connect(conn, route, 1000, context);
        // and mark it as route complete
        connMrg.routeComplete(conn, route, context);
    }
    // Do useful things with the connection.
} finally {
    connMrg.releaseConnection(conn, null, 1, TimeUnit.MINUTES);
}
PoolingHttpClientConnectionManager是一个更加复杂的实现,其管理了一个连接池,能够为多个执行线程提供连接,连接依据路由归类放入到池中,当一个请求在连接池中有对应路由的连接时,连接管理器会从池中租借出一个持久化连接而不是创建一个带有标记的连接。
PoolingHttpClientConnectionManager在总的和每条路由上都会保持最大数量限制的连接,默认该实现会为每个路由保持2个并行连接,总的数量上不超过20个连接,在现实使用中,这是限制可能太过于苛刻,尤其对于那些将HTTP作为传输协议的服务来说。
下面是一个如何调整连接池参数的例子:
PoolingHttpClientConnectionManager cm = new PoolingHttpClientConnectionManager();
// Increase max total connection to 200
cm.setMaxTotal(200);
// Increase default max connection per route to 20
cm.setDefaultMaxPerRoute(20);
// Increase max connections for localhost:80 to 50
HttpHost localhost = new HttpHost("locahost", 80);
cm.setMaxPerRoute(new HttpRoute(localhost), 50);

CloseableHttpClient httpClient = HttpClients.custom()
        .setConnectionManager(cm)
        .build();
3、请求配置
此部分配置其实可以附加在HttpClient上,也可以附加在请求的实例上,代码如下所示:
RequestConfig.Builder configBuilder = RequestConfig.custom();
// 设置连接超时
configBuilder.setConnectTimeout(MAX_TIMEOUT);
// 设置读取超时
configBuilder.setSocketTimeout(MAX_TIMEOUT);
// 设置从连接池获取连接实例的超时
configBuilder.setConnectionRequestTimeout(MAX_TIMEOUT);
// 在提交请求之前 测试连接是否可用
configBuilder.setStaleConnectionCheckEnabled(true);
//cookie管理规范设定,此处有多种可以设置,按需要设置
configBuilder.setCookieSpec(CookieSpecs.BROWSER_COMPATIBILITY);
RequestConfig requestConfig = configBuilder.build();
CloseableHttpClient client = HttpClients.custom().setConnectionManager(new PoolingHttpClientConnectionManager()).setDefaultRequestConfig(requestConfig).build();
上面代码中cookie策略的设定,CookieSpecs有多种实现,说明如下:
Standard strict(严格):状态管理策略行为完全符合RFC6265第四章的行为定义。
Standard(标准):状态管理策略较为符合RFC6265第四章定义的行为,以期望在不是完全遵守该行为之间的服务器之间进行交互。
Netscape 草案:该策略遵守Netscape公司公布最初的规范草案,除非确实需要与旧代码兼容,否则尽量避免使用它。
BEST_MATCH : 最佳匹配,不建议使用。
浏览器兼容性Browser compatibility(已过时):该策略尝试尽量去模拟老旧的浏览器版本如微软IE和Mozilla FireFox,请不要在新应用中使用。
Default:默认cookie策略是一种综合性的策略,其基于HTTP response返回的cookie属性如version信息,过期信息,与RFC2965,RFC2109或者Netscape草案兼容,该策略将会在下一个HttpClient小版本(基于RFC6265)中废弃。
Ignore cookies:所有的cookie都被忽略
强烈建议在新应用中使用Standard或者Standard strict策略,过时规范应该仅仅是在与旧系统兼容时使用。下一个HttpClient版本将会停止对过时规范的支持。
4、定制cookie策略
如果要定制cookie策略,则需要创建一个自定义的CookieSpec接口的实现,创建一个CookieSpecProvider的实现类,然后用该实现类去创建和初始化自定义规范的实例,然后使用HttpClient进行注册,一旦自定义规范被注册,它就会如同标准cookie规范一样被触发。
如下为一个实现自定义cookie策略的范例:
PublicSuffixMatcher publicSuffixMatcher = PublicSuffixMatcherLoader.getDefault();

Registry<CookieSpecProvider> r = RegistryBuilder.<CookieSpecProvider>create()
        .register(CookieSpecs.DEFAULT,
                new DefaultCookieSpecProvider(publicSuffixMatcher))
        .register(CookieSpecs.STANDARD,
                new RFC6265CookieSpecProvider(publicSuffixMatcher))
        .register("easy", new EasySpecProvider())
        .build();

RequestConfig requestConfig = RequestConfig.custom()
        .setCookieSpec("easy")
        .build();

CloseableHttpClient httpclient = HttpClients.custom()
        .setDefaultCookieSpecRegistry(r)
        .setDefaultRequestConfig(requestConfig)
        .build();
5、cookie持久化
有时候有些cookie内容我们并不想每次执行就发送一次,譬如登录等,那么我们可以直接把定制好的cookie附加到HttpClient上,这样就可以避免重复动作了,代码如下所示:
// Create a local instance of cookie store
CookieStore cookieStore = new BasicCookieStore();
// Populate cookies if needed
BasicClientCookie cookie = new BasicClientCookie("name", "value");
cookie.setDomain(".mycompany.com");
cookie.setPath("/");
cookieStore.addCookie(cookie);
// Set the store
CloseableHttpClient httpclient = HttpClients.custom()
        .setDefaultCookieStore(cookieStore)
        .build();
三、请求
HttpClient支持开箱即用的,所有定义在HTTP/1.1规范中的方法:GET、HEAD、POST、PUT、DELETE、TRACE、OPTIONS。每个方法类型都有一个指定的类:HttpGet、HttpHead、HttpPost、HttpPut、HttpDelete、HttpTrace、HttpOptions。
譬如一个get请求如下:
HttpGet httpget = new HttpGet(
     "http://www.google.com/search?hl=en&q=httpclient&btnG=Google+Search&aq=f&oq=");
参数为请求的地址,?号后边的部分是参数;当然也可以用URI,譬如上面例子中的请求用URI方式的话代码如下:
URI uri = new URIBuilder()
        .setScheme("http")
        .setHost("www.google.com")
        .setPath("/search")
        .setParameter("q", "httpclient")
        .setParameter("btnG", "Google Search")
        .setParameter("aq", "f")
        .setParameter("oq", "")
        .build();
HttpGet httpget = new HttpGet(uri);
System.out.println(httpget.getURI());
这种参数为URI的并不常用,不建议使用;
1、常用请求
(1)、get请求
基本的get请求代码如下:
/**
     * 下发http的get请求
     * @param url 请求地址
     * @param params 参数集
     * @return
     */
    public static CloseableHttpResponse httpGet(String url,
    		Map<String, Object> params)
    {
    	log.info("开始下发接口 {}", url);
    	String apiUrl = url;
    	if(params != null && !params.isEmpty())
    	{
    		StringBuffer param = new StringBuffer();
            int i = 0;
            for (String key : params.keySet())
            {
                if (i == 0 && !apiUrl.endsWith("?"))
                    param.append("?");
                else
                    param.append("&");
                param.append(key).append("=").append(params.get(key));
                i++;
            }
            apiUrl += param;
    	}
        // 定义一个get请求方法
        HttpGet httpget = new HttpGet(apiUrl);
        CloseableHttpClient httpClient = HttpClients.createDefault();

    	try {
			CloseableHttpResponse httpResponse = httpClient.execute(httpget);

			return httpResponse;
		} catch (ClientProtocolException e)
    	{
			log.error("下发http接口失败", e);
		} catch (IOException e)
    	{
			log.error("下发http接口失败", e);
		}
        return null;
    }
(2)、post请求
基本的post请求代码如下:
/**
     * post方法
     * @param url
     * @param params
     * @return
     */
    public static CloseableHttpResponse httpPost(String url,
    		Map<String, String> params)
    {
    	log.info("开始下发接口 {}", url);
    	String uri = url;
    	HttpPost post = new HttpPost(uri);
    	if(params != null && !params.isEmpty())
    	{
    		List<NameValuePair> list = new ArrayList<NameValuePair>();
            Iterator<Entry<String, String>> iterator = params.entrySet().iterator();
            while (iterator.hasNext())
            {
                Entry<String, String> elem = iterator.next();
                list.add(new BasicNameValuePair(elem.getKey(), elem.getValue()));
            }
            if (list.size() > 0)
            {
            	try
            	{
    				post.setEntity(new UrlEncodedFormEntity(list, "utf-8"));
    			} catch (UnsupportedEncodingException e)
            	{
    				log.error("接口{}组合参数失败", url, e);
    			}
            }
    	}
    	CloseableHttpClient httpClient = HttpClients.createDefault();

    	try {
			CloseableHttpResponse httpResponse = httpClient.execute(post);

			return httpResponse;
		} catch (ClientProtocolException e)
    	{
			log.error("下发http接口失败", e);
		} catch (IOException e)
    	{
			log.error("下发http接口失败", e);
		}
        return null;
    }
2、请求添加header
有时候我们会需要添加header,在发送请求的时候,那么如何加入header呢?代码如下:
HttpPost post = new HttpPost(uri);
post.addHeader(key, value);
譬如上面的get请求,更新一个添加header的方法后代码如下:
/**
     * 下发http的get请求
     * @param url 请求地址
     * @param params 参数集
     * @return
     */
    public static CloseableHttpResponse httpGet(String url,
    		Map<String, Object> params, Map<String, String> headers)
    {
    	log.info("开始下发接口 {}", url);
    	String apiUrl = url;
    	if(params != null && !params.isEmpty())
    	{
    		StringBuffer param = new StringBuffer();
            int i = 0;
            for (String key : params.keySet())
            {
                if (i == 0 && !apiUrl.endsWith("?"))
                    param.append("?");
                else
                    param.append("&");
                param.append(key).append("=").append(params.get(key));
                i++;
            }
            apiUrl += param;
    	}
        // 定义一个get请求方法
        HttpGet httpget = new HttpGet(apiUrl);
        if(headers != null && !headers.isEmpty())
        {
        	for(String key : headers.keySet())
        	{
        		httpget.addHeader(key, headers.get(key));
        	}

        }
        CloseableHttpClient httpClient = HttpClients.createDefault();

    	try {
			CloseableHttpResponse httpResponse = httpClient.execute(httpget);

			return httpResponse;
		} catch (ClientProtocolException e)
    	{
			log.error("下发http接口失败", e);
		} catch (IOException e)
    	{
			log.error("下发http接口失败", e);
		}
        return null;
    }
3、请求添加cookie
这里cookie的添加只能是通过HttpClient实例添加或者在执行的时候添加;
方法一、通过HttpClient实例添加:
BasicCookieStore cookieStore = new BasicCookieStore();
BasicClientCookie cookie = new BasicClientCookie("aaa", "bbb");
cookie.setDomain(".mycompany.com");
cookie.setPath("/");
cookieStore.addCookie(cookie);
CloseableHttpClient client = HttpClients.custom().setDefaultCookieStore(cookieStore).build();
方法二、通过HttpContext添加,代码如下:
//实例化一个cookieStore并添加cookie
BasicCookieStore cookieStore = new BasicCookieStore();
BasicClientCookie cookie = new BasicClientCookie("aaa", "bbb");
cookie.setDomain(".mycompany.com");
cookie.setPath("/");
cookieStore.addCookie(cookie);
CloseableHttpClient client = HttpClients.createDefault();
HttpGet get = new HttpGet("http://www.baidu.com");
HttpClientContext context = new HttpClientContext();//实例化一个HttpContext
context.setCookieStore(cookieStore);//添加cookieStore
CloseableHttpResponse response = null;
try {
	response = client.execute(get, context);
	System.out.println(response.getStatusLine().getStatusCode());
} catch (ClientProtocolException e) {
	e.printStackTrace();
} catch (IOException e) {
	e.printStackTrace();
}finally
{
	try {
		response.close();
		client.close();
	} catch (IOException e) {
		e.printStackTrace();
	}
}
4、执行请求
执行请求就是需要一个HttpClient实例去执行一个请求实例,该实例可以为http所有的请求方式,如上面的例子所示,基本上常用的就是直接执行请求或者附带一个HttpContext的方式;
4、响应
相应即使执行请求的返回,为CloseableHttpResponse,这个对象中含有我们所需要的所有的返回,譬如header,cookie和相应内容等,其基本内容如下代码所示:
public static void main(String[] args) {
		BasicCookieStore cookieStore = new BasicCookieStore();
		BasicClientCookie cookie = new BasicClientCookie("aaa", "bbb");
		cookie.setDomain(".mycompany.com");
		cookie.setPath("/");
		cookieStore.addCookie(cookie);
		CloseableHttpClient client = HttpClients.createDefault();
		HttpGet get = new HttpGet("http://www.baidu.com");
		HttpClientContext context = new HttpClientContext();
		context.setCookieStore(cookieStore);
		CloseableHttpResponse response = null;
		try {
			response = client.execute(get, context);
			System.out.println(response.getStatusLine().getStatusCode());//返回状态值
			Header[] headers = response.getAllHeaders();//获取所有的header信息
			boolean isContains = response.containsHeader("name");//是否包含ke为name的header
			ProtocolVersion version = response.getProtocolVersion();//获取协议版本
			// 使用响应对象获取响应实体
    	    HttpEntity entity = httpResponse.getEntity();
    	    //将响应实体转为字符串,此部分即为内容
            try {
			    String response = EntityUtils.toString(entity,"utf-8");
		    } catch (ParseException e) {
			    log.error("获取响应内容转码失败,转码类型为:{}", "utf-8", e);
		   } catch (IOException e) {
			    log.error("获取响应内容转码失败,转码类型为:{}", "utf-8", e);
		   }
		   //获取cookie
		   List<Cookie> returnCookie = context.getCookieStore().getCookies();
		} catch (ClientProtocolException e) {
			    e.printStackTrace();
		} catch (IOException e) {
			    e.printStackTrace();
		}finally
		{
			try {
				response.close();
				client.close();
			} catch (IOException e) {
				// TODO Auto-generated catch block
				e.printStackTrace();
			}
		}
	}
四、发送https请求
有部分网站为https开头,这样的话就需要特别一点的操作了,如下范例为一个发送https请求的例子:
/**
     * 发送 SSL POST请(HTTPS),K-V形式
     * @param url
     * @param params
     * @author Charlie.chen
     */
    public static CloseableHttpResponse httpPostWithSSL(String url, Map<String, Object> params)
    {
        CloseableHttpClient httpClient = HttpClients.custom()
        		.setSSLSocketFactory(createSSLConn()).setConnectionManager(connMgr)
        		.setDefaultRequestConfig(requestConfig).build();
        HttpPost httpPost = new HttpPost(url);
        CloseableHttpResponse response = null;
        try {
            httpPost.setConfig(requestConfig);
            if(params != null && !params.isEmpty())
            {
            	List<NameValuePair> pairList = new ArrayList<NameValuePair>(params.size());
                for (Map.Entry<String, Object> entry : params.entrySet()) {
                    NameValuePair pair = new BasicNameValuePair(entry.getKey(), entry
                            .getValue().toString());
                    pairList.add(pair);
                }
                httpPost.setEntity(new UrlEncodedFormEntity(pairList, Charset.forName("utf-8")));
            }
            response = httpClient.execute(httpPost);
        } catch (Exception e)
        {
            log.error("下发接口失败", e);
            return null;
        }
        return response;
    }

     /**
     * 创建SSL安全连接
     * @param url
     * @param params
     * @return
     */
    private static SSLConnectionSocketFactory createSSLConn() {
        SSLConnectionSocketFactory sslsf = null;
        try
        {
            SSLContext sslContext = new SSLContextBuilder().loadTrustMaterial(null, new TrustStrategy() {
                public boolean isTrusted(X509Certificate[] chain, String authType) throws CertificateException {
                    return true;
                }
            }).build();
            sslsf = new SSLConnectionSocketFactory(sslContext);
        } catch (GeneralSecurityException e)
        {
            e.printStackTrace();
        }
        return sslsf;
    }
五、上传文件
HttpClient有提供上传相关的部分,相关代码如下:
HttpPost post = new HttpPost(url);
MultipartEntityBuilder builder = MultipartEntityBuilder.create();
builder.setCharset(Charset.forName("UTF-8"));
builder.setMode(HttpMultipartMode.BROWSER_COMPATIBLE);
builder.addBinaryBody(new File(filePath).getName(), new File(filePath));
//请求实体
HttpEntity entity = builder.build();
post.setEntity(entity);
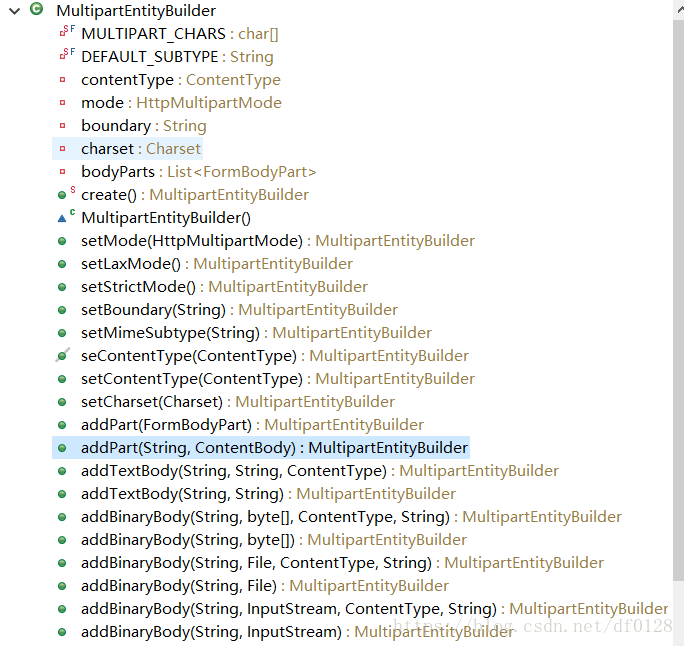
此处的添加内容有多个方法,源代码截图如下:
查看源代码可知,addTextBody和addBinaryBody方法都是调用的时addPart方法;
源码中如下这个方法是最基础的方法,其他的add方法最终都是调用的此方法:
/**
     * @since 4.4
     */
    public MultipartEntityBuilder addPart(final FormBodyPart bodyPart) {
        if (bodyPart == null) {
            return this;
        }
        if (this.bodyParts == null) {
            this.bodyParts = new ArrayList<FormBodyPart>();
        }
        this.bodyParts.add(bodyPart);
        return this;
    }
如上那个方法不常用,常用如下这几种:
public MultipartEntityBuilder addPart(final String name, final ContentBody contentBody) {
        Args.notNull(name, "Name");
        Args.notNull(contentBody, "Content body");
        return addPart(FormBodyPartBuilder.create(name, contentBody).build());
    }

    public MultipartEntityBuilder addTextBody(
            final String name, final String text, final ContentType contentType) {
        return addPart(name, new StringBody(text, contentType));
    }

    public MultipartEntityBuilder addTextBody(
            final String name, final String text) {
        return addTextBody(name, text, ContentType.DEFAULT_TEXT);
    }

    public MultipartEntityBuilder addBinaryBody(
            final String name, final byte[] b, final ContentType contentType, final String filename) {
        return addPart(name, new ByteArrayBody(b, contentType, filename));
    }

    public MultipartEntityBuilder addBinaryBody(
            final String name, final byte[] b) {
        return addBinaryBody(name, b, ContentType.DEFAULT_BINARY, null);
    }

    public MultipartEntityBuilder addBinaryBody(
            final String name, final File file, final ContentType contentType, final String filename) {
        return addPart(name, new FileBody(file, contentType, filename));
    }

    public MultipartEntityBuilder addBinaryBody(
            final String name, final File file) {
        return addBinaryBody(name, file, ContentType.DEFAULT_BINARY, file != null ? file.getName() : null);
    }

    public MultipartEntityBuilder addBinaryBody(
            final String name, final InputStream stream, final ContentType contentType,
            final String filename) {
        return addPart(name, new InputStreamBody(stream, contentType, filename));
    }

    public MultipartEntityBuilder addBinaryBody(final String name, final InputStream stream) {
        return addBinaryBody(name, stream, ContentType.DEFAULT_BINARY, null);
    }
如下是一个使用addPart方法的范例:
File file = new File(textFileName, ContentType.DEFAULT_BINARY);
HttpPost post = new HttpPost("http://echo.200please.com");
FileBody fileBody = new FileBody(file);
StringBody stringBody1 = new StringBody("Message 1", ContentType.MULTIPART_FORM_DATA);
StringBody stringBody2 = new StringBody("Message 2", ContentType.MULTIPART_FORM_DATA);
//
MultipartEntityBuilder builder = MultipartEntityBuilder.create();
builder.setMode(HttpMultipartMode.BROWSER_COMPATIBLE);
builder.addPart("upfile", fileBody);
builder.addPart("text1", stringBody1);
builder.addPart("text2", stringBody2);
HttpEntity entity = builder.build();
//
post.setEntity(entity);
HttpResponse response = client.execute(post);
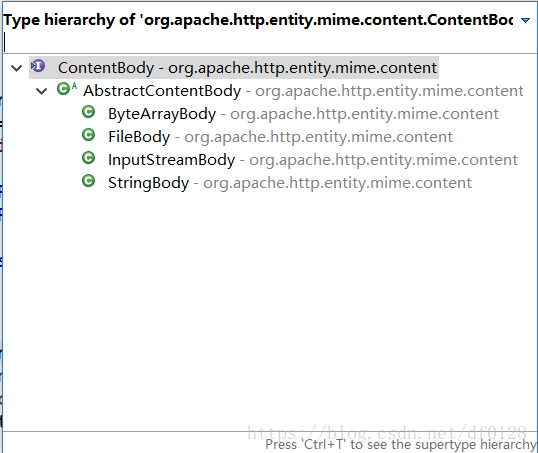
此方法支持的ContentBody的类型为如下几种:
除了使用addPart方法,较常用其实还是addBinaryBody或者addTextBody方法,范例如下:
HttpPost post = new HttpPost("http://echo.200please.com");
File file = new File(textFileName);
String message = "This is a multipart post";
MultipartEntityBuilder builder = MultipartEntityBuilder.create();
builder.setMode(HttpMultipartMode.BROWSER_COMPATIBLE);
builder.addBinaryBody("upfile", file, ContentType.DEFAULT_BINARY, textFileName);
builder.addTextBody("text", message, ContentType.DEFAULT_BINARY);
//
HttpEntity entity = builder.build();
post.setEntity(entity);
HttpResponse response = client.execute(post);
六、下载文件
下载文件代码如下所示:
/**
      * 下载文件
      * @param url 接口路径
      * @param targetFilePath 目标文件
      * @return
      */
     public static boolean downLoadFile(String url, String targetFilePath)
     {
    	 CloseableHttpClient httpclient = getHttpClient();
    	 HttpPost post = new HttpPost(url);
    	 CloseableHttpResponse httpResponse = null;
    	 try {
    		 httpResponse = httpclient.execute(post);

    		 FileOutputStream output = new FileOutputStream(targetFilePath);
    		// 得到网络资源的字节数组,并写入文件
             HttpEntity entity = httpResponse.getEntity();
             if (entity != null) {
                 InputStream instream = entity.getContent();
                 byte b[] = new byte[1024];
                 int j = 0;
                 while( (j = instream.read(b))!=-1){
                     output.write(b,0,j);
                 }
                 output.flush();
                 output.close();
                 instream.close();
             }
		} catch (ClientProtocolException e) {
			e.printStackTrace();
			return false;
		} catch (IOException e) {
			e.printStackTrace();
			return false;
		}finally
    	{
			try {
				httpResponse.close();
				httpclient.close();
			} catch (IOException e) {
				e.printStackTrace();
			}
    	}
    	 return true;
     }