一.了解从输入url到显示页面过程中都发生了什么:
二.在大致了解了上述过程后下面我将进行详细的讲解:
TCP/IP四层模型,如下图所示:

(一)通过url并利用DNS解析出目的主机的ip地址;
在地址栏输入url,url中的主机名一般是域名,但是我们要将它解析成IP地址,这就用到DNS地址解析
大致过程就是:客户端提出域名解析请求,首先检查本地的DNS缓存文件和hosts文件,如果没有就发给本地的域名服务器,如果有对应项就直接返回,如果没有对应项,如下图所示:(我们用www.baidu.com举例)
①就将请求直接就发给全球只有13台的根域名服务器,该服务器返回后缀为 .com. (注意每个根域名后面都有一个.)的顶级域名服务器的ip地址
②本地服务器去访问顶级域名服务器,该服务器返回类似 baidu.com 的二级域名服务器的ip地址
③本地服务器去访问刚返回来的二级域名服务器,该服务器返回你要找的www.baidu.com 的ip地址

(二)找到目标主机,建立TCP/IP连接;(三握手)
根据上一步我们已经获取到目标主机的ip地址,现在要开始建立TCP/IP连接,TCP/IP三次握手大致过程如下:

①.第一次连接请求SYN_SENT 向服务器发送一个携带SYN(SYN位置为1)(同步信息),SEQ(序号由客户端随机生成表明下次接受到的ACK的值要是SEQ+1(SEQ每次随机产生))信息的报文 只有SYN表示第一次握手
②.第二次连接请求服务端发送确认信息是一个携带 SYN+ACK(SYN和ACK都置为1), SEQ(由服务端随机生成序号) = y , ACK(确认信息,它要求下一次客户端发送回来的SEQ要为 x+1 就是它自身的值) = x+1,rwnd(窗口大小)=5000
③.第三次连接请求 ESTIBLISHD 客户端向服务器发送一个包含ACK , SEQ=x+1(被上一次连接限制),ACK=y+1(确认信息,它要求下一次服务端发送回来的SEQ要为 x+1 就是它自身的值) rwnd=10000(窗口大小)的报文信息
(三)Tomcat监听到请求,进行处理;
在了解这个之前,我们首先看一小段server.xml源码:
<?xml version='1.0' encoding='utf-8'?>
<Server port="8005" shutdown="SHUTDOWN">
  <Listener className="org.apache.catalina.startup.VersionLoggerListener" />
  <!-- Security listener. Documentation at /docs/config/listeners.html
  <Listener className="org.apache.catalina.security.SecurityListener" />
  -->
  <!--APR library loader. Documentation at /docs/apr.html -->
  <Listener className="org.apache.catalina.core.AprLifecycleListener" SSLEngine="on" />
  <!--Initialize Jasper prior to webapps are loaded. Documentation at /docs/jasper-howto.html -->
  <Listener className="org.apache.catalina.core.JasperListener" />
  <!-- Prevent memory leaks due to use of particular java/javax APIs-->
  <Listener className="org.apache.catalina.core.JreMemoryLeakPreventionListener" />
  <Listener className="org.apache.catalina.mbeans.GlobalResourcesLifecycleListener" />
  <Listener className="org.apache.catalina.core.ThreadLocalLeakPreventionListener" />
  <!-- Global JNDI resources
       Documentation at /docs/jndi-resources-howto.html
  -->
  <GlobalNamingResources>
    <!-- Editable user database that can also be used by
         UserDatabaseRealm to authenticate users
    -->
    <Resource name="UserDatabase" auth="Container"
              type="org.apache.catalina.UserDatabase"
              description="User database that can be updated and saved"
              factory="org.apache.catalina.users.MemoryUserDatabaseFactory"
              pathname="conf/tomcat-users.xml" />
  </GlobalNamingResources>
  <!-- A "Service" is a collection of one or more "Connectors" that share
       a single "Container" Note:  A "Service" is not itself a "Container",
       so you may not define subcomponents such as "Valves" at this level.
       Documentation at /docs/config/service.html
   -->
  <Service name="Catalina">
    <!--The connectors can use a shared executor, you can define one or more named thread pools-->
    <!--
    <Executor name="tomcatThreadPool" namePrefix="catalina-exec-"
        maxThreads="150" minSpareThreads="4"/>
    -->
    <!-- A "Connector" represents an endpoint by which requests are received
         and responses are returned. Documentation at :
         Java HTTP Connector: /docs/config/http.html (blocking & non-blocking)
         Java AJP  Connector: /docs/config/ajp.html
         APR (HTTP/AJP) Connector: /docs/apr.html
         Define a non-SSL HTTP/1.1 Connector on port 8080
    -->
    <Connector port="8080" protocol="HTTP/1.1"
               connectionTimeout="20000"
               redirectPort="8443" />
    <!-- A "Connector" using the shared thread pool-->
    <!--
    <Connector executor="tomcatThreadPool"
               port="8080" protocol="HTTP/1.1"
               connectionTimeout="20000"
               redirectPort="8443" />
    -->
    <!-- Define a SSL HTTP/1.1 Connector on port 8443
         This connector uses the BIO implementation that requires the JSSE
         style configuration. When using the APR/native implementation, the
         OpenSSL style configuration is required as described in the APR/native
         documentation -->
    <!--
    <Connector port="8443" protocol="org.apache.coyote.http11.Http11Protocol"
               maxThreads="150" SSLEnabled="true" scheme="https" secure="true"
               clientAuth="false" sslProtocol="TLS" />
    -->
    <!-- Define an AJP 1.3 Connector on port 8009 -->
    <Connector port="8009" protocol="AJP/1.3" redirectPort="8443" />
    <!-- An Engine represents the entry point (within Catalina) that processes
         every request.  The Engine implementation for Tomcat stand alone
         analyzes the HTTP headers included with the request, and passes them
         on to the appropriate Host (virtual host).
         Documentation at /docs/config/engine.html -->
    <!-- You should set jvmRoute to support load-balancing via AJP ie :
    <Engine name="Catalina" defaultHost="localhost" jvmRoute="jvm1">
    -->
    <Engine name="Catalina" defaultHost="localhost">
      <!--For clustering, please take a look at documentation at:
          /docs/cluster-howto.html  (simple how to)
          /docs/config/cluster.html (reference documentation) -->
      <!--
      <Cluster className="org.apache.catalina.ha.tcp.SimpleTcpCluster"/>
      -->
      <!-- Use the LockOutRealm to prevent attempts to guess user passwords
           via a brute-force attack -->
      <Realm className="org.apache.catalina.realm.LockOutRealm">
        <!-- This Realm uses the UserDatabase configured in the global JNDI
             resources under the key "UserDatabase".  Any edits
             that are performed against this UserDatabase are immediately
             available for use by the Realm.  -->
        <Realm className="org.apache.catalina.realm.UserDatabaseRealm"
               resourceName="UserDatabase"/>
      </Realm>
      <Host name="localhost"  appBase="webapps"
            unpackWARs="true" autoDeploy="true">
        <!-- SingleSignOn valve, share authentication between web applications
             Documentation at: /docs/config/valve.html -->
        <!--
        <Valve className="org.apache.catalina.authenticator.SingleSignOn" />
        -->
        <!-- Access log processes all example.
             Documentation at: /docs/config/valve.html
             Note: The pattern used is equivalent to using pattern="common" -->
        <Valve className="org.apache.catalina.valves.AccessLogValve" directory="logs"
               prefix="localhost_access_log." suffix=".txt"
               pattern="%h %l %u %t "%r" %s %b" />
      </Host>
    </Engine>
  </Service>
</Server>
由上述源码大致可以总结出tomcat其实分为两个重要的组成部分:Connection 和 Container
下面我给出tomcat大致组成图:
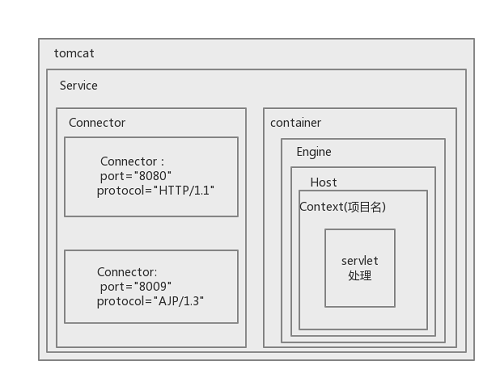
上面的框图中,我们可以知道,tomcat有两个核心的组件Connection和Container,Tomcat会开启两个端口进行服务监听,8009端口 和 8080 端口 (8080端口监听的是Browser的HTTP请求)
Tomcat具体处理请求过程如下:
在输入http://localhost:8080/TTMS/index.jsp的时候;
① 请求被端口为8080的connector监听到,在server.xml里:
② connector将请求交给他所在的service里对应的engine,来处理;engine获得请求后,将匹配他所有的host主机,如果匹配不到则交给默认的defaultHost,也就是localhost;此时,从请求localhost/TTMS/index.jsp中解析到,对应的host主机名为“localhost”;
③ host接收到请求后,匹配他下面的context,也就是你部署的项目,这里从请求路径“/TTMS/index.jsp”中,解析到对应的context为“TTMS”,故交给name=”TTMS”的context(也就是项目名称)处理;
④ context随后在自己的mappingtable(可以在web.xml中进行配置)里寻找servlet-mapping拦截路径为*.jsp的servlet,这里找到得是JSPServlet处理;
⑤ 找到JSPServlet后,开始进行Servlet的处理工作,具体如下:
Ⅰ. 加载:Servlet类被加载到Java虚拟机中,并且实例化。在这个过程中,web容器(例如tomcat)会调用Servlet类的公开无参构造函数,产生一个Servlet类的实例对象。默认情况下Servlet是在第一次请求的时候加载,但是可以通过<load-on-startup>标签设置Servlet在Web容器启动的时候加载。
Ⅱ. 初始化:Web容器初始化Servlet的时候会调用init()方法,所以初始化代码应该放在init()方法中,如打开数据源等。
Ⅲ. 提供服务: 当有HTTP请求指向Servlet的时候,调用service()方法。如果是继承自HttpServlet的话,根据不同的请求类型业务逻辑代码会包含在doGet()或doPost()方法中。
Ⅳ. 销毁:当重新部署Web应用或者关闭Web容器等的时候将调用Servlet的destroy()方法。
⑥ context执行完毕后,将HttpServletResponse 返回给Host;
⑦ host将HttpServletResponse 返回给engine;
⑧ engine 将HttpServletResponse 返回给 connector;
⑨ connector 将 HttpServletResponse 返回给用户的browser;
(四)返回html文件,进行页面渲染;
现在大多数网页一般都是采用DOM树的方式进行页面渲染,因为我的方向主要是后台,所以就不详细说明了。。。
(五)断开TCP/IP连接;(四挥手)
(一般不会服务器响应一次就关闭连接,现在的网页一般建立的都是长连接Keep-alive,因为建立和释放连接都会消耗大量资源,降低系统工作的效率和速度)
具体的断开TCP/IP连接的过程如下:
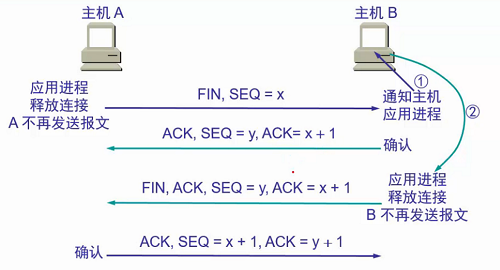
①. 第一步主机A发送释放连接请求并将TCP报文的FIN位置为1 随机生成一个SEQ值
②. 主机B 向主机A发送确认报文 ACK置为1 随机生成一个SEQ值,ACK的值位上一步 SEQ 的值加一 第二步主要发送还没有发送完的数据报文信息
(经过这两步 A到B 的连接就释放掉了(此时整个连接处于半关闭状态) A只接收B的回应 不再向B发送请求)
③. 第三步 主机B向主机A发送 FIN=1 的报文继续携带ACK(应用进程释放连接 B不在发送报文)
④. 主机A 向主机B发送确认信息确认连接关闭
至此,整个连接已经释放完毕
上述就是我今天要分享的内容,都是本人自己的理解和整理,如有不对请指出。。谢谢