1.为什么要选择Spring Security
同事曾经说过,他喜欢用Shiro多过使用Spring Security,笔者也曾经使用过Shiro,对于那个时候的我来说Shiro足够简单让我接入到开发的系统当中,如果单从单体应用来说可能使用Shiro进行权限控制可能更加好,但是如果到了分布式系统中需要考虑多服务之间的鉴权需要使用Oauth的时候Spring Security 结合Spring Security Oauth会有更好的支持。Shiro在github已经有1年多没更新了,而Spring Security依在持续更新当中,此外Spring Security有更好的社区支持。在现在注重安全和不断变化的系统要求下,除了大公司自研自己一套适合自己业务的权限框架外,不断更新的Spring Security会比Shiro更适合进行完后开发。
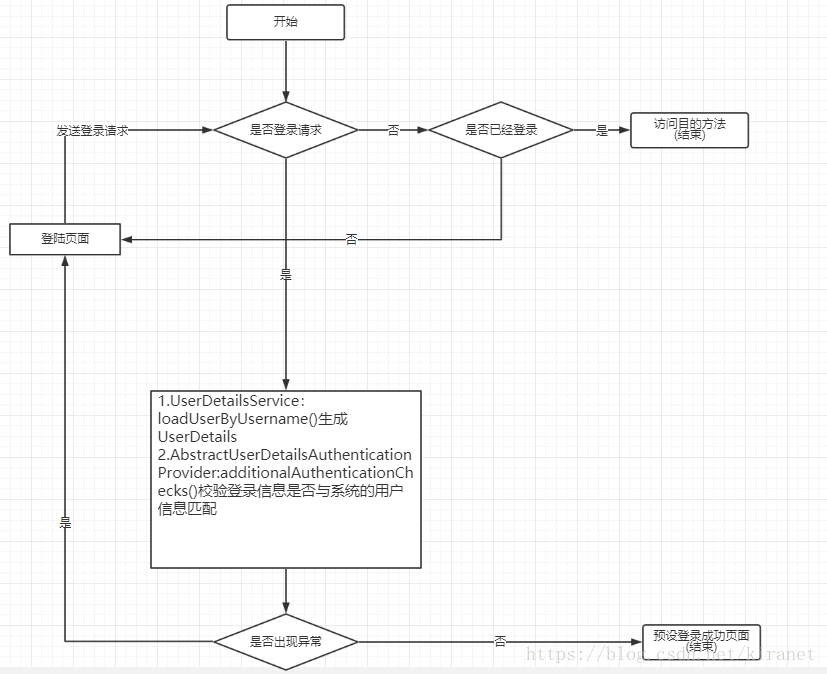
2.Spring Security运行流程图
3.主要组件
3.1 UserDetails
public interface UserDetails extends Serializable {
    Collection<? extends GrantedAuthority> getAuthorities();

    String getPassword();

    String getUsername();

    boolean isAccountNonExpired();

    boolean isAccountNonLocked();

    boolean isCredentialsNonExpired();

    boolean isEnabled();
}
UserDetails作为Spring Security整个登录过程的pojo接口,在登录中我们必须继承他构建符合我们需要的实体类,其中username和password用于登录,而authorities则用于接口的权限控制。
3.2 UserDetailsService
public interface UserDetailsService {
    UserDetails loadUserByUsername(String username) throws UsernameNotFoundException;
}
用于生成UserDetails,在常规的开发当中都会继承这个接口并组装出完后使用的UserDetails类。
3.3 UsernamePasswordAuthenticationFilter
public void doFilter(ServletRequest req, ServletResponse res, FilterChain chain)
        throws IOException, ServletException {
    HttpServletRequest request = (HttpServletRequest) req;
    HttpServletResponse response = (HttpServletResponse) res;

    if (!requiresAuthentication(request, response)) {
        chain.doFilter(request, response);

        return;
    }

    if (logger.isDebugEnabled()) {
        logger.debug("Request is to process authentication");
    }

    Authentication authResult;

    try {
        authResult = attemptAuthentication(request, response);
        if (authResult == null) {
            // return immediately as subclass has indicated that it hasn't completed
            // authentication
            return;
        }
        sessionStrategy.onAuthentication(authResult, request, response);
    }
    catch (InternalAuthenticationServiceException failed) {
        logger.error(
                "An internal error occurred while trying to authenticate the user.",
                failed);
        unsuccessfulAuthentication(request, response, failed);

        return;
    }
    catch (AuthenticationException failed) {
        // Authentication failed
        unsuccessfulAuthentication(request, response, failed);

        return;
    }

    // Authentication success
    if (continueChainBeforeSuccessfulAuthentication) {
        chain.doFilter(request, response);
    }

    successfulAuthentication(request, response, chain, authResult);
}

public Authentication attemptAuthentication(HttpServletRequest request,
        HttpServletResponse response) throws AuthenticationException {
    if (postOnly && !request.getMethod().equals("POST")) {
        throw new AuthenticationServiceException(
                "Authentication method not supported: " + request.getMethod());
    }

    String username = obtainUsername(request);
    String password = obtainPassword(request);

    if (username == null) {
        username = "";
    }

    if (password == null) {
        password = "";
    }

    username = username.trim();

    UsernamePasswordAuthenticationToken authRequest = new UsernamePasswordAuthenticationToken(
            username, password);

    // Allow subclasses to set the "details" property
    setDetails(request, authRequest);

    return this.getAuthenticationManager().authenticate(authRequest);
}
UsernamePasswordAuthenticationFilter用于登录进行过滤在他的doFilter方法中,首先通过requiresAuthentication方法确认当前的访问url是否约定的登录处理接口,如果不是约定的登录接口就让请求往下一个过滤器传递,如果是则继续玩下执行,则会使用初始化中的AuthenticationManager的AbstractUserDetailsAuthenticationProvider的authenticate方法进行校验。
3.4 AuthenticationManager
public interface AuthenticationManager {
	Authentication authenticate(Authentication authentication)
			throws AuthenticationException;
}
在UsernamePasswordAuthenticationFilter过滤器中会使用AuthenticationManager的authenticate方法进行登录校验,而Spring Security提供了一个实现ProviderManager给我们使用,而ProviderManager会通过自己的AuthenticationProvider数组,调用其authenticate方法进行校验。
3.5 AbstractUserDetailsAuthenticationProvider
public Authentication authenticate(Authentication authentication)
		throws AuthenticationException {
	Assert.isInstanceOf(UsernamePasswordAuthenticationToken.class, authentication,
			messages.getMessage(
					"AbstractUserDetailsAuthenticationProvider.onlySupports",
					"Only UsernamePasswordAuthenticationToken is supported"));

	// Determine username
	String username = (authentication.getPrincipal() == null) ? "NONE_PROVIDED"
			: authentication.getName();

	boolean cacheWasUsed = true;
	UserDetails user = this.userCache.getUserFromCache(username);

	if (user == null) {
		cacheWasUsed = false;

		try {
			user = retrieveUser(username,
					(UsernamePasswordAuthenticationToken) authentication);
		}
		catch (UsernameNotFoundException notFound) {
			logger.debug("User '" + username + "' not found");

			if (hideUserNotFoundExceptions) {
				throw new BadCredentialsException(messages.getMessage(
						"AbstractUserDetailsAuthenticationProvider.badCredentials",
						"Bad credentials"));
			}
			else {
				throw notFound;
			}
		}

		Assert.notNull(user,
				"retrieveUser returned null - a violation of the interface contract");
	}

	try {
		preAuthenticationChecks.check(user);
		additionalAuthenticationChecks(user,
				(UsernamePasswordAuthenticationToken) authentication);
	}
	catch (AuthenticationException exception) {
		if (cacheWasUsed) {
			// There was a problem, so try again after checking
			// we're using latest data (i.e. not from the cache)
			cacheWasUsed = false;
			user = retrieveUser(username,
					(UsernamePasswordAuthenticationToken) authentication);
			preAuthenticationChecks.check(user);
			additionalAuthenticationChecks(user,
					(UsernamePasswordAuthenticationToken) authentication);
		}
		else {
			throw exception;
		}
	}

	postAuthenticationChecks.check(user);

	if (!cacheWasUsed) {
		this.userCache.putUserInCache(user);
	}

	Object principalToReturn = user;

	if (forcePrincipalAsString) {
		principalToReturn = user.getUsername();
	}

	return createSuccessAuthentication(principalToReturn, authentication, user);
}
在AbstractUserDetailsAuthenticationProvider中的authenticate中,代码首先会通过retrieveUser方法使用我们定义的UserDetailsService的生成对应的UserDetails,获得UserDetails后,我们在使用自身的additionalAuthenticationChecks方法去验证数据库的用户信息和登录信息是否一致。如果additionalAuthenticationChecks没有报错,那么请求就会带着UserDetails的权限成功登陆。