这是本人博客处女座,也许会有很多问题,还请各位大神指点。之所以写这边博客,并不是因为自己这方面学的很深入,只是最近在初学蓝牙模块,想对学习过程做个总结。
好的,废话少说,直接开始正文。
使用 Android BluetoothAPI 来完成使用蓝牙进行通信的四项主要任务:设置蓝牙、查找局部区域内的配对设备或可用设备、连接设备,以及在设备之间传输数据。要想实现这4个基础的功能,还必须的知道蓝牙的一些基本的类和接口:
1:BluetoothAdapter:
表示蓝牙适配器,也就是本地蓝牙,一般的安卓手机或者平板都有蓝牙模块,因此,你想通过蓝牙去连接外部的蓝牙设备,必须要获取本地蓝牙适配器,通过他才能外部蓝牙进行连接。那么如何获取本地蓝牙适配器呢?方法很简单
BluetoothAdapter mBluetoothAdapter = BluetoothAdapter.getDefaultAdapter();if (mBluetoothAdapter == null) { // Device does not support Bluetooth }
我们需要注意的是,我们想要使用本地蓝牙设备,必须获取系通权限,获取权限的方式也很简单:
<manifest ... >
  <uses-permission android:name="android.permission.BLUETOOTH" />
  ...
</manifest>
获取本地蓝牙只能说明系统支持蓝牙模块,还并不能与外部蓝牙进行连接,我们还必须打开蓝牙设备:
if (!mBluetoothAdapter.isEnabled()) {
    Intent enableBtIntent = new Intent(BluetoothAdapter.ACTION_REQUEST_ENABLE);
    startActivityForResult(enableBtIntent, REQUEST_ENABLE_BT);
}
2:BluetoothDevices:
我们希望与外部蓝牙进行连接,就必须知道远程外部蓝牙的mac地址,所以,我们首先要获取远程外部蓝牙。由于我们使用的android手机或者安卓系统平板,他们在此之前已经连接过很多蓝牙设备,因此存在本地已经配对的蓝牙列表,那么我们如何获得已经配对的蓝牙设备呢?
Set<BluetoothDevice> pairedDevices = mBluetoothAdapter.getBondedDevices();
// If there are paired devices
if (pairedDevices.size() > 0) {
    // Loop through paired devices
    for (BluetoothDevice device : pairedDevices) {
        // Add the name and address to an array adapter to show in a ListView
        mArrayAdapter.add(device.getName() + "\n" + device.getAddress());
    }
}
假如我们需要连接的是一个新的(未配对过的)蓝牙设备,因此我们必须开启蓝牙发现,蓝牙发现是一个重量级的过程,耗时且耗系统资源,因此当我们发现远程蓝牙之后,必须停止蓝牙发现。那么,我们如何知道系统已经扫描到外部蓝牙了呢?我们通过广播去接受系统的蓝牙发现。
开启蓝牙发现:

bluetoothAdapter.startDiscovery();注册广播进行接收:
private final BroadcastReceiver mReceiver = new BroadcastReceiver() {
    public void onReceive(Context context, Intent intent) {
        String action = intent.getAction();
        // When discovery finds a device
        if (BluetoothDevice.ACTION_FOUND.equals(action)) {
            // Get the BluetoothDevice object from the Intent
            BluetoothDevice device = intent.getParcelableExtra(BluetoothDevice.EXTRA_DEVICE);
            // Add the name and address to an array adapter to show in a ListView
            mArrayAdapter.add(device.getName() + "\n" + device.getAddress());
        }
    }
};
// Register the BroadcastReceiver
IntentFilter filter = new IntentFilter(BluetoothDevice.ACTION_FOUND);
registerReceiver(mReceiver, filter); // Don't forget to unregister during onDestroy
3:蓝牙连接
我们假定存在外部蓝牙设备,即存在蓝牙的服务端,在此只考虑蓝牙客户端的情况。
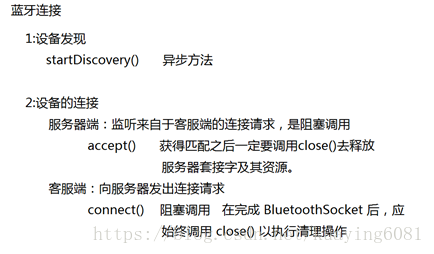
在执行蓝牙连接之前,一定要取消蓝牙发现,取消蓝牙发现也挺简单的。只需要调用BluetoothAdapter.cancelDiscovery();由于蓝牙连接是一个阻塞的方法,因此,我们新建一个线程实现蓝牙连接是一个不错的方式,如果在UI线程中直接调用蓝牙连接的方法,很有可能造成ANR错误,于是直接上代码:
private class ConnectThread extends Thread {
		  private final BluetoothSocket mmSocket;
		  private final BluetoothDevice mmDevice;
		  public ConnectThread(BluetoothDevice device) {
		      BluetoothSocket tmp = null;
		      mmDevice = device;
		      try {
		          tmp = device.createRfcommSocketToServiceRecord(MY_UUID);
		      } catch (IOException e) { }
		      mmSocket = tmp;
		  }

		  public void run() {
		      btAdapter.cancelDiscovery();

		      try {
		          mmSocket.connect();
		      } catch (IOException connectException) {
		          try {
		              mmSocket.close();
		          } catch (IOException closeException) { }
		          return;
		      }
		  }
		  public void cancel() {
		      try {
		          mmSocket.close();
		      } catch (IOException e) { }
		  }
		}
4:蓝牙通信
蓝牙连接完成以后,只需要获取mmSocket端口的蓝牙输入,输出流即可与外部蓝牙进行通信。
本人刚刚接触蓝牙这方面,所了解的也只是冰山一角,不求给读者带来多大的帮助,只求与读者一起学习。