一、背景介绍
最近需要做人脸识别方向的东西,就被分配了新的任务,利用摄像头实时检测人脸表情,并制作成一个小软件,这里当然要用C++实现,并用C++做成一个接口。
由于博主之前用python做过类似的小程序,因此这里的模型实现主要采用了python,为了用C++实现接口,这里采用C++调用python模型的方式。
表情识别其实已经相对成熟,c++调用python模型网上也有介绍,博主在参考了一些文献之后对其进行了综合处理,参考的文献主要有:
[1]表情识别程序:https://github.com/xionghc/Facial-Expression-Recognition
[2]c++调用python模型:https://blog.csdn.net/qq_34484472/article/details/76598852
博主在参考以上代码的情况下,进行了删减,去除了一些不需要的功能。不过博主在做的过程中,没有自己训练模型,而是采用其训练好的模型直接调用。下面进行详细讲解。
二、数据集介绍
人脸表情识别程序所采用的数据集为FER2013(facial-expression-recognition 2013),该数据集需要在kaggle网站上进行下载,下载地址为:
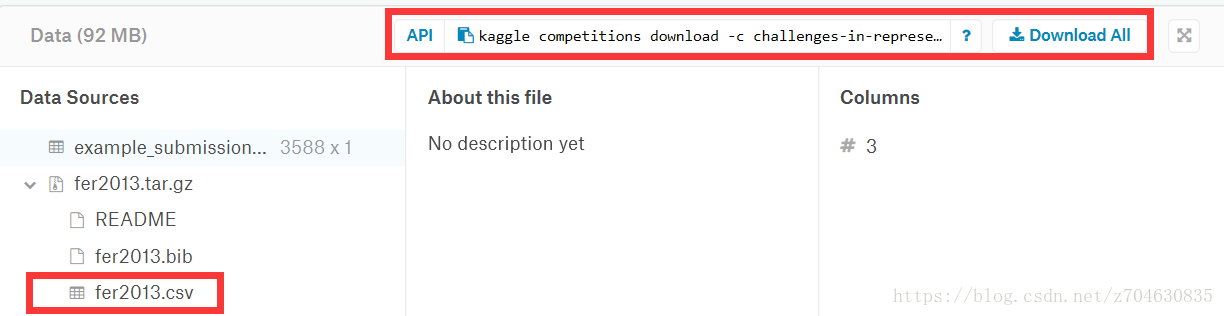
下载的数据是压缩文件,对其进行手动解压,解压后文件格式是csv,文件名为fer2013.csv,对这个文件进行提取可以得到三个文件,具体的提取过程会在后续进行介绍:

其中train文件的emotion一共有7种,csv文件中每个数字对应一种表情,7种表情包括:
0 - 'angry', 1 - 'disgusted', 2 - 'fearful', 3 - 'happy', 4 - 'sad', 5 - 'surprised', 6 - 'neutral'
每一行除了emotion的标记之外,还有一幅影像,只不过在csv文件里,影像用灰度值表示了,csv文件打开之后,里面的内容如下:

不过可能由于FER2013数据集的质量不太好,大部分模型的验证精度只有60%(如googleNet和AlexNet都只有63%)左右,好一点的可以到70%。
三、python部分(tensorflow实现)
模型的训练过程主要用tensorflow实现,为了简化程序,我将所有的文件及文件夹进行了简化,只保留以下数据:
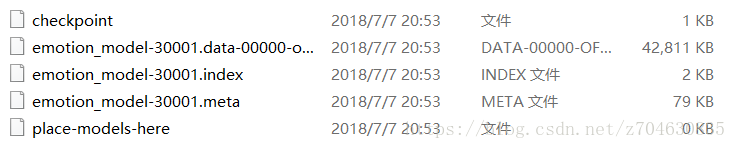
-- ckpt (用于保存最终模型训练结果的文件夹)
-- data (原始数据文件夹)
|------ emojis (保存了7种表情的emoji图像)
|------ angry.png
|------ disgusted.png
...
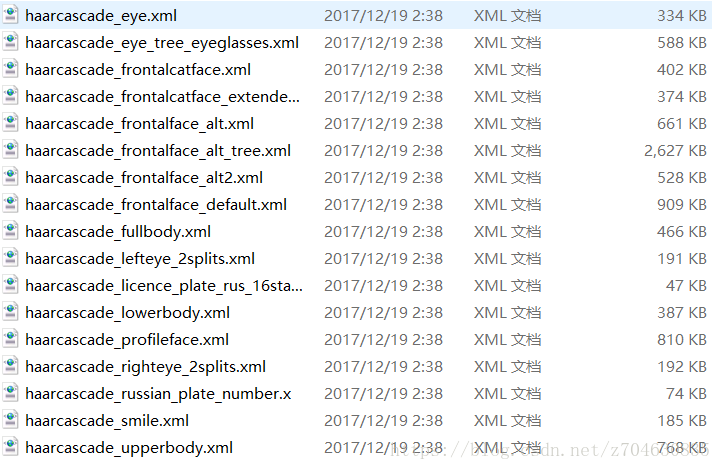
|------ haarcascade_files (保存了68点人脸识别的文件)
|------ haarcascade_eye.xml
|------ haarcascade_frontalface_default.xml
|------ fer2013 (保存了原始训练数据)
|------ fer2013.csv
-- constant.py (常用参数的设置文件)
-- preprocessing_model.py (csv数据预处理文件)
-- model.py (模型文件,包括训练过程)
-- test.py (模型应用文件)原始数据文件夹中的原始数据基本都可以在网上下载到。haarcascade文件可以从opencv的安装包中找到,以opencv安装包的根目录为路径,则haarcascade的文件路径为“opencv\\sources\\data\\haarcascades\\*.xml”:
1.程序中的常数设置——constants.py
该文件中主要给出了程序中的主要常数的设置,文件内容比较短,主要参数设置如下:
# deepNN中的图像尺寸参数
IMAGE_WIDTH = 48
IMAGE_HEIGHT = 48

# 原始数据
EMOTIONS = ['angry', 'disgusted', 'fearful', 'happy', 'sad', 'surprised', 'neutral']
CASC_PATH = './data/haarcascade_files/haarcascade_frontalface_default.xml'
EMOJI_DIR = './data/emojis/'
TRAIN_DATA = './data/fer2013/fer2013.csv'

# 模型的训练参数
IS_TRAIN = False
CHECKPOINT_DIR = './ckpt'
VALID_DATA = './valid_sets/'
IS_VALID = False

# 模型的应用参数
IS_TEST = True
SHOW_BOX = True
2.csv文件的预处理——preprocessing_model.py
该文件中的关键步骤是分解fer2013.csv文件,将其分解为三个文件,用于训练和验证。之后再定义加载数据的函数,用于读取csv文件中的数据,同时读取相应的标签。直接给出该文件的代码:
import collections

import numpy as np
import pandas as pd
from tensorflow.python.framework import dtypes, random_seed

from constant import *

# 加载数据
def load_data(data_file):

    # 读取csv格式的数据
    data = pd.read_csv(data_file)
    pixels = data['pixels'].tolist()
    faces = []
    i = 0

    # 逐行读取人脸
    for pixel_sequence in pixels:
        face = [int(pixel) for pixel in pixel_sequence.split(' ')]
        face = np.asarray(face).reshape(IMAGE_WIDTH, IMAGE_HEIGHT)

        faces.append(face)

    faces = np.asarray(faces)
    faces = np.expand_dims(faces, -1)
    emotions = pd.get_dummies(data['emotion']).as_matrix()
    return faces, emotions


# 定义数据集及其属性
class DataSet(object):

    def __init__(self, images, labels, reshape=True, dtype=dtypes.float32, seed=None):
        seed1, seed2 = random_seed.get_seed(seed)
        np.random.seed(seed1 if seed is None else seed2)
        if reshape:
            assert images.shape[3] == 1
            images = images.reshape(images.shape[0],
                              images.shape[1]*images.shape[2])

        # 图像像元值归一化处理
        if dtype == dtypes.float32:
            images = images.astype(np.float32)
            images = np.multiply(images, 1.0 / 255.0)

        self._num_examples = images.shape[0]
        self._images = images
        self._labels = labels
        self._epochs_completed = 0
        self._index_in_epoch = 0

    @property
    def images(self):
        return self._images

    @property
    def labels(self):
        return self._labels

    @property
    def num_examples(self):
        return self.num_examples

    @property
    def epochs_completed(self):
        return self._epochs_completed

    def next_batch(self, batch_size, shuffle=True):
        start = self._index_in_epoch

        # shuffle for the first epoch
        if self._epochs_completed == 0 and start == 0 and shuffle:
            perm0 = np.arange(self._num_examples)
            np.random.shuffle(perm0)
            self._images = self._images[perm0]
            self._labels = self._labels[perm0]

        # Go to the next epoch
        if start + batch_size > self._num_examples:
            self._epochs_completed += 1
            rest_num_examples = self._num_examples - start
            images_rest_part = self._images[start:self._num_examples]
            labels_rest_part = self._labels[start:self._num_examples]

            # Shuffle
            if shuffle:
                perm = np.arange(self._num_examples)
                np.random.shuffle(perm)
                self._images = self._images[perm]
                self._labels = self._labels[perm]
            start = 0
            self._index_in_epoch = batch_size - rest_num_examples
            end = self._index_in_epoch
            images_new_part = self._images[start:end]
            labels_new_part = self._labels[start:end]
            return np.concatenate((images_rest_part, images_new_part), axis=0), np.concatenate((labels_rest_part, labels_new_part), axis=0)
        else:
            self._index_in_epoch += batch_size
            end = self._index_in_epoch
            return self._images[start:end], self._labels[start:end]


def input_data(train_dir, dtype=dtypes.float32, reshape=True, seed=None):
    training_size = 28709
    validation_size = 3589
    # test_size = 3589

    train_faces, train_emotions = load_data(train_dir)
    print('Dataset load success!!')
    # Validation data
    validation_faces = train_faces[training_size : training_size + validation_size]
    validation_emotions = train_emotions[training_size : training_size + validation_size]
    # Test data
    test_faces = train_faces[training_size + validation_size : ]
    test_emotions = train_emotions[training_size + validation_size : ]
    # Training data
    train_faces = train_faces[:training_size]
    train_emotions = train_emotions[:training_size]

    Datasets = collections.namedtuple('Datasets', ['train', 'validation', 'test'])
    train = DataSet(train_faces, train_emotions, reshape=reshape, seed=seed)
    validation = DataSet(validation_faces, validation_emotions, dtype=dtype, reshape=reshape, seed=seed)
    test = DataSet(test_faces, test_emotions, dtype=dtype, reshape=reshape, seed=seed)
    return Datasets(train=train, validation=validation, test=test)

def _test():
    input_data(TRAIN_DATA)

if __name__ == '__main__':
    _test()
3.模型的建立及训练——model.py
准备好了训练数据之后,需要建立模型。这里也是直接给出模型的建立文件:
import os
import tensorflow as tf
import cv2

from prepeocessing import *


def deepnn(x):
    x_image = tf.reshape(x, [-1, 48, 48, 1])

    # conv1
    w_conv1 = weight_variables([5, 5, 1, 64])
    b_conv1 = bias_variable([64])
    h_conv1 = tf.nn.relu(conv2d(x_image, w_conv1) + b_conv1)
    # pool1
    h_pool1 = maxpool(h_conv1)
    # norm1
    norm1 = tf.nn.lrn(h_pool1, 4, bias=1.0, alpha=0.001 / 9.0, beta=0.75)

    # conv2
    w_conv2 = weight_variables([3, 3, 64, 64])
    b_conv2 = bias_variable([64])
    h_conv2 = tf.nn.relu(conv2d(norm1, w_conv2) + b_conv2)
    norm2 = tf.nn.lrn(h_conv2, 4, bias=1.0, alpha=0.001 / 9.0, beta=0.75)
    h_pool2 = maxpool(norm2)

    # Fully connected layer
    w_fc1 = weight_variables([12 * 12 * 64, 384])
    b_fc1 = bias_variable([384])
    h_conv3_flat = tf.reshape(h_pool2, [-1, 12 * 12 * 64])
    h_fc1 = tf.nn.relu(tf.matmul(h_conv3_flat, w_fc1) + b_fc1)

    # Fully connected layer
    w_fc2 = weight_variables([384, 192])
    b_fc2 = bias_variable([192])
    h_fc2 = tf.matmul(h_fc1, w_fc2) + b_fc2

    # linear
    w_fc3 = weight_variables([192, 7])
    b_fc3 = bias_variable([7])
    y_conv = tf.add(tf.matmul(h_fc2, w_fc3), b_fc3)

    return y_conv


def conv2d(x, w):
    return tf.nn.conv2d(x, w, strides=[1, 1, 1, 1], padding='SAME')


def maxpool(x):
    return tf.nn.max_pool(x, ksize=[1, 3, 3, 1],
                            strides=[1, 2, 2, 1], padding='SAME')


def weight_variables(shape):
    initial = tf.truncated_normal(shape, stddev=0.1)
    return tf.Variable(initial)


def bias_variable(shape):
    initial = tf.constant(0.1, shape=shape)
    return tf.Variable(initial)


def train_model(train_data):
    fer2013 = input_data(train_data)
    max_train_steps = 30001

    x = tf.placeholder(tf.float32, [None, 2304])
    y_ = tf.placeholder(tf.float32, [None, 7])

    y_conv = deepnn(x)

    cross_entropy = tf.reduce_mean(
        tf.nn.softmax_cross_entropy_with_logits(labels=y_, logits=y_conv))
    train_step = tf.train.AdamOptimizer(1e-4).minimize(cross_entropy)
    correct_prediction = tf.equal(tf.argmax(y_conv, 1), tf.argmax(y_, 1))
    accuracy = tf.reduce_mean(tf.cast(correct_prediction, tf.float32))

    with tf.Session() as sess:
        saver = tf.train.Saver()
        sess.run(tf.global_variables_initializer())
        for step in range(max_train_steps):
            batch = fer2013.train.next_batch(50)
            if step % 100 == 0:
                train_accuracy = accuracy.eval(feed_dict={
                    x: batch[0], y_: batch[1]})
                print('step %d, training accuracy %g' % (step, train_accuracy))
            train_step.run(feed_dict={x: batch[0], y_: batch[1]})

            if step + 1 == max_train_steps:
                saver.save(sess, './models/emotion_model', global_step=step + 1)
            if step % 1000 == 0:
                print('*Test accuracy %g' % accuracy.eval(feed_dict={
                    x: fer2013.validation.images, y_: fer2013.validation.labels}))


def predict(image=[[0.1] * 2304]):
    x = tf.placeholder(tf.float32, [None, 2304])
    y_conv = deepnn(x)

    # init = tf.global_variables_initializer()
    saver = tf.train.Saver()
    probs = tf.nn.softmax(y_conv)
    y_ = tf.argmax(probs)

    with tf.Session() as sess:
        # assert os.path.exists('/tmp/models/emotion_model')
        ckpt = tf.train.get_checkpoint_state('./models')
        print(ckpt.model_checkpoint_path)
        if ckpt and ckpt.model_checkpoint_path:
            saver.restore(sess, ckpt.model_checkpoint_path)
            print('Restore ssss')
        return sess.run(probs, feed_dict={x: image})


def image_to_tensor(image):
    tensor = np.asarray(image).reshape(-1, 2304) * 1 / 255.0
    return tensor


def valid_model(modelPath, validFile):
    x = tf.placeholder(tf.float32, [None, 2304])
    y_conv = deepnn(x)
    probs = tf.nn.softmax(y_conv)

    saver = tf.train.Saver()
    ckpt = tf.train.get_checkpoint_state(modelPath)

    with tf.Session() as sess:
        print(ckpt.model_checkpoint_path)
        if ckpt and ckpt.model_checkpoint_path:
            saver.restore(sess, ckpt.model_checkpoint_path)
            print('Restore model sucsses!!')

        files = os.listdir(validFile)

        for file in files:
            if file.endswith('.jpg'):
                image_file = os.path.join(validFile, file)
                image = cv2.imread(image_file, cv2.IMREAD_GRAYSCALE)
                tensor = image_to_tensor(image)
                result = sess.run(probs, feed_dict={x: tensor})
                print(file, EMOTIONS[result.argmax()])
4.实现人脸表情识别——test.py
这里先直接上代码,然后再解释如何使用:
from model import *

cascade_classifier = cv2.CascadeClassifier(CASC_PATH)


def format_image(image):
    '''
    函数功能:转换图像的格式
    '''
    if len(image.shape) > 2 and image.shape[2] == 3:
        image = cv2.cvtColor(image, cv2.COLOR_BGR2GRAY)
    # image = cv2.cvtColor(image, cv2.COLOR_BGR2GRAY)
    faces = cascade_classifier.detectMultiScale(
        image, scaleFactor=1.3, minNeighbors=5)

    # None is no face found in image
    if not len(faces) > 0:
        return None, None

    max_are_face = faces[0]
    for face in faces:
        if face[2] * face[3] > max_are_face[2] * max_are_face[3]:
            max_are_face = face

    # face to image
    face_coor = max_are_face
    image = image[face_coor[1]:(face_coor[1] + face_coor[2]), face_coor[0]:(face_coor[0] + face_coor[3])]

    # Resize image to network size
    try:
        image = cv2.resize(image, (48, 48), interpolation=cv2.INTER_CUBIC)
    except Exception:
        print("[+} Problem during resize")
        return None, None
    return image, face_coor


def face_dect(image):
    """
    检测图像中有多少张脸
    """
    if len(image.shape) > 2 and image.shape[2] == 3:
        image = cv2.cvtColor(image, cv2.COLOR_BGR2GRAY)
    faces = cascade_classifier.detectMultiScale(
        image, scaleFactor=1.3, minNeighbors=5)

    if not len(faces) > 0:
        return None
    max_face = faces[0]
    for face in faces:
        if face[2] * face[3] > max_face[2] * max_face[3]:
            max_face = face
    face_image = image[max_face[1]:(max_face[1] + max_face[2]), max_face[0]:(max_face[0] + max_face[3])]
    try:
        image = cv2.resize(face_image, (48, 48), interpolation=cv2.INTER_CUBIC) / 255.
    except Exception:
        print("[+} Problem during resize")
        return None
    return face_image, image


def resize_image(image, size):
    try:
        image = cv2.resize(image, size, interpolation=cv2.INTER_CUBIC) / 255.
    except Exception:
        print("+} Problem during resize")
        return None
    return image


def demo(modelPath, showBox=False):
    # 构建模型---------------------------------------------------
    face_x = tf.placeholder(tf.float32, [None, 2304])
    y_conv = deepnn(face_x)
    probs = tf.nn.softmax(y_conv)
    # 构建完毕---------------------------------------------------

    # 存储器
    saver = tf.train.Saver()
    ckpt = tf.train.get_checkpoint_state(modelPath)
    sess = tf.Session()

    # 加载模型
    if ckpt and ckpt.model_checkpoint_path:
        saver.restore(sess, ckpt.model_checkpoint_path)
        print('Restore model sucsses!!')

    # 加载emoji
    feelings_faces = []
    for index, emotion in enumerate(EMOTIONS):
        feelings_faces.append(cv2.imread(EMOJI_DIR + emotion + '.png', -1))
    # 运行video
    video_captor = cv2.VideoCapture(0)

    emoji_face = []
    result = None

    while True:
        # 打开摄像头并做准备
        ret, frame = video_captor.read()
        detected_face, face_coor = format_image(frame)
        if showBox:
            if face_coor is not None:
                [x, y, w, h] = face_coor
                cv2.rectangle(frame, (x, y), (x + w, y + h), (255, 0, 0), 2)


        # if cv2.waitKey(1) & 0xFF == ord(' '):
        if cv2.waitKey(10):
            if detected_face is not None:
                # 如果存在人脸图像,则存储一张样片,并进行表情识别
                # cv2.imwrite('a.jpg', detected_face)
                tensor = image_to_tensor(detected_face)
                # 识别人脸的情绪,并计算情绪分类的概率
                result = sess.run(probs, feed_dict={face_x: tensor})
        if result is not None:
            for index, emotion in enumerate(EMOTIONS):
                # 输出字体,内容为emotion的各个概率,颜色为绿色
                cv2.putText(frame, emotion, (10, index * 20 + 20), cv2.FONT_HERSHEY_PLAIN, 1, (0, 255, 0), 1)
                # 矩形框出人脸
                cv2.rectangle(frame, (130, index * 20 + 10), (130 + int(result[0][index] * 100), (index + 1) * 20 + 4),
                              (255, 0, 0), -1)
                emoji_face = feelings_faces[np.argmax(result[0])]

            # 输出对应的emoji_face
            for c in range(0, 3):
                frame[200:320, 10:130, c] = emoji_face[:, :, c] * (emoji_face[:, :, 3] / 255.0) + frame[200:320, 10:130,
                                            c] * (1.0 - emoji_face[:, :, 3] / 255.0)
        cv2.imshow('face', frame)
        # calculate_time(frame)
        if cv2.waitKey(1) & 0xFF == ord('q'):
            break


def main():
    if IS_TEST:
        demo(CHECKPOINT_DIR, SHOW_BOX)
    elif IS_TRAIN:
        train_model(TRAIN_DATA)
    elif IS_VALID:
        valid_model(CHECKPOINT_DIR, VALID_DATA)


if __name__ == '__main__':
    main()
文件中主要看main()函数。如果是自己第一次执行的情况下,需要先训练,这里我们可以再constant文件中设置IS_TRAIN为True,而测试IS_TEST和验证IS_VALID都设置为False,执行实验,即可实现对模型的训练过程。训练完毕后,会在ckpt文件夹里存储最终训练好的模型参数。
训练并保存好模型参数之后,即可开始进行实验。同理,将constant.py文件中的IS_TEST设置为True即可执行。此时需要安装好摄像头,这一步可直接打开摄像头进行人脸表情的识别。识别的效果还不错,有兴趣的同学可以自己试试。
四、C++部分
当然了,如果只用python实现的话,那网上的代码可以直接拿来用了,不过实时上还要将其转换为c++程序。如果从头编写c++程序又太慢,且deepNN那里的实现也比较麻烦,因此想办法利用C++调用tensorflow训练好的模型即可。
C++这里需要注意的就是必须要先配置好python环境,这里不详细介绍,网上的教程也挺多的。配置好python环境之后即可开始实验。首先要介绍的就是文件的配置情况了,在建好c++的project情况下,相关文件及文件夹的位置放置情况为:
-- Debug                    (不用管)
-- fer2013                  (将写好的python文件和训练好的模型放进来)
    |------ ckpt                    (python文件中的ckpt文件夹,里面保存了训练好的模型)
    |------ data                    (第二版用,python文件中的data文件夹)
    |------ Debug                   (不用管)
    |------ ×64                     (不用管)
    |------ constant.py             (放进来的python文件)
    |------ preprocessing_model.py  (放进来的python文件)
    |------ model.py                (放进来的python文件)
    |------ test.py                 (放进来的python文件)
    |------ main.cpp                (调用python模块)
    |------ constant.h              (第二版用,用于存储常数的文件)
    |------ model.hpp               (第二版用,用于训练模型的文件)
    |------ fer2013.vcxproj         (不用管)
-- ×64                      (不用管)
-- fer2013.sln              (不用管)
-- fer2013.VC.db            (不用管)
-- fer2013.VC.VC.opendb     (不用管)
这里我前后共做了两次改进,一般情况下用第一版直接实现人脸表情的识别就可以了,下面会详细介绍。
第一版
第一次在做的时候,只想着实现c++调用python训练好的模型即可,网上也找了找类似教程,不多,但幸好能用,这一版只用写一个main.cpp文件就可以了。下面直接给出c++的代码:
#include<Python.h>
#include<iostream>


int demo(std::string modelPath, bool showBox = false)
{
	Py_Initialize();	// 初始化

	if (!Py_IsInitialized())
	{
		return -1;	// 如果初始化失败则返回-1
	}

	PyObject* pMod = NULL;
	PyObject* pFunc = NULL;
	PyObject* pParm = NULL;
	PyObject* pRetVal = NULL;

	/*int iRetVal = -999;*/
	char* modulName = "test";								// 这个是被调用的py文件模块名字

	pMod = PyImport_ImportModule(modulName);
	if (!pMod)
	{
		return -1;	// 如果加载失败则返回-1
	}

	char* funcName = "demo";	// 这是此py文件模块中被调用的函数名字
	pFunc = PyObject_GetAttrString(pMod, funcName);
	if (!pFunc)
	{
		return -2;
	}

	pParm = PyTuple_New(1);
	PyTuple_SetItem(pParm, 0, Py_BuildValue("s", modelPath));	// 传入的参数,是图片的路径
	pRetVal = PyEval_CallObject(pFunc, pParm);					// 这里开始执行py脚本
	//PyArg_Parse(pRetVal, "i", &iRetVal);						// py脚本返回值给iRetVal

	Py_Finalize();		// 释放资源

	return 0;
}


void main()
{
	demo("./ckpt", SHOW_BOX=true);
}
第二版
第一版只实现了调用test模块,如果今后想利用c++训练模型呢,因此在第二版的内容中,又补充了模型的训练文件。在第二版中c++文件一共有三个: main.cpp; constant.h; model.hpp
首先是constant.h文件,主要存储一些关键的参数,这里直接给出代码:
int IMAGE_WIDTH = 64;
int IMAGE_HEIGHT = 64;

// MODE = 'demo'
std::string EMOTIONS[7] = { "angry", "disgusted", "fearful", "happy", "sad", "surprised", "neutral" };
std::string CASC_PATH = "./data/haarcascade_files/haarcascade_frontalface_default.xml";
std::string EMOJI_DIR = "./data/emojis/";

// for test
bool IS_TEST = true;

// for training
bool IS_TRAIN = false;
std::string TRAIN_DATA = "./data/fer2013/fer2013.csv";
std::string CHECKPOINT_DIR = "./ckpt";
std::string VALID_DATA = "./valid_sets/";
bool IS_VALID = false;

// show box
bool SHOW_BOX = true;
然后是model.hpp文件,主要记录了模型的构建以及模型的训练过程,这里直接给出代码:
#pragma once
#include<Python.h>

int train_model(std::string train_data)
{
	Py_Initialize();											// 初始化

	if (!Py_IsInitialized())
	{
		return -1;												// 如果初始化失败则返回-1
	}

	PyObject* pMod = NULL;
	PyObject* pFunc = NULL;
	PyObject* pParm = NULL;
	PyObject* pRetVal = NULL;

	int iRetVal = -999;
	char* modulName = "model_new";								// 这个是被调用的py文件模块名字

	pMod = PyImport_ImportModule(modulName);
	if (!pMod)
	{
		return -1;												// 如果加载失败则返回-1
	}

	char* funcName = "train_model";									// 这是此py文件模块中被调用的函数名字
	pFunc = PyObject_GetAttrString(pMod, funcName);
	if (!pFunc)
	{
		return -2;
	}

	pParm = PyTuple_New(1);
	PyTuple_SetItem(pParm, 0, Py_BuildValue("s", train_data));	// 传入的参数,是图片的路径
	pRetVal = PyEval_CallObject(pFunc, pParm);					// 这里开始执行py脚本
	PyArg_Parse(pRetVal, "i", &iRetVal);						// py脚本返回值给iRetVal

	Py_Finalize();      // 释放资源

	return 0;
}

int valid_model(std::string modelPath, std::string validFile)
{
	Py_Initialize();			// 初始化

	if (!Py_IsInitialized())
	{
		return -1;			// 如果初始化失败则返回-1
	}

	PyObject* pMod = NULL;
	PyObject* pFunc = NULL;
	PyObject* pParm = NULL;
	PyObject* pRetVal = NULL;

	int iRetVal = -999;
	char* modulName = "model_new";		// 这个是被调用的py文件模块名字

	pMod = PyImport_ImportModule(modulName);
	if (!pMod)
	{
		return -1;				// 如果加载失败则返回-1
	}

	char* funcName = "valid_model";		// 这是此py文件模块中被调用的函数名字
	pFunc = PyObject_GetAttrString(pMod, funcName);
	if (!pFunc)
	{
		return -2;
	}

	pParm = PyTuple_New(1);
	PyTuple_SetItem(pParm, 0, Py_BuildValue("s, s", modelPath, validFile));	// 传入的参数,是图片的路径
	pRetVal = PyEval_CallObject(pFunc, pParm);								// 这里开始执行py脚本
	PyArg_Parse(pRetVal, "i", &iRetVal);									// py脚本返回值给iRetVal

	Py_Finalize();				// 释放资源

	return 0;
}
最后是main.cpp文件,即用户可以自己选择训练模型or测试模型,这里直接给出代码:
#include"constant.h"
#include"model.hpp"

#include<Python.h>
#include<iostream>


int demo(std::string modelPath, bool showBox = false)
{
	Py_Initialize();	// 初始化

	if (!Py_IsInitialized())
	{
		return -1;	// 如果初始化失败则返回-1
	}

	PyObject* pMod = NULL;
	PyObject* pFunc = NULL;
	PyObject* pParm = NULL;
	PyObject* pRetVal = NULL;

	/*int iRetVal = -999;*/
	char* modulName = "test";		// 这个是被调用的py文件模块名字

	pMod = PyImport_ImportModule(modulName);
	if (!pMod)
	{
		return -1;	// 如果加载失败则返回-1
	}

	char* funcName = "demo";									// 这是此py文件模块中被调用的函数名字
	pFunc = PyObject_GetAttrString(pMod, funcName);
	if (!pFunc)
	{
		return -2;
	}

	pParm = PyTuple_New(1);
	PyTuple_SetItem(pParm, 0, Py_BuildValue("s", modelPath));	// 传入的参数,是图片的路径
	pRetVal = PyEval_CallObject(pFunc, pParm);					// 这里开始执行py脚本
	//PyArg_Parse(pRetVal, "i", &iRetVal);						// py脚本返回值给iRetVal

	Py_Finalize();	// 释放资源

	return 0;
}


void main()
{
	if (IS_TEST)
	{
		demo(CHECKPOINT_DIR, SHOW_BOX);
	}
	else if (IS_TRAIN)
	{
		train_model(TRAIN_DATA);
	}
	else if (IS_VALID)
	{
		valid_model(CHECKPOINT_DIR, VALID_DATA);
	}
}
第一版和第二版的test模块都是经过测试可以运行,测试运行的效果如下,这里我就不放人脸了,只是说明一下该程序可以顺利运行:
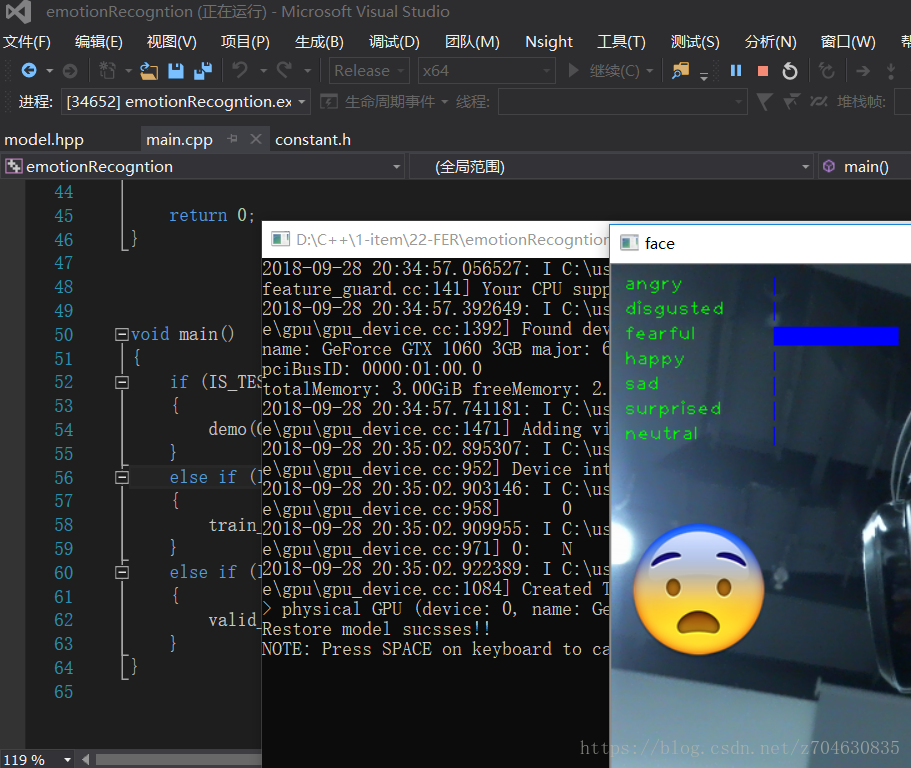
有兴趣的同学可以自己运行试试。不过第二版的训练环节我还没有测试,不知道有没有问题。
五、分析总结
现在模型是可以顺利运行,但是还是存在一定的问题:
[1]确实是识别的精度不是很高,现在想要进一步提高精度,我个人觉得需要考虑用更好的数据集
[2]初次打开模型的时候会很明显的卡一下
目前主要就是这两个问题,接下来自己还要做一些表情识别的东西,欢迎讨论。