基本概念
- Virtual Ethernet Cable
- Bidirectional FIFO
- Often used to cross namespaces
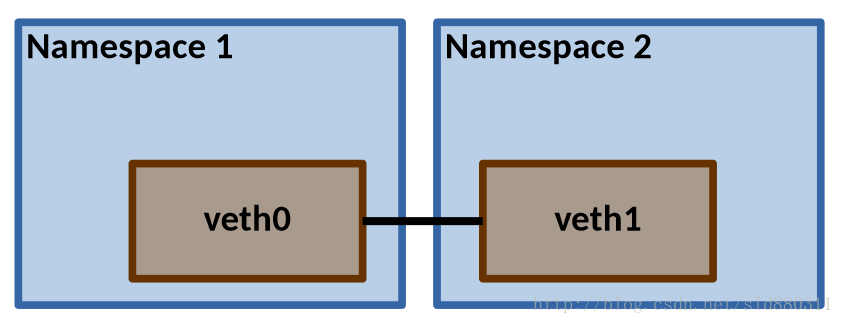
Linux container 中用到一个叫做veth的东西,这是一种新的设备,专门为 container 所建。veth 从名字上来看是 Virtual ETHernet 的缩写,它的作用很简单,就是要把从一个 network namespace 发出的数据包转发到另一个 namespace。veth 设备是成对的,一个是 container 之中,另一个在 container 之外,即在真实机器上能看到的。
VETH设备总是成对出现,送到一端请求发送的数据总是从另一端以请求接受的形式出现。创建并配置正确后,向其一端输入数据,VETH会改变数据的方向并将其送入内核网络子系统,完成数据的注入,而在另一端则能读到此数据。(Namespace,其中往veth设备上任意一端上RX到的数据,都会在另一端上以TX的方式发送出去)veth工作在L2数据链路层,veth-pair设备在转发数据包过程中并不串改数据包内容。
显然,仅有veth-pair设备,容器是无法访问网络的。因为容器发出的数据包,实质上直接进入了veth1设备的协议栈里。如果容器需要访问网络,需要使用bridge等技术,将veth1接收到的数据包通过某种方式转发出去
链接:
VETH: Typically used when you are trying to connect two entities which would want to “get hold of” (for lack of better phrase) an interface to forward/receive frames. These entities could be containers/bridges/ovs-switch etc. Say you want to connect a docker/lxc container to OVS. You can create a veth pair and push the first interface to the docker/lxc (say, as a phys interface) and push the other interface to OVS. You cannot do this with TAP.
创建veth的命令如下:
ip link add name veth0 type veth0 peer name veth1
veth设备特点
- veth和其它的网络设备都一样,一端连接的是内核协议栈
- veth设备是成对出现的,另一端两个设备彼此相连
- 一个设备收到协议栈的数据发送请求后,会将数据发送到另一个设备上去
常用命令
创建network namespace
root@ubuntu:/home/sunld# ip netns add sunldnamespace01
root@ubuntu:/home/sunld# ip netns list
sunldnamespace01
创建veth
root@ubuntu:/home/sunld# ip link add sunldveth01 type veth peer name sunldveth02
root@ubuntu:/home/sunld# ip link list
显示信息如下:
1: lo: <LOOPBACK,UP,LOWER_UP> mtu 65536 qdisc noqueue state UNKNOWN mode DEFAULT group default
    link/loopback 00:00:00:00:00:00 brd 00:00:00:00:00:00
2: eth0: <BROADCAST,MULTICAST,UP,LOWER_UP> mtu 1500 qdisc pfifo_fast state UP mode DEFAULT group default qlen 1000
    link/ether 00:0c:29:2d:d4:23 brd ff:ff:ff:ff:ff:ff
20: sunldveth02: <BROADCAST,MULTICAST> mtu 1500 qdisc noop state DOWN mode DEFAULT group default qlen 1000
    link/ether c6:bb:c0:d0:54:71 brd ff:ff:ff:ff:ff:ff
21: sunldveth01: <BROADCAST,MULTICAST> mtu 1500 qdisc noop state DOWN mode DEFAULT group default qlen 1000
    link/ether da:a1:36:d1:3b:36 brd ff:ff:ff:ff:ff:ff
添加网卡到namespace
root@ubuntu:/home/sunld# ip link set sunldveth01 netns sunldnamespace01
查看当前namespace中的veth,只有sunldveth02
root@ubuntu:/home/sunld# ip link list
显示信息如下
1: lo: <LOOPBACK,UP,LOWER_UP> mtu 65536 qdisc noqueue state UNKNOWN mode DEFAULT group default
    link/loopback 00:00:00:00:00:00 brd 00:00:00:00:00:00
2: eth0: <BROADCAST,MULTICAST,UP,LOWER_UP> mtu 1500 qdisc pfifo_fast state UP mode DEFAULT group default qlen 1000
    link/ether 00:0c:29:2d:d4:23 brd ff:ff:ff:ff:ff:ff
3: virbr0: <NO-CARRIER,BROADCAST,MULTICAST,UP> mtu 1500 qdisc noqueue state DOWN mode DEFAULT group default
    link/ether ba:d9:d4:48:55:65 brd ff:ff:ff:ff:ff:ff
20: sunldveth02: <BROADCAST,MULTICAST> mtu 1500 qdisc noop state DOWN mode DEFAULT group default qlen 1000
    link/ether c6:bb:c0:d0:54:71 brd ff:ff:ff:ff:ff:ff
通过命令查看sunldnamespace01中的veth
root@ubuntu:/home/sunld# ip netns exec sunldnamespace01 ip link list显示信息如下
1: lo: <LOOPBACK> mtu 65536 qdisc noop state DOWN mode DEFAULT group default
    link/loopback 00:00:00:00:00:00 brd 00:00:00:00:00:00
21: sunldveth01: <BROADCAST,MULTICAST> mtu 1500 qdisc noop state DOWN mode DEFAULT group default qlen 1000
    link/ether da:a1:36:d1:3b:36 brd ff:ff:ff:ff:ff:ff
配置network namespace的网口
root@ubuntu:/home/sunld# ip netns exec sunldnamespace01 ifconfig sunldveth01 100.2.96.2/16 up
root@ubuntu:/home/sunld# ip netns exec sunldnamespace01 ip addr list
显示信息如下
1: lo: <LOOPBACK> mtu 65536 qdisc noop state DOWN group default
    link/loopback 00:00:00:00:00:00 brd 00:00:00:00:00:00
21: sunldveth01: <NO-CARRIER,BROADCAST,MULTICAST,UP> mtu 1500 qdisc pfifo_fast state DOWN group default qlen 1000
    link/ether da:a1:36:d1:3b:36 brd ff:ff:ff:ff:ff:ff
    inet 100.2.96.2/16 brd 100.2.255.255 scope global sunldveth01
       valid_lft forever preferred_lft forever
开启空间脚本
#可以使用这条命令开启一个 ns0 的 shell
ip netns exec ns0 sh
示例
Veth pair
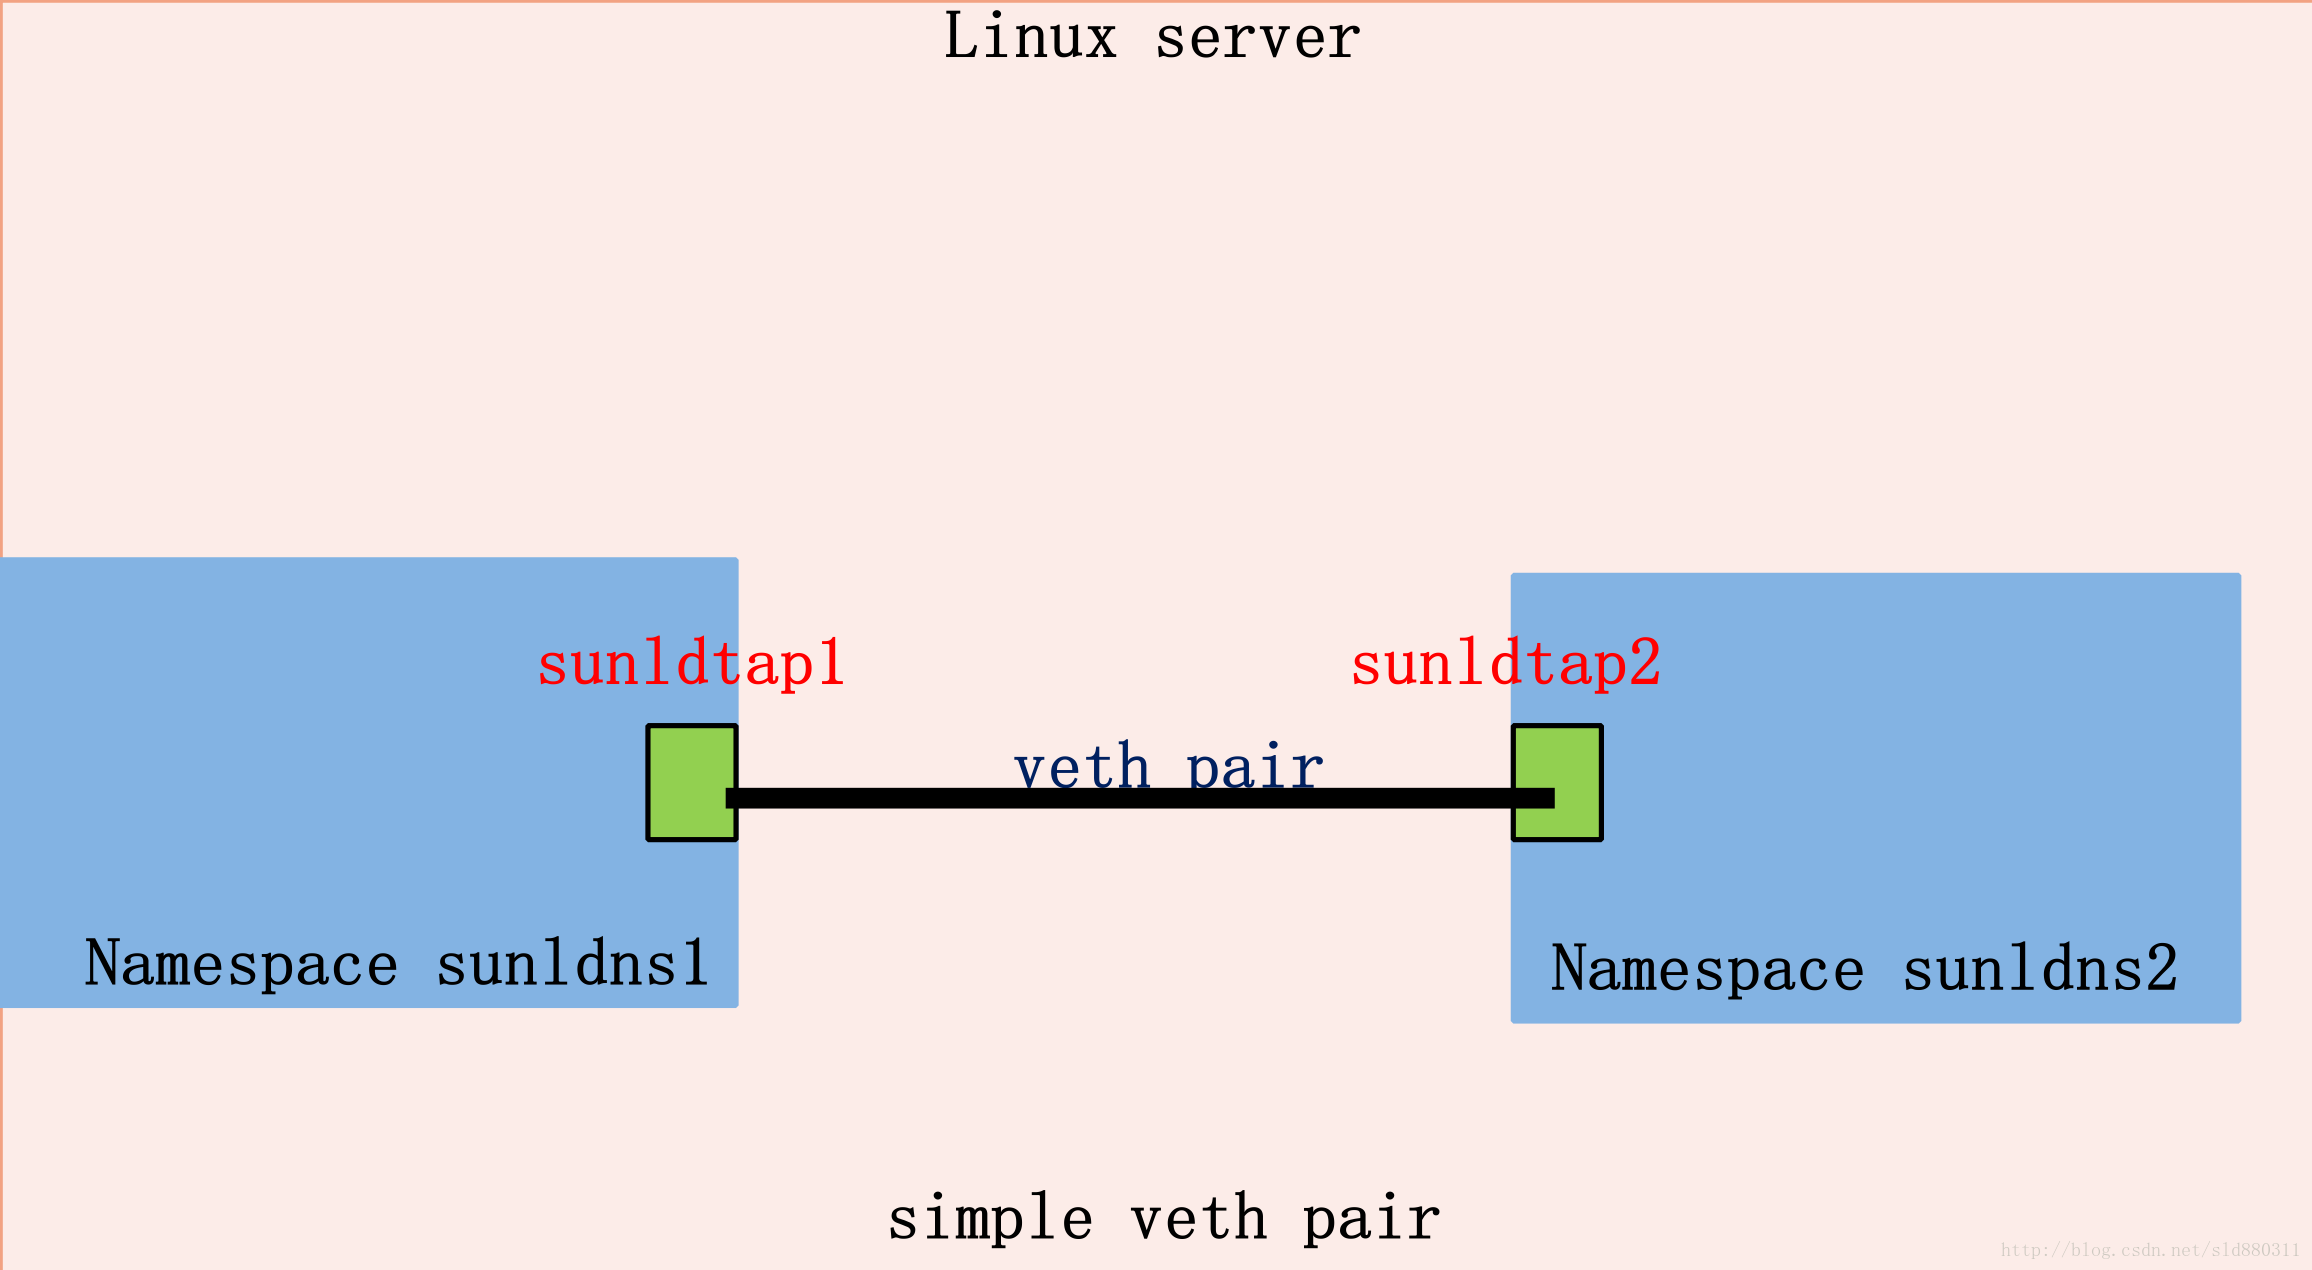
# add the namespaces
root@ubuntu:/# ip netns add sunldns1
root@ubuntu:/# ip netns add sunldns2
# create the veth pair
root@ubuntu:/# ip link add sunldtap1 type veth peer name sunldtap2
# move the interfaces to the namespaces
root@ubuntu:/# ip link set sunldtap1 netns sunldns1
root@ubuntu:/# ip link set sunldtap2 netns sunldns2
# bring up the links
root@ubuntu:/# ip netns exec sunldns1 ip link set dev sunldtap1 up
root@ubuntu:/# ip netns exec sunldns2 ip link set dev sunldtap2 up
Linuxbridge with two veth pairs

# 可以使用这条命令开启一个 ns0 的 shell ip netns exec ns0 sh
# create the switch
root@ubuntu:/# brctl addbr br-testsunld01
# 关闭 STP (生成树协议),因为只有拓扑结构很简单,用不到,关闭可以提升性能
root@ubuntu:/# brctl stp br-testsunld01 off
root@ubuntu:/# ip link set dev br-testsunld01 up
# 为网桥设置IP地址
ifconfig br-testsunld01 192.168.88.1/24 up
# add the namespaces
root@ubuntu:/# ip netns add sunldns1
root@ubuntu:/# ip netns add sunldns2

#### PORT 1
# create a port pair
root@ubuntu:/# ip link add sunldtap1 type veth peer name br-sunldtap1
# attach one side to linuxbridge
root@ubuntu:/# brctl addif br-testsunld01 br-sunldtap1
# attach the other side to namespace
root@ubuntu:/# ip link set sunldtap1 netns sunldns1
# set the ports to up
root@ubuntu:/# ip netns exec sunldns1 ip link set dev sunldtap1 up
root@ubuntu:/# ip link set dev br-sunldtap1 up
# set ip
root@ubuntu:/# ip netns exec sunldns1 ifconfig sunldtap1 192.168.88.3/24 up
# 最后别忘了设置一下路由
root@ubuntu:/home/sunld# ip netns exec sunldns1 ip route add default via 192.168.88.1

#### PORT 2
# create a port pair
root@ubuntu:/# ip link add sunldtap2 type veth peer name br-sunldtap2
# attach one side to linuxbridge
root@ubuntu:/# brctl addif br-testsunld01 br-sunldtap2
# attach the other side to namespace
root@ubuntu:/# ip link set sunldtap2 netns sunldns2
# set the ports to up
root@ubuntu:/# ip netns exec sunldns2 ip link set dev sunldtap2 up
root@ubuntu:/# ip link set dev br-sunldtap2 up
# set ip
root@ubuntu:/# ip netns exec sunldns2 ifconfig sunldtap2 192.168.88.4/24 up
openvswitch and two veth pairs
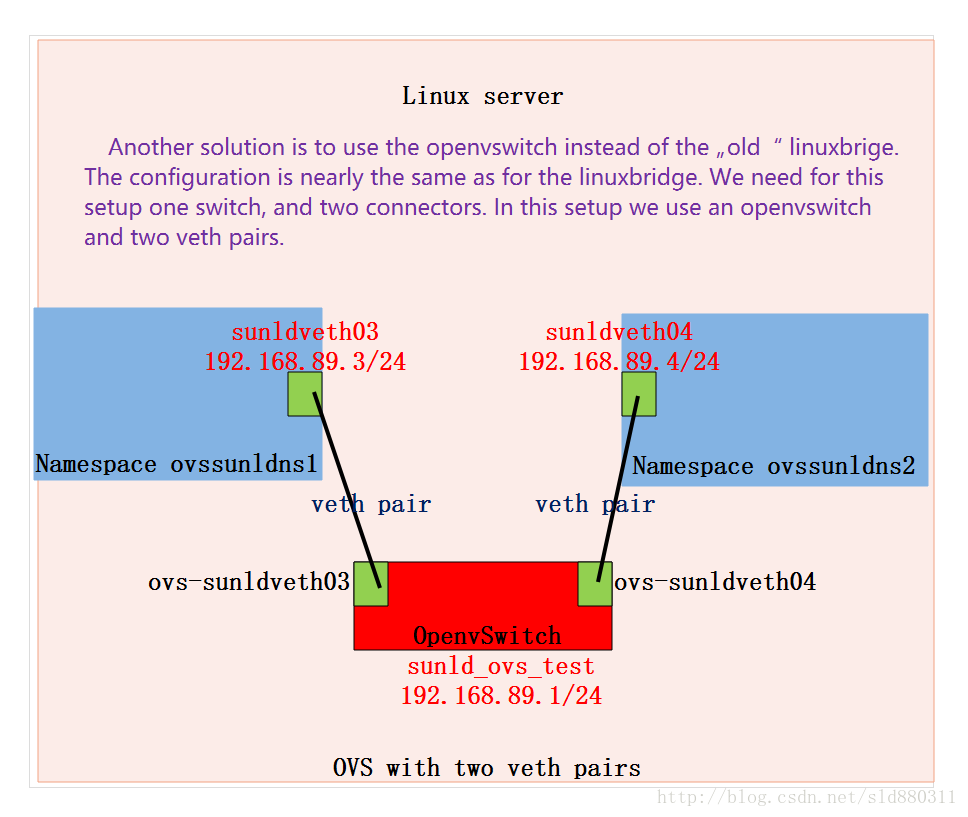
# add the namespaces
root@ubuntu:/# ip netns add ovssunldns1
root@ubuntu:/# ip netns add ovssunldns2
# create the switch
root@ubuntu:/# ovs-vsctl add-br sunld_ovs_test
root@ubuntu:/# ip link set dev sunld_ovs_test up
#
#### PORT 1
# create a port pair
root@ubuntu:/# ip link add sunldveth03 type veth peer name ovs-sunldveth03
# attach one side to ovs
root@ubuntu:/# ovs-vsctl add-port sunld_ovs_test ovs-sunldveth03
# attach the other side to namespace
root@ubuntu:/# ip link set sunldveth03 netns ovssunldns1
# set the ports to up
root@ubuntu:/# ip link set dev ovs-sunldveth03 up
root@ubuntu:/# ip netns exec ovssunldns1 ip link set dev sunldveth03 up
#
#### PORT 2
# create a port pair
root@ubuntu:/# ip link add sunldveth04 type veth peer name ovs-sunldveth04
# attach one side to ovs
root@ubuntu:/# ovs-vsctl add-port sunld_ovs_test ovs-sunldveth04
# attach the other side to namespace
root@ubuntu:/# ip link set sunldveth04 netns ovssunldns2
# set the ports to up
root@ubuntu:/# ip link set dev ovs-sunldveth04 up
root@ubuntu:/# ip netns exec ovssunldns2 ip link set dev sunldveth04 up

####配置IP
root@ubuntu:/# ifconfig sunld_ovs_test 192.168.89.1/24 up
root@ubuntu:/# ip netns exec ovssunldns1 ifconfig sunldveth03 192.168.89.3/24 up
root@ubuntu:/# ip netns exec ovssunldns2 ifconfig sunldveth04 192.168.89.4/24 up
#
bridge信息
Bridge sunld_ovs_test
        Port sunld_ovs_test
            Interface sunld_ovs_test
                type: internal
        Port "ovs-sunldveth03"
            Interface "ovs-sunldveth03"
        Port "ovs-sunldveth04"
            Interface "ovs-sunldveth04"
openvswitch and two openvswitch ports
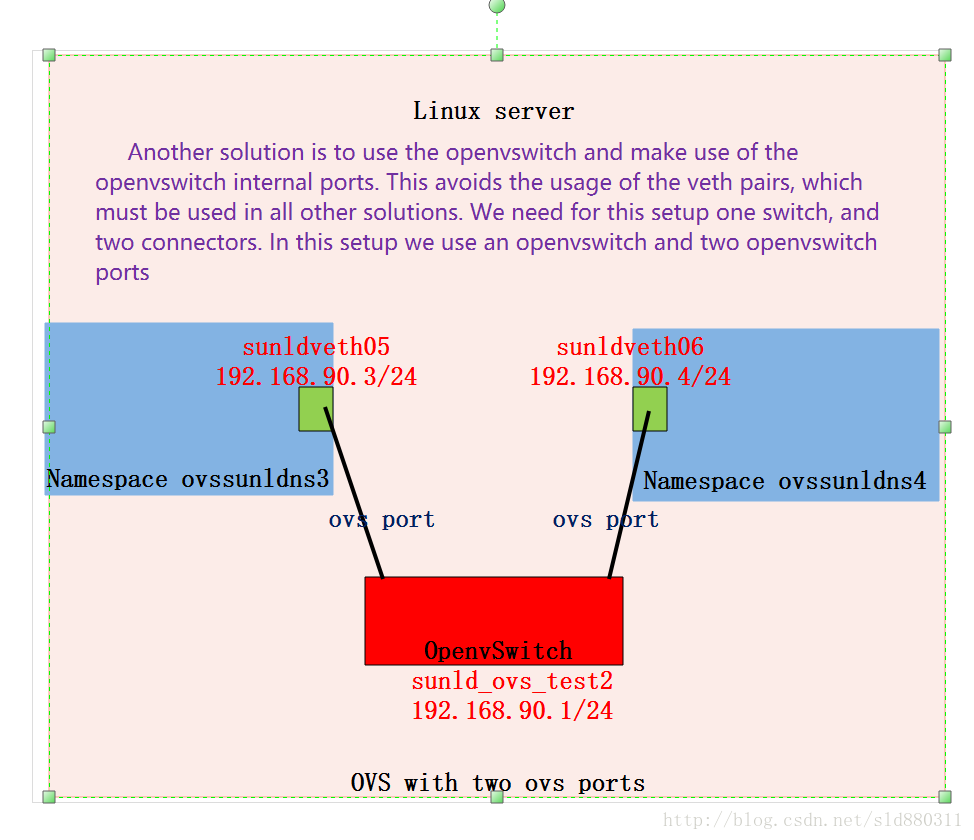
# add the namespaces
root@ubuntu:/# ip netns add ovssunldns3
root@ubuntu:/# ip netns add ovssunldns4

# create the switch
root@ubuntu:/# ovs-vsctl add-br sunld_ovs_test2
root@ubuntu:/# ip link set dev sunld_ovs_test2 up
#
#### PORT 1
# create an internal ovs port
root@ubuntu:/# ovs-vsctl add-port sunld_ovs_test2 sunldveth05 -- set Interface sunldveth05 type=internal
# attach it to namespace
root@ubuntu:/# ip link set sunldveth05 netns ovssunldns3
# set the ports to up
root@ubuntu:/# ip netns exec ovssunldns3 ip link set dev sunldveth05 up
#
#### PORT 2
# create an internal ovs port
root@ubuntu:/# ovs-vsctl add-port sunld_ovs_test2 sunldveth06 -- set Interface sunldveth06 type=internal
# attach it to namespace
root@ubuntu:/# ip link set sunldveth06 netns ovssunldns4
# set the ports to up
root@ubuntu:/# ip netns exec ovssunldns4 ip link set dev sunldveth06 up
#配置IP
root@ubuntu:/# ifconfig sunld_ovs_test2 192.168.90.1/24 up
root@ubuntu:/# ip netns exec ovssunldns3 ifconfig sunldveth05 192.168.90.3/24 up
root@ubuntu:/# ip netns exec ovssunldns4 ifconfig sunldveth06 192.168.90.4/24 up
bridge信息
Bridge "sunld_ovs_test2"
        Port "sunldveth05"
            Interface "sunldveth05"
                type: internal
        Port "sunldveth06"
            Interface "sunldveth06"
                type: internal
        Port "sunld_ovs_test2"
            Interface "sunld_ovs_test2"
                type: internal
内核代码
static netdev_tx_t veth_xmit(struct sk_buff *skb, struct net_device *dev)
{
    struct veth_priv *priv = netdev_priv(dev);
    struct net_device *rcv;
    int length = skb->len;
    rcu_read_lock();
    rcv = rcu_dereference(priv->peer);

    if (unlikely(!rcv)) {
        kfree_skb(skb);
        goto drop;
    }
     //转发给peer
    if (likely(dev_forward_skb(rcv, skb) == NET_RX_SUCCESS)) {
        struct pcpu_vstats *stats = this_cpu_ptr(dev->vstats);
        u64_stats_update_begin(&stats->syncp);
        stats->bytes += length;
        stats->packets++;
        u64_stats_update_end(&stats->syncp);
    } else {
drop:
        atomic64_inc(&priv->dropped);
    }
    rcu_read_unlock();
    return NETDEV_TX_OK;
}
如何工作
向veth pair 的一端输入数据,veth pair 转换请求发送报文为需要接收处理的报文,将其注入内核协议栈,在另一端能读到此数据。
通过简单的实例分析工作流程
部署图
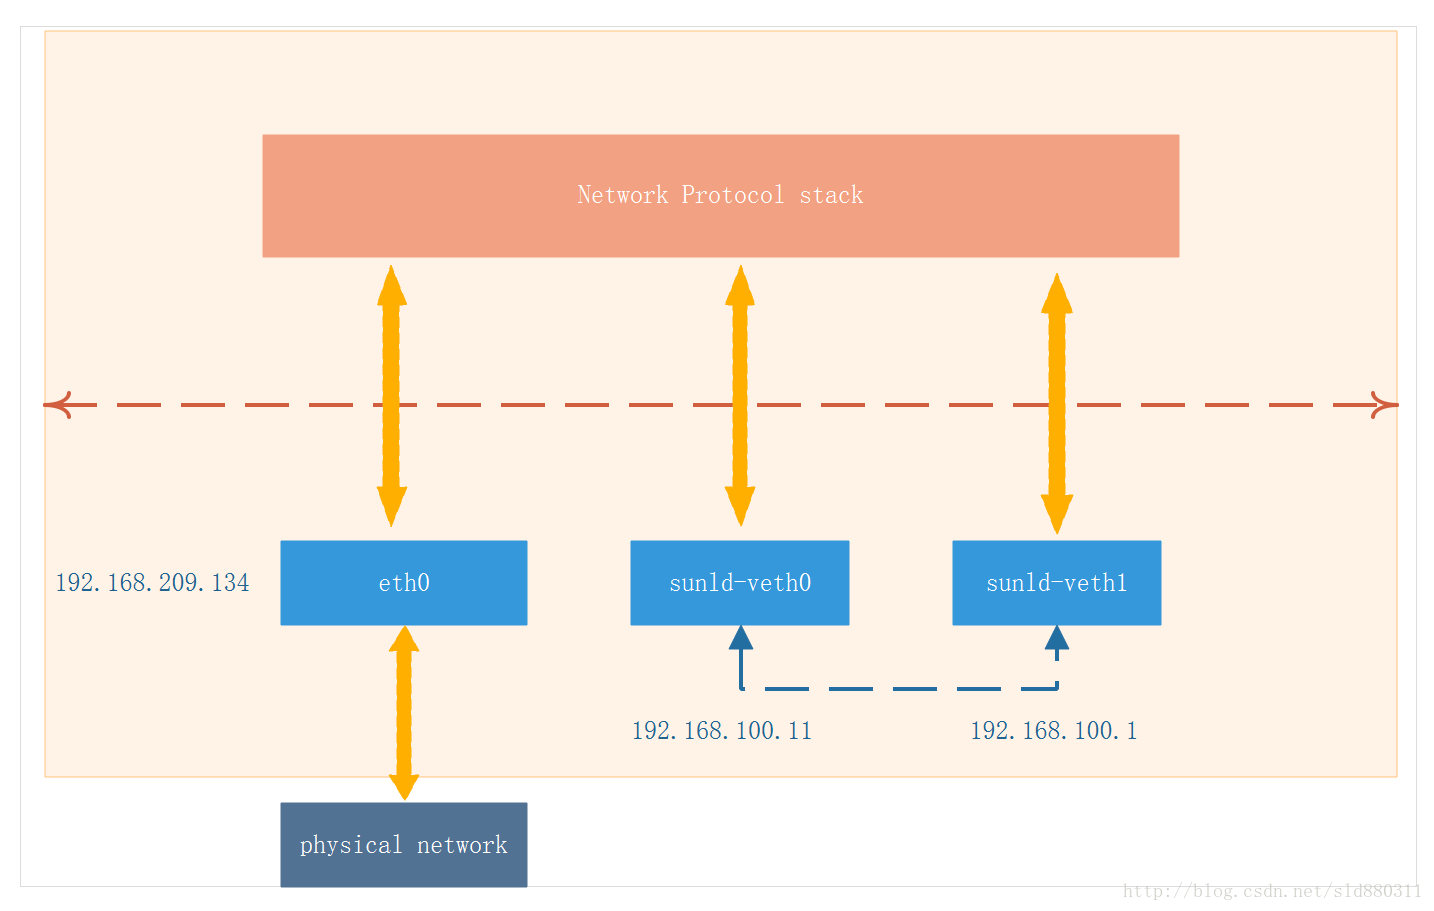
创建veth
root@ubuntu:/home/sunld# ip link add sunld-veth0 type veth peer name sunld-veth1
root@ubuntu:/home/sunld# ip link set dev sunld-veth0 up
root@ubuntu:/home/sunld# ip link set dev sunld-veth1 up
配置sunld-veth0的ip
root@ubuntu:/home/sunld# ifconfig sunld-veth0 192.168.100.11/24 up测试连通性-sunld-veth1没配置IP
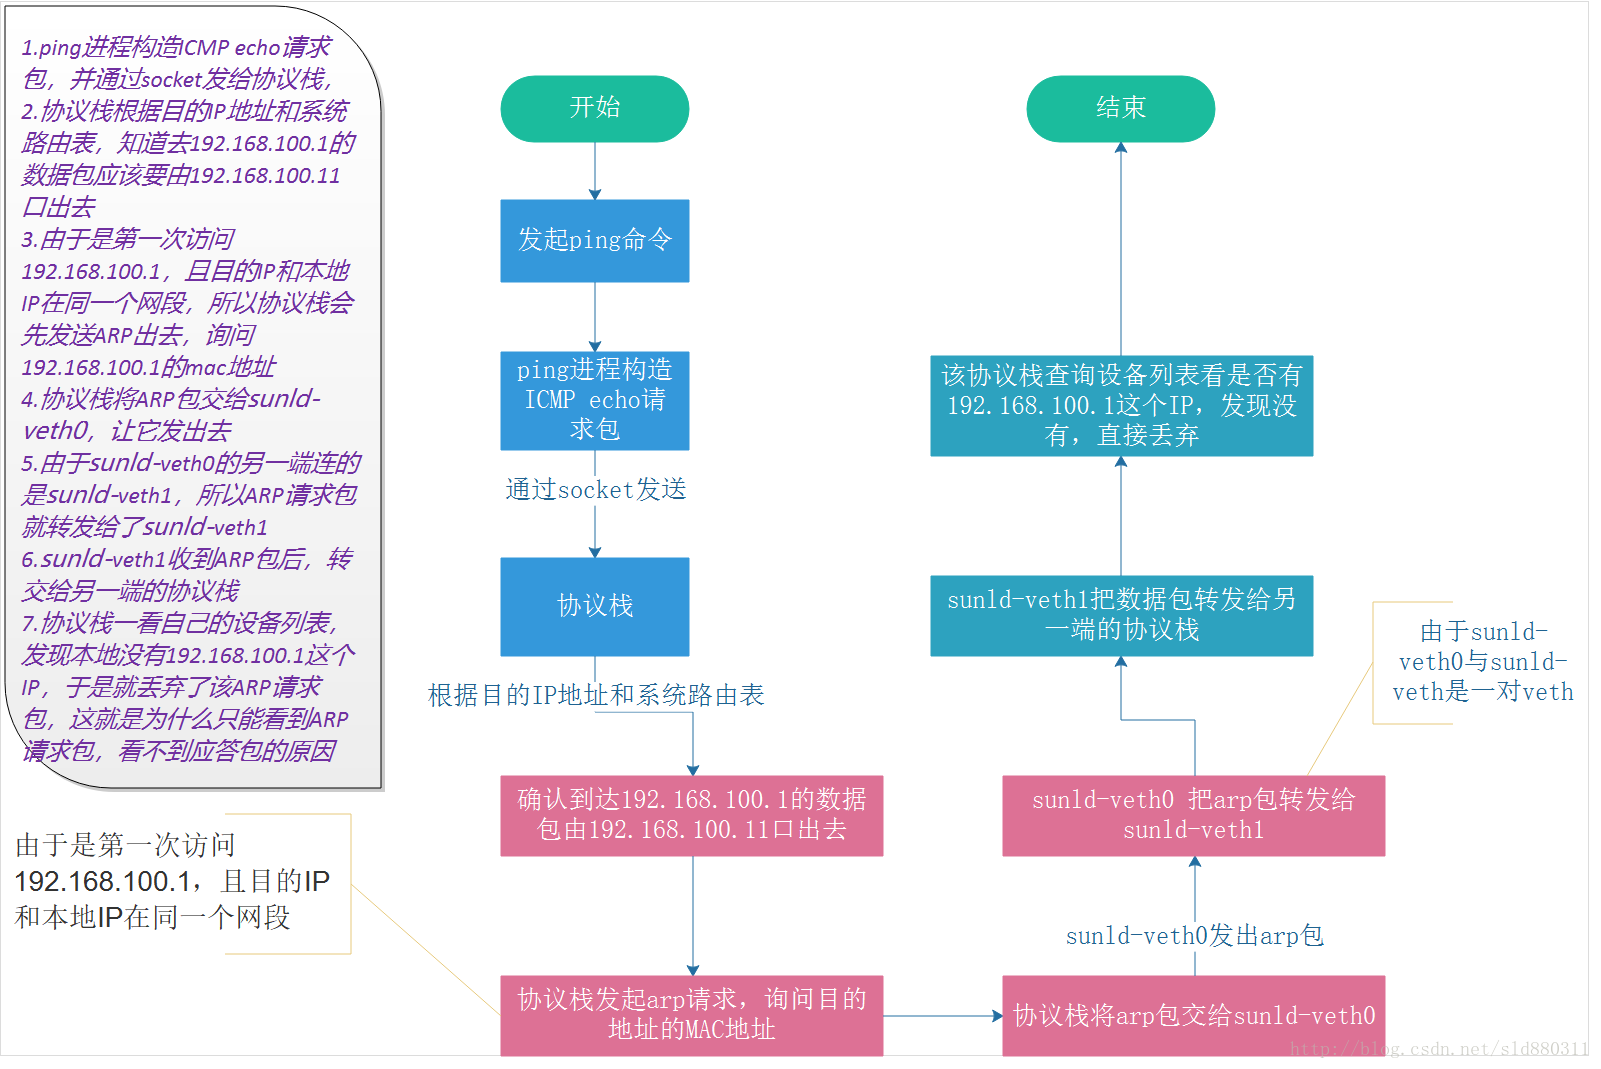
直接ping 192.168.100.1-不通
root@ubuntu:/home/sunld# ping -c 4 192.168.100.1
PING 192.168.100.1 (192.168.100.1) 56(84) bytes of data.
From 192.168.100.11 icmp_seq=1 Destination Host Unreachable
From 192.168.100.11 icmp_seq=2 Destination Host Unreachable
From 192.168.100.11 icmp_seq=3 Destination Host Unreachable
From 192.168.100.11 icmp_seq=4 Destination Host Unreachable

--- 192.168.100.1 ping statistics ---
4 packets transmitted, 0 received, +4 errors, 100% packet loss, time 3016ms
pipe 3
查看抓包数据
veth0
root@ubuntu:/home/sunld# tcpdump -n -i sunld-veth0
tcpdump: verbose output suppressed, use -v or -vv for full protocol decode
listening on sunld-veth0, link-type EN10MB (Ethernet), capture size 262144 bytes
08:10:36.369731 ARP, Request who-has 192.168.100.1 tell 192.168.100.11, length 28
08:10:37.366887 ARP, Request who-has 192.168.100.1 tell 192.168.100.11, length 28
08:10:38.366174 ARP, Request who-has 192.168.100.1 tell 192.168.100.11, length 28
08:10:39.385792 ARP, Request who-has 192.168.100.1 tell 192.168.100.11, length 28
08:10:40.382525 ARP, Request who-has 192.168.100.1 tell 192.168.100.11, length 28
08:10:41.382961 ARP, Request who-has 192.168.100.1 tell 192.168.100.11, length 28
^C
6 packets captured
6 packets received by filter
0 packets dropped by kernel
veth1
root@ubuntu:/home/sunld# tcpdump -n -i sunld-veth1
tcpdump: verbose output suppressed, use -v or -vv for full protocol decode
listening on sunld-veth1, link-type EN10MB (Ethernet), capture size 262144 bytes
08:11:28.469362 ARP, Request who-has 192.168.100.1 tell 192.168.100.11, length 28
08:11:29.466553 ARP, Request who-has 192.168.100.1 tell 192.168.100.11, length 28
08:11:30.467384 ARP, Request who-has 192.168.100.1 tell 192.168.100.11, length 28
08:11:31.478582 ARP, Request who-has 192.168.100.1 tell 192.168.100.11, length 28
08:11:32.479044 ARP, Request who-has 192.168.100.1 tell 192.168.100.11, length 28
08:11:33.478274 ARP, Request who-has 192.168.100.1 tell 192.168.100.11, length 28
^C
6 packets captured
6 packets received by filter
0 packets dropped by kernel
分析
执行ping的过程:
测试连通性sunld-veth1配置了IP
sunld-veth1配置IP
root@ubuntu:/home/sunld# ifconfig sunld-veth1 192.168.100.1/24 up直接ping192.168.100.1
注意:对于非debian系统,这里有可能ping不通,主要是因为内核中的一些ARP相关配置导致sunld-veth1不返回ARP应答包,如ubuntu上就会出现这种情况,解决办法如下:
root@ubuntu:/home/sunld# echo 1 > /proc/sys/net/ipv4/conf/sunld-veth1/accept_local
root@ubuntu:/home/sunld# echo 1 > /proc/sys/net/ipv4/conf/sunld-veth0/accept_local
root@ubuntu:/home/sunld# echo 0 > /proc/sys/net/ipv4/conf/all/rp_filter
root@ubuntu:/home/sunld# echo 0 > /proc/sys/net/ipv4/conf/sunld-veth0/rp_filter
root@ubuntu:/home/sunld# echo 0 > /proc/sys/net/ipv4/conf/sunld-veth1/rp_filter
再ping 192.168.100.1成功(由于192.168.100.1是本地IP,所以默认会走lo设备,为了避免这种情况,这里使用ping命令带上了-I参数,指定数据包走指定设备)
root@ubuntu:/home/sunld# ping -c 4 192.168.100.1 -I sunld-veth0
PING 192.168.100.1 (192.168.100.1) from 192.168.100.11 sunld-veth0: 56(84) bytes of data.
64 bytes from 192.168.100.1: icmp_seq=1 ttl=64 time=0.095 ms
64 bytes from 192.168.100.1: icmp_seq=2 ttl=64 time=0.119 ms
64 bytes from 192.168.100.1: icmp_seq=3 ttl=64 time=0.110 ms
64 bytes from 192.168.100.1: icmp_seq=4 ttl=64 time=0.186 ms

--- 192.168.100.1 ping statistics ---
4 packets transmitted, 4 received, 0% packet loss, time 3010ms
rtt min/avg/max/mdev = 0.095/0.127/0.186/0.036 ms
查看抓包数据
veth0
root@ubuntu:/home/sunld# tcpdump -n -i sunld-veth0
tcpdump: verbose output suppressed, use -v or -vv for full protocol decode
listening on sunld-veth0, link-type EN10MB (Ethernet), capture size 262144 bytes
09:43:51.218158 IP 192.168.100.11 > 192.168.100.1: ICMP echo request, id 30903, seq 1, length 64
09:43:52.224143 IP 192.168.100.11 > 192.168.100.1: ICMP echo request, id 30903, seq 2, length 64
09:43:53.223929 IP 192.168.100.11 > 192.168.100.1: ICMP echo request, id 30903, seq 3, length 64
09:43:54.222923 IP 192.168.100.11 > 192.168.100.1: ICMP echo request, id 30903, seq 4, length 64
^C
4 packets captured
4 packets received by filter
0 packets dropped by kernel
veth1
root@ubuntu:/home/sunld# tcpdump -n -i sunld-veth1
tcpdump: verbose output suppressed, use -v or -vv for full protocol decode
listening on sunld-veth1, link-type EN10MB (Ethernet), capture size 262144 bytes
09:44:36.825998 IP 192.168.100.11 > 192.168.100.1: ICMP echo request, id 30921, seq 1, length 64
09:44:37.827332 IP 192.168.100.11 > 192.168.100.1: ICMP echo request, id 30921, seq 2, length 64
09:44:38.826755 IP 192.168.100.11 > 192.168.100.1: ICMP echo request, id 30921, seq 3, length 64
09:44:39.826982 IP 192.168.100.11 > 192.168.100.1: ICMP echo request, id 30921, seq 4, length 64
^C
4 packets captured
4 packets received by filter
0 packets dropped by kernel
lo
root@ubuntu:/home/sunld# tcpdump -n -i lo | grep 192.168.100
tcpdump: verbose output suppressed, use -v or -vv for full protocol decode
listening on lo, link-type EN10MB (Ethernet), capture size 262144 bytes
09:46:02.147861 IP 192.168.100.1 > 192.168.100.11: ICMP echo reply, id 30959, seq 1, length 64
09:46:03.146847 IP 192.168.100.1 > 192.168.100.11: ICMP echo reply, id 30959, seq 2, length 64
09:46:04.146913 IP 192.168.100.1 > 192.168.100.11: ICMP echo reply, id 30959, seq 3, length 64
09:46:05.146204 IP 192.168.100.1 > 192.168.100.11: ICMP echo reply, id 30959, seq 4, length 64
^C355 packets captured
722 packets received by filter
0 packets dropped by kernel
分析
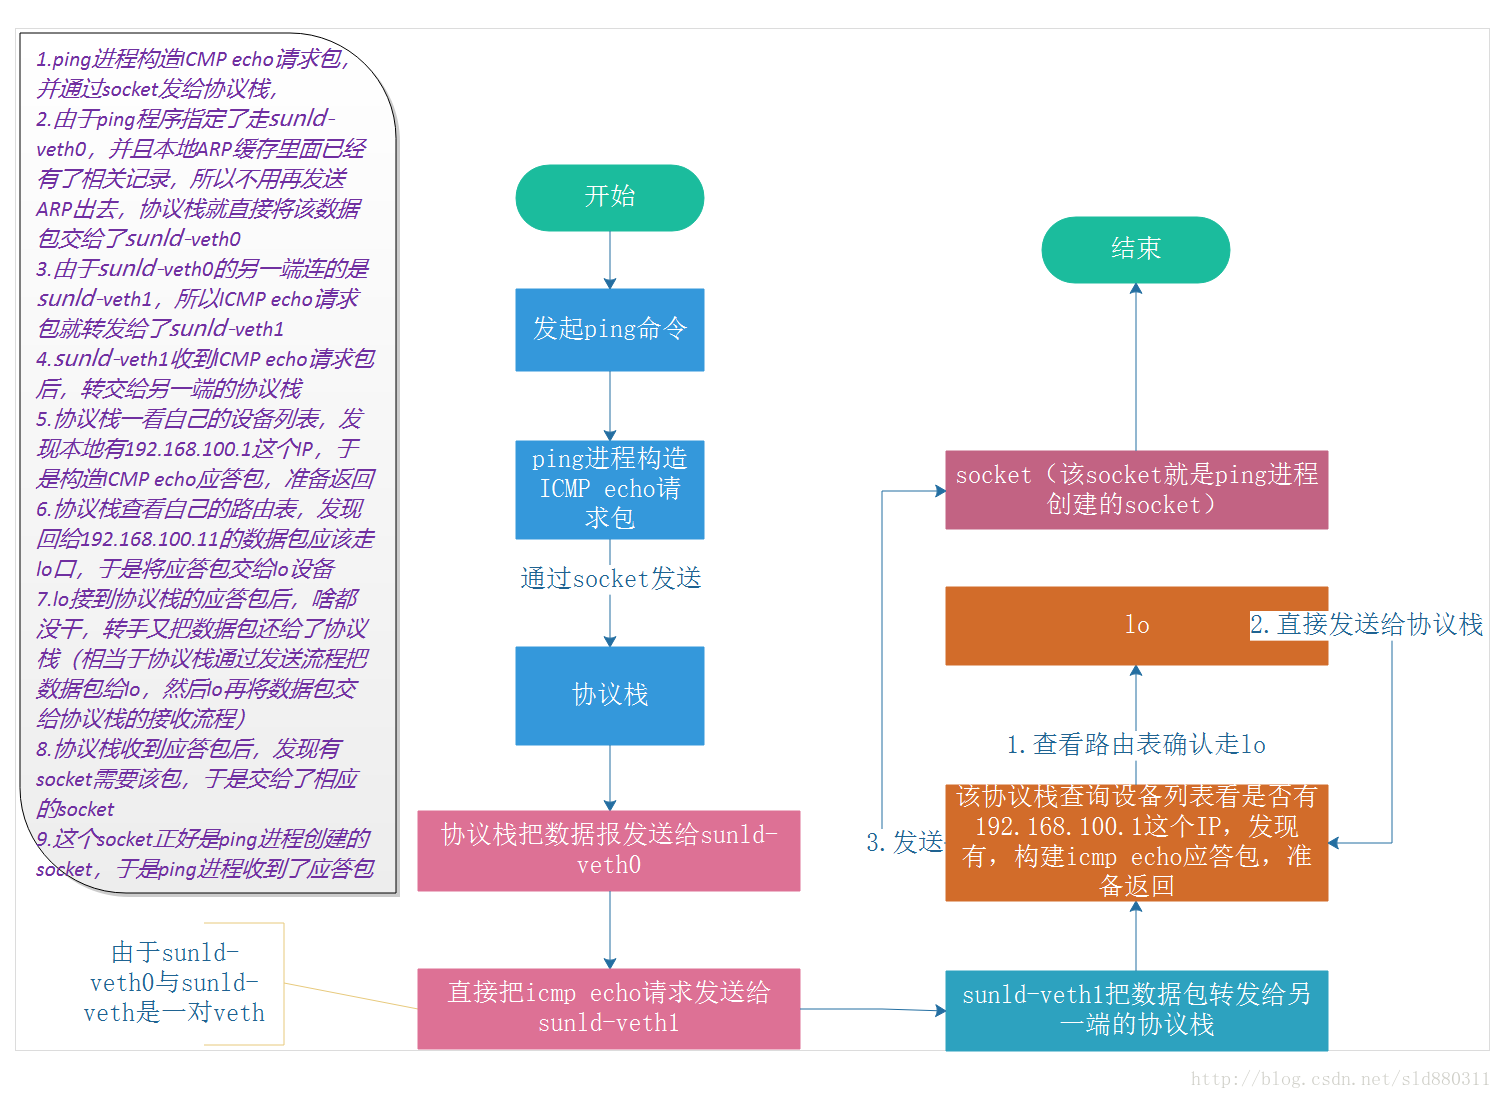
结论
从上面的介绍中可以看出,从sunld-veth0设备出去的数据包,会转发到sunld-veth1上,如果目的地址是sunld-veth1的IP的话,就能被协议栈处理,否则连ARP那关都过不了,IP forward啥的都用不上,所以不借助其它虚拟设备的话,这样的数据包只能在本地协议栈里面打转转,没法走到eth0上去,即没法发送到外面的网络中去。比如ovs、linuxbridge。
用途
如上所述,常用于不同命名空间之间进行数据穿越。
其他
NETIF_F_NETNS_LOCAL
NETIF_F_NETNS_LOCAL是网络设备的一个特性,设置该特性的网络设备,不允许在不同network namespace间移动。这类设备也叫做本地设备(local devices)。
Loopback,VXLAN,PPP,bridge都是这类设备。可以通过以下命令查看:
root@ubuntu:/sys/dev# ethtool -k sunld_ovs_test | grep netns
netns-local: off [fixed]
root@ubuntu:/sys/dev# ethtool --show-features sunld_ovs_test|grep netns
netns-local: off [fixed]
如果对这类设备network namespace,会报下面的错误:
ip link set br0 netns ns1
RTNETLINK answers: Invalid argument
参考资料
Linux 上的基础网络设备详解
Linux Networking Explained
Introducing Linux Network Namespaces
Linux Switching – Interconnecting Namespaces
veth源码
Linux虚拟网络设备之veth
Linux网络设备工作原理
基于veth的网络虚拟化
Namespaces in operation, part 7: Network namespaces