转自:https://blog.csdn.net/shen_jz2012/article/details/53319956
在VMware虚拟机里安装CentOS,一般设置为NAT上网方式,十分方便。但是这样有个缺点,这样的上网方式是DHCP的,也就是每一次重启你的ip都会改变。如果你进入/etc/sysconfig/networt-scripts/ifcfg-eth0文件,将上网类型从dhcp修改为static,并对ip,掩码,网关做相应修改之后,重启网络服务,这时候可以看到静态ip生效了。设置静态ip非常有用,尤其是在部署集群的时候,我们肯定不希望每次重启机器的i就改变,这对于ssh,集群里配置文件(比如spark或者hadoop里的slaves)都非常不方便。
如何解决既可以设置静态ip,又能访问外网,同时能与宿主机相互ping通呢?
解决办法:
1、修改宿主机中的VMNet8网卡,同样设置为静态ip,一般是192.168.X.1,图1是我自己的设置,记住网关一定要设置为(一般也默认设置为)192.168.X.2,DNS设置为你可以访问外网的服务器。
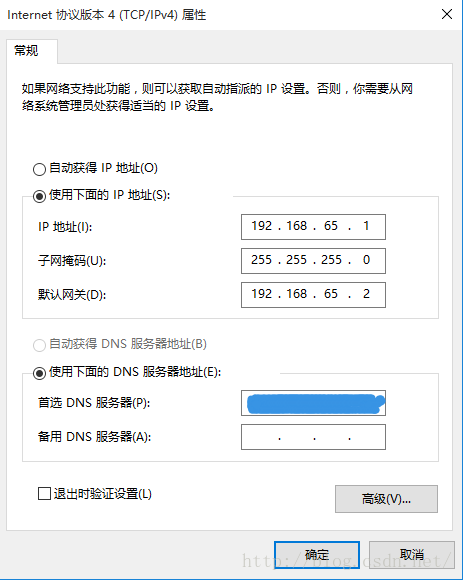
图1 宿主机VMNet8网络设置
2、修改虚拟机CentOS网络设置,如图2所示,红色方框是必须设置的几项,主要配置好IPADDR,NETMASK,GATEWAY和DNS几项,之前将网络类型从dhcp修改为static而访问不了外网很大原因是因为没有设置DNS。注意,DNS要设置跟你的宿主机一样,GATEWAY也需跟VMNet8一样,这样宿主机和虚拟机之间才能相互ping通。
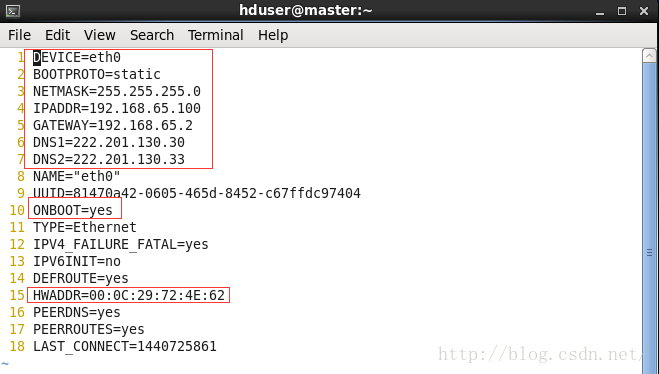
图2 CentOS中的/etc/sysconfig/network-scripts/ifcfg-eth0文件
3、重启CentOS中的网络,(root权限下)键入命令service network restart
4、测试:1)ping
www.baidu.com 2)ping 192.168.X.2 3)ping 192.168.X.1(如果虚拟机ping宿主机ping不同,除了没有在同一个网段或者网关设置问题,一个很大的原因也可能是你宿主机防火墙没关闭)
P.S. 网络设置同时也可以参考这篇博客:http://blog.chinaunix.net/uid-28856509-id-4536553.html
附:
系统升级成win10之后,网络中的VMnet1和VMnet8都显示未识别的网络,做一下修改即可。
1、使用win+R快捷键弹出运行窗口之后,用regedit打开注册表页面
2、进入注册表[HKEY_LOCAL_MACHINE\SYSTEM\CurrentControlSet\Control\Class\{4D36E972-E325-11CE-BFC1-08002BE10318}],逐项查看其下的[项](0000,0001至00xx),看右边哪一项的[值]为:"DriverDesc"="VMware Virtual Ethernet Adapter for VMnet1"
3、找到后,添加一个“DWORD”值(32位),名称为“*NdisDeviceType”(*号是必须的),数据值改为“1”
4、重复第2步,找 VMnet8 ,再重复第3步,添加值。
5、重启机器
最后再加一句
如上配置后:1、如果主机与虚拟机之间ping不通,需要关闭防火墙后重试;
/etc/init.d/iptables stop
[root@mode ~]# more /etc/selinux/config
# This file controls the state of SELinux on the system.
# SELINUX= can take one of these three values:
#       enforcing - SELinux security policy is enforced.
#       permissive - SELinux prints warnings instead of enforcing.
#       disabled - SELinux is fully disabled.
SELINUX=enforcing
# SELINUXTYPE= type of policy in use. Possible values are:
#       targeted - Only targeted network daemons are protected.
#       strict - Full SELinux protection.
SELINUXTYPE=targeted
[root@mode ~#
修改SELINUX属性为disabled 即可关闭CentOS的安全机制
2、如果VM CentOS 与主机能互相ping通 但无法上网,可以查看网关配置是否正常
[root@mode ~]# route -n
Kernel IP routing table
Destination     Gateway         Genmask         Flags Metric Ref    Use Iface
192.168.92.0    0.0.0.0         255.255.255.0   U     0      0        0 eth0
169.254.0.0     0.0.0.0         255.255.0.0     U     0      0        0 eth0
可以尝试在CentoOs中配置网关:route add default gw 192.168.X.2 后重试。
[root@mode ~]# route add default gw 192.168.92.2
[root@mode ~]# route -n
Kernel IP routing table
Destination     Gateway         Genmask         Flags Metric Ref    Use Iface
192.168.92.0    0.0.0.0         255.255.255.0   U     0      0        0 eth0
169.254.0.0     0.0.0.0         255.255.0.0     U     0      0        0 eth0
0.0.0.0         192.168.92.2    0.0.0.0         UG    0      0        0 eth0
[root@mode ~]# ping www.baidu.com
PING www.a.shifen.com (163.177.151.109) 56(84) bytes of data.
64 bytes from 163.177.151.109: icmp_seq=1 ttl=128 time=8.92 ms
64 bytes from 163.177.151.109: icmp_seq=2 ttl=128 time=10.4 ms