一.pymysql模块的使用
1、pymysql的下载和使用
之前我们都是通过MySQL自带的命令行客户端工具mysql来操作数据库,那如何在python程序中操作数据库呢?这就用到了pymysql模块,该模块本质就是一个套接字客户端软件,使用前需要事先安装。
(1)pymysql模块的下载
pip3 install pymysql
(2)pymysql的使用
数据库和数据都已存在
# 实现:使用Python实现用户登录,如果用户存在则登录成功(假设该用户已在数据库中)


import pymysql
user = input('请输入用户名:')

pwd = input('请输入密码:')


# 1.连接
conn = pymysql.connect(host='127.0.0.1', port=3306, user='root', password='', db='db8', charset='utf8')


# 2.创建游标
cursor = conn.cursor()

#注意%s需要加引号
sql = "select * from userinfo where username='%s' and pwd='%s'" %(user, pwd)
print(sql)

# 3.执行sql语句
cursor.execute(sql)

result=cursor.execute(sql) #执行sql语句,返回sql查询成功的记录数目
print(result)


# 关闭连接,游标和连接都要关闭
cursor.close()
conn.close()

if result:
    print('登陆成功')
else:
    print('登录失败')
2、execute()之sql注入
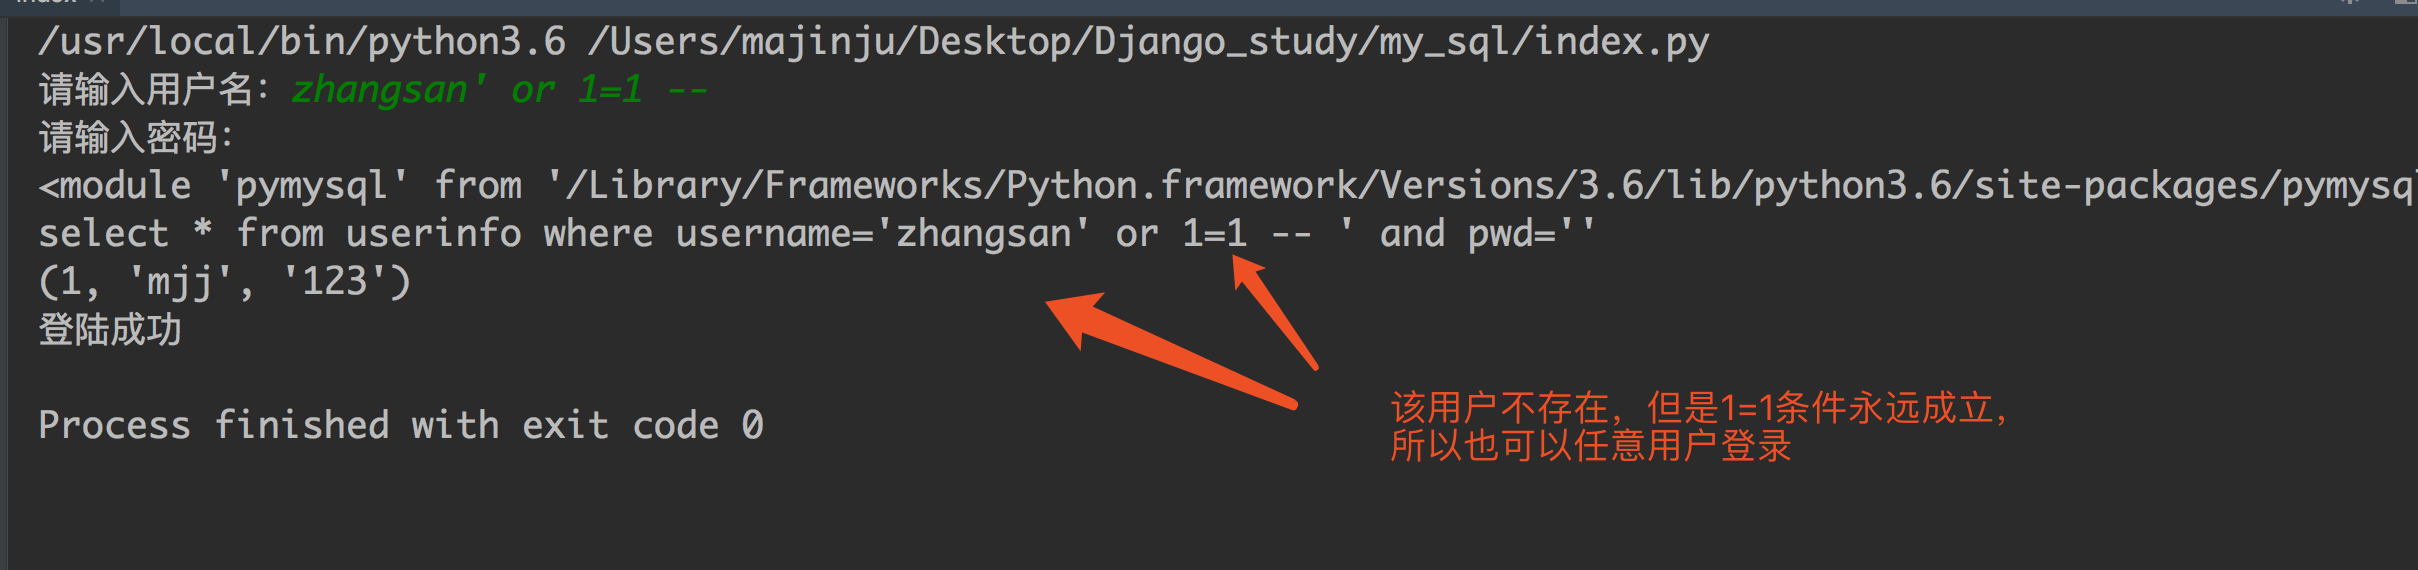
最后那一个空格,在一条sql语句中如果遇到select * from userinfo where username='mjj' -- asadasdas' and pwd='' 则--之后的条件被注释掉了(注意--后面还有一个空格)

#1、sql注入之:用户存在,绕过密码
mjj' -- 任意字符

#2、sql注入之:用户不存在,绕过用户与密码
xxx' or 1=1 -- 任意字符


解决方法:
# 原来是我们对sql进行字符串拼接
# sql="select * from userinfo where name='%s' and password='%s'" %(username,pwd)
# print(sql)
# result=cursor.execute(sql)

#改写为(execute帮我们做字符串拼接,我们无需且一定不能再为%s加引号了)
sql="select * from userinfo where name=%s and password=%s" #!!!注意%s需要去掉引号,因为pymysql会自动为我们加上
result=cursor.execute(sql,[user,pwd]) #pymysql模块自动帮我们解决sql注入的问题,只要我们按照pymysql的规矩来。
3、增、删、改:conn.commit()
commit()方法:在数据库里增、删、改的时候,必须要进行提交,否则插入的数据不生效。
import pymysql
username = input('请输入用户名:')

pwd = input('请输入密码:')


# 1.连接
conn = pymysql.connect(host='localhost', port=3306, user='root', password='', db='db8', charset='utf8')


# 2.创建游标
cursor = conn.cursor()


# 操作
# 增
# sql = "insert into userinfo(username,pwd) values (%s,%s)"


# effect_row = cursor.execute(sql,(username,pwd))
#同时插入多条数据
#cursor.executemany(sql,[('李四','110'),('王五','119')])

# print(effect_row)#

# 改
# sql = "update userinfo set username = %s  where id = 2"
# effect_row = cursor.execute(sql,username)
# print(effect_row)


# 删
sql = "delete from userinfo  where id = 2"
effect_row = cursor.execute(sql)
print(effect_row)


#一定记得commit
conn.commit()

# 4.关闭游标
cursor.close()

# 5.关闭连接
conn.close()

4、查:fetchone、fetchmany、fetchall
fetchone():获取下一行数据,第一次为首行;
fetchall():获取所有行数据源
fetchmany(4):获取4行数据
查看一下表内容:
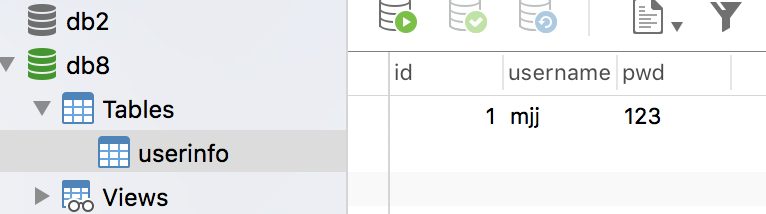
mysql> select * from userinfo;
+----+----------+-----+
| id | username | pwd |
+----+----------+-----+
|  1 | mjj      | 123 |
|  3 | 张三     | 110 |
|  4 | 李四     | 119 |
+----+----------+-----+
3 rows in set (0.00 sec)
使用fetchone():
import pymysql

# 1.连接
conn = pymysql.connect(host='localhost', port=3306, user='root', password='', db='db8', charset='utf8')


# 2.创建游标
cursor = conn.cursor()

sql = 'select * from userinfo'
cursor.execute(sql)


# 查询第一行的数据
row = cursor.fetchone()
print(row) # (1, 'mjj', '123')

# 查询第二行数据
row = cursor.fetchone()
print(row) # (3, '张三', '110')

# 4.关闭游标
cursor.close()

# 5.关闭连接
conn.close()
使用fetchall():
import pymysql

# 1.连接
conn = pymysql.connect(host='localhost', port=3306, user='root', password='', db='db8', charset='utf8')


# 2.创建游标
cursor = conn.cursor()

sql = 'select * from userinfo'
cursor.execute(sql)

# 获取所有的数据
rows = cursor.fetchall()
print(rows)

# 4.关闭游标
cursor.close()

# 5.关闭连接
conn.close()

#运行结果
((1, 'mjj', '123'), (3, '张三', '110'), (4, '李四', '119'))
默认情况下,我们获取到的返回值是元组,只能看到每行的数据,却不知道每一列代表的是什么,这个时候可以使用以下方式来返回字典,每一行的数据都会生成一个字典:
cursor = conn.cursor(cursor=pymysql.cursors.DictCursor) #在实例化的时候,将属性cursor设置为pymysql.cursors.DictCursor
在fetchone示例中,在获取行数据的时候,可以理解开始的时候,有一个行指针指着第一行的上方,获取一行,它就向下移动一行,所以当行指针到最后一行的时候,就不能再获取到行的内容,所以我们可以使用如下方法来移动行指针:
cursor.scroll(1,mode='relative')  # 相对当前位置移动
cursor.scroll(2,mode='absolute') # 相对绝对位置移动
第一个值为移动的行数,整数为向下移动,负数为向上移动,mode指定了是相对当前位置移动,还是相对于首行移动
# 1.Python实现用户登录
# 2.Mysql保存数据

import pymysql

# 1.连接
conn = pymysql.connect(host='localhost', port=3306, user='root', password='', db='db8', charset='utf8')


# 2.创建游标
cursor = conn.cursor(cursor=pymysql.cursors.DictCursor)

sql = 'select * from userinfo'
cursor.execute(sql)


# 查询第一行的数据
row = cursor.fetchone()
print(row) # (1, 'mjj', '123')

# 查询第二行数据
row = cursor.fetchone() # (3, '张三', '110')
print(row)

cursor.scroll(-1,mode='relative') #设置之后,光标相对于当前位置往前移动了一行,所以打印的结果为第二行的数据
row = cursor.fetchone()
print(row)

cursor.scroll(0,mode='absolute') #设置之后,光标相对于首行没有任何变化,所以打印的结果为第一行数据
row = cursor.fetchone()
print(row)

# 4.关闭游标
cursor.close()

# 5.关闭连接
conn.close()

#结果如下

{'id': 1, 'username': 'mjj', 'pwd': '123'}
{'id': 3, 'username': '张三', 'pwd': '110'}
{'id': 3, 'username': '张三', 'pwd': '110'}
{'id': 1, 'username': 'mjj', 'pwd': '123'}
fetchmany():
import pymysql

# 1.连接
conn = pymysql.connect(host='localhost', port=3306, user='root', password='', db='db8', charset='utf8')


# 2.创建游标
cursor = conn.cursor(cursor=pymysql.cursors.DictCursor)

sql = 'select * from userinfo'
cursor.execute(sql)


# 获取2条数据
rows = cursor.fetchmany(2)
print(rows)

# 4.关闭游标

# rows = cursor.fetchall()
# print(rows)
cursor.close()

# 5.关闭连接
conn.close()

#结果如下:
[{'id': 1, 'username': 'mjj', 'pwd': '123'}, {'id': 3, 'username': '张三', 'pwd': '110'}]
二.索引
1、索引的介绍
数据库中专门用于帮助用户快速查找数据的一种数据结构。类似于字典中的目录,查找字典内容时可以根据目录查找到数据的存放位置吗,然后直接获取。
2、索引的作用
约束和加速查找
3、常见的几种索引:
- 普通索引
- 唯一索引
- 主键索引
- 联合索引(多列)

   - 联合主键索引

  - 联合唯一索引
- 联合普通索引


无索引: 从前往后一条一条查询
有索引:创建索引的本质,就是创建额外的文件(某种格式存储,查询的时候,先去格外的文件找,定好位置,然后再去原始表中直接查询。但是创建索引越多,会对硬盘也是有损耗。

建立索引的目的:
a.额外的文件保存特殊的数据结构
b.查询快,但是插入更新删除依然慢
c.创建索引之后,必须命中索引才能有效
ash索引和BTree索引
(1)hash类型的索引:查询单条快,范围查询慢
(2)btree类型的索引:b+树,层数越多,数据量指数级增长(我们就用它,因为innodb默认支持它)
3.1 普通索引
作用:仅有一个加速查找
create table userinfo(
                   nid int not null auto_increment primary key,
                   name varchar(32) not null,
                   email varchar(64) not null,
                   index ix_name(name)
               );
create index 索引的名字 on 表名(列名)
drop index 索引的名字 on 表名
show index from 表名
3.2 唯一索引
唯一索引有两个功能:加速查找和唯一约束(可含null)
create table userinfo(
                   id int not null auto_increment primary key,
                   name varchar(32) not null,
                   email varchar(64) not null,
                   unique  index  ix_name(name)
               );
create unique index 索引名 on 表名(列名)
drop index 索引名 on 表名;
3.3 主键索引
主键索引有两个功能: 加速查找和唯一约束(不含null)
create table userinfo(

                   id int not null auto_increment primary key,
                   name varchar(32) not null,
                   email varchar(64) not null,
                   unique  index  ix_name(name)
           )
          or

           create table userinfo(

                   id int not null auto_increment,
                   name varchar(32) not null,
                   email varchar(64) not null,
                   primary key(nid),
                   unique  index  ix_name(name)
         )
alter table 表名 add primary key(列名);
alter table 表名 drop primary key;
alter table 表名  modify  列名 int, drop primary key;
3.4 组合索引
组合索引是将n个列组合成一个索引
其应用场景为:频繁的同时使用n列来进行查询,如:where name = 'alex' and email = '[email protected]'。
create index 索引名 on 表名(列名1,列名2);
4、索引名词
#覆盖索引:在索引文件中直接获取数据
        例如:
        select name from userinfo where name = 'alex50000';


#索引合并:把多个单列索引合并成使用
        例如:
        select * from  userinfo where name = 'alex13131' and id = 13131;
5、正确使用索引的情况
数据库表中添加索引后确实会让查询速度起飞,但前提必须是正确的使用索引来查询,如果以错误的方式使用,则即使建立索引也会不奏效。
使用索引,我们必须知道:
(1)创建索引
(2)命中索引
(3)正确使用索引
准备:
#1. 准备表
create table userinfo(
id int,
name varchar(20),
gender char(6),
email varchar(50)
);

#2. 创建存储过程,实现批量插入记录
delimiter $$ #声明存储过程的结束符号为$$
create procedure auto_insert1()
BEGIN
    declare i int default 1;
    while(i<3000000)do
        insert into userinfo values(i,concat('alex',i),'male',concat('egon',i,'@oldboy'));
        set i=i+1;
    end while;
END$$ #$$结束
delimiter ; #重新声明分号为结束符号

#3. 查看存储过程
show create procedure auto_insert1\G

#4. 调用存储过程
call auto_insert1();
测试:
     - like '%xx'
            select * from userinfo where name like '%al';
        - 使用函数
            select * from userinfo where reverse(name) = 'alex333';
        - or
            select * from userinfo where id = 1 or email = 'alex122@oldbody';
            特别的:当or条件中有未建立索引的列才失效,以下会走索引
                    select * from userinfo where id = 1 or name = 'alex1222';
                    select * from userinfo where id = 1 or email = 'alex122@oldbody' and name = 'alex112'
        - 类型不一致
            如果列是字符串类型,传入条件是必须用引号引起来,不然...
            select * from userinfo where name = 999;
        - !=
            select count(*) from userinfo where name != 'alex'
            特别的:如果是主键,则还是会走索引
                select count(*) from userinfo where id != 123
        - >
            select * from userinfo where name > 'alex'
            特别的:如果是主键或索引是整数类型,则还是会走索引
                select * from userinfo where id > 123
                select * from userinfo where num > 123
        - order by
            select email from userinfo order by name desc;
            当根据索引排序时候,选择的映射如果不是索引,则不走索引
            特别的:如果对主键排序,则还是走索引:
                select * from userinfo order by nid desc;

        - 组合索引最左前缀
            如果组合索引为:(name,email)
            name and email       -- 使用索引
            name                 -- 使用索引
            email                -- 不使用索引
什么是最左前缀呢?
最左前缀匹配:
        create index ix_name_email on userinfo(name,email);
                 select * from userinfo where name = 'alex';
                 select * from userinfo where name = 'alex' and email='alex@oldBody';

                 select * from userinfo where  email='alex@oldBody';

             如果使用组合索引如上,name和email组合索引之后,查询
             (1)name和email ---使用索引
             (2)name        ---使用索引
             (3)email       ---不适用索引
              对于同时搜索n个条件时,组合索引的性能好于多个单列索引
        ******组合索引的性能>索引合并的性能*********
6、索引的注意事项
       (1)避免使用select *
       (2)count(1)或count(列) 代替count(*)
       (3)创建表时尽量使用char代替varchar
       (4)表的字段顺序固定长度的字段优先
       (5)组合索引代替多个单列索引(经常使用多个条件查询时)
       (6)尽量使用短索引 (create index ix_title on tb(title(16));特殊的数据类型 text类型)
       (7)使用连接(join)来代替子查询
       (8)连表时注意条件类型需一致
       (9)索引散列(重复少)不适用于建索引,例如:性别不合适
7、执行计划
explain + 查询SQL - 用于显示SQL执行信息参数,根据参考信息可以进行SQL优化
mysql> explain select * from userinfo;
    +----+-------------+----------+------+---------------+------+---------+------+---------+-------+
    | id | select_type | table    | type | possible_keys | key  | key_len | ref  | rows    | Extra |
    +----+-------------+----------+------+---------------+------+---------+------+---------+-------+
    |  1 | SIMPLE      | userinfo | ALL  | NULL          | NULL | NULL    | NULL | 2973016 | NULL  |
    +----+-------------+----------+------+---------------+------+---------+------+---------+-------+

    mysql> explain select * from (select id,name from userinfo where id <20) as A;
    +----+-------------+------------+-------+---------------+---------+---------+------+------+-------------+
    | id | select_type | table      | type  | possible_keys | key     | key_len | ref  | rows | Extra       |
    +----+-------------+------------+-------+---------------+---------+---------+------+------+-------------+
    |  1 | PRIMARY     | <derived2> | ALL   | NULL          | NULL    | NULL    | NULL |   19 | NULL        |
    |  2 | DERIVED     | userinfo   | range | PRIMARY       | PRIMARY | 4       | NULL |   19 | Using where |
    +----+-------------+------------+-------+---------------+---------+---------+------+------+-------------+
    2 rows in set (0.05 sec)
参数说明:
select_type:
                查询类型
                    SIMPLE          简单查询
                    PRIMARY         最外层查询
                    SUBQUERY        映射为子查询
                    DERIVED         子查询
                    UNION           联合
                    UNION RESULT    使用联合的结果
table:
                正在访问的表名
type:
                查询时的访问方式,性能:all < index < range < index_merge < ref_or_null < ref < eq_ref < system/const
                ALL             全表扫描,对于数据表从头到尾找一遍
                                select * from userinfo;
                                特别的:如果有limit限制,则找到之后就不在继续向下扫描
                                       select * from userinfo where email = 'alex112@oldboy'
                                       select * from userinfo where email = 'alex112@oldboy' limit 1;
                                       虽然上述两个语句都会进行全表扫描,第二句使用了limit,则找到一个后就不再继续扫描。

INDEX :      全索引扫描,对索引从头到尾找一遍
                                select nid from userinfo;

RANGE:        对索引列进行范围查找
                                select *  from userinfo where name < 'alex';
                                PS:
                                    between and
                                    in
                                    >   >=  <   <=  操作
                                    注意:!= 和 > 符号


INDEX_MERGE:  合并索引,使用多个单列索引搜索
                                select *  from userinfo where name = 'alex' or nid in (11,22,33);

REF:       根据索引查找一个或多个值
                                select *  from userinfo where name = 'alex112';

EQ_REF:    连接时使用primary key 或 unique类型
                                select userinfo2.id,userinfo.name from userinfo2 left join tuserinfo on userinfo2.id = userinfo.id;


CONST:常量
            表最多有一个匹配行,因为仅有一行,在这行的列值可被优化器剩余部分认为是常数,const表很快,因为它们只读取一次。
                 select id from userinfo where id = 2 ;

SYSTEM:系统
             表仅有一行(=系统表)。这是const联接类型的一个特例。
                 select * from (select id from userinfo where id = 1) as A;


possible_keys:可能使用的索引

key:真实使用的

key_len:  MySQL中使用索引字节长度

rows: mysql估计为了找到所需的行而要读取的行数 ------ 只是预估值

extra:
                该列包含MySQL解决查询的详细信息
                “Using index”
                    此值表示mysql将使用覆盖索引,以避免访问表。不要把覆盖索引和index访问类型弄混了。
                “Using where”
                    这意味着mysql服务器将在存储引擎检索行后再进行过滤,许多where条件里涉及索引中的列,当(并且如果)它读取索引时,就能被存储引擎检验,因此不是所有带where子句的查询都会显示“Using where”。有时“Using where”的出现就是一个暗示:查询可受益于不同的索引。
                “Using temporary”
                    这意味着mysql在对查询结果排序时会使用一个临时表。
                “Using filesort”
                    这意味着mysql会对结果使用一个外部索引排序,而不是按索引次序从表里读取行。mysql有两种文件排序算法,这两种排序方式都可以在内存或者磁盘上完成,explain不会告诉你mysql将使用哪一种文件排序,也不会告诉你排序会在内存里还是磁盘上完成。
                “Range checked for each record(index map: N)”
                   这个意味着没有好用的索引,新的索引将在联接的每一行上重新估算,N是显示在possible_keys列中索引的位图,并且是冗余的
8、慢日志记录
开启慢查询日志,可以让MySQL记录下查询超过指定时间的语句,通过定位分析性能的瓶颈,才能更好的优化数据库系统的性能。
(1) 进入MySql 查询是否开了慢查询
         show variables like 'slow_query%';
         参数解释:
             slow_query_log 慢查询开启状态  OFF 未开启 ON 为开启
        slow_query_log_file 慢查询日志存放的位置(这个目录需要MySQL的运行帐号的可写权限,一般设置为MySQL的数据存放目录)

(2)查看慢查询超时时间
       show variables like 'long%';
       ong_query_time 查询超过多少秒才记录   默认10秒

(3)开启慢日志(1)(是否开启慢查询日志,1表示开启,0表示关闭。)
           set global slow_query_log=1;
(4)再次查看
              show variables like '%slow_query_log%';

(5)开启慢日志(2):(推荐)
         在my.cnf 文件中
         找到[mysqld]下面添加:
           slow_query_log =1
        slow_query_log_file=C:\mysql-5.6.40-winx64\data\localhost-slow.log
         long_query_time = 1

    参数说明:
        slow_query_log 慢查询开启状态  1 为开启
        slow_query_log_file 慢查询日志存放的位置
        long_query_time 查询超过多少秒才记录   默认10秒 修改为1秒
9、分页性能相关方案
先回顾一下,如何取当前表中的前10条记录,每十条取一次......
第1页:
select * from userinfo limit 0,10;
第2页:
select * from userinfo limit 10,10;
第3页:
select * from userinfo limit 20,10;
第4页:
select * from userinfo limit 30,10;
......
第2000010页
select * from userinfo limit 2000000,10;

PS:会发现,越往后查询,需要的时间约长,是因为越往后查,全文扫描查询,会去数据表中扫描查询。
最优的解决方案
(1)只有上一页和下一页
        做一个记录:记录当前页的最大id或最小id
        下一页:
        select * from userinfo where id>max_id limit 10;

        上一页:
        select * from userinfo where id<min_id order by id desc limit 10;


  (2) 中间有页码的情况
           select * from userinfo where id in(
               select id from (select * from userinfo where id > pre_max_id limit (cur_max_id-pre_max_id)*10) as A order by A.id desc limit 10
           );