文章目录
1、背景介绍
随着 Go 语言的流行,越来越多的公司和开发人员在工作中使用该语言开发项目,上一篇文章 使用 Jenkins 执行 Go 工程构建镜像 中,提到使用
go get命令时,出现的一些列问题,让人很是抓狂,所以迫切需要一款可以很好管理 Go 依赖的工具。Dep 是 Go 官方依赖管理工具,通过它,我们可以很方便的管理 Go 项目依赖,同时还可以指定私有库依赖,非常好用。
2、环境、软件准备
本次演示环境,我是在本机 MAC OS 上操作,以下是安装的软件及版本:
- Dep: v0.4.1
- Go: 1.10.3
注意:Dep 作为 Go 语言项目的依赖管理工具,那么需要在本机安装好 Go 环境,这里忽略 Go 的安装过程,详细过程可参考 Go 官网 文档,这里着重介绍下 Dep 安装以及依赖管理配置操作。
3、Dep 安装
Dep 作为 Go 官方依赖管理工具,它依赖 Go 环境版本 >= 1.9,其安装方式也很简单,针对不同的系统环境,安装方式也不一样。
3.1、MacOS 系统
针对 MacOS 系统,我们可以采用 HomeBrew 来进行安装。
# 安装 dep
$ brew install dep
# 升级 dep
$ brew upgrade dep
安装完毕后,可以使用 dep version 查看版本信息,确认是否正确安装。
$ dep version
dep:
 version     : v0.4.1
 build date  : 2018-01-27
 git hash    : 37d9ea0
 go version  : go1.9.3
 go compiler : gc
 platform    : darwin/amd64
注意: 这里最新的 dep 版本已经更新到 v0.5.0 了,我本地安装的版本 v0.4.1,因为网络问题,我执行升级 Dep 时失败了。。。不过没关系,暂时不影响我们使用。
3.2、Linux 等其他系统
针对其他系统,Dep 官网提供了适配脚本 install.sh 来帮助我们源码安装。
$ curl https://raw.githubusercontent.com/golang/dep/master/install.sh | sh
3.3、go get 安装方式
当然,如果上述方式都不支持或者想在开发模式下使用 Dep,那么可以采用 go get 安装。
$ go get -u github.com/golang/dep/cmd/dep
4、Dep 配置文件说明
Dep 安装完毕,接下来创建一个 Go 测试项目 deptest,执行一下 dep init 操作,看看会出现些啥东西吧!
$ cd $GOPATH/src/
$ mkdir deptest && cd deptest
$ dep init
$ ls -alt
drwxr-xr-x   5 wanyang3  staff  170 10 12 15:53 .
-rw-r--r--   1 wanyang3  staff  286 10 12 15:53 Gopkg.lock
-rw-r--r--   1 wanyang3  staff  666 10 12 15:53 Gopkg.toml
drwxr-xr-x   2 wanyang3  staff   68 10 12 15:53 vendor
我们发现,在当前项目下生成了 Gopkg.lock 和 Gopkg.toml 文件以及 vendor 文件夹,它们三者的关系如下图:
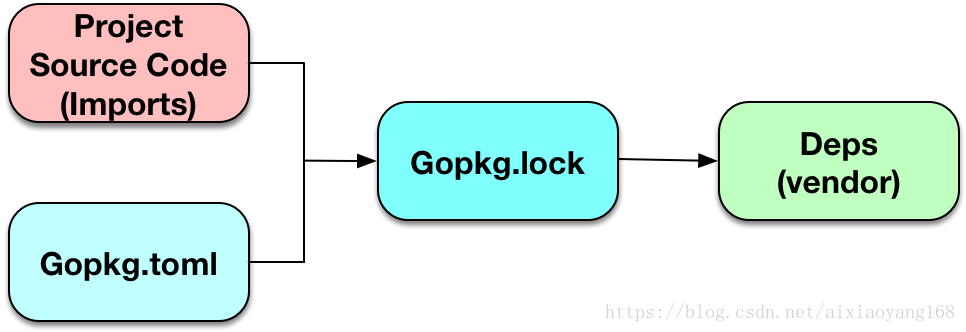
简单介绍下三者主要作用:
- Gopkg.toml:是 Dep 依赖管理的主要配置文件,它既可以根据代码自动生成,也可以手动配置。配置文件中包含
[[constraint]]、[[override]]、[prune]、required、ignored等配置项,它们分别有不同作用,详细可以参考 这里。 - Gopkg.lock:是 Dep 根据
Gopkg.toml配置的依赖自动生成的文件,不需要手工维护。详细可以参考 这里 - vendor:该目录是 golang 依赖管理目录,默认会优先加载该目录的依赖代码,Dep 默认会将项目依赖拉取到该目录。
执行完 dep init 后,默认生成的 Gopkg.toml 文件如下:
# Gopkg.toml example
#
# Refer to https://github.com/golang/dep/blob/master/docs/Gopkg.toml.md
# for detailed Gopkg.toml documentation.
#
# required = ["github.com/user/thing/cmd/thing"]
# ignored = ["github.com/user/project/pkgX", "bitbucket.org/user/project/pkgA/pkgY"]
#
# [[constraint]]
#   name = "github.com/user/project"
#   version = "1.0.0"
#
# [[constraint]]
#   name = "github.com/user/project2"
#   branch = "dev"
#   source = "github.com/myfork/project2"
#
# [[override]]
#   name = "github.com/x/y"
#   version = "2.4.0"
#
# [prune]
#   non-go = false
#   go-tests = true
#   unused-packages = true

[prune]
  go-tests = true
  unused-packages = true
我们可以看到示例文件中分别包含了几个关键配置项,简单介绍下各配置项的作用吧!
constraints、overrides属于依赖配置规则项,通过它用户可以配置项目依赖的版本、分支、源信息等以及依赖项配置继承传递信息。required、ignored属于包管理视图规则项,通过它用户可以通过导入或者排除导入的路径来操作导入的视图。prune设置确定将什么文件或者目录视为不必要的,从而从 vendor 目录中自动删除。metadata该项上边默认文件没有显示,它主要用来用户自定义 Key-Value 键值对,不过 Dep 会忽略这些值。noverify该项上边默认文件也没有显示,它主要用来设置跳过 vendor 验证的项目根目录列表。
5、使用 Dep 进行依赖管理
接下来,我们来使用 Dep 进行依赖管理。先修改一下 Gopkg.toml,增加一个之前使用过的依赖 astaxie/beego,配置文件如下:
$ vim Gopkg.toml
# 约束条件
[[constraint]]
  name = "github.com/astaxie/beego"
  # 指定版本,不写默认拉取最新版本,可不写
  version = "=1.9.0"
  # 指定分支,不写默认为 master
  #branch = "master"
  # 修订,可不写
  #revision = "beego 1.9.0"
  # 指定来源,也可不写
   source = "github.com/astaxie/beego"

[prune]
  go-tests = true
  unused-packages = true
接下来,执行一下 dep ensure 命令,来执行同步操作。
$ dep ensure
no dirs contained any Go code
提示说当前目录没有任何 Go 代码。这里我们虽然指定了依赖,但还没有创建 Go 文件引用呢!那么创建一个 Go 代码引用 beego 包如下。
$ vim main.go
package main

import (
	"fmt"
	"github.com/astaxie/beego"
)

func main() {
	fmt.Println("do call method from github.com/astaxie/beego")
	beego.Run()
}
再次执行一下 dep ensure -v 命令,看下执行结果吧! (注意:建议加上 -v参数会将执行过程打印出来,方便了解其执行原理。)
$ dep ensure -v
Root project is "deptest"
 1 transitively valid internal packages
 1 external packages imported from 1 projects
(0)   ✓ select (root)
(1)	? attempt github.com/astaxie/beego with 1 pkgs; 27 versions to try
(1)	    try github.com/astaxie/[email protected]
(2)	✗   github.com/astaxie/[email protected] not allowed by constraint 1.9.0:
(2)	    1.9.0 from (root)
(1)	    try github.com/astaxie/[email protected]
(2)	✗   github.com/astaxie/[email protected] not allowed by constraint 1.9.0:
(2)	    1.9.0 from (root)
(1)	    try github.com/astaxie/[email protected]
(2)	✗   github.com/astaxie/[email protected] not allowed by constraint 1.9.0:
(2)	    1.9.0 from (root)
(1)	    try github.com/astaxie/[email protected]
(1)	✓ select github.com/astaxie/[email protected] w/9 pkgs
  ✓ found solution with 9 packages from 1 projects

Solver wall times by segment:
  b-source-exists: 16.774759719s
      b-list-pkgs:  241.183443ms
           b-gmal:  167.059009ms
          satisfy:    3.602636ms
      select-atom:    1.005801ms
         new-atom:      505.09µs
  b-list-versions:     353.055µs
      select-root:       70.85µs
       b-pair-rev:      41.997µs
            other:      12.103µs
        b-matches:        7.25µs
   b-pair-version:       2.314µs

  TOTAL: 17.188603267s

(1/1) Wrote github.com/astaxie/[email protected]
根据打印的执行日志可以看到,其指定版本匹配过程。因为我们上边指定了 version = "=1.9.0",即限定只能使用 1.9.0 版本,所以 Dep 会逐个匹配版本,直至匹配到为止。这里提一下 Gopkg.toml 的 version 规则。如果上边不指定 version = "=1.9.0" 而是 version = "1.9.0",那么 Dep 会默认会在左侧加上 ^ (像这样 version = "^1.9.0"),它表示的版本区间为 1.9.0 <= version < 2.0.0,它的规则为最左边的非零位的版本 +1,其他位变为 0(如果非零位为最后一位,则前一位 +1,其他位变为 0),什么意思呢?看下如下示例:
^1.2.3 区间为 1.2.3 <= X < 2.0.0
^0.2.3 区间为 0.2.3 <= X < 0.3.0
^0.0.3 区间为 0.0.3 <= X < 0.1.0
当然,version 还有更多符号来匹配版本区间值,例如 !=、>、<、>=、<=、-、~ 等,详细配置可以参考 这里。
好了,回归正题,执行完毕,我们会发现在 vendor 目录下自动下载好了指定版本的依赖了。
$ tree -a
.
├── Gopkg.lock
├── Gopkg.toml
├── main.go
└── vendor
    └── github.com
        └── astaxie
            └── beego
                ├── .gitignore
                ├── .gosimpleignore
                ├── .travis.yml
                ├── CONTRIBUTING.md
                ├── LICENSE
                ├── README.md
                ├── admin.go
                ......
如果,我们想修改依赖的 beego 版本,例如升级 beego 版本到 1.9.2,该如何操作呢?很简单,首先修改 Gopkg.toml 文件的 [[constraint]] 版本为 version = "=1.9.2",然后执行 dep ensure -update -v 即可。
$ dep ensure -update -v
Root project is "deptest"
 1 transitively valid internal packages
 1 external packages imported from 1 projects
(0)   ✓ select (root)
(1)	? attempt github.com/astaxie/beego with 1 pkgs; 27 versions to try
(1)	    try github.com/astaxie/[email protected]
(2)	✗   github.com/astaxie/[email protected] not allowed by constraint 1.9.2:
(2)	    1.9.2 from (root)
(1)	    try github.com/astaxie/[email protected]
(2)	✗   github.com/astaxie/[email protected] not allowed by constraint 1.9.2:
(2)	    1.9.2 from (root)
(1)	    try github.com/astaxie/[email protected]
(1)	✓ select github.com/astaxie/[email protected] w/9 pkgs
  ✓ found solution with 9 packages from 1 projects

Solver wall times by segment:
  b-source-exists: 4.930954758s
      b-list-pkgs: 4.691861213s
           b-gmal:  216.38495ms
      select-atom:   1.318051ms
       b-pair-rev:   1.303336ms
          satisfy:   1.050234ms
         new-atom:    154.474µs
      select-root:     62.735µs
  b-list-versions:      30.62µs
            other:     24.773µs
        b-matches:       8.54µs
   b-pair-version:      1.467µs

  TOTAL: 9.843155151s
如果,我们想增加一个新的依赖,该怎么办呢?三种方法,一是直接在代码中 import,然后重新执行 dep ensure -v 会自动增加,二是直接修改 Gopkg.toml 增加新的 [[constraint]] 配置依赖,三是使用 dep ensure -add 命令增加新的依赖,那接下来演示一下第三种方式吧!
$ dep ensure -add github.com/bitly/go-simplejson@=0.5.0
Fetching sources...

"github.com/bitly/go-simplejson" is not imported by your project, and has been temporarily added to Gopkg.lock and vendor/.
If you run "dep ensure" again before actually importing it, it will disappear from Gopkg.lock and vendor/.
说明一下,这里 @=0.5.0 指定依赖版本为 0.5.0,可不填,不填默认拉取最新版本。不过打印的日志提示该依赖未被我们项目引用,如果此时运行 dep ensure,那么该依赖将会从 Gopkg.lock 和 vendor 目录删除。这也是 Dep 的机制之一,自动删除未被引用的依赖。看下 Gopkg.toml 和 Gopkg.lock 以及 vendor目录分别增加了什么内容。
$ cat Gopkg.toml
......
[[constraint]]
  name = "github.com/bitly/go-simplejson"
  version = "=0.5.0"

$ cat Gopkg.lock
......
[[projects]]
  name = "github.com/bitly/go-simplejson"
  packages = ["."]
  revision = "aabad6e819789e569bd6aabf444c935aa9ba1e44"
  version = "v0.5.0"

$ tree -L 3 vendor/
vendor/
└── github.com
    ├── astaxie
    │   └── beego
    └── bitly
        └── go-simplejson
可以看到 Dep 自动帮我们修改了配置文件以及下载指定版本依赖了,非常方便,接下来,在 main.go 文件中 import 该 go-simplejson 依赖。
package main

import (
	"fmt"
	"github.com/astaxie/beego"
	"github.com/bitly/go-simplejson"
)

func main() {
	fmt.Println("do call method from github.com/bitly/go-simplejson")
	strJson := `{"name": "wanyang3", "address": "beijing china"}`
	mapJson, _ := simplejson.NewJson([]byte(strJson))
	name, _ := mapJson.Get("name").String()
	address, _ := mapJson.Get("address").String()
	fmt.Printf("name: %s, address: %s\n", name, address)

	fmt.Println("do call method from github.com/astaxie/beego")
	beego.Run()
}
此时,我们再次执行 dep ensure -v 看下过程,会提示已经同步了,不需要再次拉取依赖。
$ dep ensure -v
Gopkg.lock was already in sync with imports and Gopkg.toml
(1/2) Wrote github.com/bitly/[email protected]
(2/2) Wrote github.com/astaxie/[email protected]
运行一下该程序,看下日志输出,妥妥没问题的。
$ bee run
______
| ___ \
| |_/ /  ___   ___
| ___ \ / _ \ / _ \
| |_/ /|  __/|  __/
\____/  \___| \___| v1.9.1
2018/10/16 11:23:41 INFO     ▶ 0001 Using 'deptest' as 'appname'
2018/10/16 11:23:41 INFO     ▶ 0002 Initializing watcher...
deptest
2018/10/16 11:23:43 SUCCESS  ▶ 0003 Built Successfully!
2018/10/16 11:23:43 INFO     ▶ 0004 Restarting 'deptest'...
2018/10/16 11:23:43 SUCCESS  ▶ 0005 './deptest' is running...
do call method from github.com/bitly/go-simplejson
name: wanyang3, address: beijing china
do call method from github.com/astaxie/beego
2018/10/16 11:23:43.652 [I] http server Running on http://:8080
6、使用 Dep 依赖私有库配置
上边演示的都是依赖别人写好的 github.com 上边的依赖库,有些时候,我们可能需要依赖自己开发的或者公司内部开发的依赖库,存放在公司内部代码管理平台上(例如:Gitlab),但又不想放在 Github 上的时候,Dep 能帮我们搞定吗?答案是肯定的,Dep 可以配置私有库依赖。在这之前,我们先来演示一下,如何在项目中依赖自己在 Github 上的开源库。
6.1 使用 Dep 配置自定义 (Github) 依赖
首先,需要我们去 github 上创建一个 repository ,这里忽略创建过程,详细可参考 这里。这里我创建一个测试 huwanyang/helloword 仓库,创建 Go 代码如下:
$ vim sayhelloworld.go
package helloworld

import "fmt"

func SayHelloWorld() {
	fmt.Println("Hello world!")
}

func Version() string {
	return "v1.0.0"
}

func SayOther(str string) {
	fmt.Printf("Saying: %s\n", str)
}
然后,在本地测试项目 main.go 中 import 该依赖库。注意:这里我不使用上边 dep ensure -add 方式添加依赖,来演示一下 Dep 自动增加依赖配置方式。
$ cat main.go
package main

import (
	"fmt"
	"github.com/astaxie/beego"
	"github.com/bitly/go-simplejson"
	"github.com/huwanyang/helloword"
)

func main() {
	fmt.Println("do call method from github.com/bitly/go-simplejson")
	strJson := `{"name": "wanyang3", "address": "beijing china"}`
	mapJson, _ := simplejson.NewJson([]byte(strJson))
	name, _ := mapJson.Get("name").String()
	address, _ := mapJson.Get("address").String()
	fmt.Printf("name: %s, address: %s\n", name, address)

	fmt.Println("do call method from github.com/huwanyang/helloWord")
	helloworld.SayHelloWorld()
	helloworld.SayOther("go dep test")
	fmt.Printf("Version: %s\n", helloworld.Version())

	fmt.Println("do call method from github.com/astaxie/beego")
	beego.Run()
}
接下来,执行一下 dep ensure -v 命令看下执行过程输出,看下是否有问题。
$ dep ensure -v
Root project is "deptest"
 1 transitively valid internal packages
 3 external packages imported from 3 projects
(0)   ✓ select (root)
(1)	? attempt github.com/astaxie/beego with 1 pkgs; at least 1 versions to try
(1)	    try github.com/astaxie/[email protected]
(1)	✓ select github.com/astaxie/[email protected] w/9 pkgs
(2)	? attempt github.com/bitly/go-simplejson with 1 pkgs; at least 1 versions to try
(2)	    try github.com/bitly/[email protected]
(2)	✓ select github.com/bitly/[email protected] w/1 pkgs
(3)	? attempt github.com/huwanyang/helloword with 1 pkgs; 1 versions to try
(3)	    try github.com/huwanyang/helloword@master
(3)	✓ select github.com/huwanyang/helloword@master w/1 pkgs
  ✓ found solution with 11 packages from 3 projects

Solver wall times by segment:
     b-source-exists:  8.95597773s
         b-list-pkgs:  637.47607ms
              b-gmal: 535.441868ms
         select-atom:   3.463791ms
     b-list-versions:   1.902083ms
             satisfy:    931.748µs
            new-atom:    208.606µs
         select-root:     95.907µs
               other:     28.605µs
  b-deduce-proj-root:      3.358µs

  TOTAL: 10.135529766s

(1/3) Wrote github.com/huwanyang/helloword@master
(2/3) Wrote github.com/bitly/[email protected]
(3/3) Wrote github.com/astaxie/[email protected]
没有问题,不过可以看到它跟另外两个依赖不同的就是,它是拉取了 master 分支,而另外两个依赖是指定的版本,当然,如果我们给仓库打一个版本标签,这里也可以指定固定版本依赖。看下 Gopkg.toml 和 Gopkg.lock,以及 vendor 目录分别自动增加了什么内容。
$ cat Gopkg.toml
# 没有增加任何配置

$ cat Gopkg.lock
......
[[projects]]
  branch = "master"
  name = "github.com/huwanyang/helloword"
  packages = ["."]
  revision = "3031802d694e616755844a4959c0c42f07333d17"

$ tree -L 3 vendor/
vendor/
└── github.com
    ├── astaxie
    │   └── beego
    ├── bitly
    │   └── go-simplejson
    └── huwanyang
        └── helloword
我们发现 Gopkg.toml 文件没有增加任何配置,但是 Gopkg.lock 里面已经自动增加了依赖配置信息,Dep 最终是读取了 Gopkg.lock 里面的依赖配置。所以这种方式,会出现两个文件看起来配置不太一样。建议大家采用:方式二直接修改 Gopkg.toml 增加新的 [[constraint]] 配置依赖,方式三使用 dep ensure -add 命令增加新的依赖。
6.2 使用 Dep 配置私有库 (Gitlab) 依赖
接下来,继续演示如何使用 Dep 配置私有库依赖。因为公司采用的是 Gitlab 作为代码管理仓库,那么我们就在 Gitlab 上创建一个依赖库,项目名称依旧为 helloword,项目地址为 http://gitlab.xxx.com/wanyang3/helloword.git,这里忽略创建过程,详细可参考 这里,创建 Go 代码如下:
$ vim helloword.go
package helloworld

import "fmt"

func SayHelloWorld() {
	fmt.Println("Gitlab Hello world!")
}

func Version() string {
	return "v2.0.0"
}

func SayOther(str string) {
	fmt.Printf("Gitlab Saying: %s\n", str)
}
然后,修改 Gopkg.toml 文件,增加私有依赖配置如下。
$ vim Gopkg.toml
......
[[constraint]]
  name = "gitlab.xxx.com/wanyang3/helloword"
  branch = "master"
  source = "http://gitlab.xxx.com/wanyang3/helloword.git"
这里提一下,我指定了 [[constraint]] 下边的 source 字段为上边创建的私有库依赖项目地址,目的就是让 Dep 去指定的源获取依赖。接下来,我们在 main.go 文件中 import 该库。
package main

import (
	"github.com/astaxie/beego"
	"github.com/bitly/go-simplejson"
	gitlab "gitlab.xxx.com/wanyang3/helloword"
	github "github.com/huwanyang/helloword"
	"fmt"
)

func main() {
	fmt.Println("1. do call method from github.com/bitly/go-simplejson")
	strJson := `{"name": "wanyang3", "address": "beijing china"}`
	mapJson, _ := simplejson.NewJson([]byte(strJson))
	name, _ := mapJson.Get("name").String()
	address, _ := mapJson.Get("address").String()
	fmt.Printf("name: %s, address: %s\n", name, address)

	fmt.Println("2. do call method from github.com/huwanyang/helloWord")
	github.SayHelloWorld()
	github.SayOther("go dep test")
	fmt.Printf("Version: %s\n", github.Version())

	fmt.Println("3. do call method from gitlab.xxx.com/wanyang3/helloword")
	gitlab.SayHelloWorld()
	gitlab.SayOther("go dep test")
	fmt.Printf("Version: %s\n", gitlab.Version())

	fmt.Println("4. do call method from github.com/astaxie/beego")
	beego.Run()}
说明一下,因为这里 github 跟 gitlab 上两个仓库包名都为 helloworld,所以 import 之后为了区分二者,我采用别名方式来调用。接下来,执行一下 dep ensure -v 命令看下执行过程输出。
$ dep ensure -v
Root project is "deptest"
 1 transitively valid internal packages
 4 external packages imported from 4 projects
(0)   ✓ select (root)
(1)	? attempt github.com/astaxie/beego with 1 pkgs; at least 1 versions to try
(1)	    try github.com/astaxie/[email protected]
(1)	✓ select github.com/astaxie/[email protected] w/9 pkgs
(2)	? attempt github.com/huwanyang/helloword with 1 pkgs; at least 1 versions to try
(2)	    try github.com/huwanyang/helloword@master
(2)	✓ select github.com/huwanyang/helloword@master w/1 pkgs
(3)	? attempt github.com/bitly/go-simplejson with 1 pkgs; at least 1 versions to try
(3)	    try github.com/bitly/[email protected]
(3)	✓ select github.com/bitly/[email protected] w/1 pkgs
(4)	? attempt gitlab.xxx.com/wanyang3/helloword (from http://gitlab.xxx.com/wanyang3/helloword.git) with 1 pkgs; 1 versions to try
(4)	    try gitlab.xxx.com/wanyang3/helloword (from http://gitlab.xxx.com/wanyang3/helloword.git)@master
(4)	✓ select gitlab.xxx.com/wanyang3/helloword (from http://gitlab.xxx.com/wanyang3/helloword.git)@master w/1 pkgs
  ✓ found solution with 12 packages from 4 projects

Solver wall times by segment:
     b-source-exists: 10.40748019s
         b-list-pkgs: 775.690832ms
              b-gmal: 683.544779ms
             satisfy:   1.088152ms
         select-atom:    899.464µs
            new-atom:    328.243µs
         select-root:    149.888µs
               other:     45.723µs
     b-list-versions:      20.77µs
  b-deduce-proj-root:      6.567µs

  TOTAL: 11.869254608s

(1/4) Wrote github.com/huwanyang/helloword@master
(2/4) Wrote github.com/bitly/[email protected]
(3/4) Wrote gitlab.xxx.com/wanyang3/helloword (from http://gitlab.xxx.com/wanyang3/helloword.git)@master
(4/4) Wrote github.com/astaxie/[email protected]
注意:执行该步骤时,本地 Mac 上会弹出来一个确认框,目的是为了获取第三方依赖库权限认证信息(当然前提是你第三方依赖库开启了权限认证),因为我本地 git 配置了 credential.helper=osxkeychain 项保存认证信息,所以弹出框提示确认从 osxkeychain 获取认证信息,点击始终允许即可。如果不是这种配置,应该会出现弹出框让输入第三方依赖库登录账户和密码。
OK 没有问题,看下 Gopkg.lock 和 vendor 目录分别自动增加了什么内容。
$ cat Gopkg.lock
......
[[projects]]
  branch = "master"
  name = "gitlab.xxx.com/wanyang3/helloword"
  packages = ["."]
  revision = "95f80350de8c1f5904dee97a23aa4ce5d6a29761"
  source = "http://gitlab.xxx.com/wanyang3/helloword.git"

$ tree -L 3 vendor/
vendor/
├── gitlab.xxx.com
│   └── wanyang3
│       └── helloword
└── github.com
    ├── astaxie
    │   └── beego
    ├── bitly
    │   └── go-simplejson
    └── huwanyang
        └── helloword
最后,启动一下该项目,看下日志输出是否正确吧! 妥妥没问题的!
$ bee run
______
| ___ \
| |_/ /  ___   ___
| ___ \ / _ \ / _ \
| |_/ /|  __/|  __/
\____/  \___| \___| v1.9.1
2018/10/16 15:27:27 INFO     ▶ 0001 Using 'deptest' as 'appname'
2018/10/16 15:27:27 INFO     ▶ 0002 Initializing watcher...
deptest/vendor/gitlab.xxx.com/wanyang3/helloword
deptest
2018/10/16 15:27:29 SUCCESS  ▶ 0003 Built Successfully!
2018/10/16 15:27:29 INFO     ▶ 0004 Restarting 'deptest'...
2018/10/16 15:27:29 SUCCESS  ▶ 0005 './deptest' is running...
1. do call method from github.com/bitly/go-simplejson
name: wanyang3, address: beijing china
2. do call method from github.com/huwanyang/helloWord
Hello world!
Saying: go dep test
Version: v1.0.0
3. do call method from gitlab.xxx.com/wanyang3/helloword
Gitlab Hello world!
Gitlab Saying: go dep test
Version: v2.0.0
4. do call method from github.com/astaxie/beego
2018/10/16 15:27:29.764 [I] http server Running on http://:8080
参考资料