mysql 复制原理可参考https://blog.csdn.net/qq_16399991/article/details/82749333
环境说明
服务器以前已经安装了msyql5.5,使用3306端口,安装目录为: /usr/local/data/mysql 。为了不影响以前服务 ,我启用3307端口作为主库,使用3308端口作为从库。
一.一台mysql服务启动多个端口
可参考http://blog.chinaunix.net/uid-25266990-id-3320868.html
1.创建数据库指定存放数据的目录
我将3307 放在/usr/local/data/mysqlCluster/mysql3307 目录下
2.首先要先把my.cnf配置文件复制一份,开几个端口要复制几份
root:[/usr/local/data/mysqlCluster/mysql3307]pwd
/usr/local/data/mysqlCluster/mysql3307
root:[/usr/local/data/mysqlCluster/mysql3307]cp /etc/my.cnf ./
3.创建数据库指定存放数据的目录
root@iZ:[/usr/local/data/mysqlCluster/mysql3307]mkdir data
#创建完成后目录结构如下
root@iZ23iuzu9fvZ:[/usr/local/data/mysqlCluster/mysql3307]ls
data  my.cnf
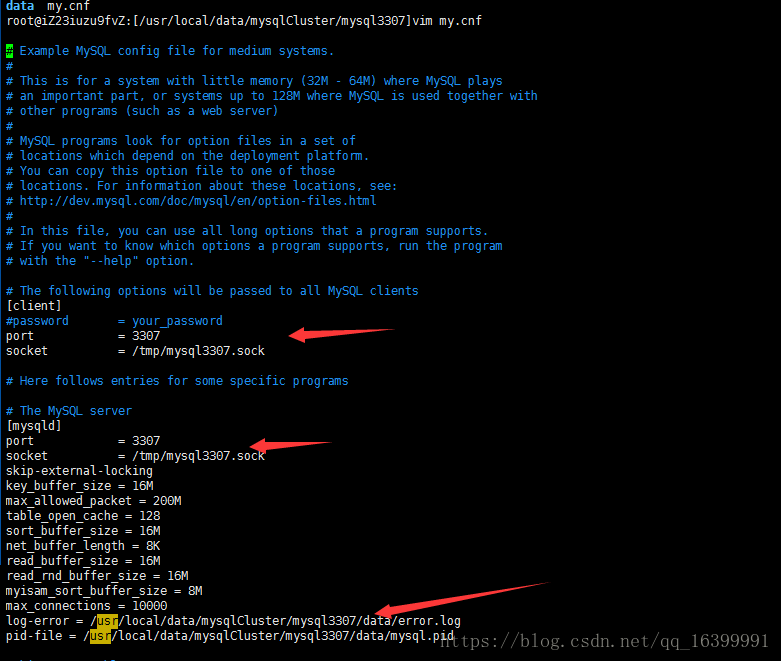
4.修改my.cnf 文件把默认的3306端口改成 3307
其中涉及多处都有修改,需仔细检查下。server id 不能相同。
5.初始化数据库
root@iZ23iuzu9fvZ:[/usr/local/data/mysqlCluster/mysql3307]/usr/local/data/mysql/scripts/mysql_install_db  --datadir=/usr/local/data/mysqlCluster/mysql3307/data/  --user=mysql --basedir=/usr/local/data/mysql
Installing MySQL system tables...
OK
Filling help tables...
OK
......6.启动mysql,要指定.cnf文件和目录启动
root@iZ:[/usr/local/data/mysqlCluster]/usr/local/data/mysql/bin/mysqld_safe --defaults-extra-file=/usr/local/data/mysqlCluster/mysql3307/my.cnf --datadir=/usr/local/data/mysqlCluster/mysql3307/data/ --user=mysql &
[1] 10402
##启动成功
停止MYSQL,对应的sock文件。
/usr/local/mysql/bin/mysqladmin -uroot -S /tmp/mysql3308.sock shutdown7.登陆mysql

至此 3307端口已经启动成功,我们用相同的步骤,再启动下3308端口;
二.mysql主从复制相关配置
1. 配置主机,开启bin-log
打开 3307端口配置文件 my.cnf (我的环境在/usr/local/data/mysqlCluster/mysql3307 目录下 ) 找到log-bin配置项

保存配置 并重启3307数据库。重启完成我,我们连接上3307数据库,使用 show master status 命令查看主库的状态。
root@iZ23iuzu9fvZ:[/usr/local/data]mysql -S /tmp/mysql3307.sock -P 3307
Welcome to the MySQL monitor.  Commands end with ; or \g.
Your MySQL connection id is 1
Server version: 5.5.34-log Source distribution

Copyright (c) 2000, 2013, Oracle and/or its affiliates. All rights reserved.
.........
mysql> show master status ;
+-----------------------+----------+--------------+------------------+
| File                  | Position | Binlog_Do_DB | Binlog_Ignore_DB |
+-----------------------+----------+--------------+------------------+
| mysql-bin-3307.000001 |      107 |              |                  |
+-----------------------+----------+--------------+------------------+
1 row in set (0.01 sec)
我们可以看到,File正是我们刚刚配置的mysql-bin-3307 文件 。至此主库已配置完成。
2.配置从机,开启relay-log
从机端口 3308,打开 3308端口配置文件 my.cnf (我的环境在/usr/local/data/mysqlCluster/mysql3308 目录下 ),新加relay_log配置项。

定义好我们保存关闭配置文件,重启3308 服务。
3.主机授权从机允许复制
然后我们在主机上操作,grant 授权从机3308 允许监听。命令如下:
mysql> grant replication slave on *.* to slave@localhost identified by '123456';
Query OK, 0 rows affected (0.02 sec)

##解释下 赋予 replication slave 权限给 slave 用户 ,*.* 代表所有库的所有表, localhost是从机的地
#址,因为我从机和主机在一个服务器上所以使用了localhost,如果你的从机和主机不在一个服务器上可以改成你的从机的ip地
#址, 123456 是登录密码。
4.配置从机 监听主机
现在在从机从机上操作。
## 确保 停止salve
mysql> stop slave;
Query OK, 0 rows affected, 1 warning (0.00 sec)

#开始配置
#master_host      配置你监听的主机地址
#master_port      你监听主机的端口
#master_user      用户名,就是我们刚刚在主机授权时的用户名
#master_password  授权的用户密码
#master_log_file  是你主机二进制文件,可以在主机中使用show mater status 查看
#master_log_pos   开始复制的位置。 show mater status 查看
mysql>
mysql> change master to
    -> master_host='localhost',
    -> master_port=3307,
    -> master_user='slave',
    -> master_password='123456',
    -> master_log_file='mysql-bin-3307.000001',
    -> master_log_pos=254;
Query OK, 0 rows affected (0.06 sec)

#开启slave
mysql> start slave;
Query OK, 0 rows affected (0.00 sec)

#配置完成 查看 slave 状态
#可以看到 Slave_IO_State: Waiting for master to send event slave状态是等待主机发送事件
#我们只要观察Slave_IO_Running: Yes
#           Slave_SQL_Running: Yes
#这两个线程都是yes

mysql> show slave status \G;
*************************** 1. row ***************************
               Slave_IO_State: Waiting for master to send event
                  Master_Host: localhost
                  Master_User: slave
                  Master_Port: 3307
                Connect_Retry: 60
              Master_Log_File: mysql-bin-3307.000001
          Read_Master_Log_Pos: 254
               Relay_Log_File: mysql-relay-bin-3308.000002
                Relay_Log_Pos: 258
        Relay_Master_Log_File: mysql-bin-3307.000001
             Slave_IO_Running: Yes
            Slave_SQL_Running: Yes
              Replicate_Do_DB:
          Replicate_Ignore_DB:
           Replicate_Do_Table:
       Replicate_Ignore_Table:
      Replicate_Wild_Do_Table:
  Replicate_Wild_Ignore_Table:
                   Last_Errno: 0
                   Last_Error:
                 Skip_Counter: 0
          Exec_Master_Log_Pos: 254
              Relay_Log_Space: 419
              Until_Condition: None
               Until_Log_File:
                Until_Log_Pos: 0
           Master_SSL_Allowed: No
           Master_SSL_CA_File:
           Master_SSL_CA_Path:
              Master_SSL_Cert:
            Master_SSL_Cipher:
               Master_SSL_Key:
        Seconds_Behind_Master: 0
Master_SSL_Verify_Server_Cert: No
                Last_IO_Errno: 0
                Last_IO_Error:
               Last_SQL_Errno: 0
               Last_SQL_Error:
  Replicate_Ignore_Server_Ids:
             Master_Server_Id: 107
1 row in set (0.00 sec)

ERROR:
No query specified

mysql>
至此从机 已配置完成。
开始测试
我们切换到主机 并在test库上创建一个表
mysql> use test;
Database changed
#创建表abc
mysql> create table abc( id INT PRIMARY KEY  NOT NULL  AUTO_INCREMENT, title VARCHAR(20) NOT NULL,  des VARCHAR(40) NOT NULL );
Query OK, 0 rows affected (0.06 sec)

mysql>
在从库上查看test库中是否创建了表abc
mysql> use test;
Database changed
mysql> show tabls;
ERROR 1064 (42000): You have an error in your SQL syntax; check the manual that corresponds to your MySQL server version for the right syntax to use near 'tabls' at line 1
mysql> show tables;
+----------------+
| Tables_in_test |
+----------------+
| abc            |
+----------------+
1 row in set (0.00 sec)
可以看到已成功复制过来了, 配置完成。