转自:https://blog.csdn.net/u010853261/article/details/54380866
Netty是一个Java的NIO客户端服务端框架可以快速的开发网络应用程序,比如客户端和服务端的协议,大大简化了网络程序的开发过程。我们知道Netty的整体架构主要由3部分组成:缓冲(buffer)、通道(channel)、事件模型(event model)。所有的高级也行都构建于这三个组件之上。下面我们基于这个架构实现一个简单的网络聊天功能。
1.环境:
JDK 7
Maven3
Netty 4.1
IDEA14
2.服务端
服务端的handler
netty的所有IO处理都是基于事件驱动的,所以对于服务端我们先从服务端的Handler开始:
这里我新建了SimpleChatServerHandler类,让他继承于SimpleChannelInboundHandler。并重写父类的一些方法,源码如下:
package netty.cookbook.simplechat;

import io.netty.channel.Channel;
import io.netty.channel.ChannelHandlerContext;
import io.netty.channel.SimpleChannelInboundHandler;
import io.netty.channel.group.ChannelGroup;
import io.netty.channel.group.DefaultChannelGroup;
import io.netty.util.concurrent.GlobalEventExecutor;

/**
 * Created by louyuting on 16/12/8.
 * 服务端处理IO
 */
public class SimpleChatServerHandler extends SimpleChannelInboundHandler<String>{

    public static ChannelGroup channels = new DefaultChannelGroup(GlobalEventExecutor.INSTANCE);

    /**
     * 每当服务端收到新的客户端连接时,客户端的channel存入ChannelGroup列表中,并通知列表中其他客户端channel
     * @param ctx
     * @throws Exception
     */
    @Override
    public void handlerAdded(ChannelHandlerContext ctx) throws Exception {
        //获取连接的channel
        Channel incomming = ctx.channel();
        //通知所有已经连接到服务器的客户端,有一个新的通道加入
        for(Channel channel:channels){
            channel.writeAndFlush("[SERVER]-"+incomming.remoteAddress()+"加入\n");
        }
        channels.add(ctx.channel());
    }

    /**
     *每当服务端断开客户端连接时,客户端的channel从ChannelGroup中移除,并通知列表中其他客户端channel
     * @param ctx
     * @throws Exception
     */
    @Override
    public void handlerRemoved(ChannelHandlerContext ctx) throws Exception {
        //获取连接的channel
        Channel incomming = ctx.channel();
        for(Channel channel:channels){
            channel.writeAndFlush("[SERVER]-"+incomming.remoteAddress()+"离开\n");
        }
        //从服务端的channelGroup中移除当前离开的客户端
        channels.remove(ctx.channel());
    }

    /**
     * 每当从服务端读到客户端写入信息时,将信息转发给其他客户端的Channel.
     * @param ctx
     * @param msg
     * @throws Exception
     */
    @Override
    protected void channelRead0(ChannelHandlerContext ctx, String msg) throws Exception {
        Channel incomming = ctx.channel();
        //将收到的信息转发给全部的客户端channel
        for(Channel channel:channels){
            if(channel != incomming) {
                channel.writeAndFlush("[" + incomming.remoteAddress() + "]" + msg + "\n");
            }else{
                channel.writeAndFlush("[You]"+msg+"\n");
            }
        }
    }

    /**
     * 服务端监听到客户端活动
     * @param ctx
     * @throws Exception
     */
    @Override
    public void channelActive(ChannelHandlerContext ctx) throws Exception {
        //服务端接收到客户端上线通知
        Channel incoming = ctx.channel();
        System.out.println("SimpleChatClient:" + incoming.remoteAddress()+"在线");
    }

    /**
     * 服务端监听到客户端不活动
     * @param ctx
     * @throws Exception
     */
    @Override
    public void channelInactive(ChannelHandlerContext ctx) throws Exception {
        //服务端接收到客户端掉线通知
        Channel incoming = ctx.channel();
        System.out.println("SimpleChatClient:" + incoming.remoteAddress()+"掉线");
    }

    /**
     * 当服务端的IO 抛出异常时被调用
     * @param ctx
     * @param cause
     * @throws Exception
     */
    @Override
    public void exceptionCaught(ChannelHandlerContext ctx, Throwable cause) throws Exception {
        //super.exceptionCaught(ctx, cause);
        Channel incoming = ctx.channel();
        System.out.println("SimpleChatClient:" + incoming.remoteAddress()+"异常");
        //异常出现就关闭连接
        cause.printStackTrace();
        ctx.close();
    }
}
对上面的handler做如下说明:
1、SimpleChatServerHandler继承自SimpleChannelInboundHandler,这个类实现了ChannelInboundHandler接口,ChannelInboundHandler提供了很多事件处理的接口方法,我们仅仅需要继承SimpleChannelInboundHandler并重写这些方法。
2、覆盖了父类的handlerAdded(ChannelHandlerContext ctx)事件处理方法,每当从服务端收到新的客户端连接时,客户端的Channel存入ChannelGroup列表中,并通知列表中的其他客户端。在这个方法中我获取到了新连接的channel,并通知所有已经连接到服务器的channel有一个新的客户端连接进来(注意这里的通知不会在服务器端显示),然后把新连接的客户端channel添加到服务端的channelGroup。
3、覆盖了handlerRemoved()事件处理方法。每当从服务端收到客户端断开时,客户端的Channel从ChannelGroup列表中移除,并通知列表中的其他客户端。这个方法的实现和handlerAdded()方法完全相反,它通知所有已经连接到服务器的channel有一个客户端从服务器断开(注意这里的通知不会在服务器端显示),然后把这个客户端channel从服务端的channelGroup中移除。
4、覆盖了 channelRead0() 事件处理方法。每当从服务端读到客户端写入信息时,将信息转发给其他所有的客户端的Channel。
5、覆盖了 channelActive() 事件处理方法。服务端监听到客户端正在活动时调用(在线)。
6、覆盖了 channelInactive() 事件处理方法。服务端监听到客户端不活动是调用(离线).
7、exceptionCaught() 事件处理方法是:当出现 Throwable 对象才会被调用,即当 Netty 由于 IO 错误或者处理器在处理事件时抛出的异常时出现。在大部分情况下,捕获的异常应该被记录下来并且把关联的 channel 给关闭掉。然而这个方法的处理方式会在遇到不同异常的情况下有不同的实现,比如你可能想在关闭连接之前发送一个错误码的响应消息。
所以上面的handler中函数一个比较常规运行顺序是:
- handlerAdded()
- channelActive()
- channelRead0()
- channelInactive()
- handlerRemoved()
服务端的handler容器ServerInitializer
SimpleChatServerInitializer 用来增加多个的handler处理类到ChannelPipeline上,ChannelPipeline简单理解就可以看成是一个handler容器,包括编码、解码、SimpleChatServerHandler等。我实现的源码如下:
package netty.cookbook.simplechat;

import io.netty.channel.ChannelInitializer;
import io.netty.channel.ChannelPipeline;
import io.netty.channel.socket.SocketChannel;
import io.netty.handler.codec.DelimiterBasedFrameDecoder;
import io.netty.handler.codec.Delimiters;
import io.netty.handler.codec.string.StringDecoder;
import io.netty.handler.codec.string.StringEncoder;

/**
 * Created by louyuting on 16/12/8.
 * 用来增加多个的处理类到ChannelPipeline上:包括编码,解码,SimpleChatServerHandler
 */
public class SimpleChatServerInitializer extends ChannelInitializer<SocketChannel>{

    @Override
    protected void initChannel(SocketChannel ch) throws Exception {
        ChannelPipeline pipeline = ch.pipeline();

        pipeline.addLast("framer", new DelimiterBasedFrameDecoder(8192, Delimiters.lineDelimiter()));
        pipeline.addLast("decoder", new StringDecoder());
        pipeline.addLast("encoder", new StringEncoder());
        pipeline.addLast("handler", new SimpleChatServerHandler());

        System.out.println("SimpleChatClient:" + ch.remoteAddress()+"连接上服务器");
    }
}
启动服务器
最后来编写一个main方法来启动服务器:源码如下:
package netty.cookbook.simplechat;

import io.netty.bootstrap.ServerBootstrap;
import io.netty.channel.ChannelFuture;
import io.netty.channel.ChannelOption;
import io.netty.channel.EventLoopGroup;
import io.netty.channel.nio.NioEventLoopGroup;
import io.netty.channel.socket.nio.NioServerSocketChannel;
import utils.LogUtil;

/**
 * Created by louyuting on 16/12/8.
 * 启动服务端
 */
public class SimpleChatServer {
    private int port;

    public SimpleChatServer(int port){
        this.port = port;
    }

    public void run() throws Exception{
        //NioEventLoopGroup是用来处理IO操作的多线程事件循环器
        //boss用来接收进来的连接
        EventLoopGroup bossGroup = new NioEventLoopGroup();
        //用来处理已经被接收的连接;
        EventLoopGroup workerGroup = new NioEventLoopGroup();

        try{
            //是一个启动NIO服务的辅助启动类
            ServerBootstrap sBootstrap = new ServerBootstrap();
            //These EventLoopGroup's are used to handle all the events and IO for ServerChannel and Channel's.
            //为bootstrap设置acceptor的EventLoopGroup和client的EventLoopGroup
            //这些EventLoopGroups用于处理所有的IO事件
            //?这里为什么设置两个group呢?
            sBootstrap.group(bossGroup, workerGroup)
                    .channel(NioServerSocketChannel.class)
                    .childHandler(new SimpleChatServerInitializer())
                    .option(ChannelOption.SO_BACKLOG, 128)
                    .childOption(ChannelOption.SO_KEEPALIVE, true);

            LogUtil.log_debug("SimpleChatServer 启动了");

            //绑定端口,开始接收进来的连接
            ChannelFuture future = sBootstrap.bind(port).sync();
            //等待服务器socket关闭
            //在本例子中不会发生,这时可以关闭服务器了
            future.channel().closeFuture().sync();
        } finally {
            //
            workerGroup.shutdownGracefully();
            bossGroup.shutdownGracefully();

            LogUtil.log_debug("SimpleChatServer 关闭了");
        }

    }

    public static void main(String[] args) throws Exception {
        new SimpleChatServer(8080).run();
    }
}
启动服务器端的代码基本都是一个套路:
1、首先定义NioEventLoopGroup,这个NioEventLoopGroup是用来处理IO操作的多线程事件循环器。在这个服务端应用中,我创建了两个NioEventLoopGroup,一个称谓boss,一个称为worker。这里的这两个NioEventLoopGroup是有明确的分工任务的,boss用来接收进来的连接、用来处理已经被接收的连接。一旦boss接收到连接,就会把连接信息注册到worker上面,然后worker处理连接。这里通过把接收请求和处理连接解耦,大大增强了服务端接收请求和处理连接的能力。
2、ServerBootstrap是一个启动NIO服务的辅助启动类。在这个类上我们需要配置服务器的各种信息,配置事件循环器、配置通道类型(NioServerSocketChannel)、添加childHandler、设置通道的可选参数等等。
3、剩下的就是绑定端口然后启动服务。这里我们在机器上绑定了机器所有网卡上的 8080 端口。当然 现在你可以多次调用 bind() 方法(基于不同绑定地址)。
至此、我们已经完成了基于Netty的聊天服务端的程序。
3. 客户端
客户端的实现代码其实基本上都和服务端差别不大。
客户端的handler
客户端的这个handler比较简单,只需要打印出其余客户端发送的信息就行了。
package netty.cookbook.simplechat;

import io.netty.channel.ChannelHandlerContext;
import io.netty.channel.SimpleChannelInboundHandler;
import utils.LogUtil;

/**
 * Created by louyuting on 16/12/8.
 * 客户端处理IO,只需要将读到的信息打印出来就OK了
 */
public class SimpleChatClientHandler extends SimpleChannelInboundHandler<String>{
    /**
     * 每当从服务端读到客户端写入信息时,将信息转发给其他客户端的Channel.
     * @param ctx
     * @param msg
     * @throws Exception
     */
    @Override
    protected void channelRead0(ChannelHandlerContext ctx, String msg) throws Exception {
        LogUtil.log_debug(msg);
    }

}
客户端的ChannelInitializer
与服务端类似:
package netty.cookbook.simplechat;

import io.netty.channel.ChannelInitializer;
import io.netty.channel.ChannelPipeline;
import io.netty.channel.socket.SocketChannel;
import io.netty.handler.codec.DelimiterBasedFrameDecoder;
import io.netty.handler.codec.Delimiters;
import io.netty.handler.codec.string.StringDecoder;
import io.netty.handler.codec.string.StringEncoder;

/**
 * Created by louyuting on 16/12/8.
 * 用来增加多个的处理类到ChannelPipeline上:包括编码,解码,SimpleChatServerHandler
 */
public class SimpleChatClientInitializer extends ChannelInitializer<SocketChannel>{

    @Override
    protected void initChannel(SocketChannel ch) throws Exception {
        ChannelPipeline pipeline = ch.pipeline();

        pipeline.addLast("framer", new DelimiterBasedFrameDecoder(8192, Delimiters.lineDelimiter()));
        pipeline.addLast("decoder", new StringDecoder());
        pipeline.addLast("encoder", new StringEncoder());
        pipeline.addLast("handler", new SimpleChatClientHandler());
    }
}
客户端启动程序
编写main启动客户端
package netty.cookbook.simplechat;

import io.netty.bootstrap.Bootstrap;
import io.netty.channel.Channel;
import io.netty.channel.EventLoopGroup;
import io.netty.channel.nio.NioEventLoopGroup;
import io.netty.channel.socket.nio.NioSocketChannel;

import java.io.BufferedReader;
import java.io.InputStreamReader;

/**
 * Created by louyuting on 16/12/8.
 * 启动服务端
 */
public class SimpleChatClient {
    private final int port;
    private final String host;

    public SimpleChatClient(String host, int port){
        this.host = host;
        this.port = port;
    }

    public void run() throws Exception{
        EventLoopGroup group = new NioEventLoopGroup();

        try{
            //是一个启动NIO服务的辅助启动类
            Bootstrap bootstrap = new Bootstrap();
            bootstrap.group(group)
                    .channel(NioSocketChannel.class)
                    .handler(new SimpleChatClientInitializer());

            Channel channel = bootstrap.connect(host, port).sync().channel();

            BufferedReader in = new BufferedReader(new InputStreamReader(System.in));
            while (true){
                channel.writeAndFlush(in.readLine()+"\r\n");
            }
        } catch (Exception e){
            e.printStackTrace();
        } finally{
            group.shutdownGracefully();
        }
    }

    public static void main(String[] args) throws Exception {
        new SimpleChatClient("localhost",8080).run();
    }

}
启动之后运行:
首先启动服务端,然后再启动两个客户端。运行之后截图如下:
服务端:

客户端1
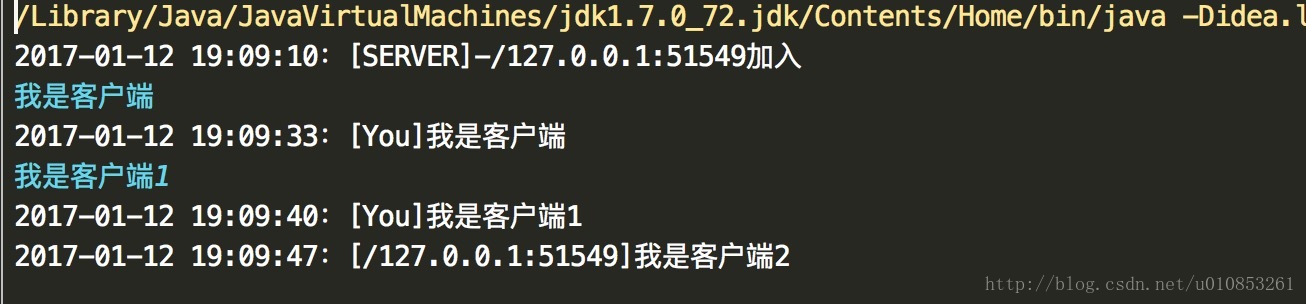
客户端2

所有源码的Github地址
https://github.com/leetcode-hust/leetcode/tree/master/louyuting/src/netty/cookbook/simplechat
--------------------- 本文来自 惜暮 的CSDN 博客 ,全文地址请点击:https://blog.csdn.net/u010853261/article/details/54380866?utm_source=copy