Activity的启动方式,严格来说有两种形式。第一种是在Android应用中启动,第二种是从Launcher中点击应用快捷图标启动。Android应用中Activity启动流程,在上篇博文Activity启动流程源码分析(应用中)已介绍过了,想了解的同学,可以看看一下。本篇博文将会介绍从Launcher中启动Activity具体流程。
在开始介绍之前,我们需要了解一些概念,如:
- ActivityThread: 应用的启动入口类,当应用启动,会首先执行其main方法,开启主线程消息循环机制。
- ApplicationThread: ActivityThread的内部类,主要与系统进程AMS通信,从而对应用进程的具体Activity操作进行管理。
- Instrumentation: ActivityThread的属性变量,主要辅助ActivityThread类调用Activity的生命周期相关方法。
- ActivityManagerService(AMS): Activity管理系统服务类,主要是对所有的Activity进行管理。
- ActivityStack: Activity任务栈,AMS的属性变量,AMS中Activtiy的实际管理者。
一、什么是Launcher?
通俗的来说,就是我们正常解锁后,进入的第一个界面,即桌面(HomeScreen)。Launcher本身就是一个app,它主要作用是用来显示widget和管理手机上其他应用软件app。通过查看源码,我们知道Android系统会内置一些系统应用,如Launcher,联系人、照相机等,并且在Android系统启动后,会自动启动Launcher,让用户可以通过Launcher启动其他应用。
二、Launcher中启动应用源码分析
Launcher中启动应用,也即是Launcher中启动Activity,因为每个应用都是由多个Activities组成的。下面我们就从Launcher源码开始分析:
    View createShortcut(ShortcutInfo info) {
        return createShortcut(R.layout.application,
                (ViewGroup) mWorkspace.getChildAt(mWorkspace.getCurrentPage()), info);
    }

    View createShortcut(int layoutResId, ViewGroup parent, ShortcutInfo info) {
        BubbleTextView favorite = (BubbleTextView) mInflater.inflate(layoutResId, parent, false);
        favorite.applyFromShortcutInfo(info, mIconCache);
        favorite.setOnClickListener(this);//核心代码
        return favorite;
    }
在创建应用快捷图标的时候,都会给应用快捷图标View设置监听事件setOnClickListener(this),从这监听事件的设定,我们也就知道Launcher类实现了View.OnTouchListener接口,所以我们来看看Onclick()方法
  public void onClick(View v) {
        .......
        Object tag = v.getTag();
        if (tag instanceof ShortcutInfo) {
            // Open shortcut
            final Intent intent = ((ShortcutInfo) tag).intent;
            int[] pos = new int[2];
            v.getLocationOnScreen(pos);
            intent.setSourceBounds(new Rect(pos[0], pos[1],
                    pos[0] + v.getWidth(), pos[1] + v.getHeight()));

            boolean success = startActivitySafely(v, intent, tag);//核心代码

            if (success && v instanceof BubbleTextView) {
                mWaitingForResume = (BubbleTextView) v;
                mWaitingForResume.setStayPressed(true);
            }
        } else if (tag instanceof FolderInfo) {
            if (v instanceof FolderIcon) {
                FolderIcon fi = (FolderIcon) v;
                handleFolderClick(fi);
            }
        } else if (v == mAllAppsButton) {
            if (mState == State.APPS_CUSTOMIZE) {
                showWorkspace(true);
            } else {
                onClickAllAppsButton(v);
            }
        }
    }
点击应用快捷图标,就会执行onClick(),然后就会调用startActivitySafely方法,我们继续来看此方法
    boolean startActivitySafely(View v, Intent intent, Object tag) {
        boolean success = false;
        try {
            success = startActivity(v, intent, tag);//核心代码
        } catch (ActivityNotFoundException e) {
            Toast.makeText(this, R.string.activity_not_found, Toast.LENGTH_SHORT).show();
            Log.e(TAG, "Unable to launch. tag=" + tag + " intent=" + intent, e);
        }
        return success;
    }
这里就开始startActivity了,我们继续看这方法
    boolean startActivity(View v, Intent intent, Object tag) {
        intent.addFlags(Intent.FLAG_ACTIVITY_NEW_TASK);

        try {
            // Only launch using the new animation if the shortcut has not opted out (this is a
            // private contract between launcher and may be ignored in the future).
            boolean useLaunchAnimation = (v != null) &&
                    !intent.hasExtra(INTENT_EXTRA_IGNORE_LAUNCH_ANIMATION);
            if (useLaunchAnimation) {
                ActivityOptions opts = ActivityOptions.makeScaleUpAnimation(v, 0, 0,
                        v.getMeasuredWidth(), v.getMeasuredHeight());

                startActivity(intent, opts.toBundle());
            } else {
                startActivity(intent);
            }
            return true;
        } catch (SecurityException e) {
            Toast.makeText(this, R.string.activity_not_found, Toast.LENGTH_SHORT).show();
            Log.e(TAG, "Launcher does not have the permission to launch " + intent +
                    ". Make sure to create a MAIN intent-filter for the corresponding activity " +
                    "or use the exported attribute for this activity. "
                    + "tag="+ tag + " intent=" + intent, e);
        }
        return false;
}前面说了,Launcher本身就是一个应用,通过阅读源码知道,Launcher类也是继承于Activity,到这里,startActivity()也就是和我们上篇博文Activity启动流程源码分析(应用中)中startActivity是一样的,具体流程也是相同的,唯一不同的是在startSpecificActivityLocked()时,Launcher启动的Activity没有进程,需要新建应用进程。让我们来看看startSpecificActivityLocked()源码
 private final void startSpecificActivityLocked(ActivityRecord r,
            boolean andResume, boolean checkConfig) {
        // Is this activity's application already running?
        ProcessRecord app = mService.getProcessRecordLocked(r.processName,
                r.info.applicationInfo.uid);

        if (r.launchTime == 0) {
            r.launchTime = SystemClock.uptimeMillis();
            if (mInitialStartTime == 0) {
                mInitialStartTime = r.launchTime;
            }
        } else if (mInitialStartTime == 0) {
            mInitialStartTime = SystemClock.uptimeMillis();
        }

        if (app != null && app.thread != null) {//Activity所在进程判断,进程存在时,直接启动Activity
            try {
                app.addPackage(r.info.packageName);

                realStartActivityLocked(r, app, andResume, checkConfig);//核心代码

                return;
            } catch (RemoteException e) {
                Slog.w(TAG, "Exception when starting activity "
                        + r.intent.getComponent().flattenToShortString(), e);
            }

            // If a dead object exception was thrown -- fall through to
            // restart the application.
        }

        mService.startProcessLocked(r.processName, r.info.applicationInfo, true, 0,
                "activity", r.intent.getComponent(), false, false);
    }
因为从Launcher启动的Activity进程不存在,所以就会执行mService.startProcessLocked()来新建进程,其中mService为ActivityManagerService,我们来看看具体代码:
    final ProcessRecord startProcessLocked(String processName,
            ApplicationInfo info, boolean knownToBeDead, int intentFlags,
            String hostingType, ComponentName hostingName, boolean allowWhileBooting,
            boolean isolated) {
        ProcessRecord app;
        .......

        if (app == null) {
            app = newProcessRecordLocked(null, info, processName, isolated);
            if (app == null) {
                Slog.w(TAG, "Failed making new process record for "
                        + processName + "/" + info.uid + " isolated=" + isolated);
                return null;
            }
            mProcessNames.put(processName, app.uid, app);
            if (isolated) {
                mIsolatedProcesses.put(app.uid, app);
            }
        } else {
            // If this is a new package in the process, add the package to the list
            app.addPackage(info.packageName);
        }
        .......
        startProcessLocked(app, hostingType, hostingNameStr);//核心代码
        return (app.pid != 0) ? app : null;
    }
在创建进程记录后,就会执行startProcessLocked(app, hostingType, hostingNameStr)来创建进程,我们继续
  private final void startProcessLocked(ProcessRecord app,
            String hostingType, String hostingNameStr) {
        ......

        try {
            .......

            // Start the process.  It will either succeed and return a result containing
            // the PID of the new process, or else throw a RuntimeException.

            //核心代码,开始创建进程
            Process.ProcessStartResult startResult = Process.start("android.app.ActivityThread",
                    app.processName, uid, uid, gids, debugFlags,
                    app.info.targetSdkVersion, null);
           ......
        } catch (RuntimeException e) {
          .......
        }
}这里Process.start()进程启动传入了ActivityThread类,我们知道ActivityThread类是应用的入口类,所以这里开始正式启动快捷图标的应用。关于Android应用程序的入口,我已写过一篇博文Android应用程序入口源码解析,想了解的同学可以看看。让我们继续来看看Process中的start方法
    public static final ProcessStartResult start(final String processClass,
                                  final String niceName,
                                  int uid, int gid, int[] gids,
                                  int debugFlags, int targetSdkVersion,
                                  String[] zygoteArgs) {
        try {
            return startViaZygote(processClass, niceName, uid, gid, gids,
                    debugFlags, targetSdkVersion, zygoteArgs);
        } catch (ZygoteStartFailedEx ex) {
            Log.e(LOG_TAG,
                    "Starting VM process through Zygote failed");
            throw new RuntimeException(
                    "Starting VM process through Zygote failed", ex);
        }
    }
startViaZygote()从方法名中,我们知开始通过Zygote启动进程,我们继续看
 private static ProcessStartResult startViaZygote(final String processClass,
                                  final String niceName,
                                  final int uid, final int gid,
                                  final int[] gids,
                                  int debugFlags, int targetSdkVersion,
                                  String[] extraArgs)
                                  throws ZygoteStartFailedEx {
        synchronized(Process.class) {
            ArrayList<String> argsForZygote = new ArrayList<String>();

            ......

            return zygoteSendArgsAndGetResult(argsForZygote);
        }
    }
我们继续看zygoteSendArgsAndGetResult()方法
   private static ProcessStartResult zygoteSendArgsAndGetResult(ArrayList<String> args)
            throws ZygoteStartFailedEx {
        openZygoteSocketIfNeeded();

        try {
            sZygoteWriter.write(Integer.toString(args.size()));
            sZygoteWriter.newLine();

            int sz = args.size();
            for (int i = 0; i < sz; i++) {
                String arg = args.get(i);
                if (arg.indexOf('\n') >= 0) {
                    throw new ZygoteStartFailedEx(
                            "embedded newlines not allowed");
                }
                sZygoteWriter.write(arg);
                sZygoteWriter.newLine();
            }
            sZygoteWriter.flush();
            // Should there be a timeout on this?
            ProcessStartResult result = new ProcessStartResult();
            result.pid = sZygoteInputStream.readInt();
            if (result.pid < 0) {
                throw new ZygoteStartFailedEx("fork() failed");
            }
            result.usingWrapper = sZygoteInputStream.readBoolean();
            return result;
        } catch (IOException ex) {
            try {
                if (sZygoteSocket != null) {
                    sZygoteSocket.close();
                }
            } catch (IOException ex2) {
                // we're going to fail anyway
                Log.e(LOG_TAG,"I/O exception on routine close", ex2);
            }

            sZygoteSocket = null;
            throw new ZygoteStartFailedEx(ex);
        }
    }
到这里就会执行Zygote的一些原生方法,通过对Zygote的机制的了解,我们知道Zygote会fork自身进程来创建应用进程,进而执行ActivityThread的main方法,初始化相关应用参数,我们来看看ActivityThread的main方法
  public static void main(String[] args) {
        SamplingProfilerIntegration.start();

        // CloseGuard defaults to true and can be quite spammy.  We
        // disable it here, but selectively enable it later (via
        // StrictMode) on debug builds, but using DropBox, not logs.
        CloseGuard.setEnabled(false);

        Process.setArgV0("<pre-initialized>");

        Looper.prepareMainLooper();
        if (sMainThreadHandler == null) {
            sMainThreadHandler = new Handler();
        }

        ActivityThread thread = new ActivityThread();
        thread.attach(false);//核心方法

        AsyncTask.init();

        if (false) {
            Looper.myLooper().setMessageLogging(new
                    LogPrinter(Log.DEBUG, "ActivityThread"));
        }

        Looper.loop();

        throw new RuntimeException("Main thread loop unexpectedly exited");
}通过博文Android消息机制源码解析(Handler)知,Android的消息循环机制就是这个时候创建的,这里我们着重需要来看看ActivityThead的attach方法
  private void attach(boolean system) {
        sThreadLocal.set(this);
        mSystemThread = system;
        if (!system) {
            ViewRootImpl.addFirstDrawHandler(new Runnable() {
                public void run() {
                    ensureJitEnabled();
                }
            });
            android.ddm.DdmHandleAppName.setAppName("<pre-initialized>");
            RuntimeInit.setApplicationObject(mAppThread.asBinder());

            //Binder通信机制
            IActivityManager mgr = ActivityManagerNative.getDefault();
            try {
                mgr.attachApplication(mAppThread);
            } catch (RemoteException ex) {
                // Ignore
            }
        } else {
           .......
        }
      .......
        });
}这里通过Binder跨进程通信机制调用了ActivityManagerService中的attachApplication()方法,我们继续
    public final void attachApplication(IApplicationThread thread) {
        synchronized (this) {
            int callingPid = Binder.getCallingPid();
            final long origId = Binder.clearCallingIdentity();

            attachApplicationLocked(thread, callingPid);//核心方法

            Binder.restoreCallingIdentity(origId);
        }
    }
我们继续看attachApplicationLocked()方法
  private final boolean attachApplicationLocked(IApplicationThread thread,
            int pid) {

        // Find the application record that is being attached...  either via
        // the pid if we are running in multiple processes, or just pull the
        // next app record if we are emulating process with anonymous threads.
        ProcessRecord app;
        ......

        try {
            ......
            //1.建立应用Application
            thread.bindApplication(processName, appInfo, providers,
                    app.instrumentationClass, profileFile, profileFd, profileAutoStop,
                    app.instrumentationArguments, app.instrumentationWatcher, testMode,
                    enableOpenGlTrace, isRestrictedBackupMode || !normalMode, app.persistent,
                    new Configuration(mConfiguration), app.compat, getCommonServicesLocked(),
                    mCoreSettingsObserver.getCoreSettingsLocked());
            updateLruProcessLocked(app, false, true);
            app.lastRequestedGc = app.lastLowMemory = SystemClock.uptimeMillis();
        } catch (Exception e) {
           .....
        }

        .....

        // See if the top visible activity is waiting to run in this process...
        ActivityRecord hr = mMainStack.topRunningActivityLocked(null);

        if (hr != null && normalMode) {
            if (hr.app == null && app.uid == hr.info.applicationInfo.uid
                    && processName.equals(hr.processName)) {
                try {
                    if (mHeadless) {
                        Slog.e(TAG, "Starting activities not supported on headless device: " + hr);

                    } else if (mMainStack.realStartActivityLocked(hr, app, true, true)) {//2.启动应用Activity

                        didSomething = true;

                    }
                } catch (Exception e) {
                    Slog.w(TAG, "Exception in new application when starting activity "
                          + hr.intent.getComponent().flattenToShortString(), e);
                    badApp = true;
                }
            } else {
                mMainStack.ensureActivitiesVisibleLocked(hr, null, processName, 0);
            }
        }
        ......

        return true;
}注释1处,在Android应用程序入口源码解析中,已经分析过,这里主要就是通过Binder跨进程通信,创建应用Application,执行Application的attachBaseContext和onCreate方法,两方法也为应用程序的开发入口。注释2处,调用了ActivitStack中realStartActivityLocked()方法,主要就是启动Activity,也即我们从Launcher点击应用快捷图标应用的入口Activity,在博文Activity启动流程源码分析(应用中)中,已经介绍过剩余的Activity的启动流程,这里就不再介绍了。想了解的同学,可以看一下上篇博文。
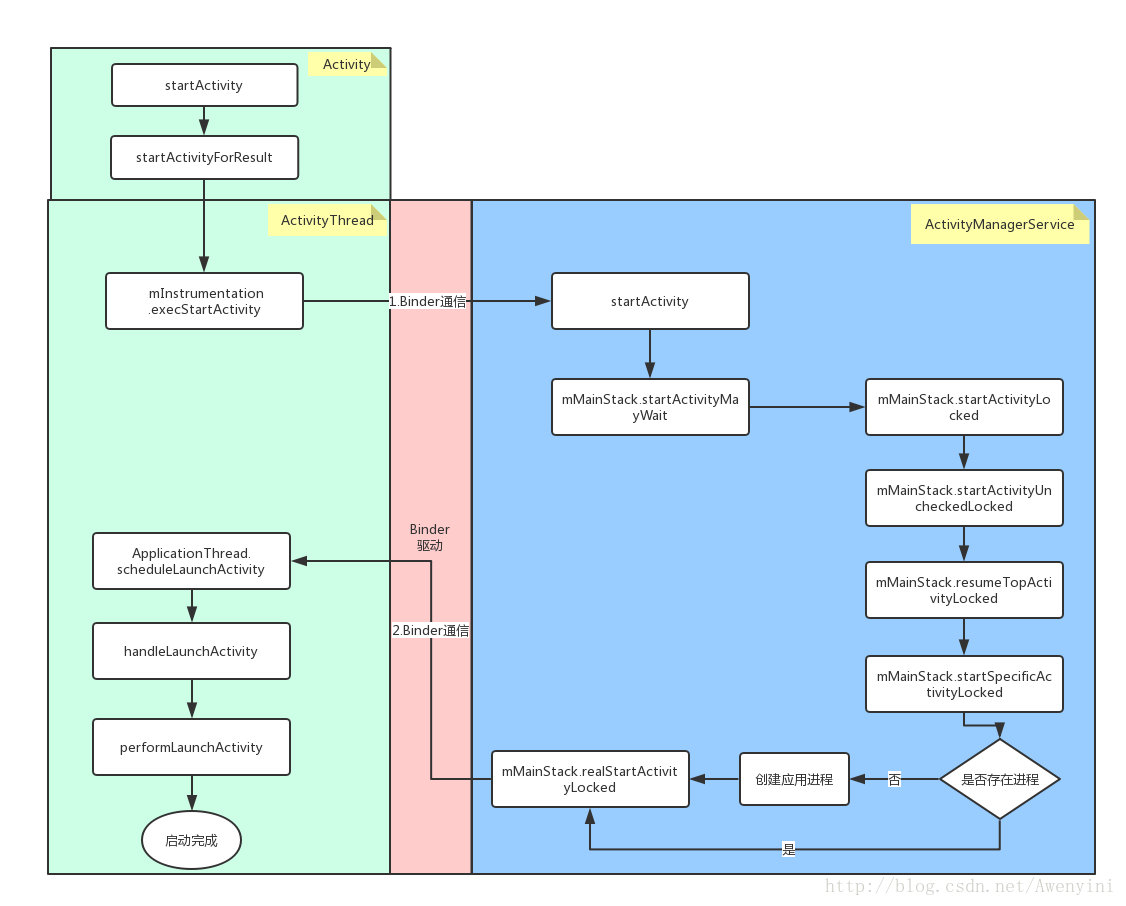
到这里,从Launcher中启动Activity的流程就讲解完了。最后再附上Activity启动流程图:
注:源码采用android-4.1.1_r1版本,建议下载源码然后自己走一遍流程,这样更能加深理解。