本文记录了本人配置Ubuntu 14.04 LTS + Torch7 + CUDA环境的过程,以及遇到的一些问题,简要介绍了Torch的使用。
Torch简介
主要参考于官方文档:http://torch.ch/
什么是Torch?
Torch是一个广泛支持机器学习算法的科学计算框架,由于采用简单而快速的脚本语言LuaJIT和一个底层的C/CUDA实现,Torch易于使用且高效。
核心特性:
- 一个强大的N-维数组(a powerful N-dimensional array)
- 大量索引、切片、置换……例程(lots of routines for indexing, slicing, transposing, …)
- 惊人的通过LuaJIT到C的接口(amazing interface to C, via LuaJIT)
- 线性代数例程(linear algebra routines)
- 神经网络和基于能量的模型(neural network, and energy-based models)
- 数值优化例程(numeric optimization routines)
- 快速高效的GPU支持(Fast and efficient GPU support)
- 可嵌入的,提供到iOS,Android和FPGA后台的端口(Embeddable, with ports to iOS, Android and FPGA backends)
为什么选择Torch
Torch的目标是在建立科学算法的同时,要有最大的灵活性和速度,而这一过程非常简单。Torch拥有一个大社区驱动包的生态系统,涉及机器学习、计算机视觉、信号处理、并行处理、图像、视频、音频和网络等,并建立在Lua社区基础之上。
Torch的核心是流行的神经网络和优化库,它们易于使用,同时在实现复杂的神经网络拓扑结构时具有最大的灵活性。你可以建立任意的神经网络图,并在CPUs和GPUs上有效地并行化。
获得与使用Torch
你可以查看入门指南 Getting Started ,开始下载并尝试使用Torch。Torch是开源的,源码可以在GitHub repo上获得。
Torch是不断变化的:它已经用在Facebook, Google, Twitter, NYU, IDIAP, Purdue和其他几家公司和研究实验室。
Torch安装
Torch7
curl是利用URL语法在命令行方式下工作的开源文件传输工具。它被广泛应用在Unix、多种Linux发行版中,并且有DOS和Win32、Win64下的移植版本。获得页面使用命令:curl http://curl.haxx.se 这是最简单的使用方法。用这个命令获得了http://curl.haxx.se指向的页面,同样,如果这里的URL指向的是一个文件或者一幅图都可以直接下载到本地。可以使用 -v 命令看curl是怎样工作的.
Torch的安装相当简便,依次输入如下命令,即可完成安装,假设安装目录为:~/sfw/Torch,请更改为自己的目录。
# 1.Install curl
sudo apt-get install curl
# 2.Install the basic package dependencies that LuaJIT and Torch require.
curl -s https://raw.githubusercontent.com/torch/ezinstall/master/install-deps | bash
# 3.Clone Torch to ~/sfw/torch, this will installs LuaJIT, LuaRocks, and then uses LuaRocks (the lua package manager) to install core packages like torch, nn and paths, as well as a few other packages.
git clone https://github.com/torch/distro.git ~/sfw/torch --recursive
# 4.Install Torch
cd ~/sfw/torch; ./install.sh
# 5.Refresh your env variables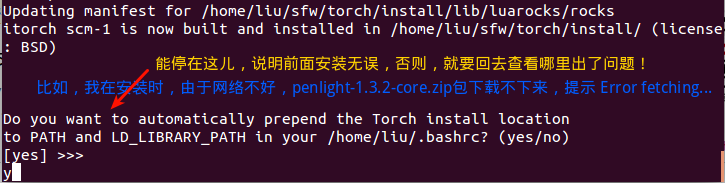
source ~/.bashrc注意:
在执行第4步时,安装进入尾声时,终端会提示是否自动添加环境变量,选择是,即输入
y或yes,如果没有到这一步而退出,说明程序安装不正确,但即使到了这一步,也不能说明安装没问题,有可能有些依赖库未安装成功,具体看终端输出的信息:
第4步结束后,可以输入
gedit ~/.bashrc打开该文件,看到文件末尾有这样一行代码:
. /home/liu/sfw/torch/install/bin/torch-activate,说明环境变量添加成功,然后执行第5步,更新环境变量。
查看了“install-deps”文件,可见安装了OpenBLAS、build-essential、gcc、g++、curl、cmake、libreadline-dev、git-core、libqt4-core、libqt4-gui、libqt4-dev、libjpeg-dev、libpng-dev、ncurses-dev、imagemagick、libzmq3-dev、gfortran、unzip、gnuplot、gnuplot-x11、ipython依赖包。
    # Install dependencies for Torch:
    if [[ $distribution == 'ubuntu' ]]; then
        declare -a target_pkgs
        target_pkgs=( build-essential gcc g++ curl \
                      cmake libreadline-dev git-core libqt4-core libqt4-gui \
                      libqt4-dev libjpeg-dev libpng-dev ncurses-dev \
                      imagemagick libzmq3-dev gfortran unzip gnuplot \
                      gnuplot-x11 ipython )
        sudo apt-get update
        # python-software-properties is required for apt-add-repository
        sudo apt-get install -y python-software-properties
        if [[ $ubuntu_major_version == '14' ]]; then
            echo '==> Found Ubuntu version 14.xx, installing dependencies'
            sudo apt-get install -y software-properties-common \
                libgraphicsmagick1-dev nodejs npm libfftw3-dev sox libsox-dev \
                libsox-fmt-all

            sudo add-apt-repository -y ppa:jtaylor/ipython
        else
            sudo add-apt-repository -y ppa:chris-lea/zeromq
            sudo add-apt-repository -y ppa:chris-lea/node.js
        fi
        sudo apt-get update
        sudo apt-get install -y "${target_pkgs[@]}"

install_openblas注意:对于依赖库ipython,torch默认安装2.3.0,如下图:
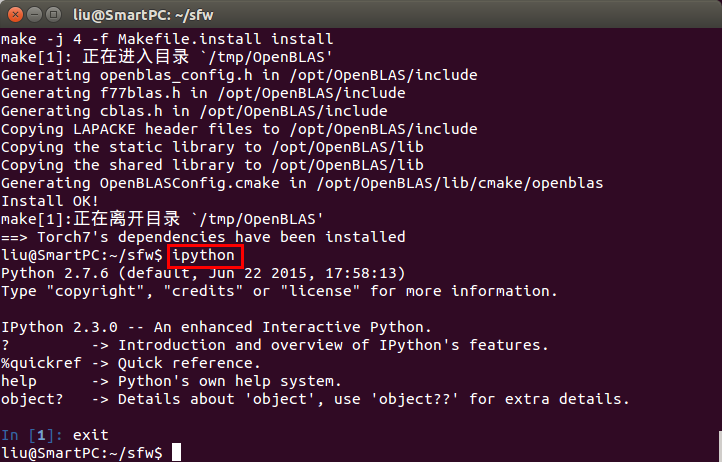
如果你之前已经安装了ipython并且版本为4(可以使用ipython --version查询),可能在后面运行itorch notebook后,在网页中打开的是“jupyter notebook”页面,而不是“itorch notebook”,而且无法新建notebook;不仅如此,你在安装上述依赖库时,会提示:“WARNING: Your ipython version is too old. Type “ipython –version” to see this. Should be at least version 2”,而实际上你的版本是4>2,原因可以从上述依赖库安装脚本文件中看出,如下。
ipython_exists=$(command -v ipython)
if [[ $ipython_exists ]]; then {
    ipython_version=$(ipython --version|cut -f1 -d'.')
    if [[ $ipython_version != 2 && $ipython_version != 3 ]]; then {
        echo 'WARNING: Your ipython version is too old.  Type "ipython --version" to see this.  Should be at least version 2'
    } fi
} fi比如我先安装了caffe,其中的“requirements”文件中也有ipython,也需要ipython,caffe默认安装最新的4.0(目前为止),导致出现上述问题,后来输入sudo apt-get remove ipython想卸载ipython,无果,最后傻傻地想卸了python2.7.6重装,谁知卸载后,系统就出问题了(Ubuntu 14.04 系统自带Python,且好多应用依赖于它),无奈只能重装。
其它包
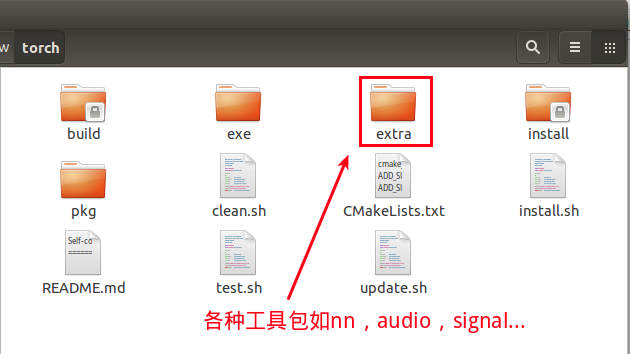
Torch是一个工具包相当丰富的工具,安装Torch时会安装一部分扩展包,在”/torch/extra/”下可以看到,如果想安装其它工具包,可以通过Luarocks在终端以命令行形式安装新的包:
luarocks install image
luarocks list
加速
如果你想使用CUDA、cuDNN加速,你还需要安装CUDA和cuDNN,可参见本人博客NVIDIA DIGITS 学习笔记(NVIDIA DIGITS-2.0 + Ubuntu 14.04 + CUDA 7.0 + cuDNN 7.0 + Caffe 0.13.0)。
Torch卸载
如果想卸载Torch,使用如下命令,注意更改目录:
rm -rf ~/sfw/torchTorch使用
概览Torch
所有关于Torch的手册资料清单见Cheatsheet,也可以在安装后的文件夹中找到,为“.md”格式的文件。
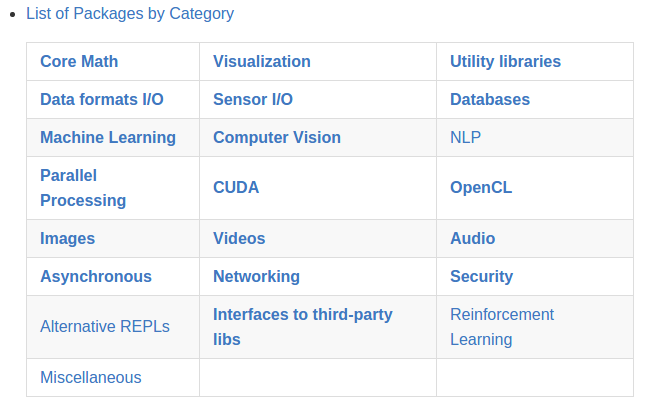
Torch中包含了很多工具包,有22类,如数学(Core Math)、机器学习(Machine Learning)、自然语言处理(NLP)、CUDA、音频、视频、图像等等,如下表。
大部分都在如下的“extra”文件夹中:
初探Torch
解释器启动Torch(LuaJIT)
Torch7 依赖于 LuaJIT 解释器, 因而启动Torch的最方便的方式是启动一个解释器,输入luajit:

如果想给一个变量赋值,并显示该变量的值,输入:a = 10,回车,=a,注意到a前面的=了吗?

是不是很不方便,太不和蔼了!原始的 LuaJIT 解释器有点简单 (no completion, no help, nothing preloaded…),下面要提及的TREPL没有上述缺点,更为人性化,启动Torch也只需输入:th。
交互式会话环境(TREPL)
启动
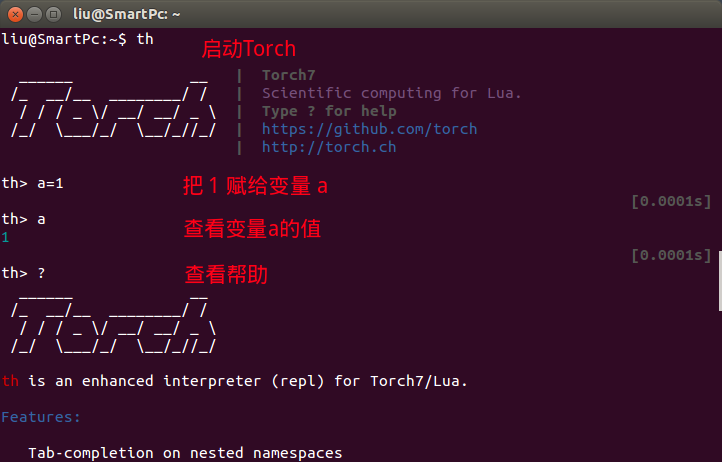
在终端输入th即可启动运行Torch,看到Torch的标志了吗?学习Torch的最简单的方法就是通过这个交互式会话(interactive session),也被称作TREPL( torch read-eval-print loop1)与Torch互动。如当你输入a=1后回车再输入a回车即可查看变量a的值;当输入?时,Torch会输出帮助内容。
退出
输入os.exit()或按两次Ctrl+C键退出Torch。运行文件
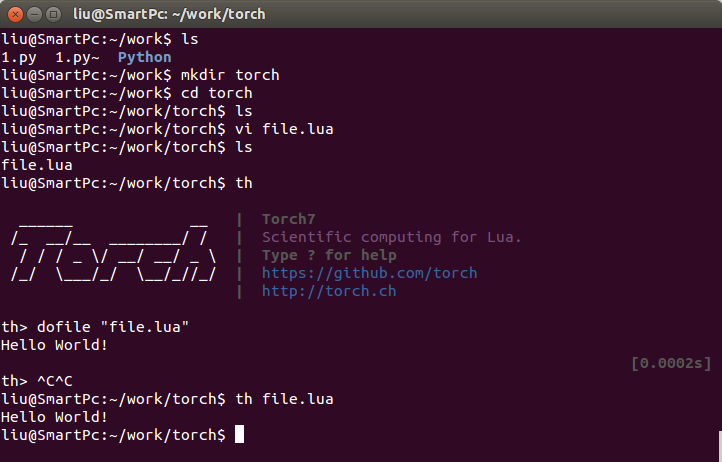
如果要计算源文件“file.lua”中的表达式,启动Torch后输入:dofile "file.lua";如果以非交互式的方式运行,可以输入:th file.lua。比如,我在”~/work/torch”目录下新建了”file.lua”文件,并输入print "Hello World!"保存,然后以上述两种方式运行:
有各种各样的方式来运行Lua代码,这与perl 和 ruby 类似:
TREPL 便利特性:
Tab-completion on nested namespaces(嵌套命名空间的Tab-补全)
Tab-completion on disk files (when opening a string)
History (preserved between sessions)
Pretty print (table introspection and coloring)
Auto-print after eval (can be stopped with ;)
Each command is profiled, timing is reported
No need for ‘=’ to print
Easy help with: ? funcname(? 函数名查看帮助)
Self help: ?
Shell commands with:cmd(example: ls)(Shell 命令:$ cmd,如$ ls -a)
机器学习与Torch7
本人仅对机器学习感兴趣,发现了这个教程Machine Learning with Torch7,包含如下子教程,应该按顺序阅读:
- Tutorial 1: Setup / Basics / Getting Started
- Tutorial 2: Supervised Learning
- Tutorial 3: Unsupervised Learning
- Tutorial 4: Graphical Models
- Tutorial 5: Creating New Modules
- Tutorial 6: Using CUDA
这个教程包含代码,可以从GitHub上下载,或者如果系统装有git的话输入如下命令直接下载到当前目录下:
git clone https://github.com/torch/tutorials.git默认情况下,解释器仅仅预加载 torch,其它的诸如image和nn的库需要手动加载:
# Loads nn and print details
require 'nn'
# Loads image and doesn't print details
require 'image';就到这吧,你可以访问Machine Learning with Torch7学习,或者查看我的对应学习笔记:Machine Learning with Torch7学习笔记,下面是相应子教程链接:
| 英文教程 | 中文笔记 |
|---|---|
| Machine Learning with Torch7 | Machine Learning with Torch7学习笔记 |
| Tutorial 1: Setup / Basics / Getting Started | ML&Torch教程1:安装/基础/开始 |
| Tutorial 2: Supervised Learning | ML&Torch教程2:有监督学习 |
| Tutorial 3: Unsupervised Learning | ML&Torch教程3:无监督学习 |
| Tutorial 4: Graphical Models | ML&Torch教程4:图模型 |
| Tutorial 5: Creating New Modules | ML&Torch教程5:创建新模块 |
| Tutorial 6: Using CUDA | ML&Torch教程6:使用CUDA |
这个教程的代码的运行依赖于“dp”包,需要安装此包才能运行示例,可点此下载安装
git clone https://github.com/nicholas-leonard/dp.git ~/sfw/torch/extra/dp
cd ~/sfw/torch/extra/dp
sudo luarocks make rocks/dp-scm-1.rockspec
也可以直接输入如下命令安装:
luarocks install dp此外,Cheatsheet里有大量的Tutorials, Demos,涵盖图像、语音、视频、语音等方面的应用,自行查阅。
一个实例教程
参考:Deep Learning with Torch, a 60 minute tutorial,教程目的:
- 理解torch和神经网络工具包;
- 在CPU和GPU上训练一个小的神经网络。
此教程教我们在数据集CIFAR-10数据集上,构建一个卷积神经网络,并用于分类,包含如下几个步骤:
- 加载和归一化数据;
- 定义神经网络;
- 定义损失函数;
- 在训练数据集上训练网络;
- 在测试集上测试网络。
注:下面的代码,需要在“itorch notebook”中输入运行。使用itorch notebook命令打开itorch notebook,并新建notebook。
加载与归一化数据集
CIFAR-10数据集包含10类物体,共50,000个训练样本,10,000个测试样本,为减小测试时间,这里使用一个小点的数据集,包含10,000个训练样本和10,000个测试样本。
使用如下代码下载(取消注释)并加载数据集:
-- os.execute('wget -c https://s3.amazonaws.com/torch7/data/cifar10torchsmall.zip')
-- os.execute('unzip cifar10torchsmall.zip')
trainset = torch.load('yourdatadirectory/cifar10/cifar10-train.t7')
testset = torch.load('yourdatadirectory/cifar10/cifar10-test.t7')
classes = {'airplane', 'automobile', 'bird', 'cat',
           'deer', 'dog', 'frog', 'horse', 'ship', 'truck'}
print(trainset)
print(#trainset.data)
使用如下代码显示数据集:
itorch.image(trainset.data[{{1,36},{},{},{}}]) -- display the 1~36-th image in dataset
for i=1,36 do
    print(classes[trainset.label[i]])
end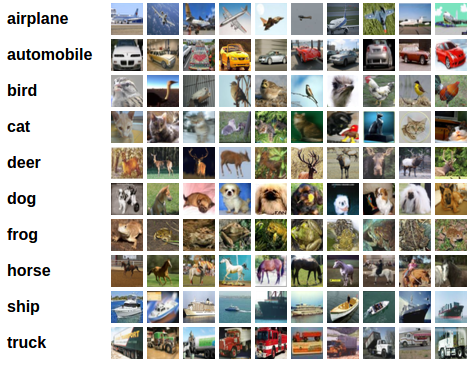
数据标准化(均值为零,方差为1):
mean = {} -- store the mean, to normalize the test set in the future
stdv  = {} -- store the standard-deviation for the future
for i=1,3 do -- over each image channel
    mean[i] = trainset.data[{ {}, {i}, {}, {}  }]:mean() -- mean estimation
    print('Channel ' .. i .. ', Mean: ' .. mean[i])
    trainset.data[{ {}, {i}, {}, {}  }]:add(-mean[i]) -- mean subtraction

    stdv[i] = trainset.data[{ {}, {i}, {}, {}  }]:std() -- std estimation
    print('Channel ' .. i .. ', Standard Deviation: ' .. stdv[i])
    trainset.data[{ {}, {i}, {}, {}  }]:div(stdv[i]) -- std scaling
end
定义神经网络
“nn”是一个神经网络工具包,使用如下代码包含它:
require 'nn'模块(Modules)是用于构建神经网络的积木,它们也是神经网络,通过容器(containers)组合其它网络形成复杂的神经网络。下面是一个用于数字图像分类的网络,它是一个简单的前馈神经网络,依次包含如下层:输入层、卷积层、池化层、卷积层、池化层、全连接层、全连接层(线性层)、高斯连接层,构成一个有序的网络容器:
我们使用的网络模型配置代码(--是注释):
require 'nn';
net = nn.Sequential()
net:add(nn.SpatialConvolution(3, 6, 5, 5)) -- 3 input image channel, 6 output channels, 5x5 convolution kernel
net:add(nn.SpatialMaxPooling(2,2,2,2))     -- A max-pooling operation that looks at 2x2 windows and finds the max.
net:add(nn.SpatialConvolution(6, 16, 5, 5))
net:add(nn.SpatialMaxPooling(2,2,2,2))
net:add(nn.View(16*5*5))                    -- reshapes from a 3D tensor of 16x5x5 into 1D tensor of 16*5*5
net:add(nn.Linear(16*5*5, 120))             -- fully connected layer (matrix multiplication between input and weights)
net:add(nn.Linear(120, 84))
net:add(nn.Linear(84, 10))                   -- 10 is the number of outputs of the network (in this case, 10 digits)
net:add(nn.LogSoftMax())                     -- converts the output to a log-probability. Useful for classification problems
print('Lenet5\n' .. net:__tostring());
执行后输出:
Lenet5
nn.Sequential {
[input -> (1) -> (2) -> (3) -> (4) -> (5) -> (6) -> (7) -> (8) -> (9) -> output]
(1): nn.SpatialConvolution(1 -> 6, 5x5)
(2): nn.SpatialMaxPooling(2,2,2,2)
(3): nn.SpatialConvolution(6 -> 16, 5x5)
(4): nn.SpatialMaxPooling(2,2,2,2)
(5): nn.View
(6): nn.Linear(400 -> 120)
(7): nn.Linear(120 -> 84)
(8): nn.Linear(84 -> 10)
(9): nn.LogSoftMax
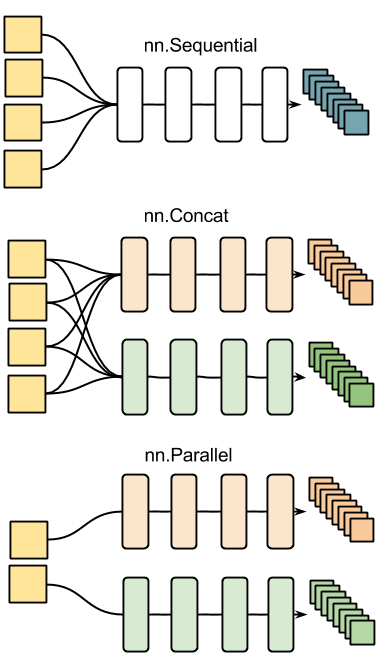
}nn中的其它容器结构:
简单测试一下网络:产生一个1×32×32的随机张量,进行一次前向传递和反向传播:
input = torch.rand(3,32,32) -- pass a random tensor as input to the network
output = net:forward(input)
print(output)
net:zeroGradParameters() -- zero the internal gradient buffers of the network (will come to this later)
gradInput = net:backward(input, torch.rand(10))
print(#gradInput) -- #a 求a的长度
为trainset添加size()函数和索引操作:
-- ignore setmetatable for now, it is a feature beyond the scope of this tutorial. It sets the index operator.
setmetatable(trainset,
    {__index = function(t, i)
                    return {t.data[i], t.label[i]}
                end}
);
trainset.data = trainset.data:double() -- convert the data from a ByteTensor to a DoubleTensor.

function trainset:size()
    return self.data:size(1)
end

print(trainset:size()) -- just to test
print(trainset[33]) -- load sample number 33.
itorch.image(trainset[33][1])
定义一个损失函数
对数似然函数常用于分类:
criterion = nn.ClassNLLCriterion()训练神经网络
定义一个统计梯度下降对象nn.StochasticGradient,把训练数据送入其训练函数train
trainer = nn.StochasticGradient(net, criterion)
trainer.learningRate = 0.001
trainer.maxIteration = 5 -- just do 5 epochs of training.
trainer:train(trainset) -- 训练网络
训练开始后,输出如下信息:
# StochasticGradient: training

# current error = 1.9760690803213

# current error = 1.7046550614051

# current error = 1.5611723361837

# current error = 1.4702427591021

# current error = 1.4034469173707
# StochasticGradient: you have reached the maximum number of iterations
# training error = 1.4034469173707
测试网络
显示测试样本:
print(classes[testset.label[100]])
itorch.image(testset.data[100])
对测试数据集进行相同的标准化操作:
testset.data = testset.data:double()   -- convert from Byte tensor to Double tensor
for i=1,3 do -- over each image channel
    testset.data[{ {}, {i}, {}, {}  }]:add(-mean[i]) -- mean subtraction
    testset.data[{ {}, {i}, {}, {}  }]:div(stdv[i]) -- std scaling
end
对第100幅图像进行类别预测:
print(classes[testset.label[100]])
itorch.image(testset.data[100])
predicted = net:forward(testset.data[100])
-- the output of the network is Log-Probabilities. To convert them to probabilities, you have to take e^x
print(predicted:exp())
计算正确率:
correct = 0
for i=1,10000 do
    local groundtruth = testset.label[i]
    local prediction = net:forward(testset.data[i])
    local confidences, indices = torch.sort(prediction, true)  -- true means sort in descending order
    if groundtruth == indices[1] then
        correct = correct + 1
    end
end
print(correct, 100*correct/10000 .. ' % ')
cunn: 使用cuda加速神经网络
使用cuda加速神经网络需要包含“cunn”库,如下代码显示如何使用cuda加速上述网络:
require 'cunn';
net = net:cuda()
criterion = criterion:cuda()
trainset.data = trainset.data:cuda()
trainer = nn.StochasticGradient(net, criterion)
trainer.learningRate = 0.001
trainer.maxIteration = 5 -- just do 5 epochs of training.
trainer:train(trainset)
看到如下输出,说明正使用CUDA进行加速:
# StochasticGradient: training

# current error = 1.3521909718752

# current error = 1.3052758892536

# current error = 1.2673446760654

# current error = 1.2342329573035

# current error = 1.2047961887121
# StochasticGradient: you have reached the maximum number of iterations
# training error = 1.2047961887121
总结
本文记录了本人配置Ubuntu 14.04 LTS + Torch7 + CUDA环境的过程,以及遇到的一些问题,简要介绍了Torch的使用。
- What’s a REPL?
A read–eval–print loop (REPL), also known as an interactive toplevel or language shell, is a simple, interactive computer programming environment that takes single user inputs (i.e. single expressions), evaluates them, and returns the result to the user; a program written in a REPL environment is executed piecewise. The term is most usually used to refer to programming interfaces similar to the classic Lisp machine interactive environment. Common examples include command line shells and similar environments for programming languages, and is particularly characteristic of scripting languages.
↩