本文将从GraphQL是什么,为什么要使用GraphQL,使用GraphQL创建简单例子,以及GraphQL实战,四个方面对GraphQL进行阐述。说得不对的地方,希望大家指出斧正。
github项目地址:https://github.com/Charming2015/graphql-todolist
一、GraphQL是什么?
关于GraphQL是什么,网上一搜一大堆。根据官网的解释就是一种用于 API 的查询语言。
一看到用于API的查询语言,我也是一脸懵逼的。博主你在开玩笑吧?你的翻译水平不过关?API还能查吗?API不是后端写好,前端调用的吗?
的确可以,这就是GraphQL强大的地方。
引用官方文档的一句话:
ask exactly what you want.
二、为什么要使用GraphQL?
在实际工作中往往会有这种情景出现:比如说我需要展示一个游戏名的列表,可接口却会把游戏的详细玩法,更新时间,创建者等各种各样的 (无用的) 信息都一同返回。
问了后端,原因大概如下:
- 原来是为了兼容PC端和移动端用同一套接口
- 或者在整个页面,这里需要显示游戏的标题,可是别的地方需要显示游戏玩法啊,避免多次请求我就全部返回咯
- 或者是因为有时候项目经理想要显示“标题+更新时间”,有时候想要点击标题展开游戏玩法等等需求,所以把游戏相关的信息都一同返回
简单说就是:
- 兼容多平台导致字段冗余
- 一个页面需要多次调用 API 聚合数据
- 需求经常改动导致接口很难为单一接口精简逻辑
有同学可能会说那也不一定要用GraphQL啊,比方说第一个问题,不同平台不同接口不就好了嘛
http://api.xxx.com/web/getGameInfo/:gameID
http://api.xxx.com/app/getGameInfo/:gameID
http://api.xxx.com/mobile/getGameInfo/:gameID
或者加个参数也行
http://api.xxx.com/getGameInfo/:gameID?platfrom=web
这样处理的确可以解决问题,但是无疑加大了后端的处理逻辑。你真的不怕后端程序员打你?
这个时候我们会想,接口能不能不写死,把静态变成动态?
回答是可以的,这就是GraphQL所做的!
三、GraphQL尝尝鲜——(GraphQL简单例子)
下面是用GraphQL.js和express-graphql搭建一个的普通GraphQL查询(query)的例子,包括讲解GraphQL的部分类型和参数,已经掌握了的同学可以跳过。
1. 先跑个hello world
- 新建一个graphql文件夹,然后在该目录下打开终端,执行
npm init --y初始化一个packjson文件。 - 安装依赖包:
npm install --save -D express express-graphql graphql - 新建sehema.js文件,填上下面的代码
//schema.js
const {
      GraphQLSchema,
      GraphQLObjectType,
      GraphQLString,
    } = require('graphql');
const queryObj = new GraphQLObjectType({
    name: 'myFirstQuery',
    description: 'a hello world demo',
    fields: {
        hello: {
            name: 'a hello world query',
            description: 'a hello world demo',
            type: GraphQLString,
            resolve(parentValue, args, request) {
                return 'hello world !';
            }
        }
    }
});
module.exports = new GraphQLSchema({
  query: queryObj
});
这里的意思是新建一个简单的查询,查询名字叫hello,会返回字段hello world !,其他的是定义名字和查询结果类型的意思。
- 同级目录下新建server.js文件,填上下面的代码
// server.js
const express = require('express');
const expressGraphql = require('express-graphql');
const app = express();

const schema = require('./schema');
app.use('/graphql', expressGraphql({
	schema,
	graphiql: true
}));

app.get('/', (req, res) => res.end('index'));

app.listen(8000, (err) => {
  if(err) {throw new Error(err);}
  console.log('*** server started ***');
});
这部分代码是用express跑起来一个服务器,并通过express-graphql把graphql挂载到服务器上。
- 运行一下
node server,并打开http://localhost:8000/
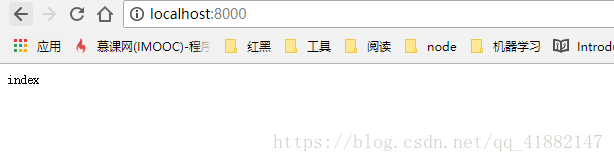
如图,说明服务器已经跑起来了
打开http://localhost:8000/graphql,是类似下面这种界面说明已经graphql服务已经跑起来了!
在左侧输入 (graphql的查询语法这里不做说明)
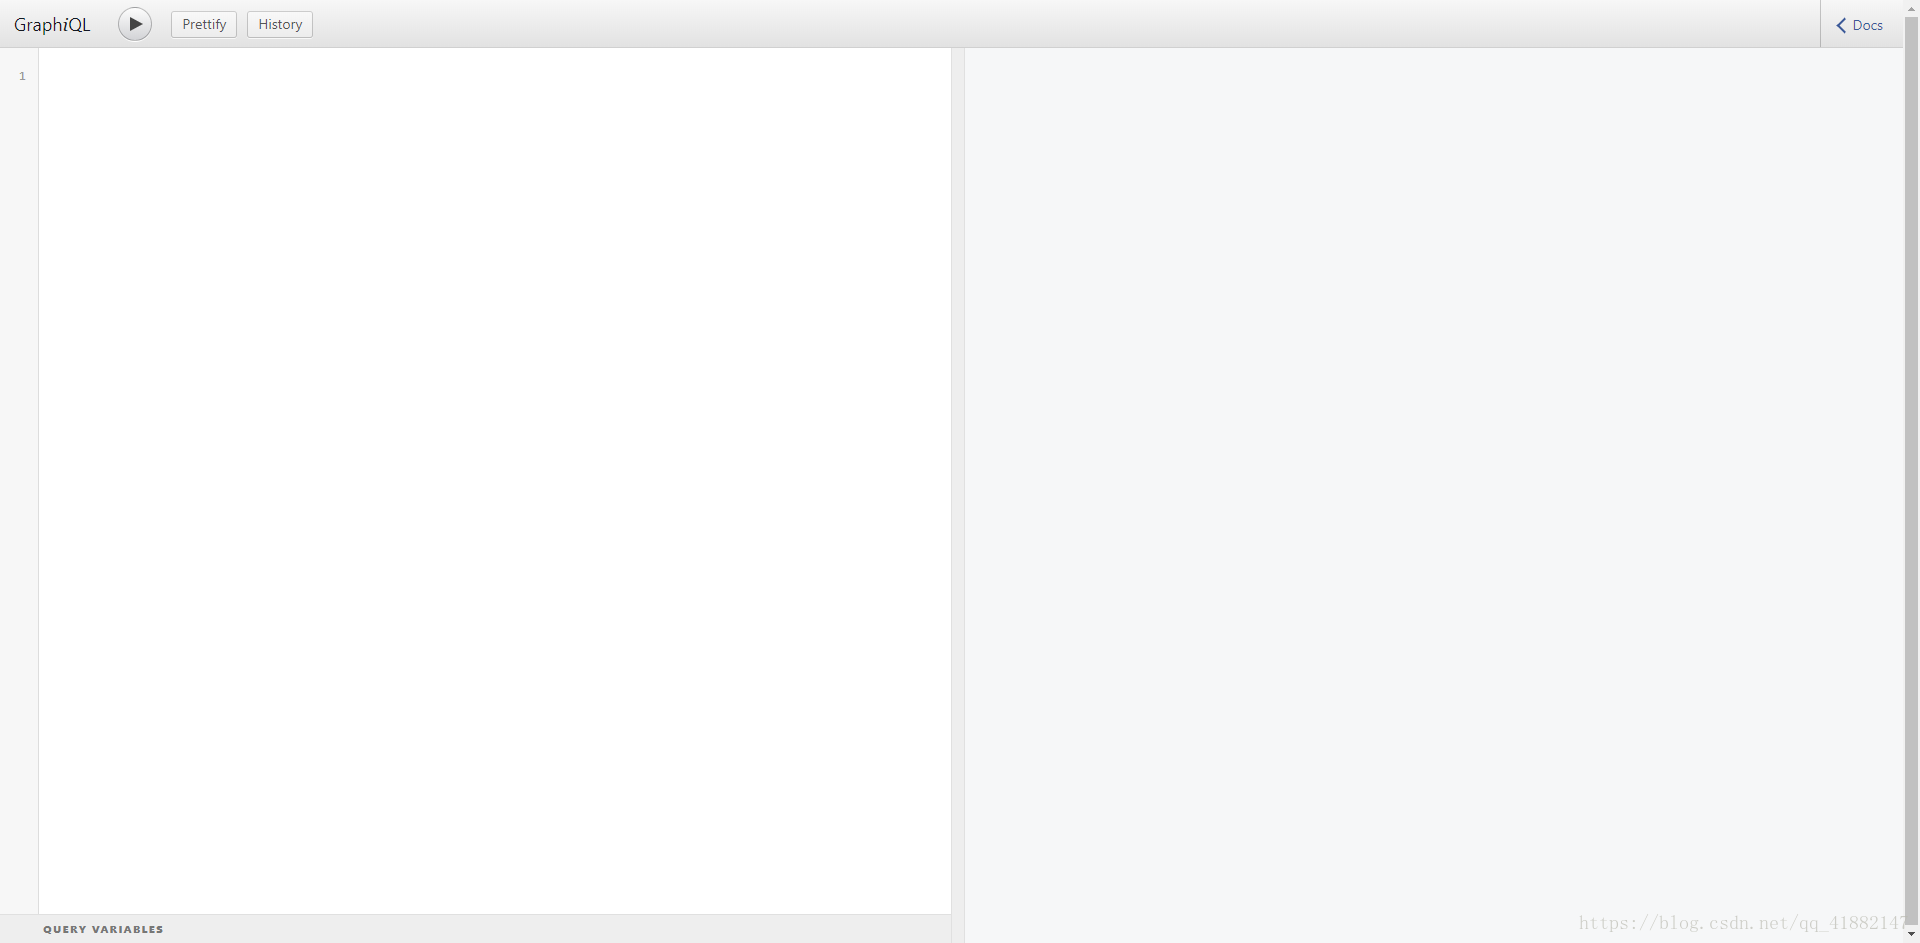
{
  hello
}
点击头部的三角形的运行按钮,右侧就会显示你查询的结果了
2. 不仅仅是hello world
先简单讲解一下代码:
const queryObj = new GraphQLObjectType({
    name: 'myFirstQuery',
    description: 'a hello world demo',
    fields: {}
});
GraphQLObjectType是GraphQL.js定义的对象类型,包括name、description 和fields三个属性,其中name和description 是非必填的。fields是解析函数,在这里可以理解为查询方法
hello: {
            name: 'a hello world query',
            description: 'a hello world demo',
            type: GraphQLString,
            resolve(parentValue, args, request) {
                return 'hello world !';
            }
        }
对于每个fields,又有name,description,type,resolve参数,这里的type可以理解为hello方法返回的数据类型,resolve就是具体的处理方法。
说到这里有些同学可能还不满足,如果我想每次查询都想带上一个参数该怎么办,如果我想查询结果有多条数据又怎么处理?
下面修改schema.js文件,来一个加强版的查询(当然,你可以整理一下代码,我这样写是为了方便阅读)
const {
      GraphQLSchema,
      GraphQLObjectType,
      GraphQLString,
      GraphQLInt,
      GraphQLBoolean
    } = require('graphql');

const queryObj = new GraphQLObjectType({
    name: 'myFirstQuery',
    description: 'a hello world demo',
    fields: {
        hello: {
            name: 'a hello world query',
            description: 'a hello world demo',
            type: GraphQLString,
            args: {
                name: {  // 这里定义参数,包括参数类型和默认值
                    type: GraphQLString,
                    defaultValue: 'Brian'
                }
            },
            resolve(parentValue, args, request) { // 这里演示如何获取参数,以及处理
                return 'hello world ' + args.name + '!';
            }
        },
        person: {
            name: 'personQuery',
            description: 'query a person',
            type: new GraphQLObjectType({ // 这里定义查询结果包含name,age,sex三个字段,并且都是不同的类型。
                name: 'person',
                fields: {
                  name: {
                    type: GraphQLString
                  },
                  age: {
                    type: GraphQLInt
                  },
                  sex: {
                    type: GraphQLBoolean
                  }
                }
            }),
            args: {
                name: {
                    type: GraphQLString,
                    defaultValue: 'Charming'
                }
            },
            resolve(parentValue, args, request) {
                return {
                    name: args.name,
                    age: args.name.length,
                    sex: Math.random() > 0.5
                };
            }
        }
    }
});

module.exports = new GraphQLSchema({
  query: queryObj
});
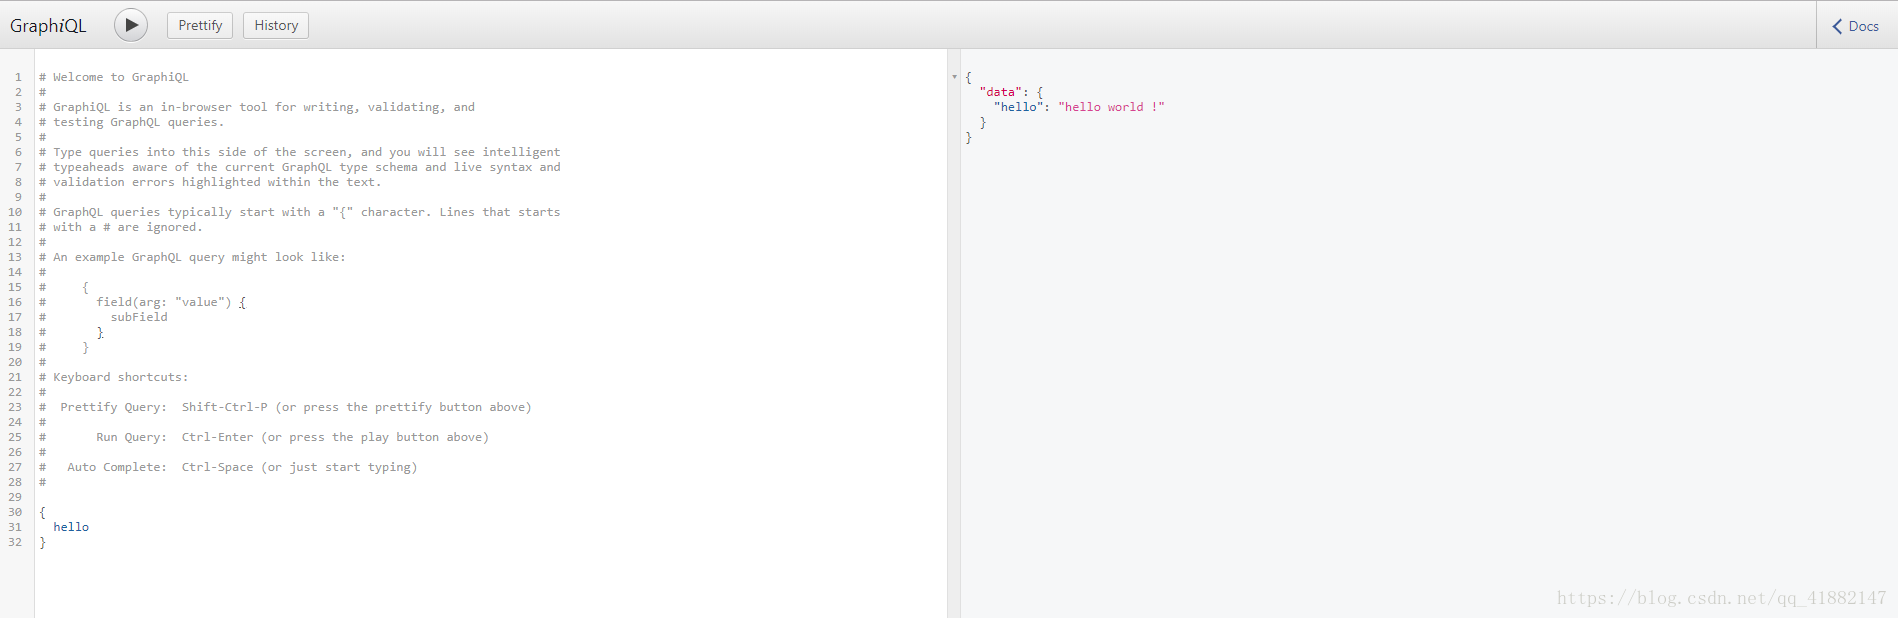
重启服务后,继续打开http://localhost:8000/graphql,在左侧输入
{
  hello(name:"charming"),
  person(name:"charming"){
    name,
    sex,
    age
  }
}
右侧就会显示出:
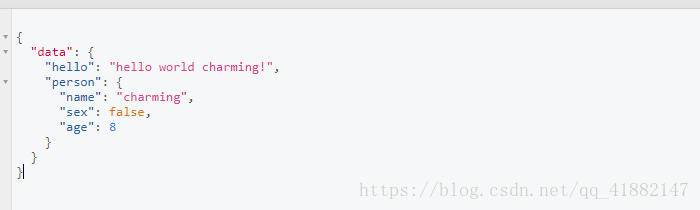
你可以在左侧仅输入person方法的sex和age两个字段,这样就会只返回sex和age的信息。动手试一试吧!
{
  person(name:"charming"){
    sex,
    age
  }
}
当然,结果的顺序也是按照你输入的顺序排序的。
定制化的数据,完全根据你查什么返回什么结果。这就是GraphQL被称作API查询语言的原因。
四、GraphQL实战
下面我将搭配koa实现一个GraphQL查询的例子,逐步从简单koa服务到mongodb的数据插入查询,再到GraphQL的使用,最终实现用GraphQL对数据库进行增删查改。
项目效果大概如下:
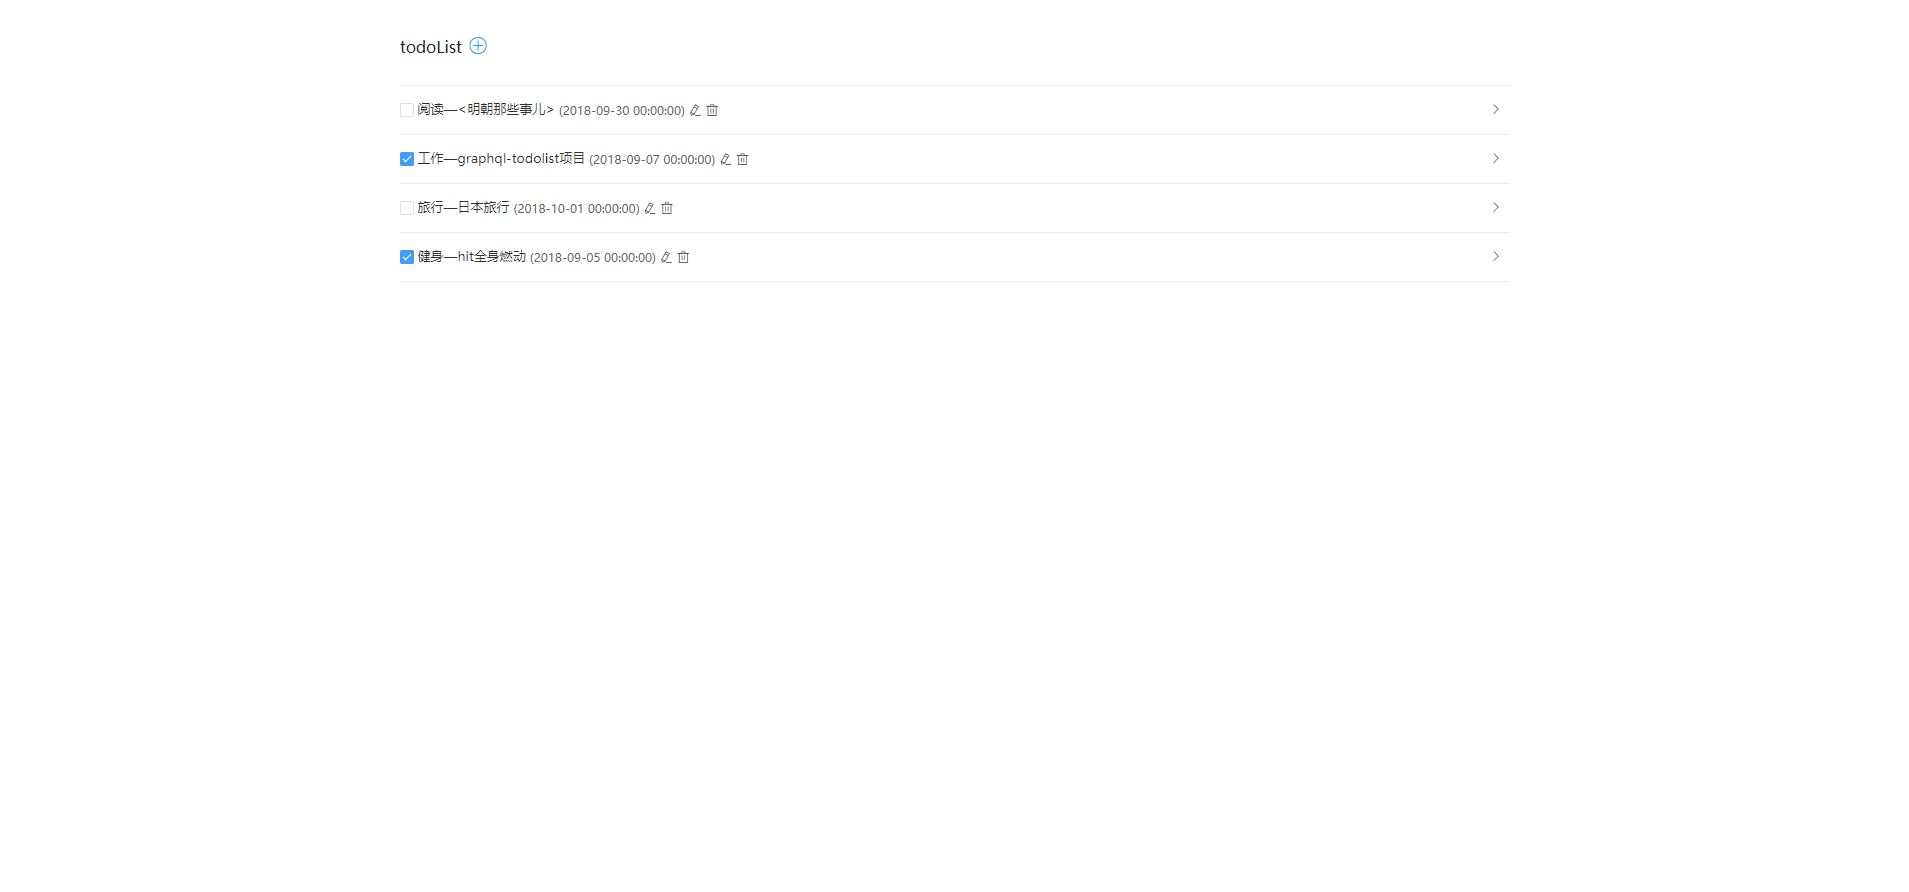
有点意思吧?那就开始吧~
先把文件目录建构建好
1. 初始化项目
- 初始化项目,在根目录下运行
npm init --y, - 然后安装一些包:
npm install koa koa-static koa-router koa-bodyparser --save -D - 新建
config、controllers、graphql、mongodb、public、router这几个文件夹。装逼的操作是在终端输入mkdir config controllers graphql mongodb public router回车,ok~
2. 跑一个koa服务器
新建一个server.js文件,写入以下代码
// server.js
import Koa from 'koa'
import Router from 'koa-router'
import bodyParser from 'koa-bodyparser'

const app = new Koa()
const router = new Router();
const port = 4000

app.use(bodyParser());

router.get('/hello', (ctx, next) => {
  ctx.body="hello world"
});


app.use(router.routes())
   .use(router.allowedMethods());

app.listen(port);

console.log('server listen port: ' + port)
执行node server跑起来服务器,发现报错了:
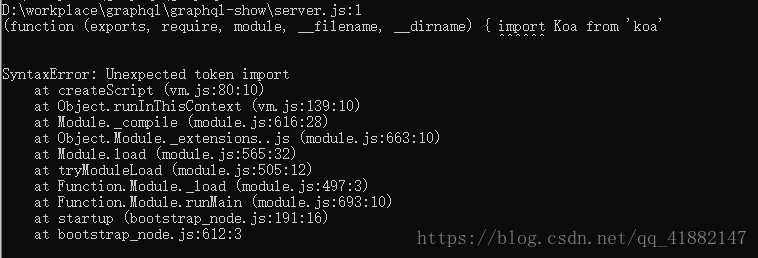
这是正常的,这是因为现在的node版本并没有支持es6的模块引入方式。
百度一下就会有解决方案了,比较通用的做法是用babel-polyfill进行转译。
详细的可以看这一个参考操作:How To Enable ES6 Imports in Node.JS
具体操作是:新建一个start.js文件,写入:
// start.js
require('babel-register')({
    presets: [ 'env' ]
})
require('babel-polyfill')
require('./server.js')
安装相关包:npm install --save -D babel-preset-env babel-polyfill babel-register
修改package.json文件,把"start": "start http://localhost:4000 && node start.js"这句代码加到下面这个位置:

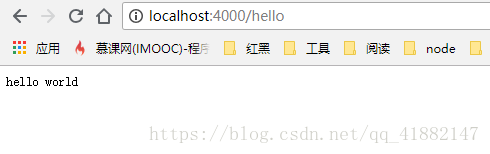
运行一下npm run start,打开http://localhost:4000/hello,结果如图:
说明koa服务器已经跑起来了。
那么前端页面呢?
(由于本文内容不是讲解前端,所以前端代码自行去github复制)
- 在public下新建
index.html文件和js文件夹,代码直接查看我的项目public目录下的 index.html 和 index-s1.js 文件 - 修改
server.js,引入koa-static模块。koa-static会把路由的根目录指向自己定义的路径(也就是本项目的public路径)
//server.js
import Koa from 'koa'
import Router from 'koa-router'
import KoaStatic from 'koa-static'
import bodyParser from 'koa-bodyparser'

const app = new Koa()
const router = new Router();
const port = 4000

app.use(bodyParser());

router.get('/hello', (ctx, next) => {
  ctx.body="hello world"
});


app.use(KoaStatic(__dirname + '/public'));
app.use(router.routes())
   .use(router.allowedMethods());

app.listen(port);

console.log('server listen port: ' + port)
打开http://localhost:4000/,发现是类似下面的页面:
这时候页面已经可以进行简单的交互,但是还没有和后端进行数据交互,所以是个静态页面。
3. 搭一个mongodb数据库,实现数据增删改查
注意: 请先自行下载好mongodb并启动mongodb。
a. 写好链接数据库的基本配置和表设定
在config文件夹下面建立一个index.js,这个文件主要是放一下链接数据库的配置代码。
//  config/index.js
export default {
  dbPath: 'mongodb://localhost/todolist'
}
在mongodb文件夹新建一个index.js和 schema文件夹, 在 schema文件夹文件夹下面新建list.js
在mongodb/index.js下写上链接数据库的代码,这里的代码作用是链接上数据库
// mongodb/index.js
import mongoose from 'mongoose'
import config from '../config'

require('./schema/list')

export const database = () => {
  mongoose.set('debug', true)

  mongoose.connect(config.dbPath)

  mongoose.connection.on('disconnected', () => {
    mongoose.connect(config.dbPath)
  })
  mongoose.connection.on('error', err => {
    console.error(err)
  })

  mongoose.connection.on('open', async () => {
    console.log('Connected to MongoDB ', config.dbPath)
  })
}
在mongodb/schema/list.js定义表和字段:
//mongodb/schema/list.js
import mongoose from 'mongoose'

const Schema = mongoose.Schema
const ObjectId = Schema.Types.ObjectId

const ListSchema = new Schema({
  title: String,
  desc: String,
  date: String,
  id: String,
  checked: Boolean,
  meta: {
    createdAt: {
      type: Date,
      default: Date.now()
    },
    updatedAt: {
      type: Date,
      default: Date.now()
    }
  }
})

ListSchema.pre('save', function (next) {// 每次保存之前都插入更新时间,创建时插入创建时间
  if (this.isNew) {
    this.meta.createdAt = this.meta.updatedAt = Date.now()
  } else {
    this.meta.updatedAt = Date.now()
  }
  next()
})
mongoose.model('List', ListSchema)
b. 实现数据库增删查改的控制器
建好表,也链接好数据库之后,我们就要写一些方法来操作数据库,这些方法都写在控制器(controllers)里面。
在controllers里面新建list.js,这个文件对应操作list数据的控制器,单独拿出来写是为了方便后续项目复杂化的模块化管理。
// controllers/list.js
import mongoose from 'mongoose'
const List = mongoose.model('List')
// 获取所有数据
export const getAllList = async (ctx, next) => {
  const Lists = await List.find({}).sort({date:-1}) // 数据查询
  if (Lists.length) {
    ctx.body = {
      success: true,
      list: Lists
    }
  } else {
    ctx.body = {
      success: false
    }
  }
}
// 新增
export const addOne = async (ctx, next) => {
  // 获取请求的数据
  const opts = ctx.request.body

  const list = new List(opts)
  const saveList = await list.save() // 保存数据
  console.log(saveList)
  if (saveList) {
    ctx.body = {
      success: true,
      id: opts.id
    }
  } else {
    ctx.body = {
      success: false,
      id: opts.id
    }
  }
}
// 编辑
export const editOne = async (ctx, next) => {
  const obj = ctx.request.body
  let hasError = false
  let error = null
  List.findOne({id: obj.id}, (err, doc) => {
  	if(err) {
  		hasError = true
  		error = err
  	} else {
  		doc.title = obj.title;
  		doc.desc = obj.desc;
  		doc.date = obj.date;
  		doc.save();
  	}
  })
  if (hasError) {
  	ctx.body = {
      success: false,
      id: obj.id
    }
  } else {
  	ctx.body = {
	  success: true,
    id: obj.id
	}
  }
}

// 更新完成状态
export const tickOne = async (ctx, next) => {
  const obj = ctx.request.body
  let hasError = false
  let error = null
  List.findOne({id: obj.id}, (err, doc) => {
  	if(err) {
  		hasError = true
  		error = err
  	} else {
  		doc.checked = obj.checked;
  		doc.save();
  	}
  })
  if (hasError) {
  	ctx.body = {
      success: false,
      id: obj.id
    }
  } else {
  	ctx.body = {
	  success: true,
    id: obj.id
	}
  }
}

// 删除
export const delOne = async (ctx, next) => {
  const obj = ctx.request.body
  let hasError = false
  let msg = null
  List.remove({id: obj.id}, (err, doc) => {
  	if(err) {
  		hasError = true
  		msg = err
  	} else {
  		msg = doc
  	}
  })
  if (hasError) {
  	ctx.body = {
      success: false,
      id: obj.id
    }
  } else {
  	ctx.body = {
  	  success: true,
      id: obj.id
  	}
  }
}
c. 实现路由,给前端提供API接口
数据模型和控制器都已经设计好了,下面就利用koa-router路由中间件,来实现请求的接口。
我们回到server.js,在上面添加一些代码。如下:
// server.js
import Koa from 'koa'
import Router from 'koa-router'
import KoaStatic from 'koa-static'
import bodyParser from 'koa-bodyparser'
import {database} from './mongodb'
import {addOne, getAllList, editOne, tickOne, delOne} from './controllers/list'

database() // 链接数据库并且初始化数据模型

const app = new Koa()
const router = new Router();
const port = 4000

app.use(bodyParser());

router.get('/hello', (ctx, next) => {
  ctx.body = "hello world"
});

// 把对请求的处理交给处理器。
router.post('/addOne', addOne)
      .post('/editOne', editOne)
      .post('/tickOne', tickOne)
      .post('/delOne', delOne)
      .get('/getAllList', getAllList)

app.use(KoaStatic(__dirname + '/public'));
app.use(router.routes())
   .use(router.allowedMethods());

app.listen(port);

console.log('server listen port: ' + port)
上面的代码,就是做了:
1. 引入mongodb设置、list控制器,
2. 链接数据库
3. 设置每一个设置每一个路由对应的我们定义的的控制器。
安装一下mongoose:npm install --save -D mongoose
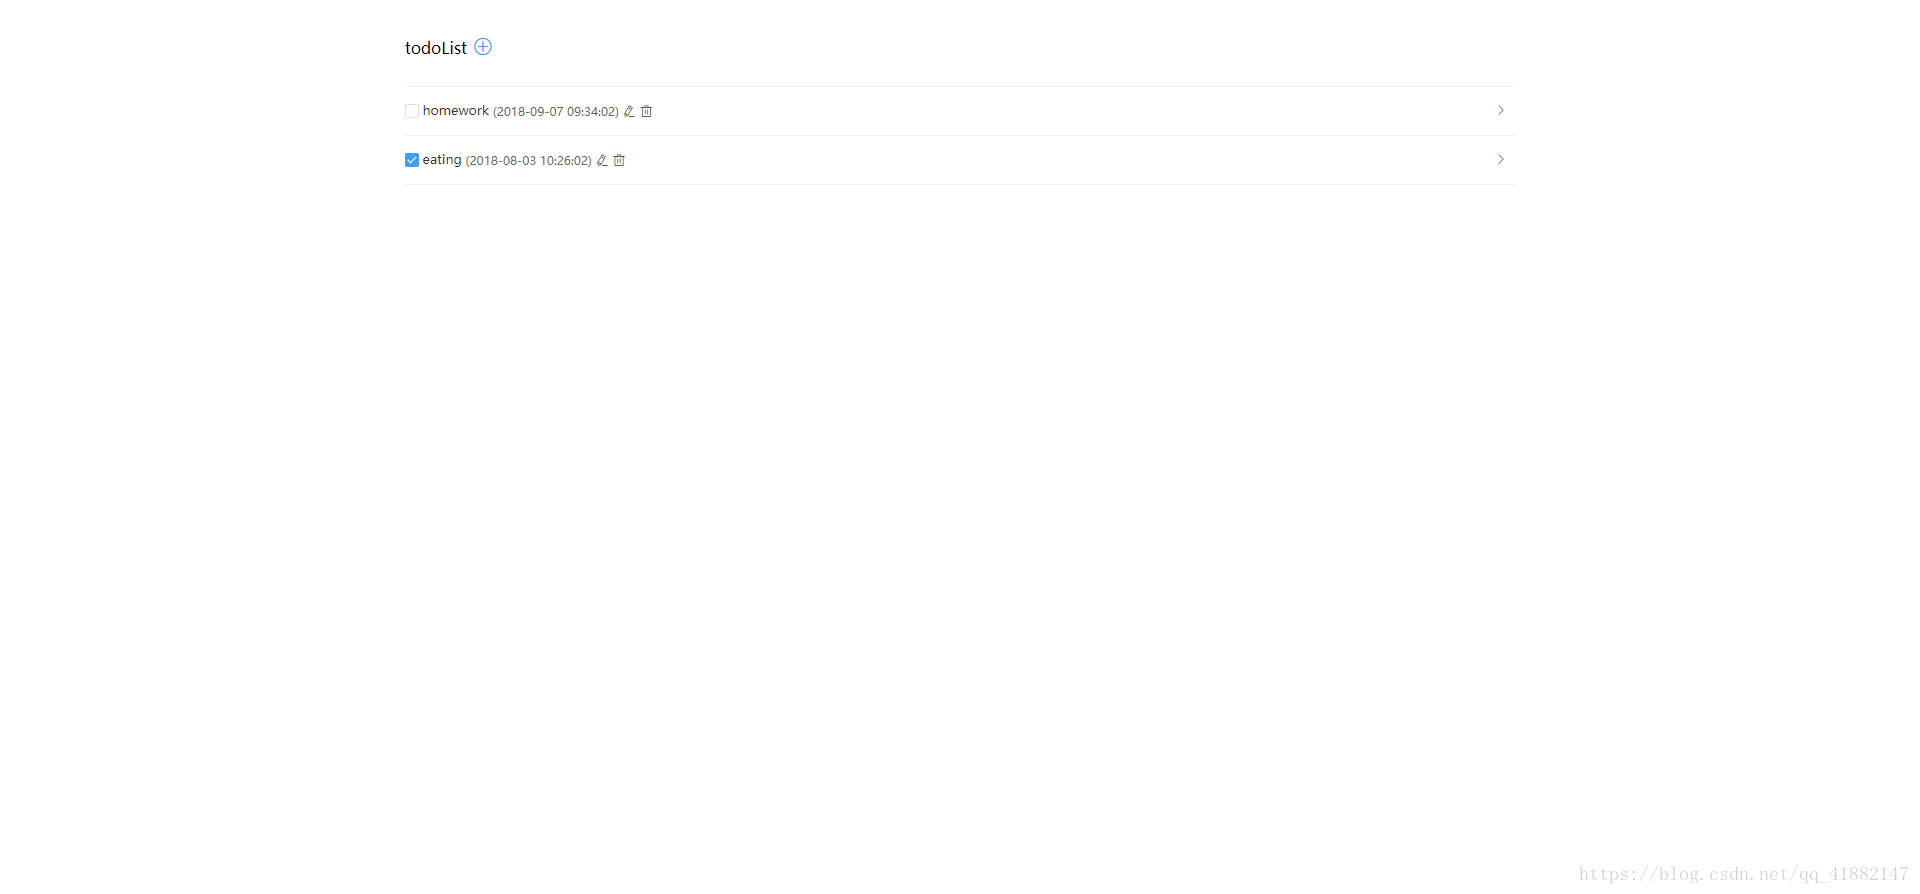
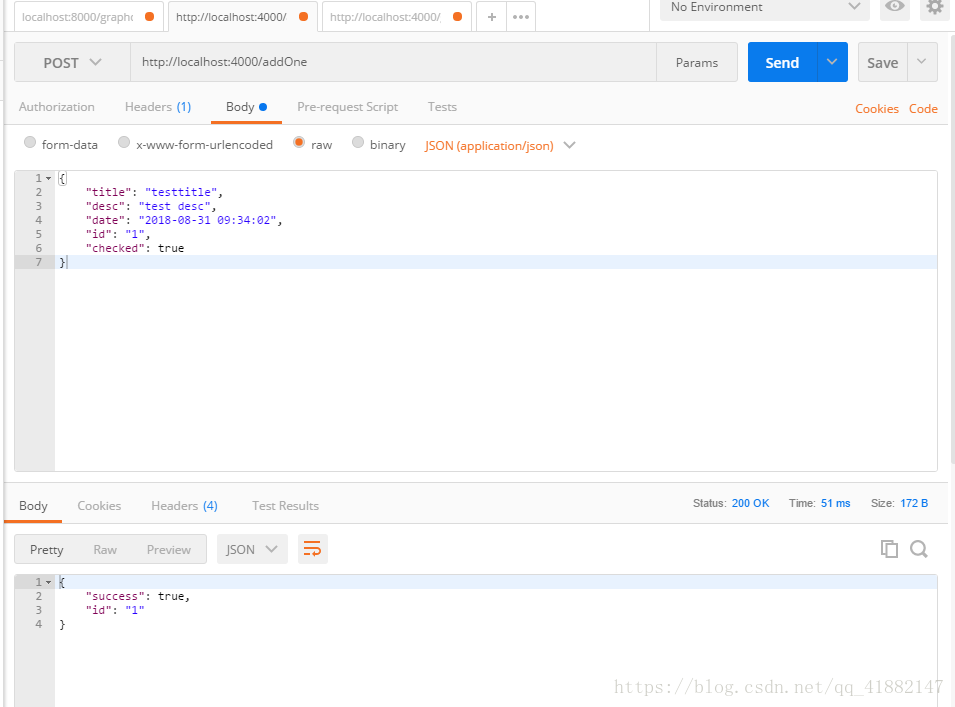
运行一下npm run start,待我们的服务器启动之后,就可以对数据库进行操作了。我们可以通过postman来模拟请求,先插几条数据:
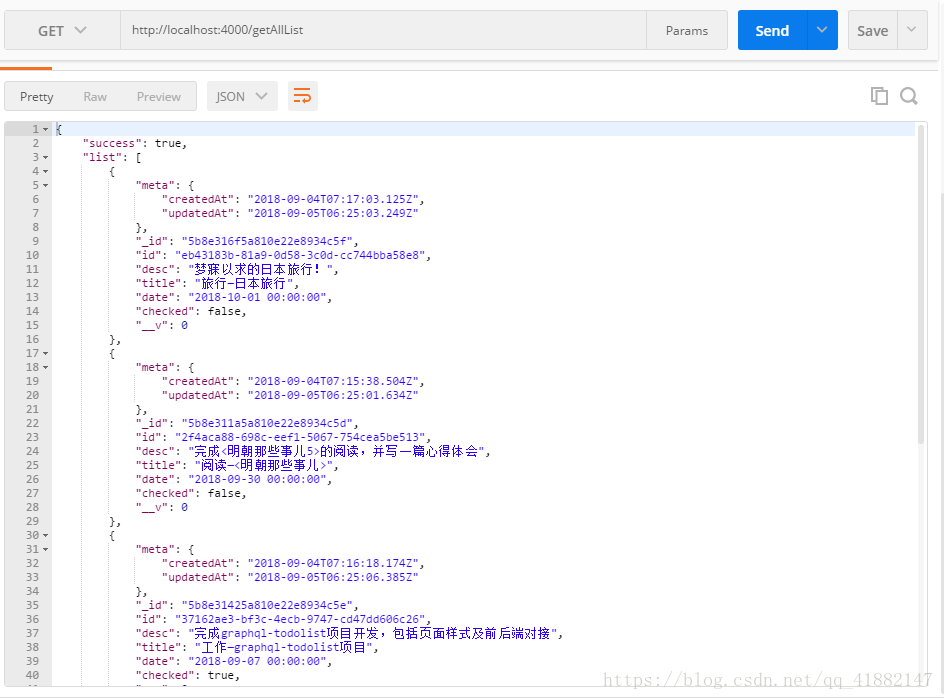
查询全部数据:
d. 前端对接接口
前端直接用ajax发起请求就好了,平时工作中都是用axios的,但是我懒得弄,所以直接用最简单的方法就好了。
引入了JQuery之后,改写public/js/index.js文件:略(项目里的public/index-s2.js的代码)
项目跑起来,发现已经基本上实现了前端发起请求对数据库进行操作了。
至此你已经成功打通了前端后台数据库,可以不要脸地称自己是一个小全栈了!
不过我们的目的还没有达到——用grapql实现对数据的操作!
4. 用grapql实现对数据的操作
GraphQL 的大部分讨论集中在数据获取(query),但是任何完整的数据平台也都需要一个改变服务端数据的方法。
REST 中,任何请求都可能最后导致一些服务端副作用,但是约定上建议不要使用 GET 请求来修改数据。GraphQL 也是类似 —— 技术上而言,任何查询都可以被实现为导致数据写入。然而,建一个约定来规范任何导致写入的操作都应该显式通过变更(mutation)来发送。
简单说就是,GraphQL用mutation来实现数据的修改,虽然mutation能做的query也能做,但还是要区分开这连个方法,就如同REST中约定用GET来请求数据,用其他方法来更新数据一样。
a. 实现查询
查询的话比较简单,只需要在接口响应时,获取数据库的数据,然后返回;
const objType = new GraphQLObjectType({
  name: 'meta',
  fields: {
    createdAt: {
      type: GraphQLString
    },
    updatedAt: {
      type: GraphQLString
    }
  }
})
let ListType = new GraphQLObjectType({
  name: 'List',
  fields: {
    _id: {
      type: GraphQLID
    },
    id: {
      type: GraphQLString
    },
    title: {
      type: GraphQLString
    },
    desc: {
      type: GraphQLString
    },
    date: {
      type: GraphQLString
    },
    checked: {
      type: GraphQLBoolean
    },
    meta: {
      type: objType
    }
  }
})
const listFields = {
  type: new GraphQLList(ListType),
  args: {},
  resolve (root, params, options) {
    return List.find({}).exec() // 数据库查询
  }
}
let queryType = new GraphQLObjectType({
    name: 'getAllList',
    fields: {
      lists: listFields,
    }
})

export default new GraphQLSchema({
  query: queryType
})
把增删查改都讲完再更改代码~
b. 实现增删查改
一开始说了,其实
mutation和query用法上没什么区别,这只是一种约定。
具体的mutation实现方式如下:
const outputType = new GraphQLObjectType({
  name: 'output',
  fields: () => ({
    id:     { type: GraphQLString},
    success:   { type: GraphQLBoolean },
  })
});

const inputType = new GraphQLInputObjectType({
  name: 'input',
  fields: () => ({
    id:          { type: GraphQLString },
    desc:        { type: GraphQLString },
    title:       { type: GraphQLString },
    date:        { type: GraphQLString },
    checked:        { type: GraphQLBoolean }
  })
});
let MutationType = new GraphQLObjectType({
  name: 'Mutations',
  fields: () => ({
    delOne: {
      type: outputType,
      description: 'del',
      args: {
        id: { type: GraphQLString }
      },
      resolve: (value, args) => {
      	console.log(args)
      	let result = delOne(args)
        return result
      }
    },
    editOne: {
      type: outputType,
      description: 'edit',
      args: {
        listObj: { type: inputType }
      },
      resolve: (value, args) => {
      	console.log(args)
      	let result = editOne(args.listObj)
        return result
      }
    },
    addOne: {
      type: outputType,
      description: 'add',
      args: {
        listObj: { type: inputType }
      },
      resolve: (value, args) => {
      	console.log(args.listObj)
      	let result = addOne(args.listObj)
        return result
      }
    },
    tickOne: {
      type: outputType,
      description: 'tick',
      args: {
        id: { type: GraphQLString },
        checked: { type: GraphQLBoolean },
      },
      resolve: (value, args) => {
      	console.log(args)
      	let result = tickOne(args)
        return result
      }
    },

  }),
});

export default new GraphQLSchema({
  query: queryType,
  mutation: MutationType
})
c. 完善其余代码
在实现前端请求Graphql服务器时,最困扰我的就是参数以什么样的格式进行传递。后来在Graphql界面玩Graphql的query请求时发现了其中的诀窍…
关于前端请求格式进行一下说明:
如上图,在玩Graphql的请求时,我们就可以直接在控制台network查看请求的格式了。这里我们只需要模仿这种格式,当做参数发送给Graphql服务器即可。
记得用反引号: `` ,来拼接参数格式。然后用data: {query: params}的格式传递参数,代码如下:
let data = {
            query: `mutation{
                      addOne(listObj:{
                        id: "${that.getUid()}",
                        desc: "${that.params.desc}",
                        title: "${that.params.title}",
                        date: "${that.getTime(that.params.date)}",
                        checked: false
                      }){
                        id,
                        success
                      }
                    }`
          }
          $.post('/graphql', data).done((res) => {
            console.log(res)
            // do something
          })
最后更改server.js,router/index.js,controllers/list.js,public/index.js改成github项目对应目录的文件代码即可。
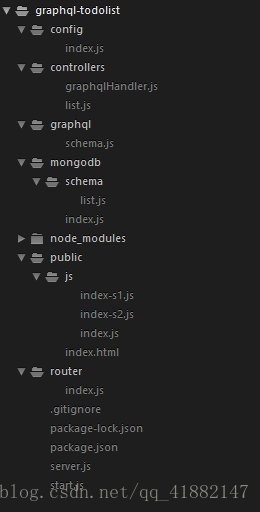
完整项目的目录如下:
五、后记
对于Vue开发者,可以使用vue-apollo使得前端传参更加优雅~
对上文有疑问或者有建议意见的,可以加我QQ:820327571,并备注:Graphql