版权声明:本文为博主原创文章,未经博主允许不得转载。 https://blog.csdn.net/u011394071/article/details/53561394
android样式的简单使用
了解android中的样式
- android中可以通过设置xml文件,指定特定view的样式,activity也可以指定特定样式
- 这里先从简单的例子了解和使用样式
设置view的样式
- 给textview设置样式,一般如果应用中textview有多处地方的样式一样,可以抽取到res/values/styles.xml文件中统一设置,在布局文件中通过@style/xxx的方式指定即可,这里所指的样式,跟网页中的css样式一样,都是为了统一风格和代码重用而设计。
- 第一种方式是在res/values/styles.xml文件中指定样式,第二种方式也是在res/values/目录下,但文件名可以根据需要随意起,但注意,xml文件名只能小写。这里为了方便,介绍第二种方式,其实可以统一到styles.xml中。
实现步骤
-
在res/values目录下创建textstyles.xml文件,用于指定文本样式
<?xml version="1.0" encoding="utf-8"?> <resources> <style name="textStyle"> <item name="android:textColor">#600f</item> <item name="android:layout_width">wrap_content</item> <item name="android:layout_height">wrap_content</item> <item name="android:background">@drawable/bg</item> <item name="android:textSize">18sp</item> </style> </resources> -
布局文件中引用样式
<TextView style="@style/textStyle" android:text="我是第一个文本"/> -
这样,如果有需要重复使用的文本就可以直接引用就可以,有些情况我们只要使用到样式中的一部分,另一部分需要个性化,这时跟类的继承关系一样,可以继承父样式,然后复写指定属性就可以了,如:
<?xml version="1.0" encoding="utf-8"?> <resources> <style name="textStyle"> <item name="android:textColor">#600f</item> <item name="android:layout_width">wrap_content</item> <item name="android:layout_height">wrap_content</item> <item name="android:background">@drawable/bg</item> <item name="android:textSize">18sp</item> </style> <style name="textStyle.Black"> <item name="android:layout_marginTop">10dp</item> <item name="android:textColor">#000</item> </style> </resources> -
布局文件中使用
 <TextView
        style="@style/textStyle"
        android:text="我是第一个文本"/>

    <TextView
        style="@style/textStyle.Black"
        android:text="我是继承第一个文本并修改颜色"/>
对于activity的样式,应该叫做主题了
-
可以直接使用系统提供的各种样式,也可以根据需要进行修改,比如使用系统提供的样式,在AndroidManifest文件中activity节点下添加一下样式,让activity以一个dialog的方式启动
<activity android:name=".MainActivity" android:theme="@style/Theme.AppCompat.Dialog"> -
效果如下:
-
但是不是系统提供的所有样式都能用,需要兼容当前版本,如果使用不当会导致程序挂掉。
-
也可以通过自定义样式,来实现不同的需求,如在res/values目录下创建mainstyle.xml文件
<?xml version="1.0" encoding="utf-8"?> <resources> <style name="MainStyle" parent="Theme.AppCompat.NoActionBar"> <item name="android:windowBackground">@color/colorWindow</item> </style> </resources> -
AndroidManifest文件中activity节点下指定样式
<activity android:name=".MainActivity" android:theme="@style/MainStyle"> -
效果如下:
兼容不同版本
- 之前说因为有些主题由于当前版本不支持导致程序崩溃,这就需要做版本适配了,对于适配主题,官方的建议是创建不同的资源文件,如android5.0出现的一些新特性需要使用,则需创建res/values-v21用来放置我们指定的主题文件。
-
再拿我们上面举的例子来说,有时候我们需要我们的背景侵入到系统栏中,比如现在的QQ,这时候android4.4以上给我们提供这样的属性,可以方便的使用,但在这之前是用不了的,会报错,所以需要做兼容,创建目录res/values-v21,把我们的mainstyle.xml放进去,然后修改成这样
<?xml version="1.0" encoding="utf-8"?> <resources> <style name="MainStyle" parent="Theme.AppCompat.NoActionBar"> <item name="android:windowTranslucentStatus">false</item> <item name="android:windowTranslucentNavigation">true</item> <!--Android 5.x开始需要把颜色设置透明,否则导航栏会呈现系统默认的浅灰色--> <item name="android:statusBarColor">@android:color/transparent</item> <!--窗体的背景,相当于我们做网页的背景,这里为了突出直接放一张图片--> <item name="android:windowBackground">@drawable/e</item> </style> </resources> -
这里还需要注意一下,使用侵入系统栏的样式时,需要在布局文件中加入这么一句android:fitsSystemWindows="true" ,否则我们的内容也跟着布局到系统栏中,看起来不太合适
<LinearLayout xmlns:android="http://schemas.android.com/apk/res/android" xmlns:tools="http://schemas.android.com/tools" android:layout_width="match_parent" android:fitsSystemWindows="true" //就是这句 android:layout_height="match_parent" android:orientation="vertical" tools:context="skxy.dev.demo.MainActivity"> <TextView style="@style/textStyle" android:text="我是第一个文本"/> <TextView style="@style/textStyle.Black" android:text="我是继承第一个文本并修改字体颜色"/> </LinearLayout> -
要使用自定义的主题,别忘了在清单文件中引用
<activity android:name=".MainActivity" android:theme="@style/MainStyle"> -
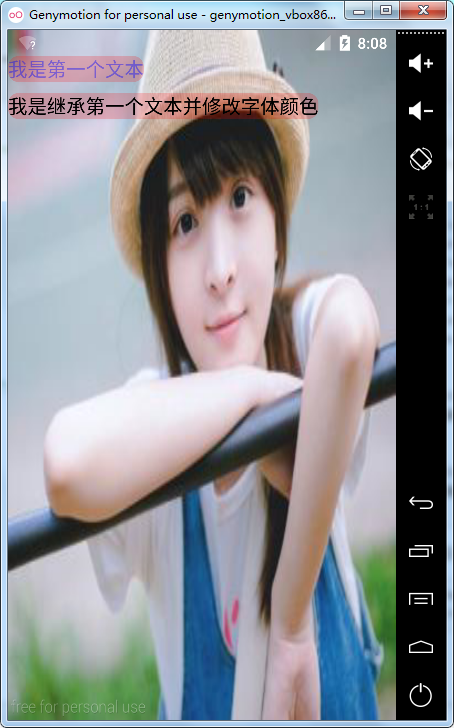
最后看看效果:
- 怎么样,瞬间感觉和谐了点哈哈~
动态切换主题
- 有时候还需要动态的切换主题,比如白天黑夜主题切换,这个怎么实现呢,这里就需要先准备好两套主题,然后监听客户的选择,动态修改主题就Ok了,这里为了方便,就使用上面写好的这两套主题
MainActivity中的逻辑实现
-
这里主要处理监听的逻辑和状态保存就可以了
package skxy.dev.demo;

import android.os.Bundle;
import android.support.v7.app.AppCompatActivity;
import android.view.View;

public class MainActivity extends AppCompatActivity{
    private int THEMEID = -1;// 设置主题id
    @Override
    protected void onCreate(Bundle savedInstanceState) {
        super.onCreate(savedInstanceState);
        if (savedInstanceState != null) {
            if (savedInstanceState.getInt("theme", -1) != -1) {
                THEMEID = savedInstanceState.getInt("theme");
                this.setTheme(THEMEID); // 设置主题皮肤
            }
        }
        setContentView(R.layout.activity_main);
    }

    public void themeone(View view) {
        //设置主题mainStyle
        setMyTheme(R.style.MainStyle);
    }

    public void themetow(View view) {
        //设置主题AppTheme
        setMyTheme(R.style.AppTheme);
    }

    private void setMyTheme(int themId) {
        THEMEID = themId;
        recreate();
    }

    // 保存主题ID,onCreate 时读取主题
    @Override
    public void onSaveInstanceState(Bundle outState) {
        super.onSaveInstanceState(outState);
//如果用户按返回键退出应用了,则第二次进来还是使用默认的主题,如果需要持久化保存用户的选择,应该使用本地持久化缓存 outState.putInt("theme", THEMEID); }}//这里需要说明一下,这保存的状态只有在应用内切换不同界面时,或者不退出应用,切换到其他应用,保存的这个状态才能拿到, -
为了照顾初学者,这里还是贴一下布局文件
<?xml version="1.0" encoding="utf-8"?> <LinearLayout xmlns:android="http://schemas.android.com/apk/res/android" xmlns:tools="http://schemas.android.com/tools" android:layout_width="match_parent" android:fitsSystemWindows="true" android:layout_height="match_parent" android:orientation="vertical" tools:context="skxy.dev.demo.MainActivity"> <TextView style="@style/textStyle" android:text="我是第一个文本"/> <TextView style="@style/textStyle.Black" android:text="我是继承第一个文本并修改字体颜色"/> <Button android:onClick="themeone" style="@style/textStyle.Black" android:text="主题1"/> <Button android:onClick="themetow" style="@style/textStyle.Black" android:text="主题2"/> </LinearLayout> -
最后看看效果:


