1 课程计划
- springmvc的介绍
- springmvc的执行流程
- 入门程序
- Springmvc架构讲解
- 组件
- Springmvc整合mybatis
- 参数绑定
- 基本数据类型
- Pojo类型
- Pojo包装类型
- 自定义参数绑定
评价:感觉参数的这块很重要
- springmvc和mybatis的区别。
2 springmvc 介绍
Spring MVC属于SpringFrameWork的后续产品,已经融合在Spring Web Flow里面。Spring 框架提供了构建 Web 应用程序的全功能 MVC 模块。使用 Spring 可插入的 MVC 架构,从而在使用Spring进行WEB开发时,可以选择使用Spring的SpringMVC框架或集成其他MVC开发框架,如Struts1,Struts2等。
Lifecycle for overriding binding, validation, etc,易于同其它View框架(Tiles等)无缝集成,采用IOC便于测试。
它是一个典型的教科书式的mvc构架,而不像struts等都是变种或者不是完全基于mvc系统的框架,对于初学者或者想了解mvc的人来说我觉得 spring是最好的,它的实现就是教科书!第二它和tapestry一样是一个纯正的servlet系统,这也是它和tapestry相比 struts所具有的优势。而且框架本身有代码,看起来容易理解。
3 springmvc 处理流程
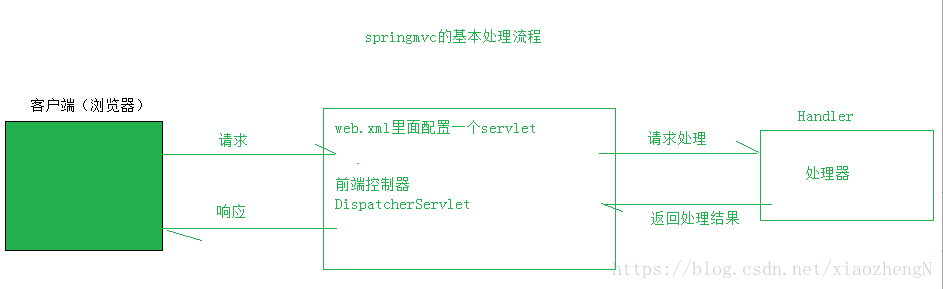
评价:核心是DispatcherServlet前端控制器,后面的Handler还有很多东西,还有视图解析器,这个只是一个大概的模型
4 入门程序
4.1 开发环境
Jar包下载:
spring:http://maven.springframework.org/release/org/springframework/spring/
jackson:
http://repo1.maven.org/maven2/com/fasterxml/jackson/core/
4.2 创建web工程

4.3 导入jar包

4.4 创建springmvc核心配置文件
| <?xml version="1.0" encoding="UTF-8"?> <beans xmlns="http://www.springframework.org/schema/beans" xmlns:xsi="http://www.w3.org/2001/XMLSchema-instance" xmlns:p="http://www.springframework.org/schema/p" xmlns:context="http://www.springframework.org/schema/context" xmlns:dubbo="http://code.alibabatech.com/schema/dubbo" xmlns:mvc="http://www.springframework.org/schema/mvc" xsi:schemaLocation="http://www.springframework.org/schema/beans http://www.springframework.org/schema/beans/spring-beans-4.0.xsd http://www.springframework.org/schema/mvc http://www.springframework.org/schema/mvc/spring-mvc-4.0.xsd http://code.alibabatech.com/schema/dubbo http://code.alibabatech.com/schema/dubbo/dubbo.xsd http://www.springframework.org/schema/context http://www.springframework.org/schema/context/spring-context-4.0.xsd">
</beans> |
评价:框架默认是加载WEB-INF下面的,springmvc-servlet.xml 的,一般为了配置文件的统一管理,我们都是自己去指定加载的
4.5 在web.xml里面配置前端控制器
| <?xml version="1.0" encoding="UTF-8"?> <web-app xmlns:xsi="http://www.w3.org/2001/XMLSchema-instance" xmlns="http://java.sun.com/xml/ns/javaee" xmlns:web="http://java.sun.com/xml/ns/javaee/web-app_2_5.xsd" xsi:schemaLocation="http://java.sun.com/xml/ns/javaee http://java.sun.com/xml/ns/javaee/web-app_2_5.xsd" id="WebApp_ID" version="2.5">
<!-- 前端控制器 --> <servlet> <servlet-name>springmvc</servlet-name> <servlet-class>org.springframework.web.servlet.DispatcherServlet</servlet-class> </servlet>
<servlet-mapping> <servlet-name>springmvc</servlet-name> <!-- 要拦截的请求格式 --> <url-pattern>*.do</url-pattern> </servlet-mapping>
</web-app> |
5 springmvc架构
5.1 框架结构(重点)

评价:这个是一个比较完整的流程图,一定要做到心中有这个图
5.2 架构流程
1.用户发送请求到前端控制器DispatcherServlet
2.DispatcherServlet收到请求调用HandlerMapping处理器映射器
3.处理器映射器根据请求url 找到具体的处理器,生成处理器链和拦截器(如果存在) 一起返回给DispatcherServlet
4. DispatcherServlet通过HandlerAdapter处理器适配器调用处理器
5.执行处理器handler
6执行完成返回ModelAndView
7 HandlerAdapter讲handler执行结果ModelAndView返回给DispatcherServlet
8 DispatcherServlet将ModelAndView发送给ViewReslover视图解析器
9 ViewReslover 解析后返回具体视图
10 DispatcherServlet 对view 进行数据解析
11 DispatcherServlet响应客户端
5.3 核心组件
DispatcherServlet:前端控制器
用户的请求发送给前端控制器,DispatcherServlet是整个流程控制的核心,由它调用其他组件处理用户请求,DispatcherServlet的降低了组件之间的耦合性。
HandlerMapping:处理器映射器
HandlerMapping负责根据用回请求找到Handler处理器,springmvc提供了不同的映射器实现不同的映射方式,例如:配置文件方式,注解方式等等。
默认是使用注解的方式:
org.springframework.web.servlet.mvc.annotation.DefaultAnnotationHandlerMapping
handler:处理器
由于handler 涉及到具体的用户业务请求,需要程序员根据业务需求开发handler,就是用来处理用户的请求。
HandlAdapter:处理器适配器
通过HandlAdapter对处理器执行,这是使用的适配器模式,可以对多种类型的处理器进行执行,默认是对注解形式的。
默认配置:
org.springframework.web.servlet.mvc.annotation.AnnotationMethodHandlerAdapter
ViewResolver:试图解析器
ViewResolver负责将处理结果生成view视图,ViewResolver首先根据逻辑视图名解析成物理视图(网页地址) 再生成view视图对象,最后对view进行数据加载处理结果通过页面展示给用户
默认配置:
org.springframework.web.servlet.view.InternalResourceViewResolver
View:视图
Springmvc框架提供了很多view视图类型的支持,包括,jsp freemaker等,常用的就是jsp
开发人员需要关注的就是 handler和view
说明:在springmvc中 处理器映射器 处理器适配器 试图解析器 是springmvc的三大组件。
5.4 处理器映射器和处理器适配器
5.4.1 处理器映射器的配置
| <!-- 处理器映射器 --> <bean class="org.springframework.web.servlet.mvc.method.annotation.RequestMappingHandlerMapping" /> |
5.4.2 处理器适配器的配置
| <!-- 处理器适配器--> <bean class="org.springframework.web.servlet.mvc.method.annotation.RequestMappingHandlerAdapter" /> |
5.4.3 配置<mvc:annotation-driver>
<mvc:annotation-driver> 可以替代注解处理器和适配器的配置。
评价:后面还自己自己去扩展适配器解析器
5.5 视图解析器
| <!-- 视图解析器 --> <bean class="org.springframework.web.servlet.view.InternalResourceViewResolver"> <property name="viewClass" value="org.springframework.web.servlet.view.JstlView" /> <property name="prefix" value="/WEB-INF/jsp/" /> <property name="suffix" value=".jsp"></property> </bean> |
ViewClass:jstlView表示jsp模版页面需要使用jstl标签库,所以classpath中必须包含jstl的相关jar包,次属性是默认的可以不用设置
Prefix和suffix 查找视图页面的前缀和后缀,最是视图地址为:
/WEB-INF/jsp/hello.jsp
配置前缀和后缀之后那么在返回的时候直接写 hello 就可以了。
6 整合mybatis
为了更好的学习,我们先整合mybatis和springmvc
6.1 需求
查询用户列表
6.2 需要的jar包
在资料文件夹里面有ssm整合需要的jar文件。
6.3 工程搭建
使用springmvc-01这个工程
6.4 sqlMapConfig.xml
| <?xml version="1.0" encoding="UTF-8"?> <!DOCTYPE configuration PUBLIC "-//mybatis.org//DTD Config 3.0//EN" "http://mybatis.org/dtd/mybatis-3-config.dtd"> <configuration>
</configuration> |
6.5 spring 整合dao配置文件
| <?xml version="1.0" encoding="UTF-8"?> <beans xmlns="http://www.springframework.org/schema/beans" xmlns:context="http://www.springframework.org/schema/context" xmlns:p="http://www.springframework.org/schema/p" xmlns:aop="http://www.springframework.org/schema/aop" xmlns:tx="http://www.springframework.org/schema/tx" xmlns:xsi="http://www.w3.org/2001/XMLSchema-instance" xsi:schemaLocation="http://www.springframework.org/schema/beans http://www.springframework.org/schema/beans/spring-beans-4.0.xsd http://www.springframework.org/schema/context http://www.springframework.org/schema/context/spring-context-4.0.xsd http://www.springframework.org/schema/aop http://www.springframework.org/schema/aop/spring-aop-4.0.xsd http://www.springframework.org/schema/tx http://www.springframework.org/schema/tx/spring-tx-4.0.xsd http://www.springframework.org/schema/util http://www.springframework.org/schema/util/spring-util-4.0.xsd">
<!-- 加载外部的数据库的连接信息 --> <context:property-placeholder location="classpath:db.properties" />
<!-- 数据源的配置 --> <bean id="dataSource" class="org.apache.commons.dbcp.BasicDataSource" destroy-method="close"> <property name="driverClassName" value="${jdbc.driver}" /> <property name="url" value="${jdbc.url}" /> <property name="username" value="${jdbc.username}" /> <property name="password" value="${jdbc.password}" /> <property name="maxActive" value="10" /> <property name="maxIdle" value="5" /> </bean>
<!-- spring管理sqlSessionFactory工厂对象 --> <bean id="sqlSessionFactory" class="org.mybatis.spring.SqlSessionFactoryBean"> <property name="dataSource" ref="dataSource" /> <property name="configLocation" value="classpath:mybatis/SqlMapConfig.xml" /> </bean>
<!-- 使用mapper代理开发配置包扫描 --> <bean class="org.mybatis.spring.mapper.MapperScannerConfigurer"> <property name="basePackage" value="com.whhp.springmvc.mapper"/> </bean> </beans> |
6.6 spring的扫描service的配置文件
| <?xml version="1.0" encoding="UTF-8"?> <beans xmlns="http://www.springframework.org/schema/beans" xmlns:context="http://www.springframework.org/schema/context" xmlns:p="http://www.springframework.org/schema/p" xmlns:aop="http://www.springframework.org/schema/aop" xmlns:tx="http://www.springframework.org/schema/tx" xmlns:xsi="http://www.w3.org/2001/XMLSchema-instance" xsi:schemaLocation="http://www.springframework.org/schema/beans http://www.springframework.org/schema/beans/spring-beans-4.0.xsd http://www.springframework.org/schema/context http://www.springframework.org/schema/context/spring-context-4.0.xsd http://www.springframework.org/schema/aop http://www.springframework.org/schema/aop/spring-aop-4.0.xsd http://www.springframework.org/schema/tx http://www.springframework.org/schema/tx/spring-tx-4.0.xsd http://www.springframework.org/schema/util http://www.springframework.org/schema/util/spring-util-4.0.xsd">
<!-- 配置包扫描器 --> <context:component-scan base-package="com.whhp.springmvc.service"/>
</beans> |
6.7 配置事物
管理事务二种方式:第一种方式通过表达式匹配,第二种方式注解。
6.8 springmvc的核心配置
| <?xml version="1.0" encoding="UTF-8"?> <beans xmlns="http://www.springframework.org/schema/beans" xmlns:xsi="http://www.w3.org/2001/XMLSchema-instance" xmlns:p="http://www.springframework.org/schema/p" xmlns:context="http://www.springframework.org/schema/context" xmlns:dubbo="http://code.alibabatech.com/schema/dubbo" xmlns:mvc="http://www.springframework.org/schema/mvc" xsi:schemaLocation="http://www.springframework.org/schema/beans http://www.springframework.org/schema/beans/spring-beans-4.0.xsd http://www.springframework.org/schema/mvc http://www.springframework.org/schema/mvc/spring-mvc-4.0.xsd http://code.alibabatech.com/schema/dubbo http://code.alibabatech.com/schema/dubbo/dubbo.xsd http://www.springframework.org/schema/context http://www.springframework.org/schema/context/spring-context-4.0.xsd">
<!-- 扫描controller --> <context:component-scan base-package="com.whhp.springmvc.controller" />
<mvc:annotation-driven/>
<!-- 视图解析器 --> <bean class="org.springframework.web.servlet.view.InternalResourceViewResolver"> <property name="viewClass" value="org.springframework.web.servlet.view.JstlView" /> <property name="prefix" value="/WEB-INF/jsp/" /> <property name="suffix" value=".jsp"></property> </bean>
</beans> |
6.9 web.xml的配置
| <?xml version="1.0" encoding="UTF-8"?> <web-app xmlns:xsi="http://www.w3.org/2001/XMLSchema-instance" xmlns="http://java.sun.com/xml/ns/javaee" xmlns:web="http://java.sun.com/xml/ns/javaee/web-app_2_5.xsd" xsi:schemaLocation="http://java.sun.com/xml/ns/javaee http://java.sun.com/xml/ns/javaee/web-app_2_5.xsd" id="WebApp_ID" version="2.5">
<!-- 加载spring容器 --> <context-param> <param-name>contextConfigLocation</param-name> <param-value>classpath:spring/application-*.xml</param-value> </context-param>
<listener> <listener-class>org.springframework.web.context.ContextLoaderListener</listener-class> </listener>
<!-- 前端控制器 --> <servlet> <servlet-name>springmvc</servlet-name> <servlet-class>org.springframework.web.servlet.DispatcherServlet</servlet-class> <!-- 指定要加载的springmvc的核心配置文件 --> <init-param> <param-name>contextConfigLocation</param-name> <param-value>classpath:springmvc.xml</param-value> </init-param> </servlet>
<servlet-mapping> <servlet-name>springmvc</servlet-name> <!-- 要拦截的请求格式 --> <url-pattern>*.do</url-pattern> </servlet-mapping>
</web-app>
|
7 参数绑定
7.1 绑定简单数据类型
7.1.2 需求分析
编辑用户,对用户的信息进行修改
请求的url:/userEdit.do
参数id
7.1.3 service实现
| //通过id查询用户 @Override public User getUserById(Integer id) { User user = userMapper.selectByPrimaryKey(id); return user; } |
评价:这个好Service层的代码,由于Mapper层我们用的逆向工程搭建的,而且都是一些简单的CRUD操作,我们没有过多的关注DAO
7.1.4 controller代码实现
| //通过id查询用户 @RequestMapping("/userEdit") public ModelAndView userEdit(HttpServletRequest request) { //获取请求参数? String id = request.getParameter("id"); Integer uid = new Integer(id); User user = userService.getUserById(uid);
//创建MModelAndView ModelAndView modelAndView = new ModelAndView(); modelAndView.addObject("user",user); modelAndView.setViewName("editUser"); return modelAndView; } |
7.1.5 默认支持的参数类型
HttpServletRequest request
HttpServletResponse response
HttpSession httpSession
Model model
如果使用model可以不使用ModelAndView,Model对象可以向页面传递参数,View对象则可以使用string返回值替代,不管是Model还是ModelAndView 本质上都是使用reuqest域传值
7.1.6 绑定简单类型
因为request在获取请求参数的时候,可以将代码进行简化。
| //通过id查询用户 @RequestMapping("/userEdit") public String userEdit(Model model,Integer id) { User user = userService.getUserById(id); model.addAttribute("user",user); return "editUser"; } |
7.1.6.1 支持的数据类型
整形Integer int 字符串,单精度,双精度 布尔型
说明: 对于布尔型的参数,请求的参数值true或false
url= localhost:8080/xxx.do?status=true
public void xxx(Boolean status)
7.1.6.2 @RequestParam(重点)
@RequestParam用来处理简单类型的绑定。
Value:参数名称,请求参数的名称(把请求参数映射到形参上)
Required:默认是true,表示请求中一定要有相印的参数,否则会报错。
HTTP Status 400 - Required Integer parameter 'id' is not present
defaultValue:可以设置默认值
400-499 :请求发送错误
500-599:服务端出错了
405:客户端是发送的get请求,但是服务端只有post请求的方法。
7.2 绑定pojo类型
7.2.1 需求分析
需求:修改数据保存
url: /editSave.do
参数: 表单中填写的数据
7.2.2 使用pojo接收表单数据
如果提交的参数很多,或者提交的表单中的内容很多的时候可以使用pojo接收数据,要求pojo对象中的属性和表单中的input的name属性一致。
页面中
| <input type="text" name="name" value="${user.username }" /> <input type="text" name="birthday" value="<fmt:formatDate value="${user.birthday}" pattern="yyyy-MM-dd" />" />
|
javaBean
| private String username; private Date birthday; |
7.2.3 解决post乱发问题
| <filter> <filter-name>CharacterEncodingFilter</filter-name> <filter-class>org.springframework.web.filter.CharacterEncodingFilter</filter-class> <init-param> <param-name>encoding</param-name> <param-value>utf-8</param-value> </init-param> </filter>
<filter-mapping> <filter-name>CharacterEncodingFilter</filter-name> <url-pattern>/*</url-pattern> </filter-mapping> |
7.3 绑定包装pojo
7.3.1 需求分析
使用包装pojo接收商品的查询条件
7.3.2 包装的pojo
| private User user;
public User getUser() { return user; }
public void setUser(User user) { this.user = user; } |
7.3.3 页面修改
| <input type="text" name="user.username" value="${user.username }" /> <input type="text" name="user.birthday" value="<fmt:formatDate value="${user.birthday}" pattern="yyyy-MM-dd" />" /> |
7.3.4 方法的编写
| //使用包装类类接收数据 @RequestMapping("/editSave2") public String editSave2(UserVo vo) { System.out.println("----"); System.out.println(vo.getUser().getUsername()); System.out.println(vo.getUser().getId()); System.out.println(vo.getUser().getSex()); return null; } |
7.4 自定义参数绑定
7.4.1 需求分析
在用户修改页面可以修改日期,根据业务自定义日期格式
由于日期数据有多种格式,所以springmvc没办法把字符串转换成日期类型。所以需要自定义参数绑定。前端控制器接收到请求后,找到注解形式的处理器适配器,对requestMapping标记的方法进行适配,并对方法中的形参进行参数绑定。在springmvc这可以在处理器适配器上自定义Converter进行参数绑定。如果使用<mvc:annotation-driven>可以在此标签上进行扩展。
7.4.2 自定义Converter
| public class DateConverter implements Converter<String, Date> {
@Override public Date convert(String source) { SimpleDateFormat simpleDateFormat = new SimpleDateFormat("yyyy-MM-dd"); try { Date date = simpleDateFormat.parse(source); return date; } catch (ParseException e) { e.printStackTrace(); } return null; } |
7.4.3 配置Conterver转换器
| <mvc:annotation-driven conversion-service="conversionService" /> <!-- 转换器的配置 --> <bean id="conversionService" class="org.springframework.format.support.FormattingConversionServiceFactoryBean" > <property name="converters" > <set> <bean class="com.whhp.springmvc.converter.DateConverter" ></bean> </set> </property>
</bean> |
评价:这个是在SpringMVC的核心配置文件配置的
8 springmvc和struts2的区别
- Springmvc是基于一个核心DispatcherServlet前端控制器,而struts2是基于一个filter过滤器
- Springmvc是基于方法开发(一个url对应一个方法),请求参数传递到方法的形参,可以设计为单例或者多例(建议单例) struts2是基于类开发,参数是通过类的属性,只能设计多例
- Struts2采用值栈存储请求和响应的数据,通过OGNL存取数据,springmvc通过参数解析器是将request请求内容解析,并给方法形参赋值,将数据和视图封装成ModelAndView对象,最后又将ModelAndView中的模型数据通过reqeust域传递到页面,。Jsp视图解析器默认使用jstl。
- 建议web层开发使用springmvc,因为struts2出现过安全方面的问题,springmvc和spring不需要进行整合,因为是一站式处理的。