前文,我们讲述了rocketMq的基本使用,接下来聊聊如何使用springboot整合使用rocketMq;
1)新建maven工程,工程结构目录如图:
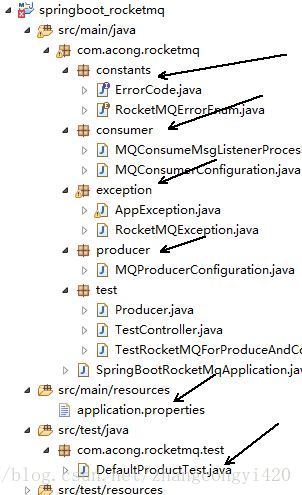
constants包下存放着常量信息,这里保存的是自定义的错误码,为将被异常类调用,
consumer包下存放的是消费者相关的配置,一个文件是消费者的配置,用于APP启动的时候全局注册,一个文件为消费者端的监听器,用于监听生产者发送过来的消息;
producer包放的是生产者相关的初始化配置信息;
test包下是用于测试的文件;
2)pom依赖的jar包,
<parent>
        <groupId>org.springframework.boot</groupId>
        <artifactId>spring-boot-starter-parent</artifactId>
        <version>2.0.1.RELEASE</version>
        <relativePath /> <!-- lookup parent from repository -->
    </parent>

    <properties>
        <project.build.sourceEncoding>UTF-8</project.build.sourceEncoding>
        <project.reporting.outputEncoding>UTF-8</project.reporting.outputEncoding>
        <java.version>1.8</java.version>
    </properties>

    <dependencies>

        <dependency>
            <groupId>org.springframework.boot</groupId>
            <artifactId>spring-boot-starter-web</artifactId>
        </dependency>

        <dependency>
            <groupId>org.springframework.boot</groupId>
            <artifactId>spring-boot-starter-test</artifactId>
            <scope>test</scope>
        </dependency>

        <dependency>
            <groupId>org.springframework.boot</groupId>
            <artifactId>spring-boot-starter</artifactId>
        </dependency>

        <dependency>
            <groupId>com.alibaba.rocketmq</groupId>
            <artifactId>rocketmq-client</artifactId>
            <version>3.2.6</version>
        </dependency>

    </dependencies>

    <build>
        <plugins>
            <plugin>
                <groupId>org.springframework.boot</groupId>
                <artifactId>spring-boot-maven-plugin</artifactId>
            </plugin>
        </plugins>
    </build>
2)application.properties的配置
spring.application.name=springboot-rocketmq
server.port=8095

###producer
#该应用是否启用生产者
rocketmq.producer.isOnOff=on
#发送同一类消息的设置为同一个group,保证唯一,默认不需要设置,rocketmq会使用ip@pid(pid代表jvm名字)作为唯一标示
rocketmq.producer.groupName=${spring.application.name}
#mq的nameserver地址
rocketmq.producer.namesrvAddr=192.168.2.203:9876
#消息最大长度 默认1024*4(4M)
rocketmq.producer.maxMessageSize=4096
#发送消息超时时间,默认3000
rocketmq.producer.sendMsgTimeout=3000
#发送消息失败重试次数,默认2
rocketmq.producer.retryTimesWhenSendFailed=2

###consumer
##该应用是否启用消费者
rocketmq.consumer.isOnOff=on
rocketmq.consumer.groupName=${spring.application.name}
#mq的nameserver地址
rocketmq.consumer.namesrvAddr=192.168.2.203:9876
#该消费者订阅的主题和tags("*"号表示订阅该主题下所有的tags),格式:topic~tag1||tag2||tag3;topic2~*;
#rocketmq.consumer.topics=DemoTopic~*;
rocketmq.consumer.topics=DemoTopic;
rocketmq.consumer.consumeThreadMin=20
rocketmq.consumer.consumeThreadMax=64
#设置一次消费消息的条数,默认为1条
rocketmq.consumer.consumeMessageBatchMaxSize=1
配置文件的相信解释可参考官网说明;
3)生产者代码:
@Configuration
public class MQProducerConfiguration {

    public static final Logger LOGGER = LoggerFactory.getLogger(MQProducerConfiguration.class);

    /**
     * 发送同一类消息的设置为同一个group,保证唯一,默认不需要设置,rocketmq会使用ip@pid(pid代表jvm名字)作为唯一标示
     */
    @Value("${rocketmq.producer.groupName}")
    private String groupName;

    @Value("${rocketmq.producer.namesrvAddr}")
    private String namesrvAddr;

    /**
     * 消息最大大小,默认4M
     */
    @Value("${rocketmq.producer.maxMessageSize}")
    private Integer maxMessageSize ;
    /**
     * 消息发送超时时间,默认3秒
     */
    @Value("${rocketmq.producer.sendMsgTimeout}")
    private Integer sendMsgTimeout;
    /**
     * 消息发送失败重试次数,默认2次
     */
    @Value("${rocketmq.producer.retryTimesWhenSendFailed}")
    private Integer retryTimesWhenSendFailed;

    @Bean
    public DefaultMQProducer getRocketMQProducer() throws RocketMQException {

        if(StringUtils.isEmpty(this.groupName)){
            throw new RocketMQException(RocketMQErrorEnum.PARAMM_NULL,"groupName is blank",false);
        }

        if (StringUtils.isEmpty(this.namesrvAddr)) {
            throw new RocketMQException(RocketMQErrorEnum.PARAMM_NULL,"nameServerAddr is blank",false);
        }

        DefaultMQProducer producer;
        producer = new DefaultMQProducer(this.groupName);

        producer.setNamesrvAddr(this.namesrvAddr);
        producer.setCreateTopicKey("AUTO_CREATE_TOPIC_KEY");

        //如果需要同一个jvm中不同的producer往不同的mq集群发送消息,需要设置不同的instanceName
        //producer.setInstanceName(instanceName);
        if(this.maxMessageSize!=null){
            producer.setMaxMessageSize(this.maxMessageSize);
        }
        if(this.sendMsgTimeout!=null){
            producer.setSendMsgTimeout(this.sendMsgTimeout);
        }
        //如果发送消息失败,设置重试次数,默认为2次
        if(this.retryTimesWhenSendFailed!=null){
            producer.setRetryTimesWhenSendFailed(this.retryTimesWhenSendFailed);
        }

        try {
            producer.start();

            LOGGER.info(String.format("producer is start ! groupName:[%s],namesrvAddr:[%s]"
                    , this.groupName, this.namesrvAddr));
        } catch (MQClientException e) {
            LOGGER.error(String.format("producer is error {}"
                    , e.getMessage(),e));
            throw new RocketMQException(e);
        }
        return producer;

    }


}
这个里面主要是读取配置文件的配置信息,然后初始化producer,项目启动的时候做全局的加载,其他地方如果有调用producer的,配置就生效了;
4)消费者代码,消费者代码包括两部分,一个是基本的配置,一个是封装的监听器信息,
consumer的基本配置代码如下:
@Configuration
public class MQConsumerConfiguration {
    public static final Logger logger = LoggerFactory.getLogger(MQConsumerConfiguration.class);

    @Value("${rocketmq.consumer.namesrvAddr}")
    private String namesrvAddr;
    @Value("${rocketmq.consumer.groupName}")
    private String groupName;
    @Value("${rocketmq.consumer.consumeThreadMin}")
    private int consumeThreadMin;
    @Value("${rocketmq.consumer.consumeThreadMax}")
    private int consumeThreadMax;
    @Value("${rocketmq.consumer.topics}")
    private String topics;
    @Value("${rocketmq.consumer.consumeMessageBatchMaxSize}")
    private int consumeMessageBatchMaxSize;

    @Autowired
    private MQConsumeMsgListenerProcessor mqMessageListenerProcessor;

    public DefaultMQPushConsumer getRocketMQConsumer() throws RocketMQException{

        if (StringUtils.isEmpty(groupName)){
            throw new RocketMQException(RocketMQErrorEnum.PARAMM_NULL,"groupName is null !!!",false);
        }
        if (StringUtils.isEmpty(namesrvAddr)){
            throw new RocketMQException(RocketMQErrorEnum.PARAMM_NULL,"namesrvAddr is null !!!",false);
        }
        if(StringUtils.isEmpty(topics)){
            throw new RocketMQException(RocketMQErrorEnum.PARAMM_NULL,"topics is null !!!",false);
        }

        DefaultMQPushConsumer consumer = new DefaultMQPushConsumer(groupName);
        consumer.setNamesrvAddr(namesrvAddr);
        consumer.setConsumeThreadMin(consumeThreadMin);
        consumer.setConsumeThreadMax(consumeThreadMax);
        consumer.registerMessageListener(mqMessageListenerProcessor);

        /**
         * 设置Consumer第一次启动是从队列头部开始消费还是队列尾部开始消费
         * 如果非第一次启动,那么按照上次消费的位置继续消费
         */
        consumer.setConsumeFromWhere(ConsumeFromWhere.CONSUME_FROM_FIRST_OFFSET);
        /**
         * 设置消费模型,集群还是广播,默认为集群
         */
        //consumer.setMessageModel(MessageModel.CLUSTERING);

        /**
         * 设置一次消费消息的条数,默认为1条
         */
        consumer.setConsumeMessageBatchMaxSize(consumeMessageBatchMaxSize);

        try {
            /**
             * 设置该消费者订阅的主题和tag,如果是订阅该主题下的所有tag,
             * 则tag使用*;如果需要指定订阅该主题下的某些tag,则使用||分割,例如tag1||tag2||tag3
             */
            /*String[] topicTagsArr = topics.split(";");
            for (String topicTags : topicTagsArr) {
                String[] topicTag = topicTags.split("~");
                consumer.subscribe(topicTag[0],topicTag[1]);
            }*/
            consumer.subscribe(topics, "*");

            consumer.start();
            //logger.info("consumer is start !!! groupName:{},topics:{},namesrvAddr:{}",groupName,topics,namesrvAddr);

        } catch (Exception e) {
            // logger.error("consumer is start !!! groupName:{},topics:{},namesrvAddr:{}",groupName,topics,namesrvAddr,e);
             throw new RocketMQException(e);
        }

        return consumer;
    }

}
配置的监听器的代码为:
@Component
public class MQConsumeMsgListenerProcessor implements MessageListenerConcurrently{

    private static final Logger logger = LoggerFactory.getLogger(MQConsumeMsgListenerProcessor.class);

    @Override
    public ConsumeConcurrentlyStatus consumeMessage(List<MessageExt> msgs, ConsumeConcurrentlyContext context) {
        if(CollectionUtils.isEmpty(msgs)){
            logger.info("接收到的消息为空,不做任何处理");
            return ConsumeConcurrentlyStatus.CONSUME_SUCCESS;
        }
        MessageExt messageExt = msgs.get(0);
        String msg = new String(messageExt.getBody());
        //logger.info("接收到的消息是:"+messageExt.toString());
        logger.info("接收到的消息是:"+msg);
        if(messageExt.getTopic().equals("你的topic")){
            if(messageExt.getTags().equals("你的tag")){
                int reconsumeTimes = messageExt.getReconsumeTimes();
                if(reconsumeTimes == 3){
                    return ConsumeConcurrentlyStatus.CONSUME_SUCCESS;
                }
                //TODO 处理对应的业务逻辑
            }
        }

        return ConsumeConcurrentlyStatus.CONSUME_SUCCESS;
    }

}
其实很好理解,这个监听器在这里是单独拿了出来,我们在写demo的时候,在consumer的代码里面有一个消息监听的方法,
consumer.registerMessageListener(new MessageListenerConcurrently() {

            @Override
            public ConsumeConcurrentlyStatus consumeMessage(List<MessageExt> msgs, ConsumeConcurrentlyContext context) {
                for (MessageExt messageExt : msgs) {
                    String topic = messageExt.getTopic();
                    String tag = messageExt.getTags();
                    String msg = new String(messageExt.getBody());
                    System.out.println("*********************************");
                    System.out.println("消费响应:msgId : " + messageExt.getMsgId() + ",  msgBody : " + msg + ", tag:" + tag + ", topic:" + topic);
                    System.out.println("*********************************");
                }

                return ConsumeConcurrentlyStatus.CONSUME_SUCCESS;
            }
        });
只是在这里为更好的封装实现了监听器的接口,方便维护,其实现的效果是一样的;
在这里,对异常的处理,我们做了简单的封装,使得代码看起来更具良好的封装和可读性,下面把对于异常处理的部分简单罗列以供参考,可根据自己情况进行选择,
public interface ErrorCode extends Serializable {

    /**
     * 错误码
     *
     * @return
     */
    String getCode();

    /**
     * 错误信息
     *
     * @return
     */
    String getMsg();
}
public enum RocketMQErrorEnum implements ErrorCode {
/******** 公共 ********/
PARAMM_NULL("MQ_001", "参数为空"),
/******** 生产者 *******/
/******** 消费者 *******/
NOT_FOUND_CONSUMESERVICE("MQ_100", "根据topic和tag没有找到对应的消费服务"), HANDLE_RESULT_NULL("MQ_101", "消费方法返回值为空"), CONSUME_FAIL("MQ_102", "消费失败")
;
private String code;
private String msg;
private RocketMQErrorEnum(String code, String msg) {
this.code = code;
this.msg = msg;
}
@Override
public String getCode() {
return this.code;
}
@Override
public String getMsg() {
return this.msg;
}
}public class AppException extends RuntimeException {
/**
*
*/
private static final long serialVersionUID = 1L;
/**
* 错误编码
*/
protected ErrorCode errCode;
/**
* 错误信息
*/
protected String errMsg;
/**
* 无参构造函数
*/
public AppException() {
super();
}
public AppException(Throwable e) {
super(e);
}
public AppException(ErrorCode errCode, String... errMsg) {
super(errCode.getMsg());
this.errCode = errCode;
setErrMsg(errMsg,true);
}
public AppException(ErrorCode errCode, String errMsg,Boolean isTransfer) {
super(errMsg);
this.errCode = errCode;
setErrMsg(new String[]{errMsg},isTransfer);
}
/**
* 构造函数
*
* @param cause 异常
*/
public AppException(ErrorCode errCode, Throwable cause, String... errMsg) {
super(errCode.getCode() + errCode.getMsg(), cause);
this.errCode = errCode;
setErrMsg(errMsg,true);
}
public ErrorCode getErrCode() {
return errCode;
}
public void setErrCode(ErrorCode errCode) {
this.errCode = errCode;
}
public String getErrMsg() {
return this.errMsg;
}
public void setErrMsg(String[] errMsg,Boolean isTransfer) {
if (null != errMsg &&errMsg.length>0) {
if(errCode.getMsg().contains("%s") && isTransfer){
this.errMsg = String.format(errCode.getMsg(), errMsg);
}else{
StringBuffer sf = new StringBuffer();
for (String msg : errMsg) {
sf.append(msg+";");
}
this.errMsg = sf.toString();
}
}else{
this.errMsg = errCode.getMsg();
}
}
public static void main(String[] args) {
String str = "ERRCode:1004--对象不存在:[%s]";
if (str.contains("%s")){
System.out.println("包含");
}
}
}public class RocketMQException extends AppException {
private static final long serialVersionUID = 1L;
/**
* 无参构造函数
*/
public RocketMQException() {
super();
}
public RocketMQException(Throwable e) {
super(e);
}
public RocketMQException(ErrorCode errorType) {
super(errorType);
}
public RocketMQException(ErrorCode errorCode, String... errMsg) {
super(errorCode, errMsg);
}
/**
* 封装异常
*
* @param errorCode
* @param errMsg
* @param isTransfer
* 是否转换异常信息,如果为false,则直接使用errMsg信息
*/
public RocketMQException(ErrorCode errorCode, String errMsg, Boolean isTransfer) {
super(errorCode, errMsg, isTransfer);
}
public RocketMQException(ErrorCode errCode, Throwable cause, String... errMsg) {
super(errCode, cause, errMsg);
}
}然后在测试的目录下,创建一个测试类,
@SpringBootTest
@RunWith(SpringRunner.class)
public class DefaultProductTest {
private static final Logger logger = LoggerFactory.getLogger(DefaultProductTest.class);
/**使用RocketMq的生产者*/
@Autowired
private DefaultMQProducer defaultMQProducer;
@Test
public void send() throws MQClientException, RemotingException, MQBrokerException, InterruptedException{
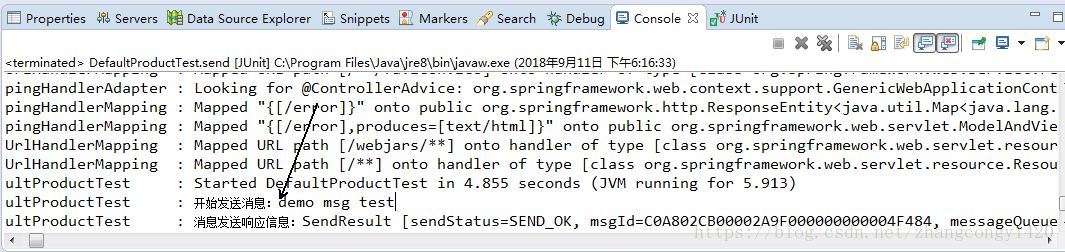
String msg = "demo msg test";
logger.info("开始发送消息:"+msg);
Message sendMsg = new Message("DemoTopic","DemoTag",msg.getBytes());
//默认3秒超时
SendResult sendResult = defaultMQProducer.send(sendMsg);
logger.info("消息发送响应信息:"+sendResult.toString());
}
}运行junit测试,消息发送成功
实际使用的时候,在业务逻辑层只需要诸如DefaultMQProducer即可,相关的配置已经在加载的时候配置完毕,后续如果有调整,只需要改动少量的配置文件即可,比如需要添加topic,直接可以在配置文件中添加;
本篇到此结束,谢谢观看!