【1】使用 NIO 完成网络通信的三个核心
① 通道(Channel):负责连接
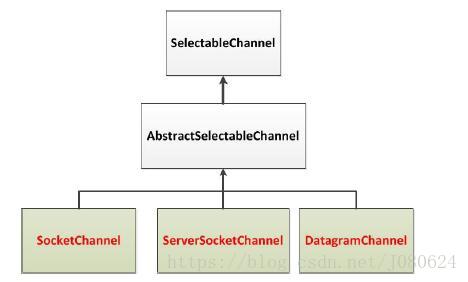
核心接口Channel,这里主要讲SelectableChannel。
java.nio.channels.Channel 接口:
	|--SelectableChannel
		|--SocketChannel(tcp)
		|--ServerSocketChannel(tcp)
		|--DatagramChannel(udp)

		|--Pipe.SinkChannel(管道)
		|--Pipe.SourceChannel(管道)
② 缓冲区(Buffer):负责数据的存取。
参考上篇博文,这里不再赘述。
③ 选择器(Selector)
SelectableChannel 的多路复用器,用于监控 SelectableChannel 的 IO 状况。
【2】阻塞式SocketChannel与ServerSocketChannel实例
Java NIO中的SocketChannel是一个连接到TCP网络套接字的通道。
操作步骤:
- 打开SocketChannel
- 读写数据
- 关闭SocketChannel
Java NIO中的ServerSocketChannel 是一个可以监听新进来的TCP连接的通道,就像标准IO中的ServerSocket一样。
源码实例如下:
package com.jane;

import java.io.IOException;
import java.net.InetSocketAddress;
import java.nio.ByteBuffer;
import java.nio.channels.FileChannel;
import java.nio.channels.ServerSocketChannel;
import java.nio.channels.SocketChannel;
import java.nio.file.Paths;
import java.nio.file.StandardOpenOption;

import org.junit.Test;

public class TestBlockingNIO2 {

	//客户端
	@Test
	public void client() throws IOException{
		//1. 获取通道
		SocketChannel sChannel = SocketChannel.open(new InetSocketAddress("127.0.0.1", 9898));
		System.out.println(sChannel.hashCode());

		FileChannel inChannel = FileChannel.open(Paths.get("1.jpg"), StandardOpenOption.READ);

		//2. 分配指定大小的缓冲区
		ByteBuffer buf = ByteBuffer.allocate(1024);

		//3. 读取本地文件,并发送到服务端
		while(inChannel.read(buf) != -1){
			buf.flip();
			sChannel.write(buf);
			buf.clear();
		}

		//4.输出完毕,Shutdown the connection for writing without closing the channel.
		sChannel.shutdownOutput();

		//5.接收服务端的反馈
		int len = 0;
		while((len = sChannel.read(buf)) != -1){
			buf.flip();
			System.out.println(new String(buf.array(), 0, len));
			buf.clear();
		}

		//6.关闭通道
		inChannel.close();
		sChannel.close();
	}

	//服务端
	@Test
	public void server() throws IOException{
		//1. 获取服务端通道
		ServerSocketChannel ssChannel = ServerSocketChannel.open();

		FileChannel outChannel = FileChannel.open(Paths.get("2.jpg"), StandardOpenOption.WRITE, StandardOpenOption.CREATE);

		//2. 绑定连接
		ssChannel.bind(new InetSocketAddress(9898));

		//3. 获取客户端连接的通道
		SocketChannel sChannel = ssChannel.accept();
		System.out.println(sChannel.hashCode());

		//4. 分配指定大小的缓冲区
		ByteBuffer buf = ByteBuffer.allocate(1024);

		//5. 接收客户端的数据,并保存到本地
		while(sChannel.read(buf) != -1){
			buf.flip();
			outChannel.write(buf);
			buf.clear();
		}

		//接收完毕,Shutdown the connection for reading without closing the channel.
		sChannel.shutdownInput();

		//6.发送反馈给客户端
		buf.put("服务端接收数据成功".getBytes());
		buf.flip();
		sChannel.write(buf);

		//7.关闭通道
		sChannel.close();
		outChannel.close();
		ssChannel.close();
	}

}
其实和以前单独使用ServerSocket和Socket逻辑一样,以前使用的普通IO流,这里使用了通道。
参考博文:
ServerSocket与Socket简解;
Socket编码实践。
【3】选择器(Selector)
① Selector定义
选择器(Selector)是SelectableChannle 对象的多路复用器,Selector 可以同时监控多个SelectableChannel 的IO 状况。也就是说,利用Selector 可使一个单独的线程管理多个Channel。
Selector 是非阻塞IO 的核心。
SelectableChannle 的结构如下图:
② Selector的应用
- 创建Selector
// 获取选择器
Selector selector = Selector.open();
通过调用Selector.open() 方法创建一个Selector。
- 向选择器注册通道
SelectableChannel.register(Selector sel, int ops)
当调用register(Selector sel, int ops) 将通道注册选择器时,选择器对通道的监听事件,需要通过第二个参数ops 指定。
可以监听的事件类型(可使用SelectionKey 的四个常量表示):
- 读: SelectionKey.OP_READ (int-1)
- 写: SelectionKey.OP_WRITE (int-4)
- 连接: SelectionKey.OP_CONNECT(int-8)
- 接收: SelectionKey.OP_ACCEPT (int-16)
 public static final int OP_READ = 1 << 0;
 public static final int OP_WRITE = 1 << 2;
 public static final int OP_CONNECT = 1 << 3;
 public static final int OP_ACCEPT = 1 << 4;
若注册时不止监听一个事件,则可以使用“位或”操作符连接。
ssChannel.register(selector, SelectionKey.OP_READ|SelectionKey.OP_WRITE);
③ SelectionKey是什么
SelectionKey:表示SelectableChannel 和Selector 之间的注册关系。每次向选择器注册通道时就会选择一个事件(选择键)。选择键包含两个表示为整数值的操作集。操作集的每一位都表示该键的通道所支持的一类可选择操作。
| 方法 | 描述 |
|---|---|
| int interestOps() | 获取感兴趣事件集合 |
| int readyOps() | 获取通道已经准备就绪的操作的集合 |
| SelectableChannel channel() | 获取注册通道 |
| Selector selector() | 返回选择器 |
| boolean isReadable() | 检测Channal 中读事件是否就绪 |
| boolean isWritable() | 检测Channal 中写事件是否就绪 |
| boolean isConnectable() | 检测Channel 中连接是否就绪 |
| boolean isAcceptable() | 检测Channel 中接收是否就绪 |
④ Selector 的常用方法
| 方法 | 描述 |
|---|---|
Set<SelectionKey> keys() |
所有的SelectionKey 集合。代表注册在该Selector上的Channel ==selectedKeys+remove掉的SelectionKey |
Set<SelectionKey> selectedKeys() |
被选择的SelectionKey 集合。返回此Selector的已选择键集 |
| int select() | 监控所有注册的Channel,当它们中间有需要处理的IO 操作时,该方法返回,并将对应得的SelectionKey 加入被选择的SelectionKey 集合中,该方法返回这些Channel 的数量。 |
| int select(long timeout) | 可以设置超时时长的select() 操作 |
| int selectNow() | 执行一个立即返回的select() 操作,该方法不会阻塞线程 |
| Selector wakeup() | 使一个还未返回的select() 方法立即返回 |
| void close() | 关闭该选择器 |
【4】 Selector使用实例
SocketChannel向ServerSocketChannel非阻塞模式发送数据:
public class TestNonBlockingNIO {


	//客户端
	@Test
	public void client() throws IOException{
		//1. 获取通道
		SocketChannel sChannel = SocketChannel.open(new InetSocketAddress("127.0.0.1", 9898));

		//2. 切换非阻塞模式
		sChannel.configureBlocking(false);

		//3. 分配指定大小的缓冲区
		ByteBuffer buf = ByteBuffer.allocate(1024);

		//4. 发送数据给服务端
		buf.put((new Date().toString() + "\n" + "你好啊,祖国").getBytes());
		buf.flip();
		sChannel.write(buf);
		buf.clear();

		//5. 关闭通道
		sChannel.close();
	}

	//服务端
	@Test
	public void server() throws IOException{
		//1. 获取通道
		ServerSocketChannel ssChannel = ServerSocketChannel.open();

		//2. 切换非阻塞模式
		ssChannel.configureBlocking(false);

		//3. 绑定连接
		ssChannel.bind(new InetSocketAddress(9898));

		//4. 获取选择器
		Selector selector = Selector.open();

		//5. 将通道注册到选择器上, 并且指定“监听接收事件”
		ssChannel.register(selector, SelectionKey.OP_ACCEPT);

//		FileChannel fileChannel = FileChannel.open(Paths.get("2.txt"), StandardOpenOption.WRITE, StandardOpenOption.READ, StandardOpenOption.CREATE);

		//6. 轮询式的获取选择器上已经“准备就绪”的事件
		while(selector.select() > 0){

			//7. 获取当前选择器中所有注册的“选择键(已就绪的监听事件)”
			Iterator<SelectionKey> it = selector.selectedKeys().iterator();
			while(it.hasNext()){
				//8. 获取准备“就绪”的事件
				SelectionKey sk = it.next();
				//第一次 16  之后为1
				System.out.println("当前SelectionKey:"+sk.interestOps());
//				ByteBuffer byteBuffer = ByteBuffer.allocate(1024);
//				byteBuffer.put(("当前SelectionKey:"+sk.interestOps()).getBytes());
//				byteBuffer.flip();
//				fileChannel.write(byteBuffer);
//				byteBuffer.clear();

				//9. 判断具体是什么事件准备就绪
				if(sk.isAcceptable()){
					//10. 若“接收就绪”,获取客户端连接
					SocketChannel sChannel = ssChannel.accept();
					System.out.println("接收就绪。。");
					//11. 切换非阻塞模式
					sChannel.configureBlocking(false);

					//12. 将该通道注册到选择器上
					sChannel.register(selector, SelectionKey.OP_READ);
				}else if(sk.isReadable()){
					//13. 获取当前选择器上“读就绪”状态的通道
					SocketChannel sChannel = (SocketChannel) sk.channel();
					System.out.println("读就绪。。");
					//14. 读取数据
					ByteBuffer buf = ByteBuffer.allocate(1024);

					int len = 0;
					while((len = sChannel.read(buf)) > 0 ){
						buf.flip();
						System.out.println(new String(buf.array(), 0, len));
						buf.clear();
					}
				}

				//15. 取消选择键 SelectionKey
				it.remove();
			}
		}
	}
}
【5】DatagramChannel实例
【4】中主要针对TCP,DatagramChannel则主要针对UDP。
实例代码如下:
public class TestNonBlockingNIO2 {

	@Test
	public void send() throws IOException{
		DatagramChannel dc = DatagramChannel.open();

		dc.configureBlocking(false);

		ByteBuffer buf = ByteBuffer.allocate(1024);

		Scanner scan = new Scanner(System.in);

		while(scan.hasNext()){
			String str = scan.next();
			buf.put((new Date().toString() + ":\n" + str).getBytes());
			buf.flip();
			dc.send(buf, new InetSocketAddress("127.0.0.1", 9898));
			buf.clear();
		}

		dc.close();
	}

	@Test
	public void receive() throws IOException{
		DatagramChannel dc = DatagramChannel.open();

		dc.configureBlocking(false);

		dc.bind(new InetSocketAddress(9898));

		Selector selector = Selector.open();

		dc.register(selector, SelectionKey.OP_READ);

		while(selector.select() > 0){
			Iterator<SelectionKey> it = selector.selectedKeys().iterator();

			while(it.hasNext()){
				SelectionKey sk = it.next();

				if(sk.isReadable()){
					ByteBuffer buf = ByteBuffer.allocate(1024);
					dc.receive(buf);
					buf.flip();
					System.out.println(new String(buf.array(), 0, buf.limit()));
					buf.clear();
				}
			}
			it.remove();
		}
	}
}
对比Socket而言,这里少了accept一步。
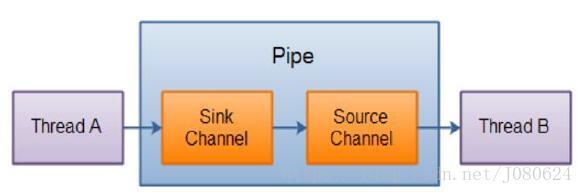
【6】管道(Pipe)
Java NIO 管道是2个线程之间的单向数据连接。
Pipe有一个source通道和一个sink通道。数据会被写到sink通道,从source通道读取。
代码示例如下:
	@Test
	public void test1() throws IOException{
		//1. 获取管道
		Pipe pipe = Pipe.open();

		//2. 将缓冲区中的数据写入管道
		ByteBuffer buf = ByteBuffer.allocate(1024);

		Pipe.SinkChannel sinkChannel = pipe.sink();
		buf.put("通过单向管道发送数据".getBytes());
		//切换为读取模式
		buf.flip();
		sinkChannel.write(buf);

		//3. 读取缓冲区中的数据
		Pipe.SourceChannel sourceChannel = pipe.source();
		//切换为读取模式
		buf.flip();
		int len = sourceChannel.read(buf);
		System.out.println(new String(buf.array(), 0, len));

		sourceChannel.close();
		sinkChannel.close();
	}